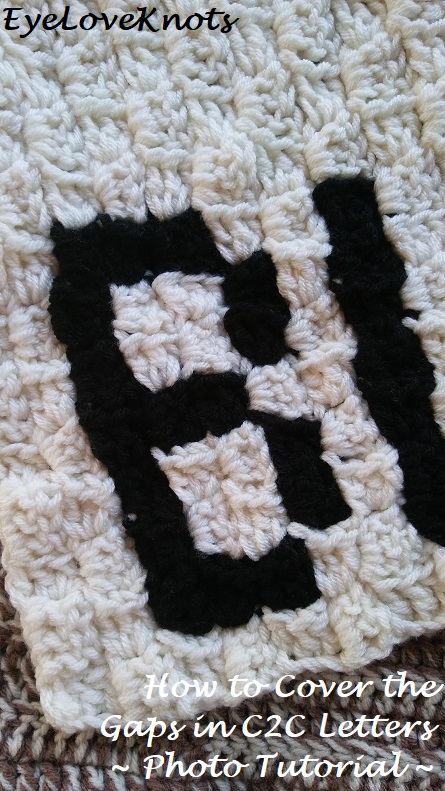
I have been working on a corner to corner blanket that I will be sharing here on the EyeLoveKnots blog soon. Before I do, I wanted to touch on the gaps that can be found at some connection points on a letter. In the “B” that you see above, there are two connection points that have met, and two that have gaps. The gaps are from the direction of crocheting, nothing you did wrong. Make sure when you cut your ends in these areas that you leave yourself a little extra so you can close up the gap before weaving them in.
For this tutorial, the sample has been worked with two strands of Hobby Lobby’s I Love This Yarn held together, and an M13/9mm crochet hook. This technique is the same no matter the yarn weight or hook size.
To close the gap, you’ll need a tapestry needle. I am using a #18.
Tutorial:

First off, what connection points am I talking about? See the area in the white oval? There are two connection points shown here – one that does meet, and the other that has an Ivory gap.
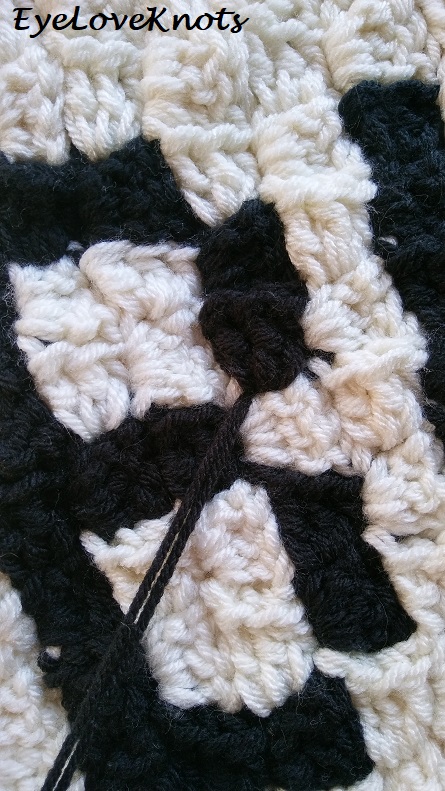
We want to work in a diagonal direction to cover this gap, and make it match the other connection point/s. Thread your tapestry needle.
Coming from across the top (right side) of the piece, insert needle down – here I am catching part of a stitch worked in the black colorway to give the stitch some security and stability.
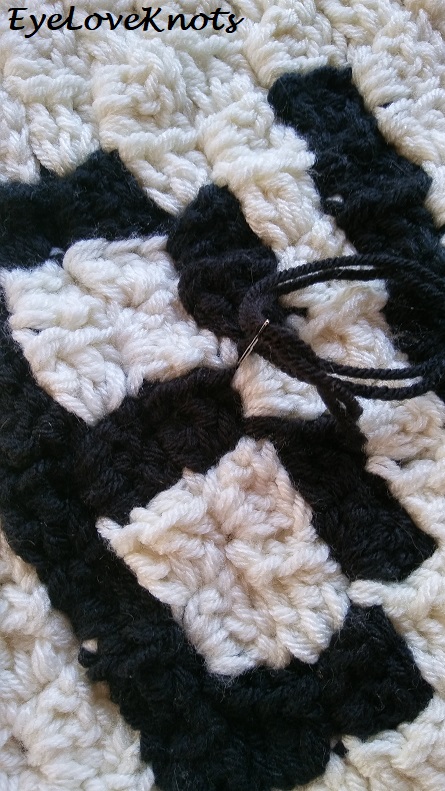
Bring the needle up from the wrong side catching some of the black cluster above to give more stability, and avoid the Ivory from showing through. Then, repeat until the connection point looks like the others.
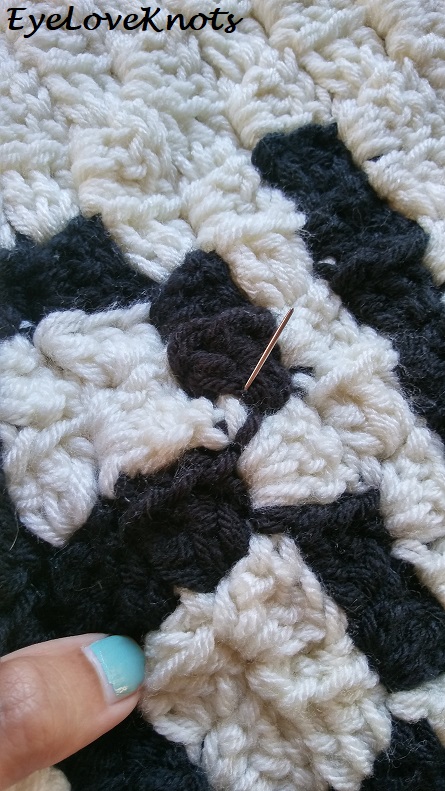
Afterwards, weave in your end as normal. In this case, I weaved one strand in at a time.

Repeat in the same manner to close up all gaps.
Let’s say you don’t have an end to weave in near the gap. What to do? Cut a piece of yarn (or in this case, two strands to be equal to what you crocheted with), and thread your tapestry needle. From the wrong side, weave in the tail end of your thread about three times to secure, then close the gap up, and weave in as normal.
And there you go – so easy!
Stay tuned for a new corner to corner blanket pattern coming this Saturday!
DO NOT claim this as your own nor should you sell my tutorial. My words, and photos are my own intellectual property. DO NOT copy and paste them anywhere, link to this tutorial instead. Thanks!
Join the EyeLoveKnots Crafting Community to share your creations, and see what other’s are up to!
Check out the EyeLoveKnots Ravelry page to keep track of all your EyeLoveKnots favorites in your que, and share your WIPS and finished projects!
Don’t miss out on new crochet patterns, reviews, jewelry tutorials and more! Subscribe to EyeLoveKnots by using the box on the right side toolbar, or follow me via Bloglovin! You can also find me sharing on the EyeLoveKnots Facebook page, and @EyeLoveKnots on Twitter!
Linked Up To…
Craft Schooling Sunday – Creative Jewish Mom
Inspiration Monday – Scattered Thoughts of a Crafty Mom
Creative Mondays – Claire Justine
Handmade Monday #76 – Sum of Their Stories
Merry Monday Link Party #205 – A Wonderful Thought
Dagmar’s Home Link Party #211 – Dagmar’s Home
The Really Crafty Link Party #120 – Keeping it Real
Ginx Woolly Linx Party May – Ginx Craft
424th Inspire Me Tuesday – A Stroll Thru Life
Lou Lou Girls Fabulous Party #216 – Lou Lou Girls
Tutorials & Tips Link Party {353} – Home Stories A to Z
The Scoop Link Party #327 – Worthing Court Blog
Talk of the Town #124 – My Repurposed Life
The Wednesday Link Party #246 – The Stitchin’ Mommy
Sew It Cook It Craft It Link Party #55 – Sew Historically
{wow me} wednesday #352 – Ginger Snap Crafts
Your Whims Wednesday #356 – My Girlish Whims
The Linky Ladies Party #133 – The Purple Poncho
Crafty Love Link Party #33 – Jessie at Home
Scrappy Stitchers Link Party #41 – Stitches ‘N’ Scraps
Funtastic Friday 180 Link Party – Olives n Okra
Home Matters Linky Party #185 – Domestic Deadline
Simply Share Linkup – Cute Capsule Life
Friday Frenzy Link Party – 05/25/18 – Kelly Lynn’s Sweets and Treats
I’m Lovin’ It Linky Party #410 – Tidy Mom
Pin Junkie Pin Party #267 – The Pin Junkie
Best of the Weekend – Hello Little Home
Sweet Inspiration Link Party #108 – The Boondocks Blog
Sundays at Home #207 – Celebrating Everyday Life
Link Your Stuff – Anniemarie’s Haakblog
Snickerdoodle Create Bake Make Party #233 – Across the Boulevard
{nifty thrifty sunday #336} – Nifty Thrifty Things
Looks much better after you closed the gaps!
If it only wasn't so much extra work (not on a small granny, but imagine a big blanket!) – especially as I don't cut the yarn, I use it again in the next row, if possible.
But I'll keep your advice in mind, thank you for your tutorial! =))
Have a nice day!
Sandra
Oh you don't have to tell me! The blanket I just shared right before this post is solid so it had a reasonable amount of ends – about 20, but I also recently finished a corner to corner blanket that I will share this weekend that had 309 ends to weave in!! Even after I carried most of them. Fun technique, but ugh.
Alexandra
EyeLoveKnots.blogspot.com
Such great info to know!! And the photo tutorial is awesome 🙂
Thanks, Kelly!
Thanks for this tip! I'm starting a c2c baby blanket soon & this will be a great help.
Glad I could help!
It looks great now. I’m not sure I will ever crochet a blanket like that, but I’m tucking away this information anyway. Thank you for sharing the tutorial at The Really Crafty Link Party. Pinned.
I don’t blame you for not wanting to deal with allllll the ends to weave in, hehe.
This looks great. I wish I could be more creative. Thanks for sharing at Creative Mondays 🙂 I am going to look around your newly moved WordPress blog now too. Hope you can join us tomorrow.
You are creative! I love the recipes and fashion posts you share. Not sure what tomorrow is, but I will be there for next week’s Creative Monday 🙂
This is a great tutorial. Thanks for sharing at #HomeMattersParty
Thanks so much for stopping by 🙂
Thanks for sharing on Friday Frenzy! A helpful tip!!!
Thanks, Colleen!