EyeLoveKnots

  • Home
  • Crochet
    • Free Crochet Patterns
    • Crochet Pattern Reviews
    • Crochet 101
  • Knitting
  • Crafting
    • Plastic Canvas DIYs
    • Jewelry DIYs
    • Sewing
    • Cross Stitching
    • Upcycling
    • Other DIYs
  • Seasonal DIYs
    • 4th of July DIYs
    • Back to School DIYs
    • Christmas DIYs
    • Easter DIYs
    • Fall DIYs
    • Halloween DIYs
    • Spring DIYs
    • St. Patrick’s Day DIYs
    • Summer DIYs
    • Thanksgiving DIYs
  • Holidays/Seasonal
    • Valentine’s Day
    • St. Patrick’s Day
    • Spring
    • Easter
    • Summer
    • 4th of July
    • Fall
    • Halloween
    • Thanksgiving
    • Christmas
    • Winter
  • Home DIY & Decor
    • In the Bathroom
    • In the Bedroom
    • In the Dining Room
    • In the Kitchen
    • In the Living Room
    • Kids Room
  • Fashion
    • Nail Art
  • Recipes
  • Living the Dream
  • Fun Finds Around the Web
  • Linking Up To…
  • Latest News & Links
  • Privacy and Sharing Policies
  • About Our GREAT Team!
  • Latest News & Links

DIY Plastic Canvas Name Banners – GREAT Baby Shower Gift or Kids Room Decoration!

June 10, 2016

This post has been sitting as a draft since September of 2014 – YIKES! 

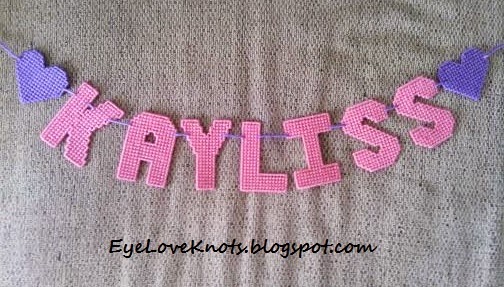
Back then: A couple weeks ago, I posted my Plastic Canvas Alphabet – Sugar Tart Crafts – Pattern Review. Ever since, I have been working on some name banners. Currently, I have three of them done – one for Kayliss (my niece), Tyler (my little cousin) and Madison (my little cousin).

The Plastic Canvas Alphabet by Toni of Sugar Tart Crafts is the PERFECT pattern for plastic canvas letters.

Before I tell you what they are great for, this is a fun, easy and rewarding project for a child to do! Craft stores carry plastic needles so no worries on that aspect, and you can do it together 🙂  I do sell the cut letters in my EyeLoveKnots Etsy shop should you be interested in purchasing them. Pair it with the rest of the materials, and you have a great gift idea for a crafty kid!

These banners are great for all shorts of celebrations including (but not limited to): Baby Shower, Bridal Shower, Nursery, Kid’s Room, Play Room, Wedding, Anniversary, Graduation, Retirement, Birthday, Christmas, Halloween, Thanksgiving… They are also GREAT photo props for Baby’s First Birthday, Maternity, Engagement…

Materials I Used:
   – 1 Sheet of Darice Stiff 7 Count in Clear. 

     *You can also use Plastic Canvas 7 Count 12″ x 18″ in Clear, however, it is soft. I would suggest adding some stiff felt to the back of your letters, or whipstitching a coordinating colored plastic canvas piece to the back of the letter. Your letters shouldn’t curl if you choose not to add the felt or colored canvas, but it could and your letters will not be as strong and sturdy.

   – Red Heart Super Saver in Rose Pink and Lavender
   – #20 Tapestry Needle
   – Opt. Ribbon or Baker’s Twine for Stringing

Time Spent:
    The average time for stitching each letter was 45 minutes.

How to String Together:
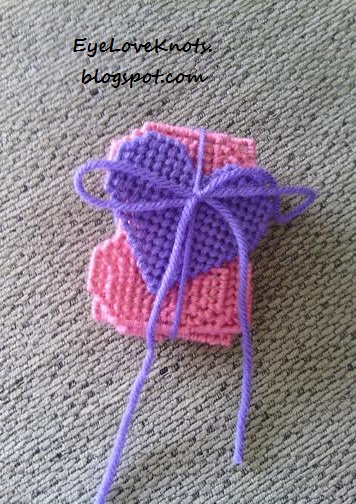
   First off, I cut a piece of yarn 60 inches long. I then threaded my yarn into a tapestry needle and began weaving it from front to back into the 5th hole down from the top of the letter on the left side and then from back to front on the right side.

Stringing your yarn in and out of the letters will cause the ends to fray. A great alternative to this is using ribbon in place of the yarn and heat sealing the ends – use caution!

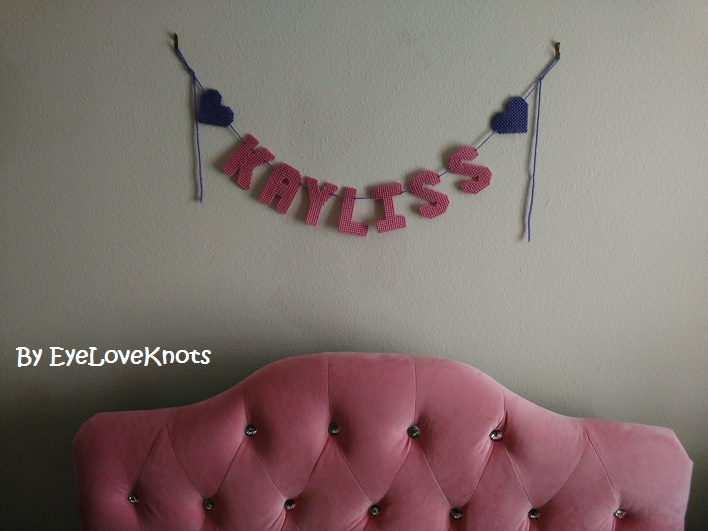
These banners are lightweight enough to use tape to hang up, but you could also create loops on the edges of your yarn/ribbon and use those to hang the banners – as we did above!

I gifted mine wrapped in the excess of the string to hang.

Filed Under: Plastic Canvas DIYs, Uncategorized Tagged With: Banner/Bunting, Boy, Decor, DIY, DIY Friday, Gift Idea, Girl, Kids Craft, Needlepoint, Nursery, One Skein, Pattern Review Plastic Canvas, Photo Prop, Plastic Canvas, Red Heart, Sugar Tart Crafts, Super Saver, Wall Art

❮ PREVIOUS POST

Handicrafter Cotton Baby Booties – Crochet Pattern Review – Bernat/Yarnspirations

NEXT POST ❯

Celtic Dream Bonnet – Crochet Pattern Review – Charmed by Ewe

Leave a Reply Cancel reply

Your email address will not be published. Required fields are marked *

This site uses Akismet to reduce spam. Learn how your comment data is processed.

Welcome!

Welcome!

Hey! I'm Alexandra, the blogger and creator behind EyeLoveKnots and On Rockwood Lane! My passion is being creative. My favorite thing to do is crochet, and you will almost always find me having a cup of coffee and working on a new crochet project, but when I'm not doing that, you might find me out at a local park rollerblading, baking some fresh cookies, picking veggies in the garden or re-decorating for a new season or holiday. My two cats are great supervisors for all my adventures (minus the being outside because they think it's too hot in Florida to be anywhere but inside), and make sure I take plenty of breaks.

Meet the Team!

Meet the Team!

On the left, Abby is the maker behind A Stitch Shy of Normal, and on the right Jessica is the maker behind Nice and Knotty and Candace is the maker behind TandC Crafters.

Together, they help me bring awesome crochet projects to you! Click the image to learn more about them, and get their Instagram links, where they are constantly sharing tons of crochet inspiration.

Don’t Miss Out

Crochet! Magazine Spring 2023

Crochet! Magazine Spring 2023

(Affiliate Link) Click this image to get this issue now. These 22 designs are the perfect way to welcome in Spring with easy to wear layers, sweet styles amplified with striking stitch patterns, and some fun whimsical projects too.

Crochet World April 2023

Crochet World April 2023

(Affiliate Link) Click this image to get this issue now. These 21 designs are the perfect way to welcome in Spring with fun pops of color, sweet crochet thread projects, and fresh takes on the classic granny stitch pattern.

Gnome Caddy Pattern

Gnome Caddy Pattern

(Affiliate Link) Click this image to get a copy of this pattern! This adorable little Spring Gnome Caddy has a place for all of your crochet supplies. It's worked in a lightweight #3 yarn, but work in a worsted weight #4 yarn for even more space!

Archives

Copyright © 2023 EyeLoveKnots · Custom site by Moonsteam Design