EyeLoveKnots

  • Home
  • Crochet
    • Free Crochet Patterns
    • Crochet Pattern Reviews
    • Crochet 101
  • Knitting
  • Crafting
    • Plastic Canvas DIYs
    • Jewelry DIYs
    • Sewing
    • Cross Stitching
    • Upcycling
    • Other DIYs
  • Seasonal DIYs
    • 4th of July DIYs
    • Back to School DIYs
    • Christmas DIYs
    • Easter DIYs
    • Fall DIYs
    • Halloween DIYs
    • Spring DIYs
    • St. Patrick’s Day DIYs
    • Summer DIYs
    • Thanksgiving DIYs
  • Holidays/Seasonal
    • Valentine’s Day
    • St. Patrick’s Day
    • Spring
    • Easter
    • Summer
    • 4th of July
    • Fall
    • Halloween
    • Thanksgiving
    • Christmas
    • Winter
  • Home DIY & Decor
    • In the Bathroom
    • In the Bedroom
    • In the Dining Room
    • In the Kitchen
    • In the Living Room
    • Kids Room
  • Fashion
    • Nail Art
  • Recipes
  • Living the Dream
  • Fun Finds Around the Web
  • Linking Up To…
  • Latest News & Links
  • Privacy and Sharing Policies
  • About Our GREAT Team!
  • Latest News & Links

Seashell Button Studded Earrings. Perfect for Sensitive Ears, and the Summer!!

March 26, 2014


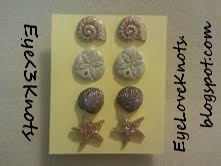
While I don’t have a tutorial available for these earrings, I have just updated my Etsy listing so I figured I would do a little post of them. Next time I make a pair, I will gladly take more photos of the process and materials. 


These are SUPER easy to make! And very fun to wear!!

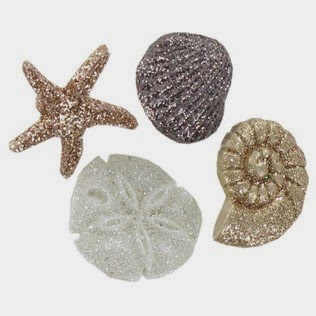
Picture is from Hobby Lobby website.
You can shop for them here.

The seashells were originally buttons, but not for long! I de-shanked them using this Button Shank Remover, glued the pieces together using super glue to secure them, and then used some E6000 to add them to some surgical steel earring posts to make them into studs.


If you purchase these buttons, you will have enough to make 4 pairs of earrings. And the process takes less than 30 minutes plus drying time.


1.) When using a button shank remover, use with caution! As soon as you clip through the shank, the piece will go flying! I usually get it set up to clip, then I cover it with the other hand close to the table so I know exactly where the clipped piece is and to ensure my eyes are protected!


2.) Why use super glue? Some of the buttons are layers of pieces put together, and the shank is the only thing holding the layers together. Once you de-shank the buttons, you will need to super glue the layers together. Be careful not to super glue your fingers as well!


3.) Before adding the E6000, it is recommended that you scratch the back surface of the button (or use sandpaper OR the sidewalk!) to help it all stick together.


4.) Using E6000… It can be very messy! I usually squeeze a quarter size amount onto a piece of junk mail (since the advertisements and things tend to be thicker), and then grab the earring by the post and dip the flat pad into the glue. I DO NOT recommend placing the glue onto the button as it’s messier and the button is going to be larger than the earring post. After dipping the flat pad into the glue, you can then place your button on top.


*I DO NOT recommend using hot glue or super glue for this because… well, I’ve tried it and it did not work AT ALL. Quite frustrating!


5.) When placing your button onto the E6000, keep in mind the placement on your ear! First instinct is going to be to center it, but sometimes you want it to be off-centered so that it will hang right on your ear. This all really depends on the size of the button you are using. Before you glue it down, go up to a mirror and test out the button a little.


6.) You can use ANY earring posts! I use surgical steel earring posts so it is PERFECT FOR SENSITIVE EARS! They are also a very affordable option!! But, if you don’t have any sensitivities, any silver plated earring post found at your local craft store or through Etsy, will work out just fine. 
*Something to keep in mind: My first go at jewelry (outside of my introductory kit where all pieces were provided and no studs were on the test), I purchased a larger package of earring studs from Joann’s, similar to these, and they do work. HOWEVER, I found that the posts on the smaller of the two sizes available tends to come loose where the flat pad and post meet. This probably happened to half of the studs I made. I don’t think the pieces will actually detach, but the posts then wiggle and it is very annoying. ESPECIALLY if you are selling your pieces. I ended up throwing out the wiggly pairs of earrings.

Filed Under: Jewelry DIYs, Uncategorized Tagged With: Beach, Buttons, E6000, Earrings, Etsy, For Sale, Girl, Jewelry, Seashells, Studs, Summer, Surgical Steel, Woman

❮ PREVIOUS POST

Napkin Ceramic Tile Coasters – CRAFT FAIL!

NEXT POST ❯

Roving and Non-Roving Scarf and Hat – Pattern Review

Leave a Reply Cancel reply

Your email address will not be published. Required fields are marked *

This site uses Akismet to reduce spam. Learn how your comment data is processed.

Welcome!

Welcome!

Hey! I'm Alexandra, the blogger and creator behind EyeLoveKnots and On Rockwood Lane! My passion is being creative. My favorite thing to do is crochet, and you will almost always find me having a cup of coffee and working on a new crochet project, but when I'm not doing that, you might find me out at a local park rollerblading, baking some fresh cookies, picking veggies in the garden or re-decorating for a new season or holiday. My two cats are great supervisors for all my adventures (minus the being outside because they think it's too hot in Florida to be anywhere but inside), and make sure I take plenty of breaks.

Meet the Team!

Meet the Team!

On the left, Abby is the maker behind A Stitch Shy of Normal, and on the right Jessica is the maker behind Nice and Knotty and Candace is the maker behind TandC Crafters.

Together, they help me bring awesome crochet projects to you! Click the image to learn more about them, and get their Instagram links, where they are constantly sharing tons of crochet inspiration.

Don’t Miss Out

Crochet! Magazine Spring 2023

Crochet! Magazine Spring 2023

(Affiliate Link) Click this image to get this issue now. These 22 designs are the perfect way to welcome in Spring with easy to wear layers, sweet styles amplified with striking stitch patterns, and some fun whimsical projects too.

Crochet World April 2023

Crochet World April 2023

(Affiliate Link) Click this image to get this issue now. These 21 designs are the perfect way to welcome in Spring with fun pops of color, sweet crochet thread projects, and fresh takes on the classic granny stitch pattern.

Gnome Caddy Pattern

Gnome Caddy Pattern

(Affiliate Link) Click this image to get a copy of this pattern! This adorable little Spring Gnome Caddy has a place for all of your crochet supplies. It's worked in a lightweight #3 yarn, but work in a worsted weight #4 yarn for even more space!

Archives

Copyright © 2023 EyeLoveKnots · Custom site by Moonsteam Design