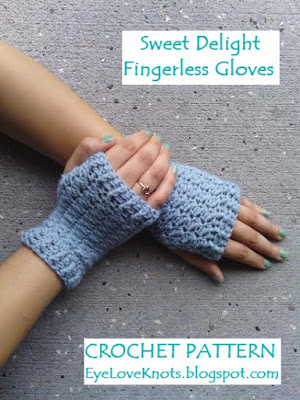
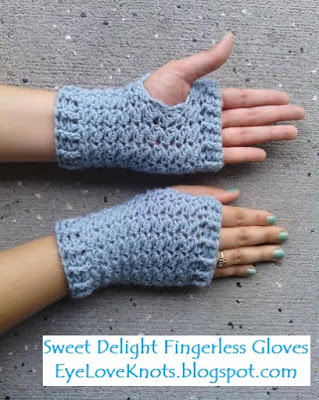
I was inspired by a current WIP of mine to create this pair of Sweet Delight Fingerless Gloves. I am very pleased with how they turned out, and how my other WIPs are also! I will be sharing them with you as I get them completed. Enjoy!
Materials:
– 130 yards (ish) of Light Weight (3) yarn – I used Baby Bee’s Sweet Delight in Teal and Anne Geddes Baby in Teddy
– I9/5.5mm Crochet Hook with Sweet Delight
– H8/5mm Crochet Hook with Anne Geddes
– Tapestry Needle for Weaving in Ends
Baby Bee’s Sweet Delight Yarn Review:
My only two other experiences with the Baby Bee’s Sweet Delight Yarn weren’t very good. I loved the yarn for it’s softness and the amount of yarn per skein, but with so much extra stretch to it, I was having trouble getting my projects to turn out as they should. The two I attempted (two different types of baby rompers) actually never were completed, and mainly because I really wanted this beautiful yarn to work for them. It’s so soft, and comes in so many beautiful colors! I’ve been holding onto this color for about a year and a half now, and when I ran out of the Anne Geddes Baby yarn to finish up a pair of these fingerless gloves, I pulled out this skein of Teal to work up a pair with my fingers crossed that the sizing would be right. I was so happy when I put on the first completed glove and found out it fit perfectly!
How does it hold up? I don’t usually wash my finished projects because I don’t wear them too often, but I wanted to get these fingerless gloves up in my EyeLoveKnots Etsy shop so I was curious to know how they would hold up with wear and wash. I am happy to say that I wore them all day – doing my hair, making coffee, driving, cooking, typing… – and I washed and dried them, and they held up just fine! I do suggest washing in cold water on the delicate cycle, and drying on low heat for about 20 minutes or so.
Time Spent:
I was able to work up a pair of these in about an hour and a half.
Measurements:
Finished glove measures about 6″ around (3″ across) and 7.25″ in length.
Gauge:
With Sweet Delight and an I9/5.5mm Hook = 4″ x 4″
Chain 18, HDC in the 4th stitch, and in each stitch across. (16 HDC)
R2 – R12: Chain 1, turn. HDC in the 2nd stitch, and each stitch across.
Fasten Off.
With Anne Geddes Baby and an H8/5mm Hook = 4″ x 4″
Chain 18, HDC in the 4th stitch, and in each stitch across. (16 HDC)
R2 – R12: Chain 1, turn. HDC in the 2nd stitch, and each stitch across.
Fasten Off.
Abbreviations:
SC – Single Crochet
HDC – Half Double Crochet
DC – Double Crochet
FDC – Foundation Double Crochet – Moogly Blog has a great video tutorial!
BPDC – Back Post Double Crochet
FPDC – Front Post Double Crochet
Pattern Notes:
Joining will be done to the beginning stitch, not beginning chain, unless otherwise noted.
I made these gloves to custom fit my hands. First off, I measured my knuckles around and found they measured about 7.5″ around. I worked my beginning chain as a foundation double crochet up to 5.5″ (figuring in stretch) because I really wasn’t too sure how many chains to do, but the foundation double crochet is also a good beginning technique for fingerless gloves worked in the round because it gives flexibility.
Watch for joining and turning directions – joining and turning is not throughout.
Normally I would add a round of slip stitches to the end of my finished piece, but I didn’t want the final opening to be too tight since slip stitching helps eliminate stretching. If yours is too loose, feel free to add a round of single crochet or slip stitches.
Pattern:
Chain 3, work a FDC 23. Join to the 3rd chain of the beginning chain 3. (24 DC)
R2 – 3: Chain 2 (will become a BPDC). FPDC around the next post, (BPDC around the next post, FPDC around the next post) around. Join.
R4: Chain 1. (SC, DC) in 1st stitch, [skip next stitch, (SC, DC) in the next stitch] around. Join. (12 clusters)
R5 – 6: Chain 1, turn. (SC, DC) in 1st stitch, [skip next stitch, (SC, DC) in the next stitch] around. Join.
R7 – 10 (Thumb Hole): Chain 1, turn. (SC, DC) in 1st stitch, [skip next stitch, (SC, DC) in the next stitch] around.
R11: Chain 1, turn. (SC, DC) in 1st stitch, [skip next stitch, (SC, DC) in the next stitch] around. Join.
R12 – 21: Chain 1, turn. (SC, DC) in 1st stitch (same as slip stitch join), [skip next stitch, (SC, DC) in the next stitch] around. Join.
R22: Chain 2 (counts as 1st DC), turn. DC in the 2nd stitch, and in each stitch around. Join. (24 DC)
R22 – 23: Chain 2 (will become a BPDC). FPDC around the next post, (BPDC around the next post, FPDC around the next post) around. Join.
Please feel free to make and sell your own Sweet Delight Fingerless Gloves using this pattern, but please DO NOT claim this pattern as your own nor should you sell my pattern, and DO NOT re-publish my photos as your own. DO NOT copy and paste my pattern anywhere, link to it instead.
*If you would like a PDF version of this post, you may get one through my EyeLoveKnots Etsy Shop or EyeLoveKnots Craftsy Shop for a small fee. This fee is to compensate for the view/s lost once you no longer need to return to the blog for the information, as you will have your own copy. Plus! It helps fund supplies for new projects to share with you!
Shop EyeLoveKnots Etsy – Women’s Sweet Delight Fingerless Gloves;
or EyeLoveKnots Craftsy – Women’s Sweet Delight Fingerless Gloves.
With so many size, yarn type and color options, I would love to see them! Please share your photos on my EyeLoveKnots Facebook page!
**I am now on Ravelry! Check out the EyeLoveKnots Ravelry page to keep track of all your EyeLoveKnots favorites in your que, and share your WIPS and finished projects!
Don’t miss out on new crochet patterns, reviews, jewelry tutorials and more! Subscribe to EyeLoveKnots by using the box on the right side toolbar, or follow me via Bloglovin


Nice! I was thinking of making such gloves for myself, but got no inspiration.
So thank you very much for sharing your pattern!
Love the colour too!
Would love your feedback if you get a chance to try this pattern! Thanks Sigrid 🙂
So, I'm trying this pattern. I've never done a FDC before, but I figured it out after a few YouTube tutorials. But, I've gotten to the end of the pattern, and I don't have any thumb holes… do you just poke your thumb through where ever it's comfortable? Or did I do something wrong?
The thumb hole is created by the center portion that is not joined. I will go back and edit the pattern for clarification.
Rounds 7-10 there isn't a join. That will be the thumb hole.
Oh… okay. Thank you!
I love your pattern and the stitch texture of these mitts. I cannot wait to try it for myself. I really haven't had much luck in making fingerless mitts but your pattern seems very straightforward and simplistic enough that I shouldn't be able to mess it up too much. Thank you for your hardwork and sharing. I find it hard enough to come up with money for yarn yet pay for patterns. Thank you so much for your generosity.
I also haven't had much luck with very many fingerless glove patterns, and wanted something simple and straightforward – loving this pattern. I have made myself three pairs since posting this – hehe. So glad you stopped by and left me a little note! 🙂
Im a pattern tester for a well known designer. Ive made fingerless gloves before that I didn't like. I am fairly picky of my paterns due to my designers wonderfully well written ones. I will try these and see how they do.
Would love to know what you think!
I've made one of these gloves so far… it got smaller the more rows I did but it fits my hand… I'm making the next one and I have to struggle to get it on my hand because instead of ending up with 24 stchs at the end… I have about 19… I'm so confused cos I'm concentrating on all the stitches and as far as I'm aware I'm following the pattern…….. arghhhh. Lovely pattern otherwise.
Make sure the beginning cluster of stitches on each row is going into the first stitch. It's easy to put it in the second or third stitch, and lose some stitches. Always here to assist if you need it! 🙂
Thats probably what I'm doing… I think I get confused where to slip stitch/join and I lose stitches doing that?
That's a possibility. Joining is to be done to the first stitch in all rounds except the thumb hole area. After joining, chain 1 and turn. Begin working the cluster of the next round in the very first stitch – the same one you just finished joining. This helps keep the pattern accurate throughout, and the turning helps keep the seam straight.
Thanks I will try again! 😀
Now I'm ending up with 13 clusters instead of 12, the opposite problem! I'm going to bed……………………….. 😛
Thank you for sharing your pattern. So far I've made one and a half pairs. It is a pretty design.
I also found it hard to keep the stitches and the pattern straight and frogged several times, but once completed, the mitts are nice. The comments above helped tremendously, both about the thumb hole and also about where to start the rows.
I waited two more rows before starting the thumb hole and then made the hole a total of six rows versus your four. This meant that I had less rows between hole and top cuff but in the end finished at row 23.
I did the slip stitch on the top of the last row.
Thank you so much for this detailed comment! Love it.
I am glad once you got the hang of the pattern that you enjoyed the finished gloves 🙂
With hand sizes all being different, adjustments here and there are to be expected. I am glad the changes came easily to you in customizing these to fit you best!
Would love if you shared them at our Yarn Fanatic Party! We are currently running a Yarn Giveaway and going on our last week of it. You can find the most recent one here: http://eyeloveknots.blogspot.com/2015/11/yarn-fanatic-party-53-week-2-rainy.html
Thanks for sharing this! I made my granddaughter a pair and she loves them! Thanks for pointing out some are join rows and others are join, turn rows! It was easy to overlook this at first. Great pattern and easy to adjust for different sizes.