EyeLoveKnots

  • Home
  • Crochet
    • Free Crochet Patterns
    • Crochet Pattern Reviews
    • Crochet 101
  • Knitting
  • Tunisian Crochet Patterns
  • Crafting
    • Plastic Canvas DIYs
    • Jewelry DIYs
    • Sewing
    • Cross Stitching
    • Upcycling
    • Other DIYs
  • Seasonal DIYs
    • 4th of July DIYs
    • Back to School DIYs
    • Christmas DIYs
    • Easter DIYs
    • Fall DIYs
    • Halloween DIYs
    • Spring DIYs
    • St. Patrick’s Day DIYs
    • Summer DIYs
    • Thanksgiving DIYs
  • Holidays/Seasonal
    • Valentine’s Day
    • St. Patrick’s Day
    • Spring
    • Easter
    • Summer
    • 4th of July
    • Fall
    • Halloween
    • Thanksgiving
    • Christmas
    • Winter
  • Home DIY & Decor
  • Fashion
    • Nail Art
  • Recipes
  • Living the Dream
  • Fun Finds Around the Web
  • Linking Up To…
  • Latest News & Links
  • Privacy and Sharing Policies
  • About Our GREAT Team!
  • Latest News & Links

DIY Easter Egg Pom Pom Decoration – Written by Tiffany

April 14, 2017

I’ve  been making tissue paper pom poms for several years now. I love how simple and fun they are to make. They can be used for any occasion and in many ways such as centerpieces or hanging decorations. There are so many variations you can do too.  

After Easter my kids always have an enormous amount of plastic egg shells. I  usually save some thinking I will find another use for them. Until now they have just sat in a storage bin. It’s great to finally have a use for these bright and colorful eggs.
This project can be done in as little as five minutes. It’s also kid friendly, so the little ones can help out too.

This tutorial was written by my awesome cousin, Tiffany, for EyeLoveKnots! She loves baking and DIYing, and is going to be joining us more often. Want to see something specifically? Drop us a line below!
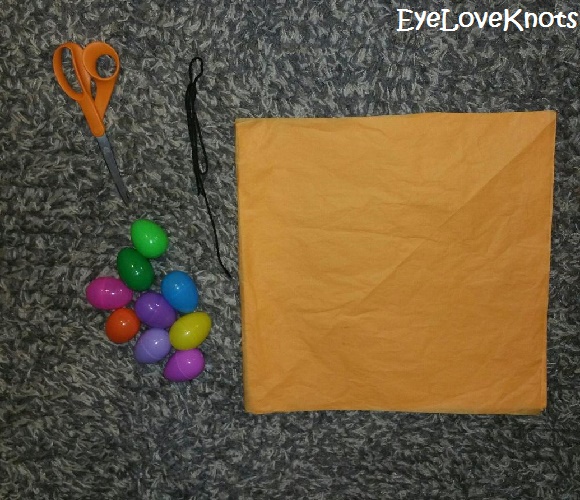
Supplies Needed:
– about 15 sheets of square tissue paper
– String
– Plastic Easter eggs
– Scissors
– Glue ( I used a hot glue gun for quick application)
Direction:
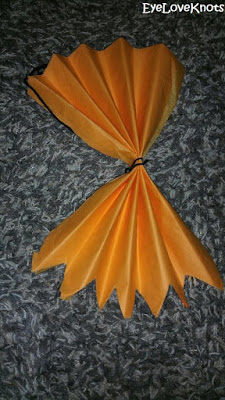
1. Start at one side of the stacked tissue paper and fold the sheets in an accordion style. Make sure to press each fold down as you go. Make each fold about an inch wide. 

2. Securely tie a string around the middle of the folded tissue paper. If you are planning on hanging the pom pom, make sure to leave extra string to hang it.

3. Cut triangle shapes along the edge of the accordion folds. I made mine about an inch deep. You can also cut different designs for a different look.

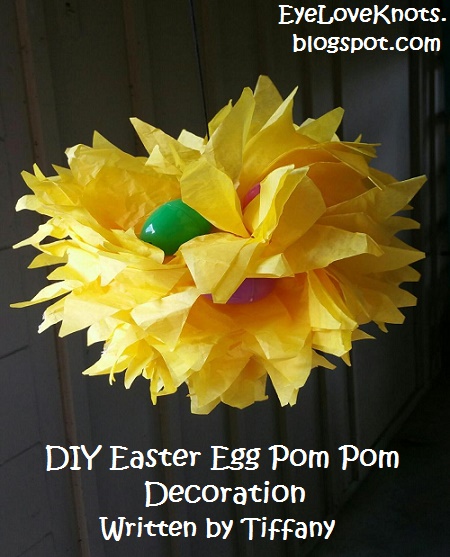
4. Gently pull inch sheet of tissue paper out so that it begins to fan out into a ball shape. Continue doing this around until all of the sheets are separated.

5. Glue the plastic eggs in various sections of the pom pom until you have the look you are going for.

Have fun and get creative with it!
Please DO NOT claim this tutorial as your own nor should you sell this tutorial, and DO NOT re-publish these photos as your own. DO NOT copy and paste this recipe anywhere, link to it instead.
Join the EyeLoveKnots Crafting Community to share your creations, and see what other’s are up to! 

Don’t miss out on new crochet patterns, reviews, jewelry tutorials and more! Subscribe to EyeLoveKnots by using the box on the right side toolbar, or follow me via Bloglovin!

Filed Under: Other DIYs, Uncategorized Tagged With: 15 Minutes or Less, Crafting with Kids, DIY Home Decor, Easter, Easter DIY, Easter Eggs, Paper Craft, Pom Pom, Spring, Spring DIY, Tissue Paper, Written by Tiffany

❮ PREVIOUS POST

Chicken Parmesan Sliders – Recipe Review – Home Made Interest

NEXT POST ❯

Reversible Celtic Weave Wrap & Pattern Pack Pro #31

Leave a Reply Cancel reply

Your email address will not be published. Required fields are marked *

This site uses Akismet to reduce spam. Learn how your comment data is processed.

Welcome!

Welcome!

Hey! I'm Alexandra, the blogger and creator behind EyeLoveKnots and On Rockwood Lane! My passion is being creative. My favorite thing to do is crochet, and you will almost always find me having a cup of coffee and working on a new crochet project, but when I'm not doing that, you might find me out at a local park rollerblading, baking some fresh cookies, picking veggies in the garden or re-decorating for a new season or holiday. My two cats are great supervisors for all my adventures (minus the being outside because they think it's too hot in Florida to be anywhere but inside), and make sure I take plenty of breaks.

Meet the Team!

Meet the Team!

On the left, Abby is the maker behind A Stitch Shy of Normal, and on the right Jessica is the maker behind Nice and Knotty and Candace is the maker behind TandC Crafters.

Together, they help me bring awesome crochet projects to you! Click the image to learn more about them, and get their Instagram links, where they are constantly sharing tons of crochet inspiration.

Don’t Miss Out

Crochet! Magazine Winter 2021

Crochet! Magazine Winter 2021

(Affiliate Link) Click this image to get this issue now. These 27 designs are the perfect way to stay warm this winter. Find a plethora of patterns for your most colorful yarns, try a new technique, and make a winter update to your wardrobe!

Crochet World December 2021

Crochet World December 2021

The new issue of Crochet World - December 2021. (Affiliate Link) Click this image to get this issue now. More than 25 crochet patterns from seasonal decorations for your home to cozy accessories and whimsical designs, there are projects to keep your hands busy all winter long!!

Dorset Embossed Shawl

Dorset Embossed Shawl

As part of the 2021 Fall Annie's Signature Collection, you'll find this Dorset Embossed Shawl worked in your favorite lightweight yarn. (Affiliate Link) Click this image to get a copy of this pattern!

Crochet Foundry Winter 2021

Crochet Foundry Winter 2021

This Winter issue has seven garments and four cozy accessories featuring beautiful soft tones that range from dazzling pinks, deep purples, and greys. This garment you see here is the Whimsical Cardigan Dress. (Affiliate Link) Click this image to get this issue now.

Archives

Copyright © 2022 EyeLoveKnots · Custom site by Moonsteam Design