EyeLoveKnots

  • Home
  • Crochet
    • Free Crochet Patterns
    • Crochet Pattern Reviews
    • Crochet 101
  • Knitting
  • Crafting
    • Plastic Canvas DIYs
    • Jewelry DIYs
    • Sewing
    • Cross Stitching
    • Upcycling
    • Other DIYs
  • Seasonal DIYs
    • 4th of July DIYs
    • Back to School DIYs
    • Christmas DIYs
    • Easter DIYs
    • Fall DIYs
    • Halloween DIYs
    • Spring DIYs
    • St. Patrick’s Day DIYs
    • Summer DIYs
    • Thanksgiving DIYs
  • Holidays/Seasonal
    • Valentine’s Day
    • St. Patrick’s Day
    • Spring
    • Easter
    • Summer
    • 4th of July
    • Fall
    • Halloween
    • Thanksgiving
    • Christmas
    • Winter
  • Home DIY & Decor
    • In the Bathroom
    • In the Bedroom
    • In the Dining Room
    • In the Kitchen
    • In the Living Room
    • Kids Room
  • Fashion
    • Nail Art
  • Recipes
  • Living the Dream
  • Fun Finds Around the Web
  • Linking Up To…
  • Latest News & Links
  • Privacy and Sharing Policies
  • About Our GREAT Team!
  • Latest News & Links

Single Solid Granny Square Ottoman Cover – Free Crochet Pattern

July 1, 2017

*This post contains affiliate links. If you make a purchase by clicking on them, I make a small commission at no extra cost to you. Thanks for your support!

Yay! This is the seventh post of the year for the 2017 GrannySpiration Challenge! I am so excited to see what everyone has been working on, especially you! At the end of this post, you will find the information for this month’s giveaway, and link up.

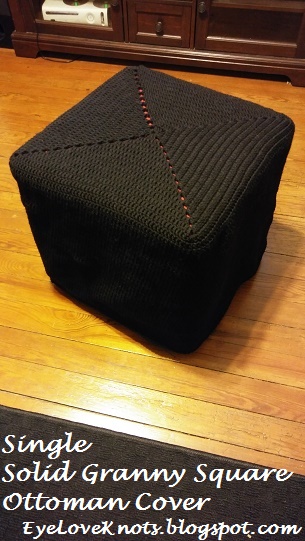
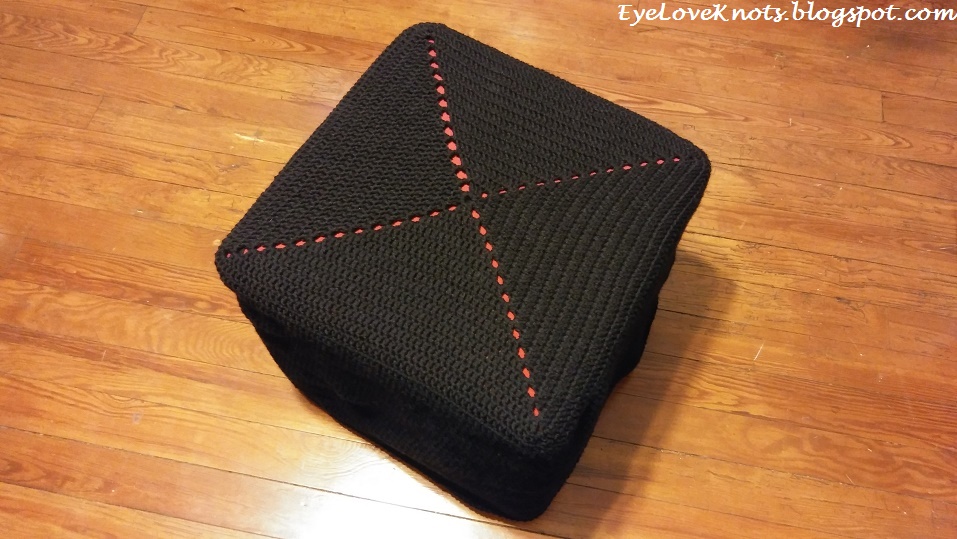
This month, I wanted to create something for my home. I moved in with Todd back in February, and shame on me, I haven’t created anything for our home! I have been talking about making some curtains, and we’ve been discussing colors and getting a new couch, but right now, I have decided to go with black to match the large area rug we have in the living room. Since creating this ottoman cover, I have many ideas for other ones, and the great thing about them is that they are removable and easy to change out depending on your mood and decor.

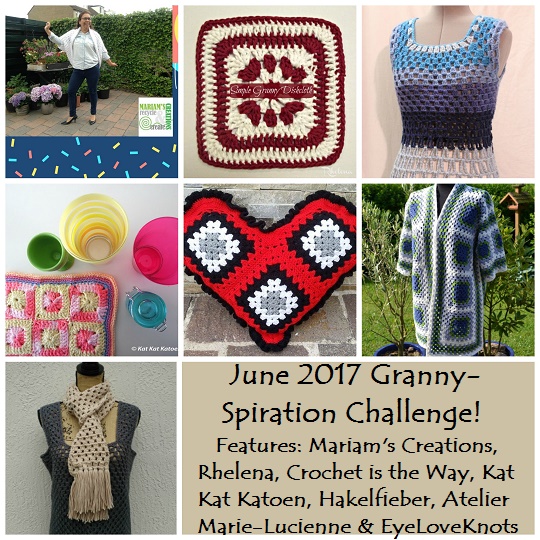
From Your Hosts: Granny Square Shrug (Tutorial) from Mariam’s Creations, Simple Granny Dishcloth (Free Crochet Pattern) from Rhelena, Be Squared Top (Free Crochet Pattern & Tutorial) from Crochet is the Way, Sweet Coaster (Tutorial) from Kat Kat Katoen, Granny Square Heart Cushion (Tutorial) from Hakelfieber, Lose Granny Square Jacket (Tutorial) from Atelier Marie-Lucienne, and Vintage Granny Square Scarf (Free Crochet Pattern) from Me! EyeLoveKnots.

Please make sure to stop by our other co-host and see what they’ve been working on too. In the image above, you’ll find their projects (and mine) from last month’s challenge.

*Sigrid from Kat Kat Katoen will no longer be participating in our Granny-Spiration Challenge 🙁 Her blog is AWESOME! Make sure to visit, read her latest blog post about returning to blogging and subscribe! It’s soooo worth it!

Marjan from Atelier Marie-Lucienne
Sandra from Hakelfieber Austria (in German)
Jenny from Crochet is the Way
Rhelena from Crochet n Crafts
Mariam from Mariam’s Creations: Recycle and Create

Materials:
     – 900 Yards of Worsted Weight Yarn – I used Red Heart Super Saver in Black (affiliate link)
     – I9/5.5mm Crochet Hook
     – #18 Tapestry Needle for Weaving in Ends
 
Material Notes:
     Yarn Alternatives: Caron’s One Pound, Bernat Super Value
 
Time Spent:
     My cover took about 8 hours to complete.
 
Measurements:
     Fits my ottoman that is 18.5″ wide by 16″ tall
 
Gauge:
     End of Round 4: Solid Granny = 5.5″
 
Abbreviations:
     DC – Double Crochet
     SC – Single Crochet
     Rev SC – Reverse Single Crochet
 
Pattern Notes:
     I have a beginner friendly photo tutorial on How to Work a Solid Granny Square.
 
Beginning chain counts towards final stitch count, except in single crochet rounds.
 
Chain 2 in the last corner of the first round of granny square is intentional to keep a more even square with future rounds.
 
Join to the first stitch, not the beginning chain.
 
I worked the body of the ottoman cover by alternating placement of the first stitch into the first and second stitches. This will help create a straight seam. On the rounds where you start in the second stitch, you will end with the last stitch in the first stitch on the right side of the beginning chain 2.
 
To custom make an ottoman cover, work your solid granny square about two inches smaller than the width of your ottoman, then begin working in the round to the desired height. I added a round of reverse single crochet because I like the finished look, but while it is on, you cannot see it so you could easily replace this with another round or two of regular single crochet. Why the finish with single crochet? To help keep the shape of the piece.
 
Pattern:
     Chain 5. Join to form a ring. Chain 5, (3 DC into the ring, chain 3) 3x, 2 DC into the ring. Join.
R2: Slip stitch into the chain space. Chain 5, (2 DC into the chain space, DC in each of the next 3 DCs, 2 DC into the next chain space, chain 3) 3x, 2 DC into the chain space, DC in each of the next 3 DCs, 1 DC into the chain space. Join. 
R3: Slip stitch into the chain space. Chain 5, (2 DC into the chain space, DC in each of the next 7 DCs, 2 DC into the next chain space, chain 3) 3x, 2 DC into the chain space, DC in each of the next 7 DCs, 1 DC into the chain space. Join.
R4: Slip stitch into the chain space. Chain 5, (2 DC into the chain space, DC in each of the next 11 DCs, 2 DC into the next chain space, chain 3) 3x, 2 DC into the chain space, DC in each of the next 11 DCs, 1 DC into the chain space. Join.
R5: Slip stitch into the chain space. Chain 5, (2 DC into the chain space, DC in each of the next 15 DCs, 2 DC into the next chain space, chain 3) 3x, 2 DC into the chain space, DC in each of the next 15 DCs, 1 DC into the chain space. Join.
R6: Slip stitch into the chain space. Chain 5, (2 DC into the chain space, DC in each of the next 19 DCs, 2 DC into the next chain space, chain 3) 3x, 2 DC into the chain space, DC in each of the next 19 DCs, 1 DC into the chain space. Join.
R7: Slip stitch into the chain space. Chain 5, (2 DC into the chain space, DC in each of the next 23 DCs, 2 DC into the next chain space, chain 3) 3x, 2 DC into the chain space, DC in each of the next 23 DCs, 1 DC into the chain space. Join.
R8: Slip stitch into the chain space. Chain 5, (2 DC into the chain space, DC in each of the next 27 DCs, 2 DC into the next chain space, chain 3) 3x, 2 DC into the chain space, DC in each of the next 27 DCs, 1 DC into the chain space. Join.
R9: Slip stitch into the chain space. Chain 5, (2 DC into the chain space, DC in each of the next 31 DCs, 2 DC into the next chain space, chain 3) 3x, 2 DC into the chain space, DC in each of the next 31 DCs, 1 DC into the chain space. Join.
R10: Slip stitch into the chain space. Chain 5, (2 DC into the chain space, DC in each of the next 35 DCs, 2 DC into the next chain space, chain 3) 3x, 2 DC into the chain space, DC in each of the next 35 DCs, 1 DC into the chain space. Join.
R11: Slip stitch into the chain space. Chain 5, (2 DC into the chain space, DC in each of the next 39 DCs, 2 DC into the next chain space, chain 3) 3x, 2 DC into the chain space, DC in each of the next 39 DCs, 1 DC into the chain space. Join.
R12: Slip stitch into the chain space. Chain 5, (2 DC into the chain space, DC in each of the next 43 DCs, 2 DC into the next chain space, chain 3) 3x, 2 DC into the chain space, DC in each of the next 43 DCs, 1 DC into the chain space. Join.
R13: Slip stitch into the chain space. Chain 5, (2 DC into the chain space, DC in each of the next 47 DCs, 2 DC into the next chain space, chain 3) 3x, 2 DC into the chain space, DC in each of the next 47 DCs, 1 DC into the chain space. Join.
 
Fasten Off.
 
R14: Skip the next chain space and DC. Reattach yarn in the next DC. Chain 2. DC into the next 49 DCs, 3 DC into the next chain space, (DC into the next 51 DCs, 3 DC into the next chain space) 3x, DC into the next DC. Join. (216 DC)
R15: Chain 2. DC into the 2nd DC, and each around. Join. (216 DC)
 
R16: Chain 2. DC into the 1st DC, and each around. Join. (216 DC)
 
R17 – 42: Repeat Rounds 15 and 16.
 
R43: Chain 1. SC into the 1st DC, and each DC around. Join. (216 SC)
 
R44: Chain 1. Rev SC into the 1st SC, and each SC around. Join. (216 SC)
 
Fasten Off, and Weave in Ends.
Please feel free to make and sell your own Single Solid Granny Square Ottoman Cover using this pattern, but please DO NOT claim this pattern as your own nor should you sell my pattern, and DO NOT re-publish my photos as your own. DO NOT copy and paste my pattern anywhere, link to it instead.
Join the EyeLoveKnots Crafting Community to share your creations, and see what other’s are up to!
Don’t miss out on new crochet patterns, reviews, jewelry tutorials and more! Subscribe to EyeLoveKnots by using the box on the right side toolbar, or follow me via Bloglovin!

Linked Up To…
Scrappy Stitchers Link Party #32 – Stitches ‘N’ Scraps
{nifty thrifty sunday #290} – Nifty Thrifty Things
Craft Schooling Sunday – Creative Jewish Mom
July 2017 Sharing Time – Raising Memories

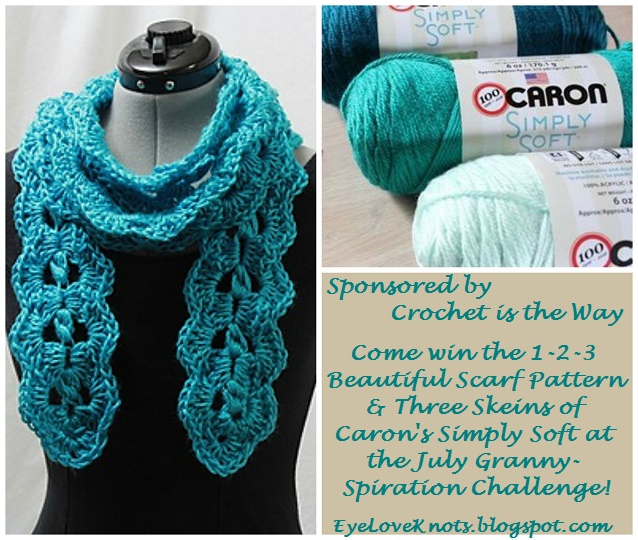
This Month’s Giveaway is sponsored by Jenny of Crochet is the Way! One winner will receive one of Jenny’s new crochet patterns – the 1-2-3 Beautiful Scarf – and three skeins of Caron’s Simply Soft in their choice of color/s to work up their own scarf. While winner will be able to choose their own color/s, the colors Jenny started with were Pagoda, Bright Green and Soft Green. I can’t wait to get started on my own scarf, but still trying to decide on yarn and a color.

a Rafflecopter giveaway

Must be 18 or older to enter. Open to all countries. Void where prohibited. Winner has 48 hours to respond to email notification, or another winner will be chosen. Jenny of Crochet is the Way is responsible for prize fulfillment.

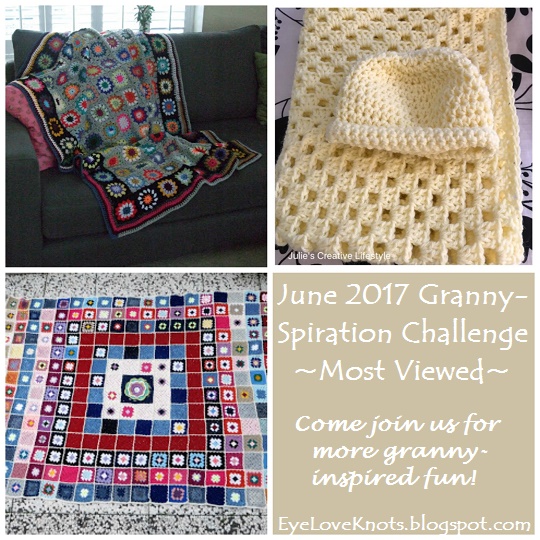
The three most viewed projects from last month’s challenge can be found in the image above. From left to right, top to bottom: Granny Square Stash Buster Blanket from Sum of Their Stories, Crochet Baby Blanket and Hats from Julie’s Creative Lifestyle, and Largest Blanket from Hobbyloes.

Now, Share Your Granny-Spiration Project With Us!


New Granny-Spiration Projects will be shared from your hosts the first Saturday of each month. Post times will vary. You will be able to link up from 12:00am EST on the first Saturday of the month, through midnight EST on the second Thursday from the start date – specific dates are on top of the Rafflecopter form – giving you almost two weeks to link up and enter the giveaway!

Please share projects that are family friendly, and GRANNY INSPIRED through use of regular granny square or solid granny square, granny stitch pattern or other afghan square in the form of a free pattern, pattern review, or inspiration piece. Not limited to crochet or knit.

Please make sure to link to your post, and not your home page. 

*If you don’t have a blog, you can still share with us by creating a Free Flickr Account – powered by Yahoo. Add your projects there, and then come back here with the link for the project.


*Link ups cannot be to Etsy listings or Ravelry pages where patterns are sold. You can link to blog posts, Flickr or Facebook pages, Pins, etc that are directed towards it, but can’t directly link to it. 

To be clearer though, Raverly pages of finished projects are okay to share. Sorry for the inconvenience! That’s per InLinkz guidelines. Thanks!

Features may be chosen at the discretion of each host. By linking up, you give us permission to feature your item.

An InLinkz Link-up


Filed Under: Free Crochet Patterns, Uncategorized Tagged With: 5.5/I9 Hook, Crochet is the Way, DIY Home Decor, Free Crochet Pattern, Giveaway, Granny Square, GrannySpirationChallenge2017, Living Room, Red Heart Super Saver, Solid Granny Square

❮ PREVIOUS POST

Essence Fringe Top – Crochet Pattern Review – MermaidCatDesigns

NEXT POST ❯

Two-Tone Shrug – Double Stitch Twins/Red Heart – Crochet Pattern Review

Comments

  1. Sigrid Swinnen says

    July 1, 2017 at 3:47 am

    Your ottoman cover is awesome! Very stylish!
    I'll still be following and visiting all the hosts, can't wait to see all their creations.
    ps: Thank you so much for the publicity and your very kind words and support x

    Reply
  2. Jenny Guldin says

    July 1, 2017 at 4:43 am

    That's a great way to update an old ottoman, or to personalize a new one… I've been thinking of getting some storage ottomans to hide part of my yarn stash, and it would be cool to use up part of the stash on them!

    Reply
  3. Rhelena says

    July 2, 2017 at 4:08 pm

    I love your ottoman cover, even though it's not finished, I like how it only covers it halfway. 🙂

    Reply
  4. ghemulet says

    July 10, 2017 at 5:19 am

    whaaaa..i made a few days ago the same project.I made an ottoman cover from scraps of yarn.
    Yours is also so so lovely.
    The next one will also be like yours but,the same,from coloured scraps.
    Thank you for hosting this colection
    Hugs!

    Reply

Leave a Reply Cancel reply

Your email address will not be published. Required fields are marked *

This site uses Akismet to reduce spam. Learn how your comment data is processed.

Welcome!

Welcome!

Hey! I'm Alexandra, the blogger and creator behind EyeLoveKnots and On Rockwood Lane! My passion is being creative. My favorite thing to do is crochet, and you will almost always find me having a cup of coffee and working on a new crochet project, but when I'm not doing that, you might find me out at a local park rollerblading, baking some fresh cookies, picking veggies in the garden or re-decorating for a new season or holiday. My two cats are great supervisors for all my adventures (minus the being outside because they think it's too hot in Florida to be anywhere but inside), and make sure I take plenty of breaks.

Meet the Team!

Meet the Team!

On the left, Abby is the maker behind A Stitch Shy of Normal, and on the right Jessica is the maker behind Nice and Knotty and Candace is the maker behind TandC Crafters.

Together, they help me bring awesome crochet projects to you! Click the image to learn more about them, and get their Instagram links, where they are constantly sharing tons of crochet inspiration.

Don’t Miss Out

Crochet! Magazine Spring 2023

Crochet! Magazine Spring 2023

(Affiliate Link) Click this image to get this issue now. These 22 designs are the perfect way to welcome in Spring with easy to wear layers, sweet styles amplified with striking stitch patterns, and some fun whimsical projects too.

Crochet World April 2023

Crochet World April 2023

(Affiliate Link) Click this image to get this issue now. These 21 designs are the perfect way to welcome in Spring with fun pops of color, sweet crochet thread projects, and fresh takes on the classic granny stitch pattern.

Gnome Caddy Pattern

Gnome Caddy Pattern

(Affiliate Link) Click this image to get a copy of this pattern! This adorable little Spring Gnome Caddy has a place for all of your crochet supplies. It's worked in a lightweight #3 yarn, but work in a worsted weight #4 yarn for even more space!

Archives

Copyright © 2023 EyeLoveKnots · Custom site by Moonsteam Design