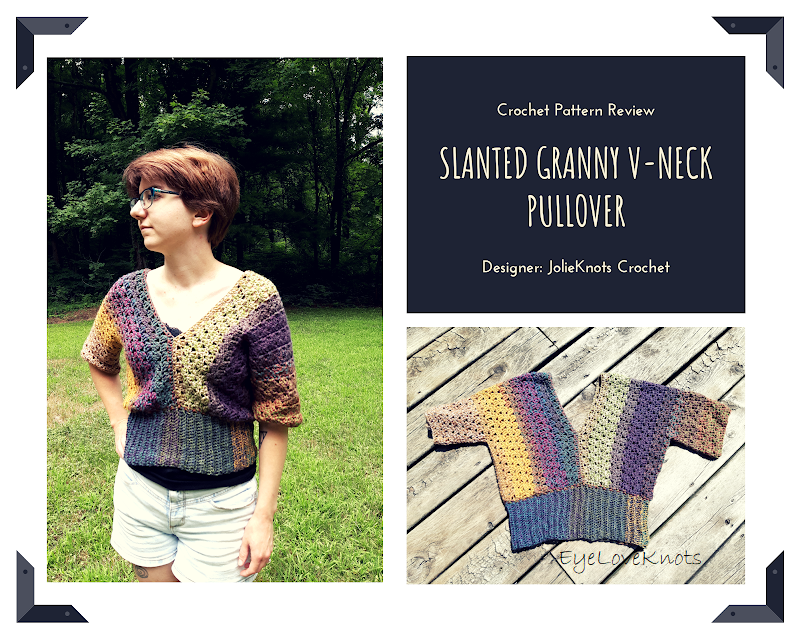
This is a crochet pattern review of the Slanted Granny V-Neck Pullover pattern from designer JolieKnots Crochet. Review done by A Stitch Shy of Normal for EyeLoveKnots.
This post contains affiliate links for Lion Brand Yarn and WeCrochet. If you make a purchase by clicking on them, I make a small commission at no extra cost to you. Thanks for your support!
It’s me, Abigail with A Stitch Shy of Normal.
Visit with me on Instagram @astitchshyofnormal for all kinds of awesome crochet makes and inspiration.
I adore fun and funky designs. I will happily pick a colorful yarn over a solid color any day, and I’ll also choose a unique fit or shape whenever possible rather than a simple rectangle top. Don’t get me wrong, there is absolutely a necessity for the simple stuff and I make plenty of those. But I am often in the mood to play around and add some spice to my wardrobe!
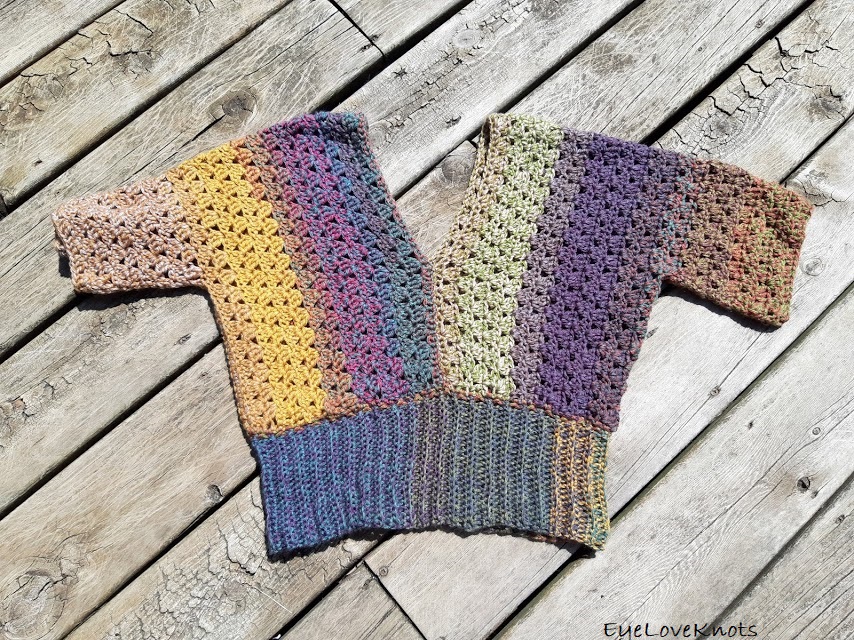
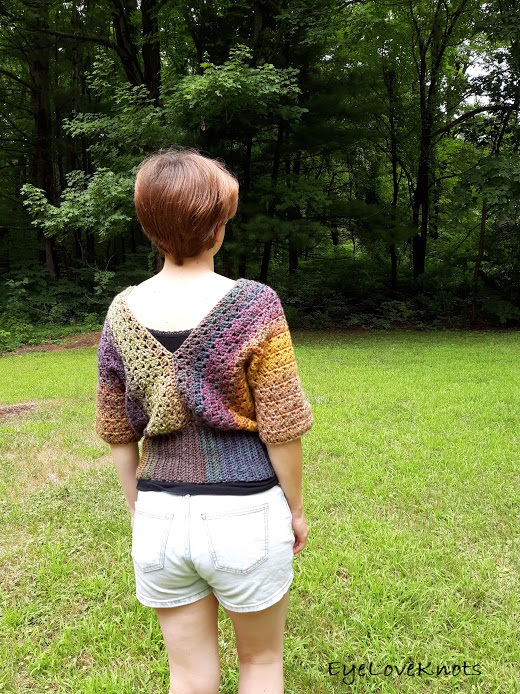
So when I saw this beautiful, colorful, fun sweater on my Ravelry pattern page, I knew I needed one in my closet like yesterday! In my experience, there’s a way to do bright and fun colors appropriately so they don’t overpower the finished item. This pattern toes that line so perfectly that I swear it was designed for me. It’s made in separate halves that are sewn together, so the colors clash against each other so adorably. It’s odd and out there, and from me those words are the highest compliment!
Materials I Used:
- Roughly 1.5 cakes of Lion Brand Mandala Tweed Stripes in “Knock on Wood” (for the small size with short sleeves)
- J10/6mm hook – I like Clover Amour Ergonomic Hooks
- Yarn needle
- Slanted Granny V-Neck Pullover pattern from JolieKnots Crochet (paid pattern)
Material Notes:
This is a rare occurrence for me, but this time I did actually use the exact yarn suggested by the designer! Her promo pictures with the Mandala Tweed Stripes are the whole reason I fell in love with this pattern, and I had seen this yarn recently in the store but needed an excuse to buy it. Obviously it was meant to be! I bought two cakes, hoping it would be enough as it was more than the stated yardage.
If I had made long sleeves, I likely would have used the entirety of the two cakes. I only bought two because the pattern calls for 700 yards for size small, and two cakes is roughly 850. This worked out perfectly because I wanted this to be a lighter sweater for late summer/early fall, so I planned short sleeves the whole time.
I would advise on getting extra yarn if you are wanting to make this. The pattern offers so many customization options that the yardage is really just a suggestion. She gives options on the actual bust size, the band height, the sleeves, if you want sleeve ribbing or not…all of these things could make the yardage vary by easily a hundred yards if you choose the widest/tallest version of every option. I got lucky having plenty of yarn to spare, but if I had chosen to switch to long sleeves and add wrist ribbing, I would have been pushing it and playing yarn chicken.
This yarn was the perfect choice for this pattern. The simple stitch pattern showcases the colorful yarn, and the unique construction lets the colors have some fun and get a little weird. I think it looked adorable in solid colors on the Ravelry pictures from other users, but what drew me to it was the color. If you’re not the type who often likes to play with color and take risks, this pattern and yarn combo might be a good “safe” way to dip your toe into fun and funky clothing!
Time Spent:
8-9 hours, approximately. The main body panels and sleeves were probably 5 or 6 hours of that, and then I took a while on the waist ribbing.
Measurements:
This is a little bit hard to compare because of the possible variations, but I measured what I can.
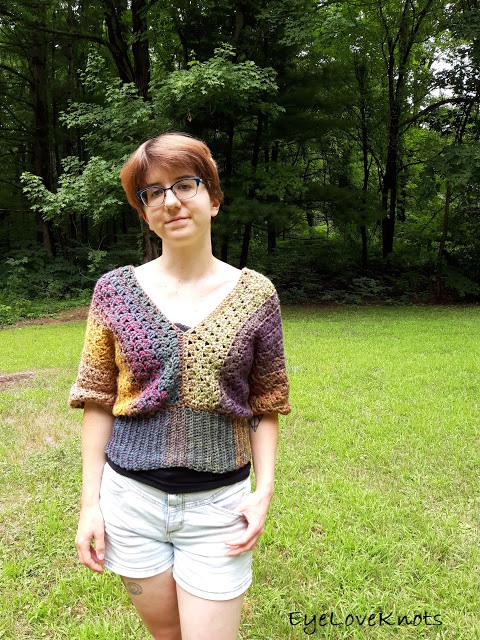
I did the small size which is supposed to fit a 34″ bust, and at the midsection below the V-neck, mine measures exactly 17″ across. The open neck allows for it to open a bit wider which is why she gives bust sizes as a suggestion but allows you to pick a size. It fits wonderfully, and I generally wear a small or extra-small depending on the brand.
Her suggested length for the options I chose would be about 20″ top to bottom laying flat, and that’s again exactly what mine measured. If you’re curious how I came up with that number, she lists the small-size panels being 30″ long (so 15″ when folded and assembled) and then the ribbing option I picked is supposed to be 5″ tall. I had these exact measurements. That worked out well for me!
Gauge Info:
From the pattern: 12sts x 6 rows = 4 inches
My own gauge: just a teeny bit more than 12 stitches, and about 6.5 rows fit into the 4 inch measurement.
If you’re curious how I got an exact sizing match when my numbers vary by a fraction of an inch (which should lead to a variation in the finished item), I don’t know if her numbers are with any sort of stretching or blocking. Mine are not. This stitch pattern and yarn gives the opportunity for plenty of stretch, so gauge will not be an exact science but you want to get pretty close!
My gauge came out perfect from the swatch, which makes sense considering I was using the exact same hook and yarn as the designer. (However, remember this doesn’t always work out as you might have different tension! Even if you’re using the exact same thing, it’s still best to swatch!)
Pattern Notes:
I adore the customization possibilities of this pattern. It’s my favorite part, from a crocheting perspective. (Obviously my favorite part overall is how gorgeous it looks!)
It’s not just the general sizing of the panels that lets you make the perfect fit. She gives you so much information on exactly how wide and tall the panels will be for each size so you can even pick the length you want (going front to back over your shoulders) and make up your own actual size from there. You can make it snug or loose and drapey, all the information is in there! I chose the Small size (34″ bust, which is about my actual size) and kept the panels exactly as written, which gives a pretty accurate fit with a little bit of slouch.
And that’s JUST the bust size options. She also talks you through the sleeves, suggesting how many rows you could do to get a certain length, and leaves it totally open to go as long as you want for your chosen sleeve style. She gives a guideline on the long-sleeve option, and I did about half of that row count to get mine about elbow length (which is what I was looking for).
And then after all of that, you sew the panels together and STILL get to pick the waist ribbing! She gives a range of options from a short crop to a long hip-length panel of ribbing at the bottom. I chose the middle option, wanting it to hit a little above the top of my pants.
The ribbing is the only time I altered the pattern a little bit. As written, you attach each row of ribbing directly to the sweater itself, and she explains this very well. I just personally prefer a cleaner line, so I first did a row of SC around the bottom of my sweater, and then did the ribbing as written but attached it to these SC stitches instead. It’s easier for me (I don’t need to look for the side of the stitches on each row) and I just like the look better. I still did the same stitch and row count as suggested.
In case you couldn’t tell, I get a little bit passionate about a pattern that is this awesomely open-ended. I love when designers give you the freedom to create what YOU want, because that’s what will make you feel good and want to actually wear it!
And it just looks so adorable. I love how it drapes and falls on my body, it has an interesting look but it covers everything appropriately. And there’s no actual front or back to it, it’s the same deep V-neck on both sides that shows exactly as much as you want it to show!
Plus, it makes me want to go back again with another colorway and this time make the long-sleeve option…with wrist ribbing and the long hip-length ribbing! And maybe I’ll make the panels longer to have a nice long sweater to wear with leggings! I’m not just saying this for the purpose of this review, I am actually really excited to go back for round 2 and make an entirely different sweater this time, because the pattern was that fun and simple to understand.
Don’t forget to visit with me on Instagram @astitchshyofnormal for all kinds of awesome crochet makes and inspiration.
If you love to DIY: Join the EyeLoveKnots Crochet & DIY Community on Facebook to share your creations, and see what others are up to!
If you love Fashion: Join the Alexandra Lane Lifestyle Facebook group to share, and see what others are up to!
Linked Up To…
Craft Schooling Sunday – Creative Jewish Mom
Happiness is Homemade Link Party #336 – Create with Cynthia
Unlimited Monthly Link Party 15 – Grammy’s Grid
The Hearth and Soul Link Party – April, the 21st Century Housewife
Handmade Monday #189 – Sum of their Stories
Ginx Woolly Linx Party August – Ginx Craft
Craftastic Monday Link Party – Sew Can Do
Little Cottage Link Party #64 – Love my Little Cottage
Weekday Wear Link Up – Away from the Blue
Pin Party #382 – The Pin Junkie
Creative Compulsions Linky Party #73 – My Bijou Life
Traffic Jam Weekend Linky Party #246 – My Bijou Life
Friday Favorites – Busy Being Jennifer
Create, Bake, Grow & Gather Party #433 – Shabby Art Boutique
Style Link Up – Lizzie in Lace
Fancy Friday – Nancy’s Fashion Style
Link Your Stuff – Annemarie’s Haakblog
A Morning Cup of Joe Linky Party – The Cottage Market
Scraptastic Saturday Party 302 – Scrapality
Snickerdoodle Create Bake Make Link Party 349 – EyeLoveKnots
Fabulous Party #334 – Lou Lou Girls
Linky Ladies Party #192 – The Purple Poncho
Turning Heads Linkup – Elegantly Dressed and Stylish
Confident Twosday Linkup – I do deClaire
Style on the Daily – Straight A Style
The Wednesday Link Party 362 – The Stitchin’ Mommy
Style Six – The Queen in Between
Party in Your PJs #323 – The Apple Street Cottage
{Wow Me} Wednesday #469 – Ginger Snap Crafts
Your Whims Wednesday #474 – My Girlish Whims
Hookin’ on Hump Day #221 – Moogly Blog
Scrappy Stitchers Link Party #66 – Stitches n Scraps
Creatively Crafty Link Party #238 – Life Beyond the Kitchen
Artsy-Fartsy Party #307 – Artsy Fartsy Mama
Encouraging Hearts & Home Blog Hop – Apron Strings & Other Things
Thursday Favorite Things #454 – An Artful Mom
Thursday Fashion Files Link Up #272 – Curly Crafty Mom
#Chicandstylish #linkup – Mummabstylish
wow, gorgeous sweater and in 9 or so hours? that is a winner! thanks so much for sharing on craft schooling Sunday as always!
That is a beautiful top on you and I love those colours together, it is so fun!
Thank you for joining the #weekdaywearlinkup! Hope that you had a lovely weekend 🙂 We managed to attend two birthday parties, even though the new restrictions made things a little different!
Super cute! Pinning! Thanks for sharing with Creative Compulsions! I will be featuring it this week.
Michelle
https://mybijoulifeonline.com
How pretty! I love the color scheme here!
jess xx
http://www.elegantlydressedandstylish.com
Love it! Simple but beautiful!