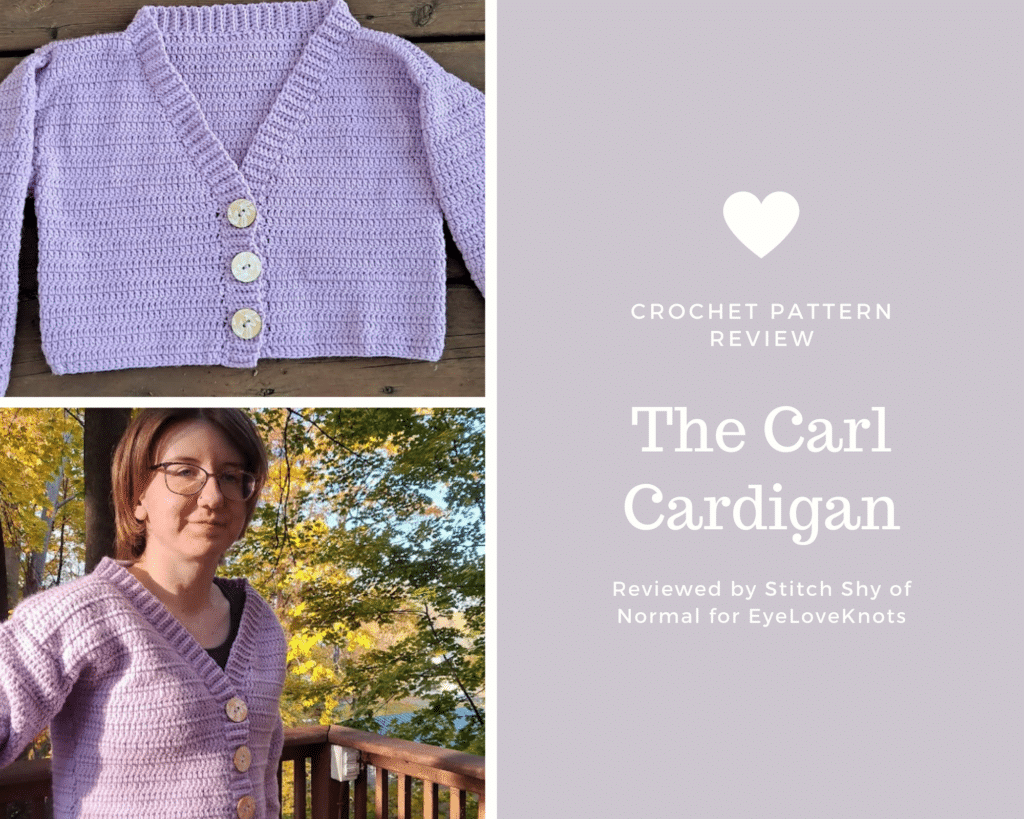
This is a crochet pattern review of the Carl Cardigan pattern by Evelyn & Peter Crochet. Review done by A Stitch Shy of Normal for EyeLoveKnots.
This post contains affiliate links for Lion Brand Yarn and WeCrochet. If you make a purchase by clicking on them, I make a small commission at no extra cost to you. Thanks for your support!
Find the crochet pattern review below, or click here to find the designer’s page for the free pattern + or buy a kit from Lion Brand Yarn!
It’s me, Abigail with A Stitch Shy of Normal.
Visit with me on Instagram @astitchshyofnormal for all kinds of awesome crochet makes and inspiration.
There’s no denying what time of year it is. It’s sweater weather, finally! I always love the fall season. I love scarves, and hats, and big bulky sweaters. I’m very glad that I work in a job where we can wear whatever we want (within safety guidelines) and it’s even a little chilly in our building, so I can keep my sweaters on all day! I don’t often have the patience most years to make many of my own crochet sweaters, but this year there must be something in the air because I’ve already designed one, made this one, and have another one currently on my hook!
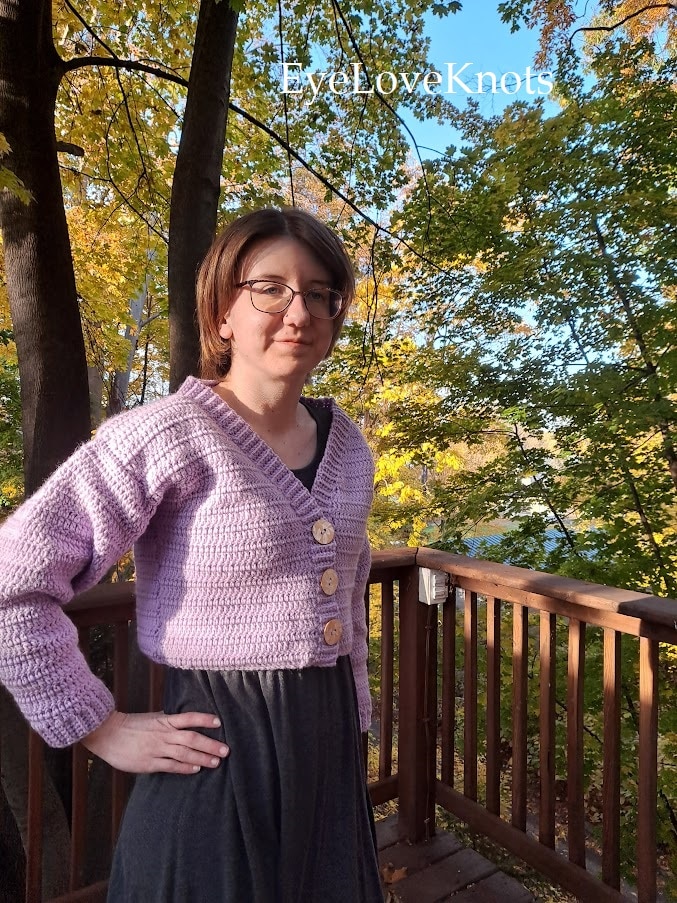
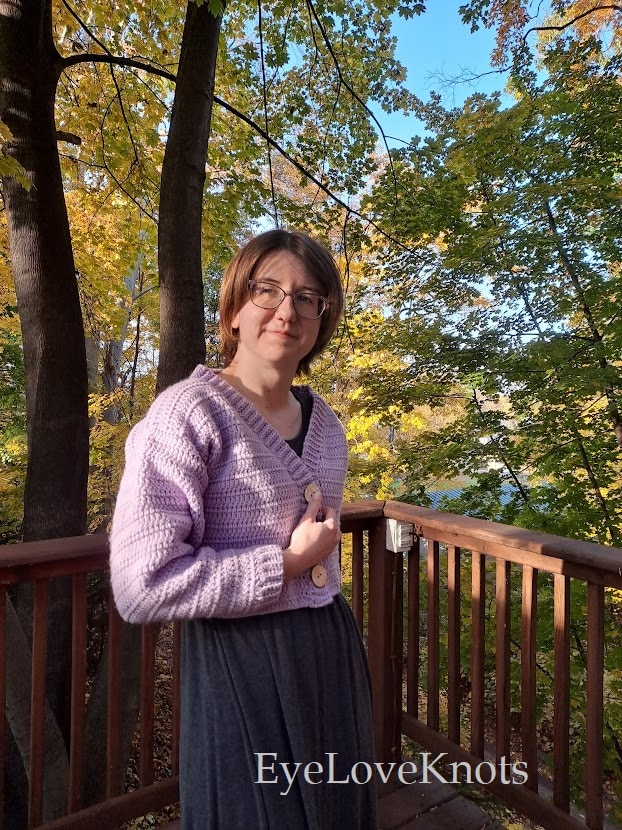
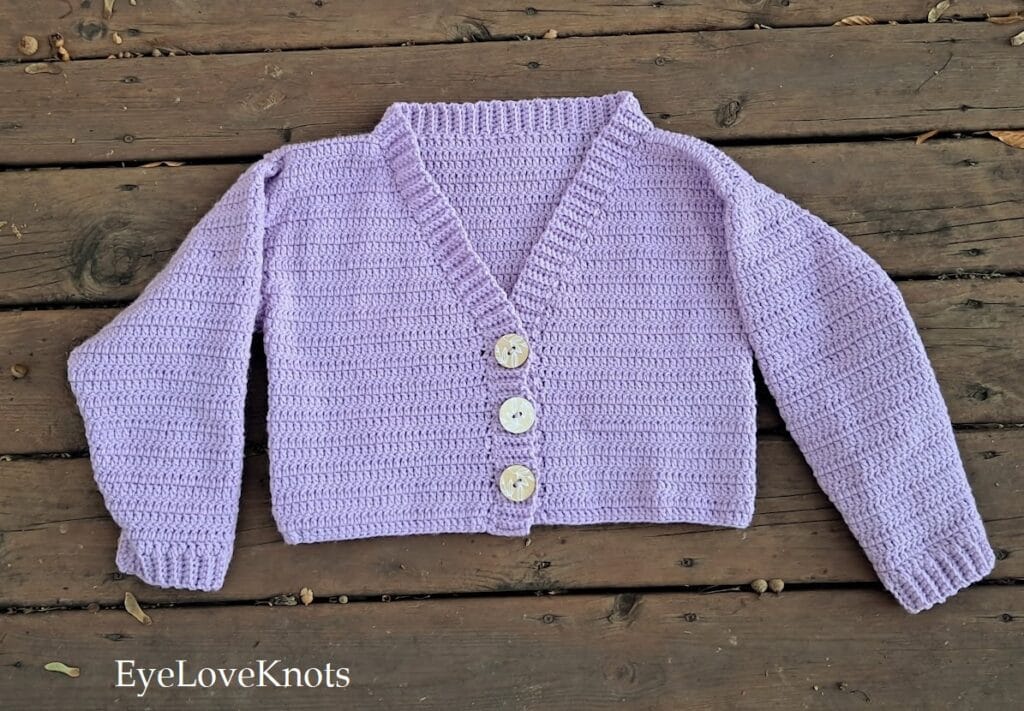
I felt drawn to this pattern for a few reasons. One is of course the casual slouchy style. I love that look. Slim-fit jeans or leggings with a baggy sweater is basically fashion goals for me, and that’s why I’m always on the look for new sweaters to either buy or make to fulfill my dreams! This one being cropped was a little different, but I think that’s also why it jumped off the Ravelry page for me. It’s following trends but also stands out. Also, I love this designer. So for all of those reasons, I immediately bought this gorgeous pattern and got started! (Which I actually didn’t mean to do quite yet, but I’ll explain that later on.)
I hope this inspires you to start whipping up a Carl Cardigan of your own! I’d love to see how others style this one because I’m a little confused on how to do that myself. You’ll be able to tell from the pictures that I did honestly try to make it cute, but I need to figure out how to really showcase this beautiful piece. I think it can totally shine if I figure out the right outfit for it.
Materials I Used to Make my Cardigan:
- Roughly 1,000 Yards of Worsted Weight Yarn – I used 2.5-3 skeins of Big Twist Value yarn in “Soft Purple”
- G/4.0mm crochet hook – I like Clover Amour Ergonomic Hooks
- The “Carl Cardigan” pattern from Evelyn & Peter, available here free or as a downloadable PDF
- 3 buttons, and it looks like the ones I bought are not on the Joann website but they were basically a light tan/white version of these (the link is a black and gray version of what I think is the same pattern, and it was this size for sure).
- Scissors/yarn needle for assembly
Material Notes:
As usual, I did need to alter my size slightly based on the original gauge swatch. This sort of modification is normal in garment-making. If the yarn you want gives you a perfect gauge swatch right away, you got very lucky! Because I had already bought this yarn, was in love with the shade, and my gauge was pretty close…I went forward without changing anything. The only thing I did was choose to follow the directions for the X-Small size, when I would normally go with Small. In most clothing, I fall anywhere between these two sizes, but my crochet gauge can be tight so I play it safe and size up most of the time. In this project, my gauge was slightly large (probably due to yarn differences), so I sized down.
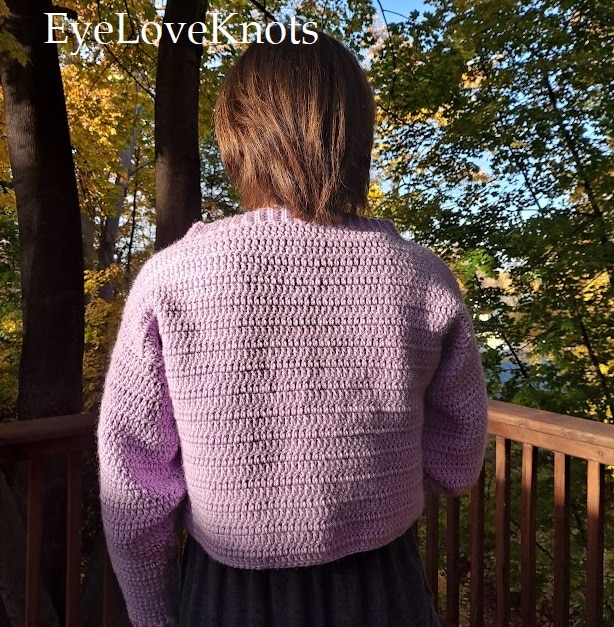
The stitch definition and texture came out beautifully in this yarn. The basic stitching gives a gorgeous simple line every other row, which adds just enough visual interest to keep it fun! The original suggested yarn (Lion Brand Feels Like Butta) gives beautiful stitch definition, so I’m very happy that mine did too when it’s so different. If you are comfortable modifying size a little bit, you could probably pull this one off with pretty much any basic worsted weight yarn. I’d love to see this in something tweed, or a very slow-striping colorway! The pattern gives suggested measurements for each size (back and front panel height/width, bust size, and sleeve length) so you can pick and choose what size would fit you best or what size you might need to do with your yarn to get the right fit.
My buttons ended up kind of big, unfortunately. This is why you need to write down what to get at the store! I forgot, and remembered that the pattern said something about it being an inch or just a little over. (Turns out it’s 1 and 1/8″). I scoured the shelves and ended up with ones that are actually 1 and 3/8″, which doesn’t seem like much of a difference but I almost had to modify the buttonhole sizing to get my big buttons to fit! I didn’t end up doing so, because they do stretch enough to fit and it’s better for the holes to be a little too snug instead of too loose. But it was a close call! I’d suggest that you stick with the written size on these, to be honest. However, if you make the same mistake as I did, it can work if you’re patient.
Would I use this yarn again for another cardigan? Yes, and I’d follow the same size choices. But…would I also love to follow the yarn suggestion and see if that fits and looks even better? Also yes. I adore Feels Like Butta, it’s so lovely and soft on the skin. I would probably make a Small in that case since that’s more along my actual sizing measurements.
Time Spent:
14ish hours in total. To be fair, at least an hour of that was spent on assembly. It’s a very quick make but then there’s a lot of folding and seaming! It’s easy to follow the instructions, but it does take some time.
Gauge:
Pattern gauge: 4″=15 DC, 9 rows
My gauge: 4″=14 DC, 8.5 rows
(Also I did not block or steam my sweater, I don’t know if the designer did.)
You can see here why I went down a size. I got very close, and I did some basic math and realized if I just followed the XS stitch counts I should get roughly the Small dimensions. I measured a few times during my first couple of rows to make sure I was in the ballpark, and it worked out! I did leave off some rows to keep my height correct, though.
Measurements:
Like I mentioned, I followed the XS directions which should have gotten me measurements along the lines of:
18.5″ width, 16″ height (back panel and before ribbing), 16.5″ sleeve length
My results ended up being:
19″ width, 16″ height (again, measuring the back panel without ribbing), and my sleeves are about 16.75″ long.
So I actually ended up falling between the XS and S dimensions, rather than meeting the Small size exactly. I was about an inch shorter on width, although the height is written to be the same. This worked out fine for me, as it fits great!
Pattern Notes:
This pattern was incredibly addicting! I actually originally planned for this to be a later review, like December or even January. I just saw the pattern and decided to snag it while I was thinking about it, and then I saw the really adorable yarn on sale at Joann and picked it up because it was a good deal. (At the time, this yarn was on sale for something like $2.50 each, and this sweater ended up using 3 of the 4 that I bought. So I made a sweater for $7.50 in yarn!)
I then got home, and thought “I’ll just swatch it up and see what this yarn will look like”. That led to “I’ll just start the panels so I’m ahead when I pick it up for real”. Then I couldn’t stop. I had gone to Joann on Saturday…by Sunday night, I had the body of the cardigan finished. Once I noticed I was over halfway done, I figured I might as well keep going and make the sleeves! That was last weekend, so I decided to just switch it up and make it this month’s pattern review instead while it’s all fresh in my mind.
So as you can probably tell from that summary, this pattern is so simple and fun! The actual stitching is very easy, the design is mostly in the shaping. The silhouette of this cardigan is genius, it’s so flattering and yet casual and comfortable. Also with the cropped length, it will look gorgeous with all the currently trendy high-waisted everything that I see people wearing! If you don’t personally wear this style, make one of these for a niece or granddaughter currently in high school, they’d love it. It perfectly fits with the eccentric thrift store-80’s-mom jeans style that I believe is currently “cool”. I’ll wear this to work this week and see if my young coworkers agree that I’m fashionable in this sweater. Either I’ll end up being right, or it will at least entertain them that I tried!
I don’t have much to say in terms of critiquing the pattern itself. Just a few comments or confusing things that I’ll share here in case it helps anyone else.
FIrst, just a tip that will save you a lot of time if you modify the size like I did. The pattern does mention if you added any rows for length, to make sure you add these on the front panels too. And this might be obvious to some people but I messed it up my first time around: If you subtract any rows for height, make sure you leave a note for yourself to leave these out on the front panel as well! I had to frog my decrease sections on both front panels because I didn’t even think about this.
On the back, you work it as a plain rectangle, so rows 2 through 36 are the same. On the front, however, you work a basic rectangle up through row 20, then do decrease rows. This means if you worked the back only to row 32 or 34, you’ll want to stop the front at row 16 or 18 to compensate! I forgot this after I left off 4 rows on my back panel. I should have stopped the front panels at 16, and didn’t even think about it. Oops. It was a simple fix, of course, but I wanted to offer that advice.
The only “mistake” I found was that in row 22 of the second front panel, it suddenly throws in to SC instead of DC across in that row. I didn’t think that made much sense, especially considering the first front panel did not do this. This must just be a typo, but I don’t want anyone to start working it that way and end up with one panel way smaller!
I also found it handy to keep a stitch marker on the decrease side, and move it up every few rows. This helped me keep track of which side stayed straight and which one slanted, as I like to stitch up my projects while watching something on TV.

My biggest “complaint”? The ribbing around the edges looks super gorgeous laying flat, and I was impressed how it curves around the shaping. However, as you can see in the pics, when it’s on my body it does not lay all flat and pretty anymore. This might be fixable with fewer ribbing rows in this section, perhaps? I wasn’t really into the idea of frogging all that ribbing this afternoon, especially when it would waste my last little bit of sunlight for taking half-decent pictures! Daylight Savings Time switches will always mess me up for a few days.
That’s about all I had on the actual pattern, the assembly made perfect sense and I appreciated having pictures and diagrams to help me through it. The directions on how to add the ribbing were nice and clear, and the suggestions on how many ribbing rows to attach to each stitch were very helpful (although with how mine lays, maybe fewer rows are needed).
When it came time to add the buttonholes, I strongly suggest following the advice to tie your buttons in the desired spot first before you decide where the holes should go. I moved mine up and down a few times before I was satisfied, and having the buttons kind of “tacked” in place helped with this decision. I ended up actually counting about how many rows I would have along the first straight section (before the slanted bit), and then spacing out my buttonholes evenly. I saw I’d have about 34 rows total here, so I chose to put my buttonholes in rows 7-8, then 17-18, and 27-28. This gave me 6 rows below the first button and above the top one, and 8 in between the middle spots. I loved how this worked out. This row count will change for each individual, but I suggest doing something like this to get it evenly placed as much as possible.
I can’t even think of what else besides my ribbing I would change about this pattern. I guess I’d possibly make my neck opening a little bit smaller? I love the slouchy look but it’s maybe an inch or two more open and loose than I would want. Also it was my choice, but if I could undo my sleeves I would add a couple inches more length. I have short arms but I guess I like longer sleeves, because I did them to the written length!
All in all, I loved this pattern and would happily make more. I think my pink-lavender colorway will be a beautiful pop of color during the winter months, and this yarn will make the cardigan nice and snuggly warm for an extra layer against the wind. The pattern is well-designed, clearly written, and has a great size range with instructions on how to get it to fit you even better. I’m amazed and so happy I found it. You need to pick up a copy right now and get started because you’ll probably end up wanting one in every color!
What color would you make this in? A bright pop like mine? A neutral staple piece like the designer did in gray? Stripes, sparkles, tweeds? I’d love to hear it!
Don’t forget to visit with me on Instagram @astitchshyofnormal for all kinds of awesome crochet makes and inspiration.
Join one of our awesome Facebook groups to share your creations, and see what others are up to!
– EyeLoveKnots Crochet & DIY Community
– DIY Home On Rockwood Lane
– Alexandra Lane Lifestyle
Linked Up To…
Linky Ladies Party #218 – The Purple Poncho
The Loop Scoop #26 – Moogly Blog
Craftastic Monday Link Party – Sew Can Do
{Wow Me} Wednesday #531 – Ginger Snap Crafts
The Wednesday Link Party 425 – Oombawka Design
Saturday Sparks Link Party 449 – Pieced Pastimes
Team Creative Crafts Linky Party #68 – Artsy-Fartsy Mama
Grace at Home No. 446 – Imparting Grace
Weekday Wear – Away from the Blue
Style on the Daily Weekly Link Up – Straight A Style
Top of the World Style Linkup No. 334 – High Latitude Style
Thursday Fashion Files Link Up #332 – Curly Crafty Mom
Ageless Style – Slices of Life
Chic and Stylish Linkup – Mummabstylish
Fancy Friday Linkup – Nancy’s Fashion Style
Style Link Up – Lizzie in Lace
Neverending Style Link-up – The Grey Brunette
Fabulous Friday’s Linkup Party – Lucy Bertoldi
Craft Schooling Sunday – Creative Jewish Mom
Ginx Woolly Linx Party November – Ginx Craft
Handmade Monday #254 – Sum of their Stories
The Really Crafty Link Party #290 – Keeping it Real
Creatively Crafty Link Party #302 – Life Beyond the Kitchen
Funtastic Friday Link Party #359 – Simply Beautiful by Angela
Happiness is Homemade #401 – Decor Craft Design
Unlimited Link Party 61 – Grammy’s Grid
You’re the Star Blog Hop – Decor Craft Design
Link-Up Potpourri #18 – My Bijou Life
614th Inspire Me Tuesday – A Stroll Thru Life
Fabulous Party 398 – Lou Lou Girls
Spread the Kindness Link Up #249 – Shelbee on the Edge
Wonderful Wednesday – Oh My Heartsie Girl
Thursday Favorite Things Link Party #516 – An Artful Mom
Encouraging Hearts and Home Blog Hop – Slices of Life
Traffic Jam Weekend Link Party #302 – My Bijou Life
Looks like hard work! It’s a lovely color: I just wore a sweater in that color.
http://www.chezmireillefashiontravelmom.com
The colour on this cardigan is beautiful and you wear it so well – it will look great with jeans but also with skirts and dresses as you’ve worn it here 🙂
Thanks for joining the #WeekdayWearLinkup! Hope that you had a wonderful weekend. We had a great one staying at Sea World on the Gold Coast 🙂