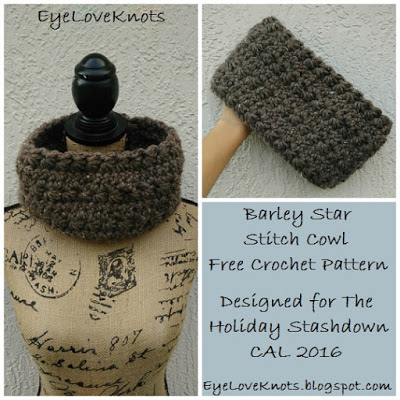
I’ve had a strange year so far, and to be honest, completely forgot I signed up for this stashdown, but I had so much fun being a part of this last year – when I shared my Whimsical Sashay Cowl – so when I got a reminder email recently, I got to town on my design. To find out more about The Holiday Stashdown 2016 and get a complete schedule of pattern releases, check out my Holiday Stashdown CAL Announcement.
Materials:
– Less than 106 yards of Super Bulky Yarn – I used less than one skein of Lion Brand’s Wool Ease Thick n Quick in the Barley colorway
– M13/9mm Crochet Hook
– Tapestry Needle for Sewing and Weaving in Ends
Material Notes:
I was given this yarn as a gift from my boyfriend’s mom. It had been sitting in my car waiting to be used when I thought about this cowl. Dig through your stash and find some super bulky yarn you have been waiting to use, or wanting to destash. At first, I thought about using some of my Sashay Yarn as I had done for the Whimsical Sashay Cowl (and still might), but I also think Bernat’s Blanket Yarn would work, two strands of worsted weight yarn held together or even three strands of lightweight yarn held together – get creative!
Time Spent:
I had my cowl ready to wear in about an hour.
Measurements:
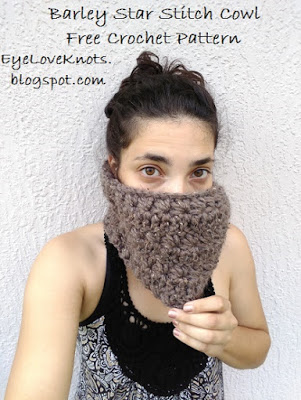
This cowl measures 12″ wide laying flat, by 6 1/8″ tall.
Gauge:
8 SC by 8 Rows = 4″ by 4 1/4″
Abbreviations:
DC – Double Crochet
Pattern Notes:
The star stitch can be a tough one. To be honest, I am not even really sure where I picked it up from anymore, but recently I decided to use it in a different cowl I was working on and fell in love with the idea all over again. I have been working some other projects with it, and seem to be having slight difficulty keeping my ends straight – I tend to get a diagonal thing going on on both sides, which is why I chose to work this flat and sew together. My seam still came out a little sideways, but with the whipstitch, it’s less noticable. If you have any tips on working this stitch pattern – I’d love to hear them 🙂 Drop me a line below!
I always work the beginning star stitch as a 5 leg star (described in the first line of the pattern below) because I find a 6 leg star to be to tall for the rest of the row.
Not depicted in the pattern below: At the end of star stitch rows, I omit the last chain 1, and loosely work a single crochet into the last stitch instead to avoid an uneven side.
This pattern calls for a row of double crochet following a star stitch row, but you could turn your piece and work another row of star stitches back across. I don’t do this because I find that the pattern isn’t noticable from the right side of the piece, and it uses more yarn so I just work a solid stitch across. Alternatively, you could work a row of single or half double crochet’s too.
Pattern:
Chain 61. Insert hook into the 2nd, 3rd, 4th and 5th chains, picking up the loops on the hook, yarn over, and pull through all 5 loops, chain 1 to secure. (Working into the side of the star just created, insert hook into the space created by the chain 1, as well as into the side of the previous star stitch, into the same stitch as the previous star stitch and into the next two stitches picking up all the loops on your hook, yarn over, and pull through all 6 loops, chain 1 to secure) 28 times. (29 Stars)
R2: Chain 2, turn. DC into the 2nd stitch, and each stitch across. (58 DC)
R3: Chain 3. Insert hook into the 2nd and 3rd chains, as well as the 1st, and 2nd stitches, picking up the loops on the hook, yarn over, and pull through all 5 loops, chain 1 to secure. (Working into the side of the star just created, insert hook into the space created by the chain 1, as well as into the side of the previous star stitch, into the same stitch as the previous star stitch and into the next two stitches picking up all the loops on your hook, yarn over, and pull through all 6 loops, chain 1 to secure) 28 times. (29 Stars)
R4 – 7: Repeat Rounds 2 & 3, 2x.
Fasten Off with a long tail for sewing. Thread the end into the tapestry needle, fold the piece so the right sides are facing and whipstitch the ends together. Alternatively, you can wait to fasten off, chain 1, turn and slip stitch the pieces together. A slip stitch join will create a bulky seam though.
Weave in remaining end/s.
This is only 1 of 24 free crochet patterns for holiday gift and decoration projects so make sure to stop by the Holiday Stashdown CAL 2016 Announcement page to get the full schedule and link to the other free crochet patterns!
Don’t forget to upload your photo/s and enter the giveaway here.
Please feel free to make and sell your own Barley Star Stitch Cowl using this pattern, but please DO NOT claim this pattern as your own nor should you sell my pattern, and DO NOT re-publish my photos as your own. DO NOT copy and paste my pattern anywhere, link to it instead.
*If you would like a PDF version of this post, you may get one through my EyeLoveKnots Etsy Shop or EyeLoveKnots Craftsy Shop for a small fee. This fee is to compensate for the view/s lost once you no longer need to return to the blog for the information, as you will have your own copy. Plus! It helps fund supplies for new projects to share with you!
Shop EyeLoveKnots Etsy – Barley Star Stitch Cowl;
or EyeLoveKnots Craftsy – Barley Star Stitch Cowl.
With so many size, yarn type and color options, I would love to see them! Please share your photos on my EyeLoveKnots Facebook page, or our latest Yarn Fanatic Party Link Up!
Share your version of this cowl on Ravelry – Barley Star Stitch Cowl. Check out the EyeLoveKnots Ravelry page to keep track of all your EyeLoveKnots favorites in your que, and share your WIPS and finished projects!
Don’t miss out on new crochet patterns, reviews, jewelry tutorials and more! Subscribe to EyeLoveKnots by using the box on the right side toolbar, or follow me via Bloglovin!


Leave a Reply