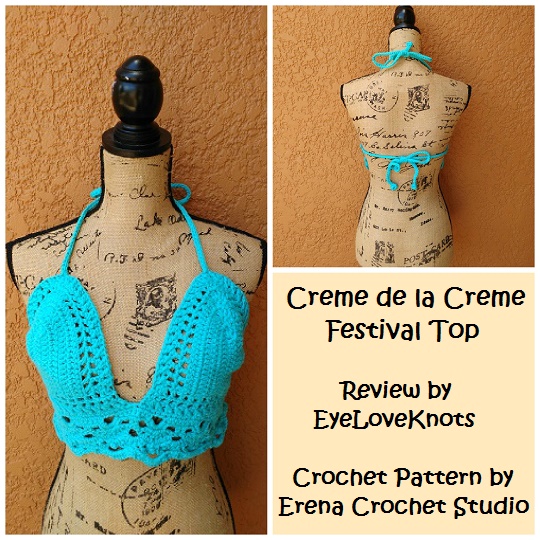
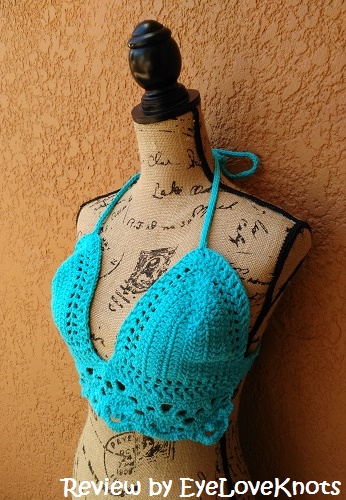
I started this top back in April of 2015. I worked most of it, and then it sat, and sat… I finally picked it back up in May of last year (2016) and finished it. I also emailed the designer, Erena, with a complete review of the pattern, errors I found, and corrections I thought should be made. She did appreciate my notes, and said she’d look over the pattern, but she never got back to me. I have requested a revised copy a couple times with no response. This top is really pretty, and if made to the correction size, would be an awesome top to wear to a festival, or for sunbathing, but you must have patience when working this pattern as it is missing some information including the complete written instructions for the different sizes, straps and lacy bottom part. Down in the Pattern Notes section you will find my detailed notes made and used to complete my top. Hope it helps you if you decide to make this top! I did see some other patterns I would have really liked to have given a try from this shop, but reading the reviews and based on my experience with this pattern, I am not sure if I will.
Materials Used:
– Less than a 4 oz/200 yard skein of Lily Sugar n Cream (affiliate link) (Worsted Weight Cotton) in the Robin’s Egg colorway
– 3.75mm Crochet Hook (as recommended)
– 4.5mm Crochet Hook (for Straps and Ties)
– #18 Tapestry Needle for Weaving in Ends
– Creme dela Creme Festival Top, Paid Crochet Pattern by Erena Crochet Studio (Etsy)
Material Notes:
Listed is the yarn that the sample is worked in, and does not specify if worsted weight, but based on myself working this project, I am providing yardage and weight.
Yarn Alternatives: Hobby Lobby’s Crafters Secret (not I Love This Cotton), Peaches n Cream, Bernat’s Handicrafter, Lion Brand’s Kitchen Cotton
Time Spent:
I had my top ready in just over two hours.
Measurements:
Pattern includes three sizes, but no specifications on sizes. I worked the second assuming it was a Medium/B Cup, and my top did come out a little large in the upper cup area.
Pattern Notes:
There aren’t any size measurements – such as Medium Size fits a 36″ bust. There also isn’t any gauge provided. My top ended up being too large for me, and if I worked another top, I would do so in a smaller hook size, or perhaps even work up the small size.
The pattern contains beginning instructions for the three sizes, but does not have written instructions for the remaining pattern for all three, only seems to be the medium size.
Medium Size should be chain 18 for 14 dc plus turning chain for the 15th.
-Based on this, I think XS/S should be chain 10 plus 5 = 15, and L should be chain 17 plus 5 = 22.; I also think that it should be said that the extra stitch in the beginning is intention as you will be working into the loop that is created.
R2 should be 12dc (not 13 since beginning chain counts as 1) in next 12 stitches… and I think opposite side of foundation chain is a better phrase to use – “12dc in next 12 stitches, in 14 stitch 2dc, in loop of chain 5 make (1dc, 1tr, 1dc) to create the center of the cup, continue around to begin working on the opposite side of the foundation chain. In next stitch 2dc, and all dc across would be 12, 3ch and turn”
-Based on this, XS/S as 8dc, 2 in 9, center in 10… dc across would be 8; L as 15dc, 2 in 16, center in 17… dc across would be 15.
R3 should be 14dc (not 15 since beginning chain counts as 1) in next 14 stitches.
-Based on this, XS/S as 10dc in next 10 stitches; L as 17dc in next 17 stitches.
R4 should be 16dc (not 17 since beg ch counts as 1).
-Based on this, XS/S as 12 dc in next 12 stitches; L as 19 dc in next 19 stitches.
R5 should be 18dc in next 18 stitches (beg ch + is an increase, not decrease as written).
-Based on this, XS/S as 14 dc in next 14 stitches; L as 21 dc in next 21 stitches.
R6 repeat to the end of row, ENDING IN DC IN LAST TWO STITCH…
R8 … Skip 2nd (not 1st as 1st is ch 3), work 1dc in next stitch then 1dc in 1st stitch that you skipPED before. 1dc in next dc stitch from last row and 1dc IN THE SAME STITCH AS YOUR LAST STITCH WORKING ACROSS THE FRONT OF THE STITCH. (see chart for BORDER). CONTINUE AROUND WORKING IN EACH DC AT THE CENTER OF THE CUP AND ENDING WITH 1DC IN THE LAST STITCH. DO NOT CUT YARN BECAUSE YOU…as I explain above.
BEFORE BEGINNING REPEAT, WORK 2DC IN THE SAME STITCH AS THE LAST ONE WORKED TO CREATE A CORNER.
WORKING UNDER CUP, REPEAT 6TH ROW ACROSS ENDING WITH 2DC IN THE SAME STITCH AS THE TURNING CHAIN AT THE END. JOIN TO THE TOP OF THE TURNING CHAIN TO COMPLETE ROW. 3CH AND TURN.
1DC IN THE NEXT STITCH, REPEAT ROW 6, ENDING WITH 1DC IN THE EACH OF THE LAST THREE STITCHES OF THE ROW. 3CH AND TURN.
REPEAT 8TH ROWS.
FASTEN OFF AFTER REPEAT, WORK 2ND CUP AND FASTEN, THEN CONTINUE ONTO THE FOLLOWING CHART WORKING IT UNDER THE CUP.
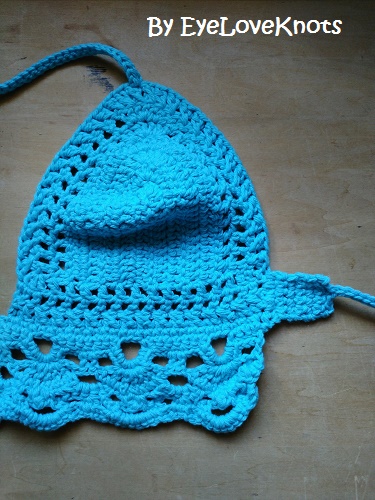
*Lacy Part Across Bottom – Taken from Chart:
R1: With RS facing and the bottom of the cup on the top, attach yarn to 1st DC on the right side, and work 1sc in each stitch across. (30sc)
R2: Ch 1, turn. SC in 1st st and next 3 sts, (ch 5, sk 2 sts, sc in next 8 sts) 5x, ch 5, sk 2 sts, sc in next 4 sts.
R3: Ch 1, turn. SC in 1st st, (ch 2, sk 2, SC in next stitch, work 7 SC into the ch 5 sp, SC in next st, ch 2, sk 2, SC 2) 5x, ch 2, sk 2, SC in next stitch, work 7 sc into the ch 5 sp, SC in next st, ch 2, sk 2, sc in last.
R4: Ch 3 [2] (counts as 1st dc) and turn. (sk 3 SC, DC in next SC, ch 1, DC in same SC, ch 1, DC in next SC, ch 1, DC in same SC, ch 1, DC in same SC, ch 1, DC in next SC, ch 1, DC in same SC, sk 3 SC, *DC into next 2 SC) 5x, sk 3 SC, DC in next SC, ch 1, DC in same SC, ch 1, DC in next SC, ch 1, DC in same SC, ch 1, DC in same SC, ch 1, DC in next SC, ch 1, DC in same SC, sk 3 SC, DC in last SC.
*DC in next two according to chart looks like would have to be a SC into next SC, ch 3, DC in next but it looks funny and doesn’t make sense. I worked it as written first with the extra chains in the beginning and end, but when I went back and worked R5, it looked bunched up so I redid R4 as I have written above.
R5: Ch 1, turn. SC in 1st, (ch 3, SC in each of the next 6 ch 1 sps) 6x, ch 3, SC in last st.
R6: Ch 1, turn. Sk 1st st, 2 SC in beg ch sp, (sk next SC, SC in next SC, ch 4, SC in next SC, tr in center of post from between previous and next SC, SC in next st, ch 4, SC in next SC, sk next SC, 3 SC into next ch sp) 5x, sk next SC, Sc in next SC, ch 4, SC in next SC, tr in center of post from between previous and next SC, SC in next st, xh 4, SC in next SC, sk next SC, 2 SC in end ch sp.
R7: Ch 3, turn. (SC in 3rd ch of ch 4 sp, ch 5, SC in 2nd ch of ch 4, ch 2, 2 SC in center st of previous SC 3, ch 2) 5x, SC in 3rd ch of ch 4 sp, ch 5, SC in 2nd ch of ch 4, ch 3, sl st in last st
R8: ch 1, turn. SC in 1st st, ch 2, (SC in next SC, 7 SC in ch 5 sp, SC in next SC, ch 2, SC in next two SC, ch 2) 5x, SC in next st, 7 SC in ch 5 sp, SC in next SC, ch 2, SC in last st.
Fasten off, even though chart continues. Looking at first image of page, can see it only has one row of the large shells. You can continue with the pattern if desired longer.
*Strap Instructions are Missing. I worked mine with a 4.5mm Hook as Follows:
Side 1 Flap: Attach yarn at bottom stitch of Row 9 (Repeat of Row 6) on the Right Side. Chain 1, SC in that stitch, and in next 4 stitches along DC side.
R2 – 6: Chain 1, turn. SC in 1st and across.
R7: Chain 1, turn. Slip Stitch in 2nd stitch. Chain 82, DC into 3rd chain from hook, 5 SC into the space between the chain and DC, join to the 1st SC, begin slip stitching down the chain through the back loops, and end with a slip stitch into the 3rd stitch of the foundation piece. Fasten Off.
Side 2 Flap: Reattach yarn at Row 1 of the lacy part on the Right Side. Chain 1, SC in that stitch, and in next 4 stitches along DC side.
R2 – 6: Chain 1, turn. SC in 1st and across.
R7: Chain 1, turn. Slip Stitch in 2nd and 3rd stitches. Chain 82, DC into 3rd chain from hook, 5 SC into the space between the chain and DC, join to the 1st SC, begin slip stitching down the chain through the back loops, and end with a slip stitch into the 4th stitch of the foundation piece. Fasten Off.
Top Straps – x 2: Attach yarn at cup point. Chain 82, DC into the 3rd chain from the hook, 5 SC into the space between the chain and DC, join to the 1st SC, begin slip stitching down the chain through the back loops, and end with a slip stitch into the 4th stitch of the foundation piece. Fasten Off.
I omitted the center strap because the stitches to thread through were more of a challenge, and center strap seemed to just be for decoration as top fit and stayed up without it.
Listing is misleading as there was no video link to access.
Join the EyeLoveKnots Crafting Community to share your creations, and see what other’s are up to!
Don’t miss out on new crochet patterns, reviews, jewelry tutorials and more! Subscribe to EyeLoveKnots by using the box on the right side toolbar, or follow me via Bloglovin! You can also find me sharing on the EyeLoveKnots Facebook page, and @EyeLoveKnots on Twitter!
Great color! Too bad that the designer didn't care to improve her pattern, maybe she had other things on her mind.
Nevertheless, you did a great job. Could be something for my daughter to maken when she is a little bit older ( because I don't see myself in this… I've got a 'few' ponds too much…) 🙂
Have a nice day, Sigrid