Learn how to crochet the Lucille Top, an easy, lightweight top worked in a lacy stitch pattern featuring cute, puffy cluster stitches and a boatneck neckline.
This post contains affiliate links for Amazon. If you make a purchase by clicking on them, I make a small commission at no extra cost to you. Thanks for your support!
Find the free crochet pattern instructions below, or purchase a printer-friendly, ad-free PDF on Ravelry by clicking here.
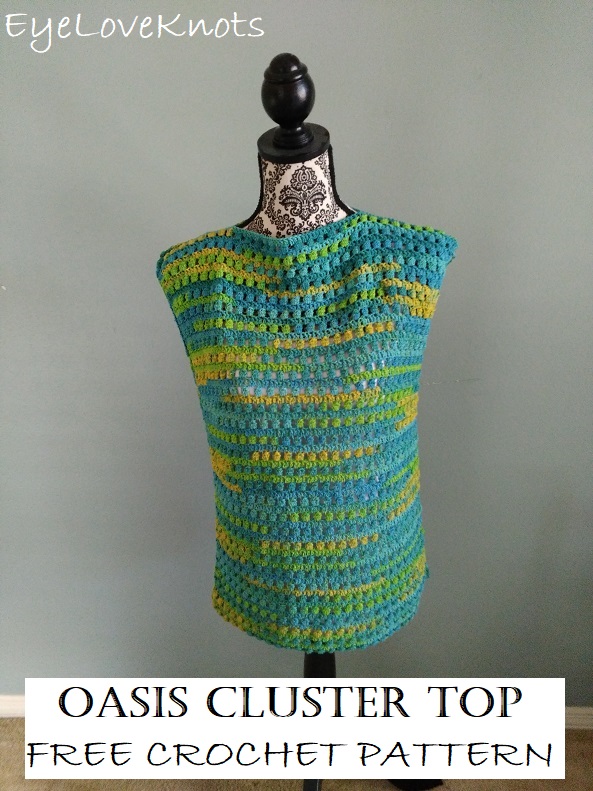
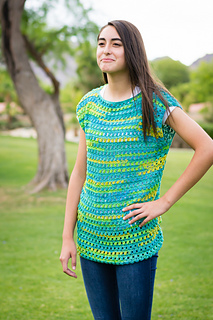
This top was first published in the Happily Hooked Magazine, Issue 27 for June 2016, which features Summer Vacation makes. I wanted to create a lightweight, kinda open top that could be worn as a cover up, or over a white tank top paired with some white shorts — oops, speaking from my own wardrobe, hehe! This top features a super easy construction and assembly, and allows the freedom of adjusting the straps/shoulder length, and overall length to give you a custom fit that you’ll love!
March 2026 Update:
This top was originally named the Oasis Cluster Top, but following it’s stitch pattern, I’ve renamed it the Lucille Top as part of my Lucille series.
I’ve also added some new sizes to range now from Extra Small to 5X, two other lengths so you can choose your favorite: cropped, hip length or tunic length, and the biggest change, besides the yarn, is the neckline.
I have kept the original boatneck style, but I’ve reworked it to fit better. Before, this top was simply two identical rectangles sewn together at the shoulders leaving the neck hole open, but really, you have to have a little shaping at the shoulders for a good fit, especially in the larger sizes or if you have a larger bust, so I never wore my original top because of this. Shame because the Wool Free Sock Yarn was really spectacular made of a springy, viscose blend. Sadly, this yarn has been discontinued.
If you do decide to work the original version, you may want to block your top to relax the yarn so it will lay better. If you go up a size, adding positive ease, or creating a slightly larger neck opening, it should also drape a little better. All in all, you just want to keep your neck opening 9″ – 11″ to maintain the style..
I was asked by Emily of Crochet Aweigh if she could feature this top at her yarn shop worked in her exclusive yarn, the Dora Canal in the Platinum Blonde Superwash Sock Yarn by Dizzy Blonde Studios, for the 2026 Orange Blossom Yarn Crawl, which spans 8 yarn shops on Central Florida. Could not be more honored that she asked! And it was the perfect opportunity for an update.
Now, I’ve decided to keep the original instructions up in this post as well, which would be better for yarns similar to the original, Premier Yarn Wool Free Sock, which leans more to a sport weight thickness and slightly heavier fabric from a similar fiber content of viscose and acrylic, perhaps like HiKoo Cobasi.
The new instructions are great for lighter wool and wool blend yarns, like most sock weight yarns, like the Berroco Vintage Sock I’ve used and the Platinum Blonde Superwash Sock Yarn Emily has used.
So this is a two-in-one pattern. Make sure to find the heading appropriate to your choice of yarn to follow those instructions.
If you would like to purchase PDF version of this post, you may get one through either my Etsy Shop or my Ravelry Shop for a small fee. This fee is to compensate for the views lost when you no longer need to return to the blog to for the information, as you will have your own copy. Plus! It helps fund supplies for new projects to share with you!
Shop Etsy: Oasis Cluster Top.
Are you a Raveler? Share your version of this project on Ravelry – Oasis Cluster Top.
BERROCO VINTAGE SOCK YARN VERSION
Materials:
- Fingering Weight #1 Yarn
- F5/3.75mm Crochet Hook
- Tapestry Needle
- Soft Tape Measure (essential for Gauge)
- Optional, Stitch Markers
Material Notes:
Yardage: The following list is separated by size, and each size contains 3 yardages for Crop Length (Hip Length, Tunic Length). These yardages are for short sleeves, so if you add sleeve length, it will require more yarn.
- XS: 641 (722, 917)
- S: 746 (841, 1067)
- M: 870 (933, 1183)
- L: 978 (1002, 1284)
- XL: 1061 (1087, 1392)
- 2X: 1231 (1203, 1541)
- 3X: 1318 (1288, 1649)
- 4X: 1431 (1333, 1726)
- 5X: 1591 (1418, 1834)
There are lots of great alternative yarn options. Direct alternatives are going to be wool and wool blend yarns, but with a 0 ease, you could easily sub out for other yarns as well, such as a nylon yarn, viscose blend, linen blend or cotton blend – you’ll just want to stay away from a 100% cotton and 100% linen as they do not stretch and hold their shape the same way.
We have lots of great crochet hooks in our Yarn Crafts and Coffee Yarn Shop. The most popular, and preferred by Candace and Emily, are the Clover Amour Crochet Hooks with the soft handles and smooth metal hook. Alexandra prefers metal crochet hooks with large, ergonomic clay handles and just loves the fun designs from SiennasBowtique and BronzeShepherdStudio! If your preference is wood, the LYKKE brand are lovely, smooth and sturdy.
Stitch Markers are really helpful to use for keeping track of rows and stitches, but also to aid in keeping the rows lined up when it’s time to seam up the top. Plastic Locking Stitch Markers and Lobster Clasp Stitch Markers are probably the most common for purchased stitch markers, but I also love to use Lever Back Stitch Markers as they are a lot easier on the fingers than the lobster clasp and slightly larger to grab the stitch better. Scrap yarn, paper clips and safety pins work too!
Measurements:
I am providing ALL of the measurements here as a handy reference, but I will also include the respective measurements throughout the pattern as check points.
Sizes Included: XS, S, M, L, XL, 2X 3X, 4X, 5X
To Fit Bust Size: 28″, 32″, 36″, 40″, 44″, 48″, 52″, 56″, 60″
Ease refers to the fit. In this case, I’ve designed this top with 0 ease so it is made to the same measurements as your bust, as I don’t like oversized garments. The difference between each size is 4″ so if you prefer something more fitted, go down a size, and if you prefer something more oversize, go up a size. Note: You may still want to follow the row count for the Underarm section and width instruction of the neckline for your bust size for a more comfortable and flattering fit.
Finished Panel Width (Not Including Arms; 0″ Ease):
- XS: 14″
- S: 16 3/8″
- M: 18 1/8″
- L: 20 3/8″
- XL: 22 1/8″
- 2X: 24 3/8″
- 3X: 26 1/8″
- 4X: 28 3/8″
- 5X: 30 1/8″
Bottom Border, All Sizes: 1″
Body Length includes the Bottom Border and goes up to, but does not include, the Underarm:
Body Length, Crop Length:
- XS, S, M: 9 5/8″
- L, XL, 2X: 8 3/4″
- 3X, 4X, 5X: 7 7/8″
Body Length, Hip Length:
- XS, S, M, L: 15 5/8″
- XL, 2X: 14 3/4″
- 3X, 4X, 5X: 13 7/8″
Body Length, Tunic Length:
- XS, S, M: 20 3/4″
- L, XL, 2X: 19 7/8″
- 3X, 4X, 5X: 19″
The Underarm Depth is for the Front Panel. The Back Panel is 7/8″ taller to account for the shoulder:
Underarm Depth:
- XS, S: 6 1/2″
- M: 7 1/4″
- L, XL: 8 1/8″
- 2X, 3X: 9″
- 4X: 9 7/8″
- 5X: 10 3/4″
Front Panel Total Length includes the Bottom Border, the Body Length and the Underarm, which ends at the top of the shoulder:
Total Length, Crop Length:
- XS, S: 17″
- M, L, XL: 17 7/8″
- 2X, 3X, 4X: 18 3/4″
- 5X: 19 5/8″
Total Length, Hip Length:
- XS, S: 23″
- M, L, XL: 23 7/8″
- 2X, 3X, 4X: 24 3/4″
- 5X: 25 5/8″
Total Length, Tunic Length:
- XS, S: 28 1/4″
- M, L, XL: 29 1/8″
- 2X, 3X, 4X: 30″
- 5X: 30 3/4″
The Back Panel Total Length is about 1″ taller than the Front Panel to account for shoulder.
The Neck Opening is measured after adding the two rounds of the inner border, which adds 1/2″ to each side or 1″ in total. Note: these measurements are smaller than the original measurements you’ll have when marking out the neckline:
- XS, S & M: 7 1/4″
- L, XL, 2X: 9″
- 3X, 4X, 5X: 9 3/4″
Bottom Border, All Sizes: 1″
Gauge (Essential):
In Pattern, 21 DC by 9 Rows (Double Crochet to Double Crochet) = 4″
Gauge it very important for garments. If you do not meet gauge, and continue making your top, the finished size will either be too small or too big so make sure to stop and check it. If you’re measuring smaller than the given measurements, go up a crochet hook size, and if you’re measuring larger, go down a crochet hook size. Rework the sample, take gauge again, and see where you are.
To work a gauge swatch, I recommend starting with a foundation double crochet (FDC) of at least 35, and then working in pattern.
The width gauge is the most important to meet. The height can always be adjusted later by working more or less repeats. If you cannot meet gauge, even with trying to go up or down hook sizes, then use your gauge swatch to determine how many stitches you’ll need to work to meet my provided measurements. Make sure to also follow the stitch multiple found in the Pattern Notes section.
Abbreviations (US Terms):
- FDC – Foundation Double Crochet
- DC – Double Crochet (Photo Tutorial)
- BLO – Back Loop Only (Photo Tutorial)
- SC – Single Crochet (Photo Tutorial)
Special Stitches:
How to Crochet the Foundation Double Crochet: Chain 3 (counts as a stitch here). Yarn over, insert hook into the first chain, yarn over, pull through, yarn over, pull through first loop (to create foundation chain), (yarn over, pull through two loops on hook) 2x. First chain and DC created. Looking at the stitch in your hand, you should see the top of the DC to the right, and parallel on the left side, it should look like the opposite side of the beginning foundation chain. You will be working in these stitches on the left. To create the next stitch and each stitch after, yarn over, insert hook under both loops of the foundation chain (left side) yarn over, pull through, yarn over, pull through first loop, (yarn over, pull through 2) 2x.
How to Crochet a Cluster: work the following all into one stitch: Yarn over, insert hook into the stitch, yarn over and pull through, yarn over and pull through 2 loops (2 loops on hook), [yarn over, insert hook into the same stitch, yarn over and pull through, yarn over and pull through 2 loops] (3 loops on hook), repeat […] (4 loops on hook), repeat […] (5 loops on hook), yarn over, pull through all 5 loops on the hook.
How to Crochet a Cluster Decrease: Yarn over, insert hook into the first stitch, yarn over and pull through, yarn over and pull through 2 loops (2 loops on hook), (yarn over, insert hook into the same stitch, yarn over and pull through, yarn over and pull through 2 loops) 2x. Skip 2 stitches. Yarn over, insert hook into the next stitch aka the last DC, yarn over and pull through, yarn over and pull through 2 loops (5 loops on hook). Yarn over and pull through all 5 loops.
How to Crochet an Invisible Double Crochet Decrease: Yarn over, insert hook into the FLO, roll hook forward and insert into the top chain of the last stitch. Yarn over and pull through both loops. (Yarn over and pull through 2 loops) 2x.
How to Half Double Crochet Decrease: Yarn over, insert hook into the first stitch, yarn over and pull through, yarn over and pull through 2 loops. Yarn over, insert hook into the next stitch, yarn over and pull through, yarn over and pull through all 4 loops.
Pattern Notes:
The stitch multiple is important if you need to adjust the number of beginning chains either to get a custom width for your panel, if you have trouble meeting gauge or want to use a different yarn weight.
The stitch multiple starting with the Foundation Double Crochet is 3 + 2 — this means a number that is divisible by 3, and then add 2 to account for the last chain space.
A foundation double crochet (or FDC) is recommended for beginning as a beginning chain can limit the amount of stretch on a finished project, and here we don’t want that beginning chain to feel too tight or restrictive as we put it on or while wearing. Alternatively, you can use one size larger crochet hook, and work a beginning chain of the number of stitches, then slip stitch join. Switch to the correct crochet hook, and work a round of double crochet (the larger hook is to add more flexibility).
If you prefer to work with a traditional chain instead, the foundation chain multiple is 3 + 4 — this means a number divisible by 3, and then add 4 to account for the turning chain. Since the Foundation Double Crochet is equal to the beginning chain plus Row 1, you’ll want to Double Crochet into the 4th chain from the hook and into each stitch across.
The beginning chain 3 of the Foundation Double Crochet and the beginning chain 2 of each row count as a double crochet.
When working into the chain space that’s before a cluster stitch, I recommend working one double crochet into the space as normal, and then one double crochet into the second chain – it’s very easy to spot. When working into a chain space that is before a 3-double crochet section, work both double crochets into the chain space.
If you would like to adjust the height of your top, you can easily add or subtract repeats. If you’re adjusting the body length, end after a cluster stitch row. If you are adjusting the Underarm section, end after a row of double crochet stitches.
This top features a boatneck style neckline, but you can easily change the neckline to your preferred one.
I’ve joined my panels using a join as you go technique along the shoulders and slip stitches along the sides of the body, but feel free to replace these with your favorite joining method/s, such as mattress stitch, whipstitch, etc.
I’ve chosen one of my favorite borders, single crochet in the back loop only. The border is 1″ along the bottom and added to the armholes to finish the sleeve, and 1/2″ along the inner neck opening. You can easily replace this border with your preferred one or omit all together. If you remove the bottom border, you’ll want to add another repeat to the body of the top so the total height is about the same.
If you would like to see instructions for a particular neckline, joining method or border, please comment below to let me know!
Crochet Pattern using Berroco Vintage Sock – Make 2, a Front and a Back Panel:
Chain 3. FDC 73 (85, 94, 106, 115, 127, 136, 148, 157). [74 (86, 95, 107, 116, 128, 137, 149, 158) DC]
Row 2: Chain 2, turn. DC into the 2nd and 3rd stitches, chain 2, skip the next 2 stitches, (cluster stitch in the next stitch, chain 2, skip the next 2 stitches) across, DC in each of the last 3 stitches.
Row 3: Chain 2, turn. DC into the 2nd stitch and each stitch across.
Note: You can measure the width of the panel after working at least 9 rows to see if it is measuring correctly.
You don’t want to measure too early as it takes several rows for the width measurement to come together. Also, don’t wait too long to check the width just in case you need to make adjustments.
After Row 9, the body width should measure:
- XS: 14″
- S: 16 3/8″
- M: 18 1/8″
- L: 20 3/8″
- XL: 22 1/8″
- 2X: 24 3/8″
- 3X: 26 1/8″
- 4X: 28 3/8″
- 5X: 30 1/8″
Note: If the width is too large, you’ll have to restart, but if it’s too small and you don’t want to restart, you could always add a border at the end along the sides before joining or block your final piece.
Now, continue on following the instructions for your chosen Body Length.
Crop Body Length:
Rows 4 – 22 (22, 22, 20, 20, 20, 20, 18, 18): Repeat Rows 2 – 3, ending after a Row 2.
Place stitch markers at the beginning and end of the final row for reference later as we’ve just completed the body up to where the Underarm will begin, and we will be seaming up the side to this point. Also, for a more simplified written pattern, the Underarm section will begin at Row 1, even though it continues on with the same pattern as the Body Length, so the stitch marker will provide the visual separation.
The body height should currently measure:
- XS, S, M: 9 5/8″
- L, XL, 2X, 3X: 8 3/4″
- 4X, 5X: 7 7/8″
You can hold the panel up to your Underarm to check the length. If you would like to add length, you can do so now by adding more repeats. Alternatively, you can work less repeats to make this section shorter. Keep in mind, we will add a 1″ border to the bottom.
Proceed to the Underarm section.
Hip Body Length:
Rows 4 – 36 (36, 36, 36, 34, 34, 32, 32, 32): Repeat Rows 2 – 3, ending after a Row 2.
Place stitch markers at the beginning and end of the final row for reference later as we’ve just completed the body up to where the Underarm will begin, and we will be seaming up the side to this point. Also, for a more simplified written pattern, the Underarm section will begin at Row 1, even though it continues on with the same pattern as the Body Length, so the stitch marker will provide the visual separation.
The body should currently measure:
- XS, S, M, L: 15 5/8″
- XL, 2X, 3X: 14 3/4″
- 4X, 5X: 13 7/8″
You can hold the panel up to your Underarm to check the length. If you would like to add length, you can do so now by adding more repeats. Alternatively, you can work less repeats to make this section shorter. Keep in mind, we will add a 1″ border to the bottom.
Proceed to the Underarm section.
Tunic Body Length:
Rows 4 – 48 (48, 48, 46, 46, 46, 44, 44, 44): Repeat Rows 2 – 3, ending after a Row 2.
Place stitch markers at the beginning and end of the final row for reference later as we’ve just completed the body up to where the Underarm will begin, and we will be seaming up the side to this point. Also, for a more simplified written pattern, the Underarm section will begin at Row 1, even though it continues on with the same pattern as the Body Length, so the stitch marker will provide the visual separation.
The body should currently measure:
- XS, S, M: 20 3/4″
- L, XL, 2X, 3X: 19 7/8″
- 4X, 5X: 19″
You can hold the panel up to your Underarm to check the length. If you would like to add length, you can do so now by adding more repeats. Alternatively, you can work less repeats to make this section shorter. Keep in mind, we will add a 1″ border to the bottom.
Proceed to the Underarm section.
Begin Underarm:
Row 1: Chain 2, turn. DC into the 2nd stitch and each stitch across.
Row 2: Chain 2, turn. DC into the 2nd and 3rd stitches, chain 2, skip the next 2 stitches, (cluster stitch in the next stitch, chain 2, skip the next 2 stitches) across, DC in each of the last 3 stitches.
Rows 3 – 9 (9, 11, 13, 13, 15, 15, 17, 19): Repeat Rows 1 – 2, ending after a Row 1.
This section adds the following to the Length:
- XS, S: 3 7/8″
- M: 4 3/4″
- L, XL: 5 5/8″
- 2X, 3X: 6 1/2″
- 4X: 7 1/4″
- 5X: 8 1/8″
Now, it’s time to mark the neckline and separate for the shoulders. Proceed to the Neckline section.
Neckline:
Mark the top center of the panel with a stitch marker. You can count your stitches to find the center stitch or fold the panel in half vertically with the middle fold on the right, line up the clusters and you will see 1 cluster halved at the middle point.
From the double crochet that is over the cluster, count over to the left (into a double crochet that is over a cluster) and place another stitch marker in the following stitches:
- XS, S: 21 aka 4 1/4″ from the center
- M, L, XL, 2X: 24 aka 4 7/8″
- 3X, 4X, 5X: 27 aka 5 1/2″
Match this on the other side, then proceed to the Right Shoulder, which will actually be on the left side of the panel as you work.
Right Shoulder:
Chain 2, turn. DC into the 2nd and 3rd stitches, chain 2, skip the next 2 stitches, (cluster stitch in the next stitch, chain 2, skip the next 2 stitches) over to the stitch marker, then work a Cluster Decrease.
Row 2: Chain 2, turn. DC into the 2nd stitch and each stitch across.
Row 3: Chain 2, turn. DC into the 2nd and 3rd stitches, chain 2, skip the next 2 stitches, (cluster stitch in the next stitch, chain 2, skip the next 2 stitches) across to the last 4 stitches, DC into each of the next 2 stitches, then Invisible Double Crochet Decrease.
Row 4: Chain 2, turn. DC into the 2nd stitch and each stitch across.
Row 5: DC into the 2nd and 3rd stitches, chain 2, skip the next 2 stitches, (cluster stitch in the next stitch, chain 2, skip the next 2 stitches) across, DC in each of the last 3 stitches.
Row 6: Chain 2, turn. DC into the 2nd stitch and each stitch across.
Stop here for the front panel, and fasten off. For the back panel, continue working two more rows.
Row 7: DC into the 2nd and 3rd stitches, chain 2, skip the next 2 stitches, (cluster stitch in the next stitch, chain 2, skip the next 2 stitches) across, DC in each of the last 3 stitches.
Row 8: Chain 2, turn. DC into the 2nd stitch and each stitch across.
Fasten off.
Left Shoulder:
With the wrong side of the fabric facing up, attach the yarn in the 6th stitch to the right of the left side stitch marker. Chain 2. Skip the next 2 stitches. Yarn over, insert hook into the next stitch, yarn over and pull through, yarn over and pull through 2 loops, (yarn over, insert hook into the same stitch, yarn over and pull through, yarn over and pull through 2 loops) 3x so they’re 5 loops on the hook. Yarn over and pull through all 5 loops. Chain 2, skip the next 2 stitches, (cluster stitch in the next stitch [note: 1st cluster is in the same stitch as the marker], chain 2, skip the next 2 stitches) across, then DC into each of the next 3 stitches.
Row 2: Chain 2, turn. DC across over to the last two stitches, then HDC2tog over the final cluster and chain 2 so it’s equal in stitches to the other side.
Row 3: Chain 2, turn. Invisible double crochet decrease over the 2nd and 3rd stitches, DC into the next stitch, chain 2, skip the next 2 stitches, (cluster stitch in the next stitch, chain 2, skip the next 2 stitches) across, DC into each of the last 3 stitches.
Row 4: Chain 2, turn. DC into the 2nd stitch and each stitch across.
Row 5: DC into the 2nd and 3rd stitches, chain 2, skip the next 2 stitches, (cluster stitch in the next stitch, chain 2, skip the next 2 stitches) across, DC in each of the last 3 stitches.
Row 6: Chain 2, turn. DC into the 2nd stitch and each stitch across.
Stop here for the front panel, and fasten off. For the back panel, continue working two more rows.
Row 7: DC into the 2nd and 3rd stitches, chain 2, skip the next 2 stitches, (cluster stitch in the next stitch, chain 2, skip the next 2 stitches) across, DC in each of the last 3 stitches.
Row 8: Chain 2, turn. DC into the 2nd stitch and each stitch across.
Fasten off.
Assembly:
Lay down one panel with the right side facing up. Lay the other panel down on top with the wrong side facing up this time.
Working through both layers, seam up each side from the bottom of Row 1 up to the stitch markers that were added after the Body so the Underarm section remains unworked.
Now, also working through both layers, seam up each shoulder across the top of the panels leaving the neck opening unworked.
Turn the top to the right side facing out.
Bottom Border:
In the Bottom Border, we will work into the back loop only beginning in Round 2, and working each round in a continuous manner without joining at the end. After working the last stitch of the round, simply work the first one of the next round into the very next stitch. It is very easy to lose track of your stitches without a join so I highly recommend placing a stitch marker into the first stitch, and moving it up with each row.
The Bottom Border is optional, and adds 1″ to the length. Add or subtract repeats if needed or as desired. You can easily change the border to another stitch, such as post stitches to achieve a ribbed pattern, and work to your desired length.
If you are a tight crocheter, you may want to go up a hook size for this border as it needs to comfortably stretch and fit over and around the hips.
Rotate the top so you can work along the opposite side of the foundation chain. Attach yarn in any stitch.
Chain 1. SC into this first stitch and each stitch around, but do not join.
Rounds 2 – 3: In the BLO, SC into each stitch around, but do not join.
Round 4: In the BLO, SC into each stitch around. In both loops as usual, slip stitch join to the first SC.
Fasten off.
Inner Neck Border:
Attach yarn in any stitch.
Chain 1. Evenly SC into this first stitch and each stitch around, including the shoulder seams. Slip stitch join to the first SC.
Round 2: In the BLO, SC into each stitch around. In both loops as usual, slip stitch join to the first SC.
Fasten off.
Sleeve Border – Work 2:
In the Sleeve Border, we will work into the back loop only beginning in Round 2, and working each round in a continuous manner without joining at the end. After working the last stitch of the round, simply work the first one of the next round into the very next stitch. It is very easy to lose track of your stitches without a join so I highly recommend placing a stitch marker into the first stitch, and moving it up with each row.
The Sleeve Border is optional, and adds 1″ to the width. Add or subtract repeats if needed or as desired. You can easily change the border to another stitch, such as post stitches to achieve a ribbed pattern, and work to your desired length.
The sleeve will fit loosely. If a tighter sleeve border is desired, evenly work in some decreases.
If a different sleeve length is desired, attach yarn in any stitch and work in the established stitch pattern starting by evenly double crocheting around with a slip stitch join to the top of the beginning chain followed by a round of the lacy puff stitch. You may need to increase or decrease in Round 1 to reach the stitch multiple, which can either be 3 + 5, as the top panels with 3 double crochets worked as decorative stitches, or a multiple of 3 with a modified puff stitch to begin the round.
Attach yarn in any stitch.
Chain 1. SC into this first stitch and each stitch around, but do not join.
Rounds 2 – 3: In the BLO, SC into each stitch around, but do not join.
Round 4: In the BLO, SC into each stitch around. In both loops as usual, slip stitch join to the first SC.
Fasten off.
Finishing:
Weave in all ends.
PREMIER YARNS WOOL FREE SOCK YARN VERSION
Materials:
- 1175 – 1645 Yards of #1 Fine Weight Yarn – I used Premier’s Wool Free Sock Yarn in the Oasis Stripe colorway
- H8/5mm Crochet Hook
- Tapestry Needle
- Soft Tape Measure (essential for Gauge)
Material Notes:
I picked this yarn because it has the viscose in it. I wanted something that was really durable and comfortable plus lightweight so that it would make an excellent Summer top or beach cover up. Sadly, it’s been discontinued. I would say a close yarn alternative might be HiKoo’s CoBaSi or Berroco’s Modern Cotton DK, even though these yarns aren’t labeled as fingering weights.
We have lots of great crochet hooks in our Yarn Crafts and Coffee Yarn Shop. The most popular, and preferred by Candace and Emily, are the Clover Amour Crochet Hooks with the soft handles and smooth metal hook. Alexandra prefers metal crochet hooks with large, ergonomic clay handles and just loves the fun designs from SiennasBowtique and BronzeShepherdStudio! If your preference is wood, the LYKKE brand are lovely, smooth and sturdy.
Time Spent:
I worked the medium size in several seatings, putting in about 14 hours.
Sizes Available:
Teen/Women XS, S, M, L, XL
Finished Measurements:
Busts: 28”, 32”, 36”, 40”, 44”
Lengths: 21 3/8”, 22 1/8”, 22 7/8”, 23 5/8”, 24 3/8”
Gauge:
20 DC = 4″ Wide
Abbreviations:
- DC – Double Crochet
- dc4tog cl – Double Crochet Four Stitches Together in the SAME Stitch to Equal a Cluster
To dc4tog cl: work the following all into one stitch: Yarn over, insert hook into the stitch, yarn over, pull through (3 loops on hook), yarn over, pull through two loops on hook, yarn over, insert hook into the same stitch, yarn over, pull through (4 loops on hook), yarn over, pull through two loops on hook, yarn over, insert hook into the same stitch, yarn over, pull through (5 loops on hook), yarn over, pull through two loops on hook, yarn over, insert hook into the same stitch, yarn over, pull through (6 loops on hook), yarn over, pull through two loops on hook, yarn over, pull through all 5 loops on the hook.
Pattern Notes:
Beginning chain counts towards final stitch count.
Each dc4tog cl counts as one stitch. Top is designed to fit a little oversized given yarn type used.
Instructions for smallest size given, with larger options in brackets.
I chose to slip stitch the pieces together as I think this creates a strong bond, however, you may feel more comfortable sewing the pieces together. If you choose to sew the pieces, you may want to use stitch markers.
As far as the shoulder/neck opening part goes, you can create thinner straps and a larger, more flexible neck opening by slip stitching through less stitches. You may want to slip stitch through this part, and then try on before fastening off so you can adjust as desired. And for the length, you can work less repeats for a shorter top.
Pattern:
Main Body – Make 2:
Chain 73, (82, 94, 100, 112). DC in the 4th chain, and each chain across. (71, 80, 92, 98, 110 DCs)
Round 2: Chain 2, turn. DC in the 2nd and 3rd stitches, chain 2, skip 2 stitches, (dc4tog cl in the next stitch, chain 2, skip 2 stitches) 21x (24x, 28x, 30x, 34x), DC in the last 3 stitches. (21, 24, 28, 30, 34 clusters and 6 DCs)
Rounds 3: Chain 2, turn. DC into the 2nd stitch, and each stitch across. (71, 80, 92, 98, 110 DCs)
Round 4 – 57 [59, 61, 63, 65]: Repeat Rows 2 and 3. Fasten Off as usual after first piece, but do not fasten off after second piece.
Shoulders/Neck Opening:
Chain 1, turn. Lay the piece together with right sides facing. Working through both layers, slip stitch in the 1st 18, (21, 26, 28, 34) stitches;
Working through just the top layer, slip stitch into the next 35, (38, 40, 42, 42) stitches;
Working through both layers, slip stitch in the last 18, (21, 26, 28, 34) stitches.
Fasten Off.
Sides:
Still working on wrong side, leave 7”, (7½”, 8”, 8½”, 9”) unsewn for armholes. Reattach yarn through both layers afterwards, and slip stitch across to end of top. Repeat on other side.
Fasten Off, and weave in all ends.
Please feel free to make and sell your own Cluster Top using this pattern, but please DO NOT claim this pattern as your own nor should you sell my pattern, and DO NOT re-publish my photos as your own. DO NOT copy and paste my pattern anywhere, link to it instead.
Join the EyeLoveKnots Crafting Community on Facebook to share your creations, and see what others are up to!
Linked Up To…
The Blended Blog Link Up – Living on Cloud Nine
Turning Heads Linkup – Elegantly Dressed and Stylish
The Style File – Lady in Violet
Also (while I was on vacation, July 2019) was shared to Monday through Saturday parties on my Linked Up To… page.
Very cute top!
Thanks, Michelle!
So pretty! I love all those colors mixed together!
Thank you for sharing at The Really Crafty Link Party. Pinned.
Yes, they definitely are an excellent color combo, especially for Summer.
Thank you for such a wonderful pattern. It is really hot where I live it is in the middle of Southern California. I really enjoy all your patterns easy and helpful and well written. Thank you for adding the OASIS CLUSTER TOP to Nicki’s SPLASH into SUMMER! Amanda
I can relate to the heat (from Florida). This is an excellent top for warm weather. The yarn is lightweight and contains Viscose (Berroco’s Modern Cotton DK is a cotton/acrylic blend which is also excellent).
So glad you enjoy my patterns 🙂 Makes me so happy to hear!
Thank you for the pattern very nice top and I just love your blog!
Glad you like it! Thank you for dropping me a line 🙂 Enjoy!
Would it be difficult to add sleeves to this pattern?
Not at all! I would attach my yarn right in the underarm seam, and then work around and join, and continue making rounds until it was the length I was looking for. If you would like it to match the stitch pattern of the top, I would start with a round of double crochet first, and make it a multiple of 3, then work in pattern.