This is a crochet pattern review of the Topaz Tee from designer Two of Wands. Review done by A Stitch Shy of Normal for EyeLoveKnots.
This post contains affiliate links for Lion Brand Yarn and WeCrochet. If you make a purchase by clicking on them, I make a small commission at no extra cost to you. Thanks for your support!
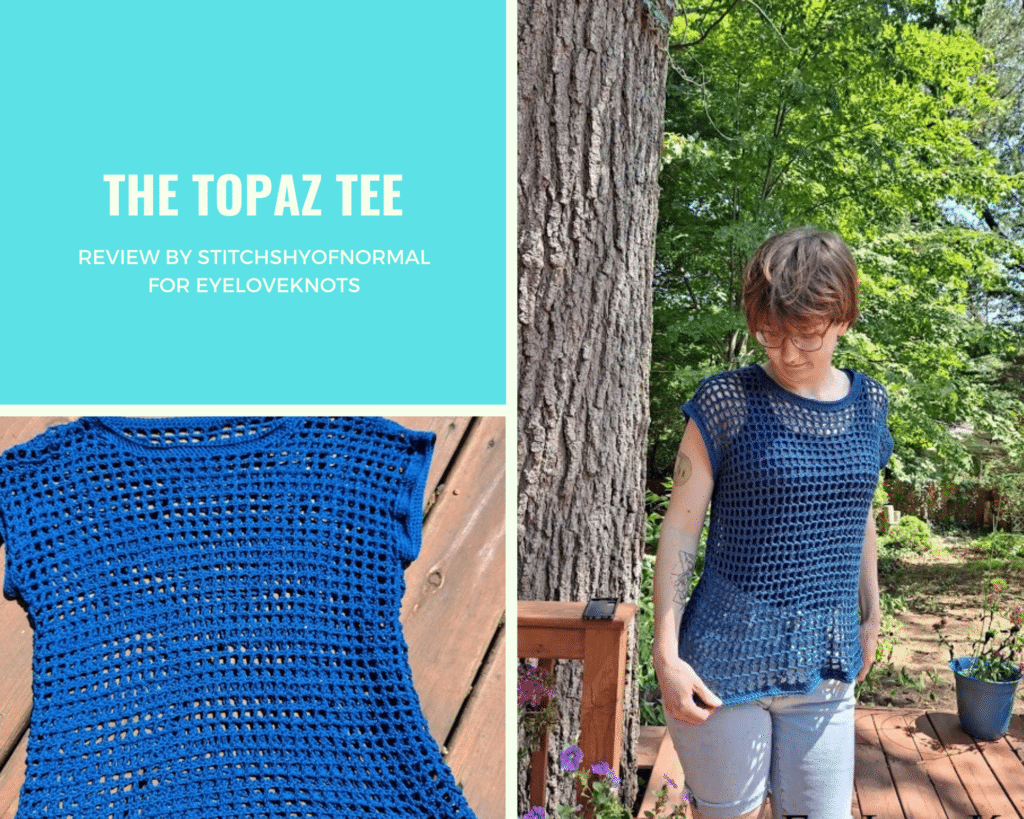
It’s me, Abigail with A Stitch Shy of Normal.
Visit with me on Instagram @astitchshyofnormal for all kinds of awesome crochet makes and inspiration.
I’m going to be honest, doing a review of a pattern from Two of Wands two months in a row was not my intention. I actually try to mix it up and try new designers before I revisit old favorites (at least for the projects I choose for these reviews, that is), but this one was totally unintentional.
This time, I didn’t have a specific pattern already listed in my Ravelry queue for July. I have a list on there, but at the moment it’s mostly home items (which I’ve made enough of lately) and several fall items. So I went browsing, and spotted the Topaz Tee from the recent Two of Wands pattern collection! She did a partnership with Lion Brand Yarn to release eight themed patterns called The Polished Collection (some are knit, some are crochet) that all had so much love and care put into the design. As soon as it dropped, I snapped up one of the kits. It turns out the kit I actually bought was (I think) the Quartz Pullover, but the pattern didn’t send with my yarn. I figured it would come later, set the yarn aside, and forgot about it.
Then when I was considering this review, I figured it would be fun to make that top! I then totally forgot which pattern it was for, went on the designer’s Ravelry page, and spotted the Topaz Tee. I remembered that it had been a top pattern, and I remembered that it was with Coboo (because that’s the yarn I received), so that seemed right to me! I bought the pattern and got to work. I’ll consider that serendipity, because I absolutely love this top. Of course I would have loved the other pattern too, but I’ll try that out another time. Maybe that’ll be one of my fall reviews! (I’ll try to mix it up and pick a different designer for August, though.)
Materials I Used to Make my Top:
- Lion Brand Coboo in Steel Blue, about 2.5 cakes (roughly 580-600 yards)
- H8/5mm hook (which is a size up from the suggested G6/4mm) – I personally like Clover Amour Ergonomic Hooks
- The Topaz Tee pattern, a paid pattern available through Two of Wands and also Lion Brand Yarn as a kit
- Scissors/needle for assembly
Material Notes:
This pattern was written with Coboo yarn so I wasn’t surprised when it worked perfectly. Every time I make something with Coboo I get nervous at first. It splits easily, and seems like it won’t be very sturdy. But as long as I stick with it, I always love the finished result! This project was no exception, this tee is so comfy and soft and lightweight. I also know it’ll hold up despite feeling so soft, because I made a large summer cardigan/ruana thing with this yarn about 3-4 years ago, wear it all the time, and it’s still comfy and in one piece.
I did change my hook size, as my gauge swatch was pretty small with the G hook. It still wasn’t perfect with the H (I must have fairly tight stitches with the mesh pattern!) However, I decided that it was close enough for me a touch on the smaller side. If you also end up changing your hook for gauge, just pay attention to your mesh squares and make sure it’s not going to stretch too much! If your gauge is coming out right in between two hook sizes, I would personally recommend going with the option that seems like it’ll be smaller and letting it stretch with time and wear, rather than too loose and having it only stretch further. Trust me, this stitch will stretch.
Would I use this yarn again? Totally. I’m floored by how this color came out and want to make so many more wearables in this colorway. I also want to try some other variations like Truboo or the sparkle version, but I have not tried any sort of gauge with these yet.
Time Spent:
Right around 10 hours. Once you get going, this pattern is very mindless and you can just pick it up and work a row or two at a time. The large open mesh stitch makes each row fly by!
Measurements:
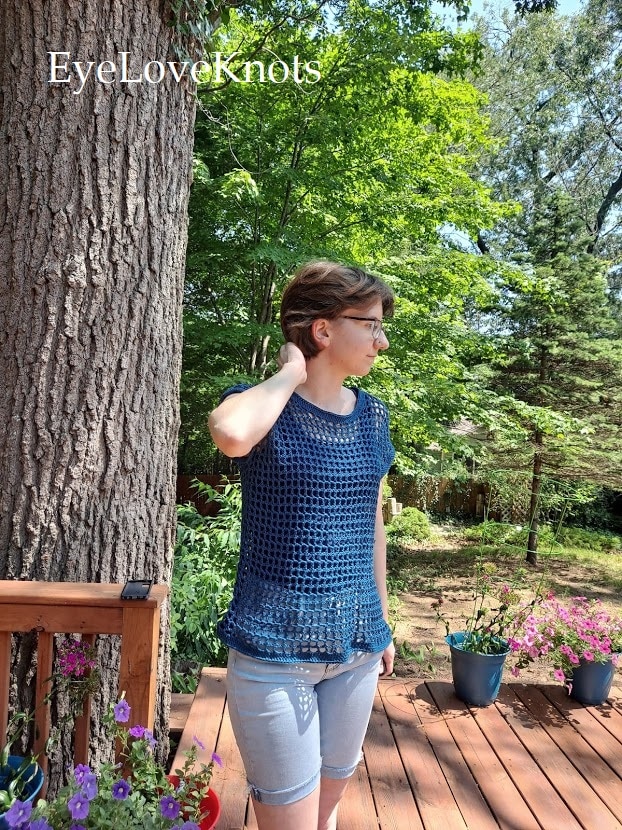
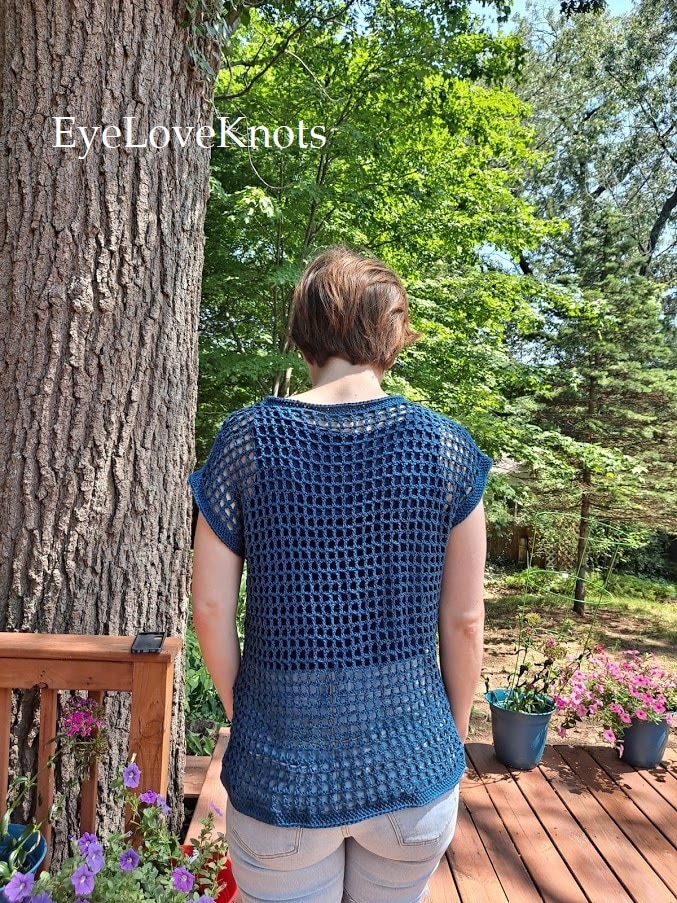
The sizes for this pattern might surprise you. This tee is written to have ten to fourteen inches of suggested ease. Wow. I was totally caught off guard at that! Obviously I could tell from the modeled pics that this is a big and drapey top but the numbers were higher than I expected.
I chose the Small size, because the dimensions given for this size were 45.5″ in bust circumference, just about 10-11″ larger than my bust circumference. Sizing down to XS (which I sometimes wear in some brands) would have left me with only about 5-6″ ease and I wanted the intended fit.
My tee ended up a bit smaller, at right around 40-42″ around. The reason I’m being vague on these measurements is because this mesh is hard to measure accurately! If you pull on it at all, it stretches like crazy. I ended up happy with my gauge but it was a little small, so that makes sense that over all these stitches I lost a couple inches worth. It absolutely still fits the vibe of loose and flowy, and I don’t think I would really want it to be any larger in my personal preference. You can see here that it’s pretty loose:

Gauge:
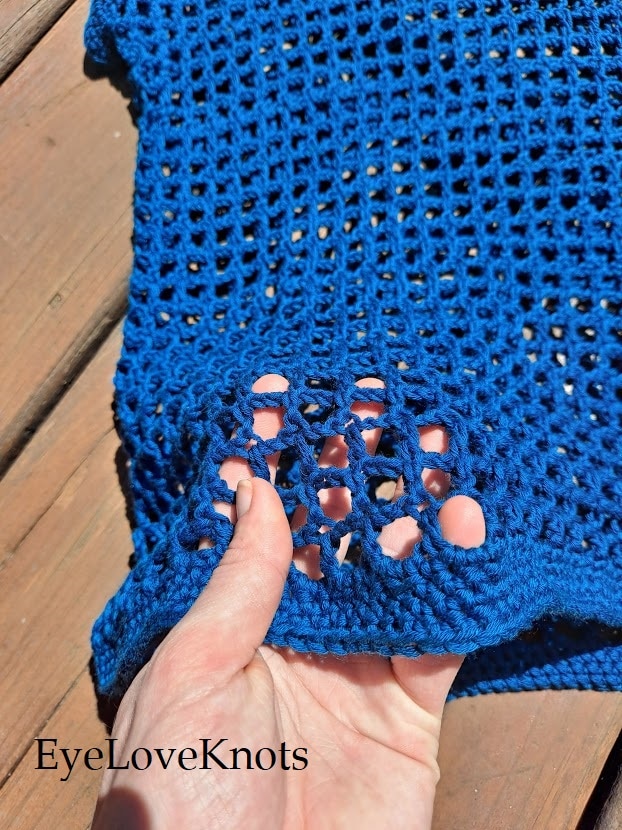
The written gauge is 4″ being 6 squares wide and 7.5 rows tall in the mesh filet squares. Mine with my H hook ended up getting to 4″ as 6 squares (well, just barely less than that) wide and about 7 rows tall. Again, though, this is with zero stretch so I realized I just needed to get within a range. I could easily stretch my top to get this exact gauge.
Pattern Notes
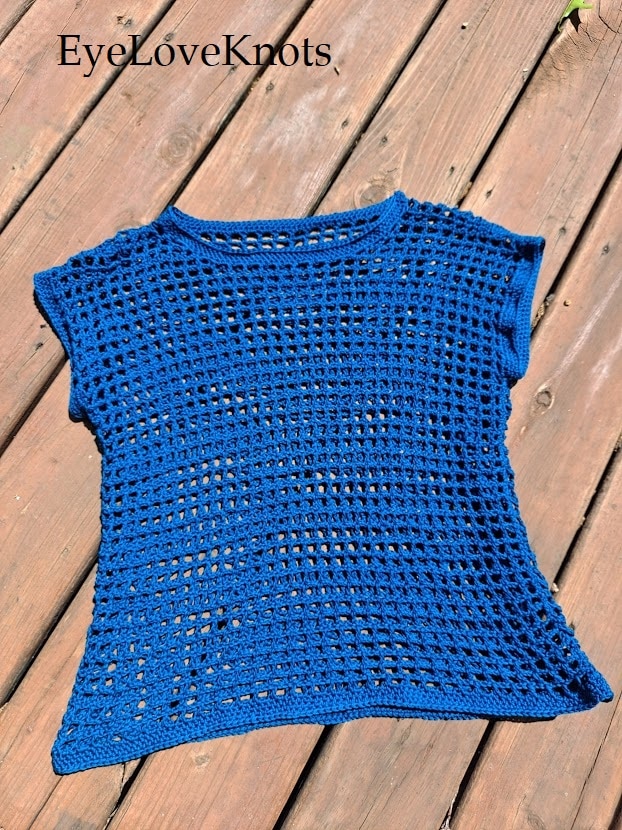
This is a very simple pattern, in terms of stitching. Once you get the hang of the mesh stitch, it’s smooth and just flies off the hook! The genius of this pattern is in the actual layout. She does a really cool technique in shaping the shoulders, rather than simply decreasing for the neckline and leaving the sides boxy (which is also a look that I love and do in many of my own designs). What you do is essentially slip stitch at the outside edges, with varying stitch counts each time. This gathers the shoulders up a little bit to give a cute neckline without bulk on the sleeves.
If you start out and feel that this mesh stitch is going to be far too loose and open, keep in mind that this is not a tee that you would generally wear by itself. It is definitely see-through! This makes it very versatile in my opinion. When I first took pics I chose to wear a tank top in a coordinating shade of dark blue, and I like how this came out. You could also go more subtle with a neutral skin-tone camisole, to let the color of your tee shine! You can choose the layer you wear underneath to either let the tee be a part of the overall look, or let it be the star.
I do like the fit, although I personally might want to size down if I make a second one. I enjoy boxy fits, but this one is about at my limit. I looked on the Ravelry project page and saw that a few other people made a size that seems to be more snug to their bodies and I love how that looks too! I’ll have to decide what I want to do on sizing when I get there. As far as color, I’m strongly leaning towards something in the purple family. Coboo only comes in a lilac, but I’m going to keep an eye out for a cotton that has an intense deep royal purple…can you imagine this tee in a shade like that? I would be so happy.
The designer makes it easy to pick your size, as I kind of explained in my measurements earlier. There is a chart listing all the written dimensions, and the suggested ease for the intended fit. You just have to decide how much ease you want, add that to your measured bust size, and then pick the size that fits right around that range! (For example, my actual bust size is about 34-35″ + 10″ ease on the lower side of what she suggested = 44-45″, and the small is written to be 45.5″! Perfect!)
I had very few actual issues with this pattern. In the printed version, the page numbers were very tiny, but that seems like the most petty thing ever to complain about. I just had to pay close attention to follow the correct order! However, I could have easily stapled these together after printing and solved my own problem. The most confusing part for me was the shoulders and neckline, but through following every word carefully I was able to get it on the second or third try. I suggest reading through this section a couple of times before you actually do it, because there is one section that got me. As you begin shaping the front neck portion, you first do a couple of rows that seem identical, and then suddenly around row 3 and 4, you change up the stitches a little bit. If you’re not paying attention (like I wasn’t at first), this can be messed up easily! But it’s not hard to fix if you catch it, and I got it after a couple attempts. The rest of the top was smooth after that.
Assembly was a piece of cake with very clear instructions. I chose to use mattress stitch to seam up my sides, in order to have a smooth invisible “seam” that would blend into the squares. I counted how many squares I would need to seam up for the right dimensions (24, if you wanted to know), then put stitch markers through both layers every 4 squares or so in order to keep them matched up. This worked beautifully!
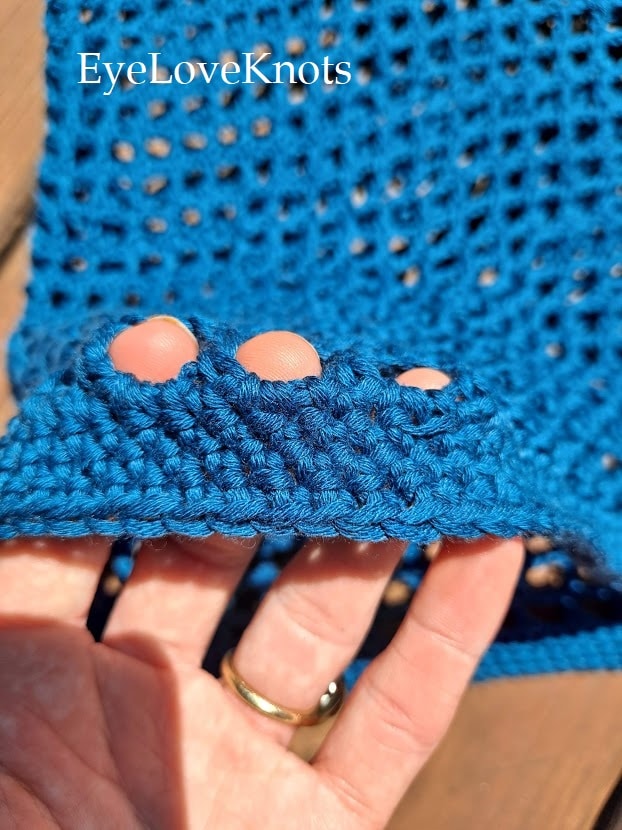
The edging is simple but gives a gorgeous look. All you end up doing is a couple seamless rows of single crochet at the edges, but it smooths out the whole thing and makes it look professional and lovely. You can see here how it gives a finished look to the open mesh.
I chose not to block my tee, but I might try steaming it one day if I find it needs to smooth out a little. I did not do this before taking pictures, thinking that it would not be laying flat on me anyway due to the drape. Whether this was a smart decision or not is up in the air. I certainly didn’t hurt anything choosing not to block it, as I can just do that later on. If you do, it could open up that gorgeous mesh even more!
I hope you enjoy this pattern and make a beautiful summer top to wow everyone at the beach. If you’ve made this or plan to in the future, how do you (or how would you) style this top? You can tell from my pictures that I wasn’t quite sure, and I’m very open to suggestions on how to wear this in the way it deserves!

Don’t forget to visit with me on Instagram @astitchshyofnormal for all kinds of awesome crochet makes and inspiration.
Join one of our awesome Facebook groups to share your creations, and see what others are up to!
– EyeLoveKnots Crochet & DIY Community
– DIY Home On Rockwood Lane
– Alexandra Lane Lifestyle
Linked Up To…
Weekday Wear Link Up – Away from the Blue
Weekly Link Up #233 – Beauty by Miss L
Turning Heads Linkup – Elegantly Dressed and Stylish
Confident Twosday Linkup – I do deClaire
Style Six – The Queen in Between
Style on the Daily – Straight A Style
Style with a Smile – Style Splash
Thursday Fashion Files Link Up #315 – Curly Crafty Mom
Chic and Stylish Link Up – Mummabstylish
Fancy Friday Linkup – Nancy’s Fashion Style
Neverending Style Link Up – The Grey Brunette
Style Link Up – Lizzie in Lace
Ginx Woolly Linx Party July – Ginx Craft
The Loop Scoop #18 – Moogly Blog
Craftastic Monday Link Party – Sew Can Do
{Wow Me} Wednesday #514 – Ginger Snap Crafts
The Wednesday Link Party 408 – Oombawka Design Crochet
Creative Crafts Linky Party #51 – Creatively Beth
Creatively Crafty Link Party #285 – Life Beyond the Kitchen
Create, Bake, Grow & Gather #478 – Shabby Art Boutique
Saturday Sparks Link Party #432 – Pieced Pastimes
Handmade Monday #237 – Sum of their Stories
The Really Crafty Link Party #276 – Keeping it Real
Artsy-Fartsy Party #354 – Artsy-Fartsy Mama
The Hearth and Soul Link Party – April, the 21st Century Housewife
Unlimited Link Party 30 – Grammy’s Grid
You’re the Star Blog Hop – Decor Craft Design
598th Inspire Me Tuesday – A Stroll Thru Life
Fabulous Party 381 – Lou Lou Girls
Your Whims Wednesday #521 – My Girlish Whims
Wonderful Wednesday – Oh My Heartsie Girl
Encouraging Hearts and Home Blog Hop – Scratch Made Food
Link Up Potpourri – My Bijou Life
Friday Favorites – Busy Being Jennifer
Funtastic Friday Link Party #342 – Simply Beautiful by Angela
Thursday Favorite Things #499 – An Artful Mom
A Morning Cup of Joe – The Cottage Market
Linky Ladies Party #215 – The Purple Poncho
That is really adorable. I think the way you styled it is very cute.
Aww, thank you! I tend to over-think things like that with handmade items. I want them to really be shown off properly!
Thanks for the review—it’s helpful to see other’s thoughts as I’m going through the project. I’m in the first row of the neckline, and I can’t tell if there should be a sl stitchfor every chain, or one sl st for every section of double chain. Either way I’m not understanding something, because I the number of stitches doesn’t match the previous row.
I’m so sorry I hadn’t seen this before! I just checked on the neckline section of this pattern. If I remember correctly, you’d slip stitch per chain and treat those as a stitch. I can try looking more closely at it though and come back to you on that!
Oh my goodness, I would wear this during the summer in every color!
I agree, I’m dreaming of other colors to make next! I love jewel tones so I’m thinking a gorgeous emerald shade next…
I think this will work in the fall and spring too! It would be really pretty in a beige color or grey too!
http://www.chezmireillefashiontravelmom.com
Ooh, I didn’t think about neutrals! I really like the sort of shade where it’s kind of lavender, kind of gray…maybe that would be a fun one to try next!
that is such a cute top! I agree with you the colour is perfect for it and it looks so nice here with the denim – I could see it working well with skirts too though! 🙂
Thanks for joining the #WeekdayWearLinkup!
Hope you have a nice weekend ahead of you 🙂 Busy one here, I’m volunteering at a fundraising booth this morning 🙂
I thought it was pretty cute with the light denim too! I need to keep experimenting with other options, I’ll definitely try a skirt. I’m enjoying my weekend for sure and I hope you do too!
So cute! Pinning!
Michelle
https://mybijoulifeonline.com
Awesome! Glad I can spread the pattern love.
This tee is really great for those tad bit chilly nights where a sweater just isn’t quite needed, but a little something would be nice.
That’s a perfect use of this pattern! It could also be great in a thicker yarn for a fall topper for even more warmth!
Where can buy these at ??
Are you referring to physical tops, or the crocheted pattern?