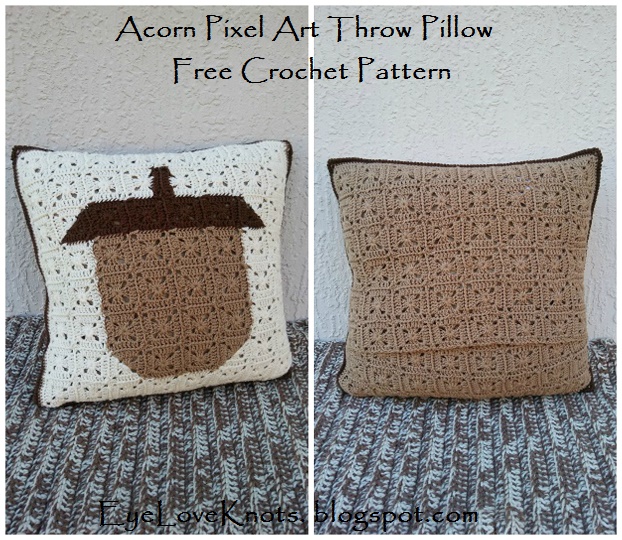
This is a free crochet pattern for how-to crochet my Acorn Pixel Art Throw Pillow.
This post contains affiliate links for LoveCrafts. If you make a purchase by clicking on them, I make a small commission at no extra cost to you. Thanks for your support!
I’ve teamed up with Melanie of Counting Crafty Sheep, Katie of Salty Pearl Crochet, Janne of Joy of Motion and Rachel of Desert Blossom Craft, alongside 21 other bloggers for the Fall Favorites Blog Hop.
This awesome Acorn Pixel Art Throw Pillow was included in the blog hop. It’s perfect for Fall decorating or use through the year for a rustic home.
If you would like a PDF version of this post, you may get one through either my EyeLoveKnots Etsy Shop, Ravelry or LoveCrafts Shop for a small fee. This fee is to compensate for the views lost when you no longer need to return to the blog to for the information, as you will have your own copy. Plus! It helps fund supplies for new projects to share with you!
Shop EyeLoveKnots Etsy Shop – Acorn Pixel Art Throw Pillow.
Shop EyeLoveKnots LoveCrafts Shop – Acorn Pixel Art Throw Pillow.
Are you a Raveler? Share your version of this project on Ravelry – Acorn Pixel Art Throw Pillow.
Near the end of September, I shared a free crochet pattern for an Acorn Pixel Art Square. In this post, I gave several ideas for what could be done with the square, and mentioned I had something in the works myself. Well, here it is! An Acorn Pixel Art Throw Pillow!
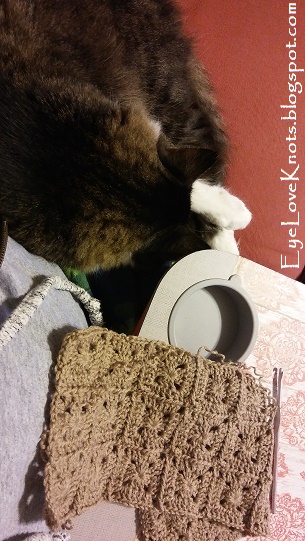
Behind the Scenes… My sweet Shiloh keeping my company outside while I work on my back piece.
I will admit, I waited til the very end to put this together. I created the whole back and seamed together in just three days. Why did I rush? You will have to wait until next week to find out! Until then… Enjoy the pattern!
Materials:
- For Back Panel: 330 Yards of Lightweight #3 Yarn – I used Baby Bee’s Sweet Delight Yarn in Teddy [Light Brown] and Chocolate [Dark Brown]
- G6/4mm Crochet Hook
- Tapestry Needle for Weaving in Ends
- 16″ or 17″ Pillow Form
Material Notes:
Yarn Alternative: Berroco’s Vintage DK.
For complete throw pillow, you will need 660 Yards of Lightweight #3 Yarn.
Time Spent:
This square took me about 7 and a half hours to complete – I worked about a row a day, including the weaving for that row.
Measurements:
Finished size is 16″ square – to fit a 16″ or 17″ pillow form.
Gauge:
First square measures 2″
Abbreviations:
- DC – Double Crochet
- SC – Single Crochet
- sc2tog – Single Crochet Two Stitches Together (decrease)
- PLT – Pull Loop Through (Join)
- To PLT: After DC, pull up a loop, insert hook from front through the corresponding stitch on MB and pull loop through
Pattern Notes:
The beginning chain 5 counts as a double crochet plus a chain 3, and the beginning chain 2 counts as the first double crochet.
Join to the second chain of the beginning chain, not the first stitch, except in the border – here you’ll join to the first single crochet.
You may work this art piece with a variety of joining methods, but I joined mine using the Pull Loop Through Method, and this pattern will be written as such. If you choose to work all the squares first, and then sew them together, you will need: 64 in Teddy. A different joining method may also create a larger or smaller finished piece. Make sure to measure!
In the instructions, I refer to MA, MB and MD. These are the motifs. MA is the current motif you are working on. MB is the first one you join to, MC is skipped and MD is the second one you join to, which is diagonal from MB. I only refer to these motifs in the one and two join instructions.
I highly recommend weaving in your ends as you complete each row, otherwise, at the end you could be left with so many ends, this square may end up in your WIPs bin, instead of being completed.
I will let you in on a little secret… I cut this end, not noticing I hadn’t weaved it in yet. Oh no! The trick to fixing this – hot glue! A small dab, hold tail end for a few moments to secure down and problem solved! Be careful not to burn yourself, and make sure your tail end is spun to look neat, and lays in a position on the square not to be seen through the corner chain spaces from the right side.
I worked my back piece in the envelope style so I can take my pillow form out, and store cover when not in season. Alternatively to this, you can create a single piece 8 squares by 8 squares, and then work the border just like the front pattern, and seam as listed below, but the pillow form will not be removable.
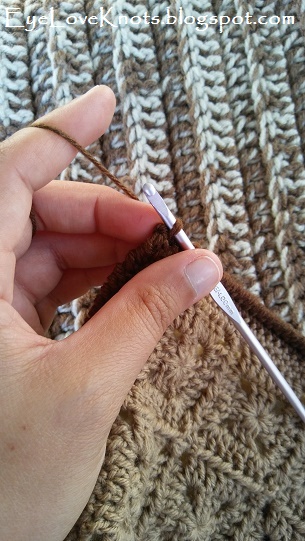
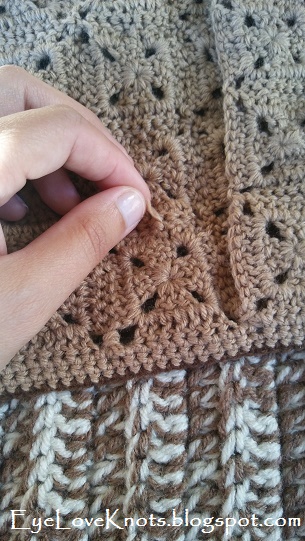
When working the reverse single crochet into the corners, you will want to hold the previous reverse single crochets already worked into the corner with your middle finger, as shown. This will prevent them from stacking up.
Front Panel (Acorn) Pattern:
Visit my Acorn Pixel Art Square to Complete the Front Panel.
Back Panel (Envelope) Pattern:
Work 2 complete 3” Solid Granny Squares in Teddy: Chain 5. Join to form a ring. Chain 5, work (3 DC, chain 3) into the ring 3x, 2 DC into the ring and Join. (12 DC)
R2: Chain 2. Work (2 DC, chain 3, 2 DC) into the chain space, [DC into the next 3 DCs, (2 DC, chain 3, 2 DC) into the next chain space] 3x, DC into the next 2 DCs and Join. Fasten Off. (28 DC) *This square will be the bottom right square of each piece. Set the second one aside, and continue on.
Working with the Join-As-You-Go PLT Method, you will have squares that require one join, and squares that require two joins – these are described below.
To Work Square with 1 Join: Chain 5. Join to form a ring. Chain 5, work (3 DC, chain 3) into the ring 3x, 2 DC into the ring and Join. (12 DC)
R2: Chain 2. Work 2 DC into the chain space, chain 1, working from behind SC into chain space of MB, chain 1, [(DC into chain space of MA, PLT) 2x, (DC into next stitch of MA, PLT) 3x, (DC into chain space of MA, PLT) 2x, chain 1, working from behind SC into chain space of MB, chain 1]; 2 DC into the same chain space, [DC into the next 3 DCs, (2 DC, chain 3, 2 DC) into the next chain space] 2x, DC into the last 2 DCs and Join, and Fasten Off. (28 DC)
To Work Square with 2 Joins: Chain 5. Join to form a ring. Chain 5, work (3 DC, chain 3) into the ring 3x, 2 DC into the ring and Join. (12 DC)
R2: Chain 2. Work 2 DC into the chain space, chain 1, working from behind SC into chain space of MB, chain 1, [(DC into chain space of MA, PLT) 2x, (DC into next stitch of MA, PLT) 3x, (DC into chain space of MA, PLT) 2x, chain 1, working from behind SC into chain space of MD, chain 1]; [(DC into chain space of MA, PLT) 2x, (DC into next stitch of MA, PLT) 3x, (DC into chain space of MA, PLT) 2x, chain 1, working from behind SC into chain space of MD, chain 1];
2 DC into the same chain space, [DC into the next 3 DCs, (2 DC, chain 3, 2 DC) into the next chain space], DC into the last 2 DCs and Join, and Fasten Off. (28 DC)
Back Graph:
As a blogger, I rely on views to my blog to earn money from my ads. Please do NOT share my graph photo, or save to Pinterest. Doing so, would allow makers to not have to return to my blog, which would result in a loss of views and income.
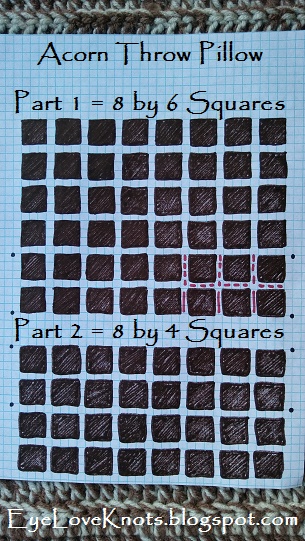
The solid lines represent 1 Join; The dotted lines represent 2 Joins; The black dots represent where the layers will overlap, with the layer piece on top.
Part 1: Following this chart, continue working solid granny squares and joining them as outlined above to create the top of your back panel. I began with the bottom right square of each piece, and worked across to the left, working in the same manner as the Acorn Pixel Art. Please refer back to the Acorn Pixel Art post if you need more information about this chart. Completely fasten off, and set aside after Part 1 has been completed – 8 squares wide by 6 squares tall.
Part 2: Now, grab your second 3″ solid granny square, and begin again, this time working a smaller piece that will serve as the bottom of your back panel. Work in the same manner as above. After Part 2 is done – 8 squares wide by 4 squares tall – proceed to the border.
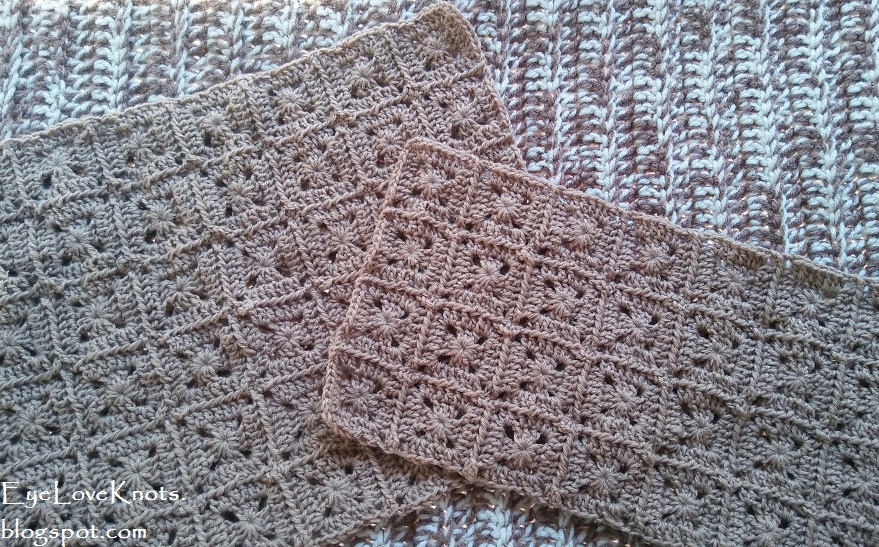
Border:
With Teddy, join yarn to top right corner. Chain 1. SC in chain space, chain 3, SC in the same chain space, SC into the next 8 stitches, SC2tog over both squares chain spaces, (SC in the same chain space just worked and the next 8 stitches, SC2tog over both squares chain spaces) 6x, SC into the same chain space just worked and the next 7 stitches;
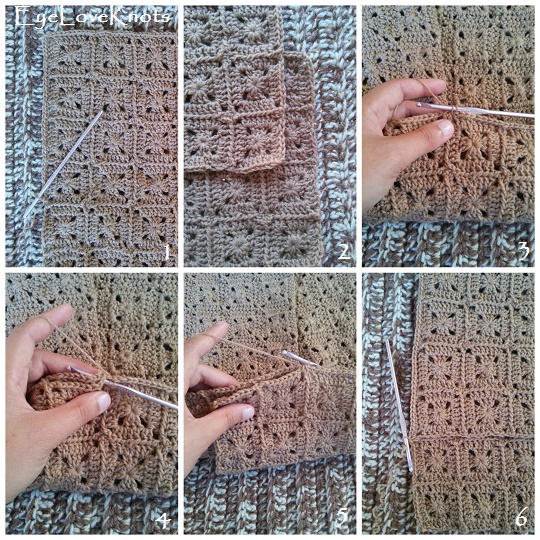
SC in chain space, chain 3, SC in the same chain space, SC into the next 8 stitches, SC2tog over both squares chain spaces, (SC in the same chain space just worked and the next 8 stitches, SC2tog over both squares chain spaces) 4x, SC in the same chain space just worked and the next 8 stitches. Layer pieces with the next square of the current piece on top of the smaller piece so you work through both layers for the next two squares, and SC2tog over both squares chain spaces – the 1st being a single layer, and the second half of the decrease being through both layers, SC in the same chain space just worked and the next 8 stitches, SC2tog over both squares chain spaces, SC in the same chain space just worked and the next 8 stitches, SC2tog over both squares chain spaces – the 1st being through both layers, and the second half of the decrease being through a single layer again, SC in the same chain space just worked and the next 8 stitches, SC2tog over both squares chain spaces, SC into the same chain space just worked and the next 7 stitches;
SC in chain space, chain 3, SC in the same chain space, SC into the next 8 stitches, SC2tog over both squares chain spaces, (SC in the same chain space just worked and the next 8 stitches, SC2tog over both squares chain spaces) 6x, SC into the same chain space just worked and the next 7 stitches;
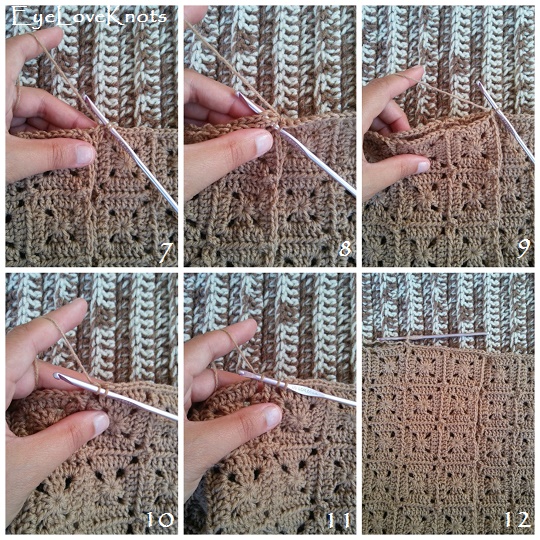
SC in the chain space, chain 3, SC in the same chain space, SC into the next 8 stitches, SC2tog over both squares chain spaces, SC in the same chain space just worked and the next 8 stitches. Layer pieces with the next square of the previous piece on top of the current smaller piece so you work through both layers again for the next two squares, and SC2tog over both squares chain spaces – the 1st being a single layer, and the second half of the decrease being through both layers, SC in the same chain space just worked and the next 8 stitches, SC2tog over both squares chain spaces, SC in the same chain space just worked and the next 8 stitches, SC2tog over both squares chain spaces – the 1st being through both layers, and the second half of the decrease being through a single layer again, (SC in the same chain space just worked and the next 8 stitches, SC2tog over both squares chain spaces) 5x, SC into the same chain space just worked, and the next 7 stitches;
SC in chain space, chain 3, SC in the same chain space, SC into the next 8 stitches, SC2tog over both squares chain spaces, (SC in the same chain space just worked and the next 8 stitches, SC2tog over both squares chain spaces) 6x, SC into the same chain space just worked and the next 7 stitches. Join. (315 SC)
R2: Chain 1. SC into the 1st SC and into the chain space, chain 3, SC into the same chain space, [SC into the next 78 SCs, SC into the chain space, chain 3, SC into the same chain space] 3x, SC into the next 77 SCs. Join with Chocolate, and fasten off Teddy. (324 SC)
R3: With Chocolate, Chain 1. SC into the 1st 2 SCs and into the chain space, chain 3, SC into the same chain space, [SC into the next 80 SCs, SC into the chain space, chain 3, SC into the same chain space] 3x, SC into the next 78 SCs. Join, but DON’T fasten off – just pull up a loop so yarn loop doesn’t come out. (332 SC)
Sew in Border Ends.
Assembly:
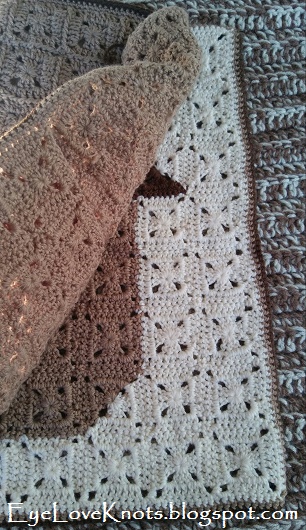
Lay the two pieces with wrong sides together. You want the back panel to have the longer piece on top.
Hold the two layers together. Reinsert hook into the loop, and pull to normal tension. Insert hook into the first stitch of both layers, and complete a slip stitch to secure layers, and chain 1.
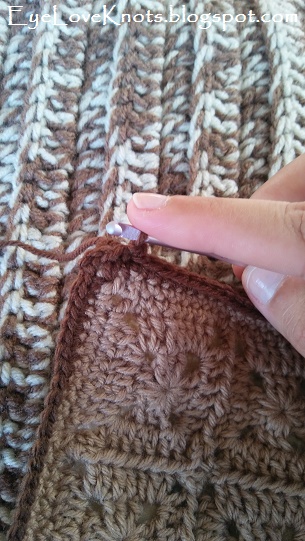
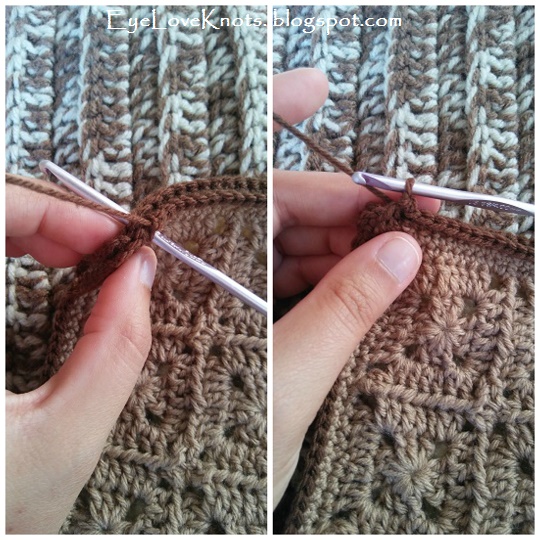
We will be working a reverse single crochet edge to join the two layers. When inserting hook into the stitch, you’ll want to lightly hold with your index finger as shown, otherwise stitch will twist. Reverse single crochet (also known as the crab stitch) is worked counter-clockwise so, you’ll be inserting the hook into the previously stitch, instead of moving forward. Be patient while working this stitch pattern so your stitches are nice and even, and not on top of each other. The pattern itself will take on a twisted appearance, which is really neat! No worries – it’s easy!
Alternatively, you can chain 1, turn and begin working this pattern so the twisted pattern is on the opposite side with the acorn. I didn’t on purpose because I thought the more plain side deserved a little more attention. You can also whipstitch or slip stitch the panels together, or work in regular single crochet through both layers. I like the reverse single crochet, and the clean and unique look it gives both sides.
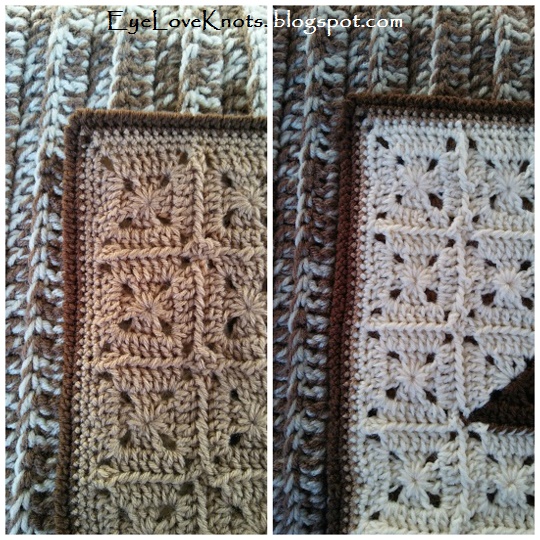
Left: Shows from Back; Right: Shows from Front.
Working through both layers AND counter-clockwise, work a reverse SC into the last stitch, and into each of the next 79 SCs, work 3 reverse SC into the chain space – corner, [reverse SC into the next 82 SCs, work 3 reverse SC into the chain space – corner, reverse SC into the same chain space] 3x, reverse SC into the next 2 SCs. Work a final reverse SC into the first stitch, and fasten off. Turn to wrong side, and weave in your final end/s. (344 Reverse SC)
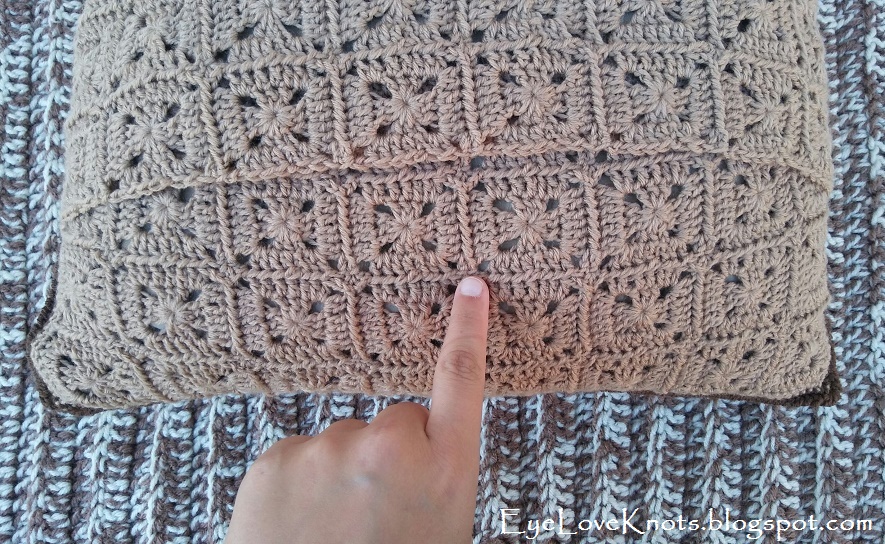
You will notice the back of your pillow may not line up due to the pillow form stretching it – my finger showing where the top line would fall if no pillow form were inserted. The overlap was intentionally put in to accommodate for this. If it bothers you, you can always add a button or two.

Please feel free to make and sell your own Acorn Square Throw Pillow using this pattern, but please DO NOT claim this pattern as your own nor should you sell my pattern, and DO NOT re-publish my photos as your own. DO NOT copy and paste my pattern anywhere, link to it instead.
Join the EyeLoveKnots Crafting Community on Facebook to share your creations, and see what others are up to!
Linked Up To…
Sundays at Home #230 – Celebrating Everyday Life
Nifty Thrifty Sunday #360 – Meet Our Life
Inspiration Monday – I Should Be Mopping the Floor
Tutorials & Tips Link Party #374 – Home Stories A to Z
Creative Monday Linkup – Claire Justine
Handmade Monday #101 – Sum of their Stories
Merry Monday Link Party #230 – A Wonderful Thought
The Scoop Link Party #352 – Worthing Court Blog
The Really Crafty Link Party #143 – Keeping it Real
Craftastic Monday Link Party – Sew Can Do
447th Inspire Me Tuesday – A Stroll Thru Life
Fabulous Party #241 – Lou Lou Girls
Talk of the Town 149 – My Repurposed Life
Sew It Cook It Craft It Link Party #79 – Sew Historically
{Wow Me} Wednesday #377 – Ginger Snap Crafts
The Wednesday Link Party #271 – The Stitchin’ Mommy
Your Whims Wednesday #381 – My Girlish Whims
Wall to Wall DIY Wednesday Week 23 – Dabbling and Decorating
Pin Party #291 – The Pin Junkie
Crafty Love Link Party #39 – Jessie at Home
Sweet Inspiration Party #133 – Purple Hues and Me
Friday Frenzy Link Party – 11/16/18 – Kelly Lynn’s Sweets and Treats
Pretty Pintastic Link Party #235 – Sparkle Living
The Linky Ladies Party #145 – The Purple Poncho
Ginx Woolly Linx Party November – Ginx Craft
Scrappy Stitchers Link Party #47 – Stitches n Scraps
Snickerdoodle Create Bake Make Link Party #258 – Across the Boulevard
I want to thank those of you who link up with us, and those of you who visit with those who link up. Sharing the love, and helping each other with more traffic is awesome! Keep it up!
This week I am featuring, from left to right, top to bottom: Dirndl Bag, Crochet Inspiration with Basic Steps from Sachsenrose, Henriette Square, Crochet Pattern Review from Natas Nest, Anna’s Blanket, Crochet Inspiration from Keep on Keeping on, and Stashbusting: African Flower Squares, Crochet Inspiration from Hilde Hook.
New Granny-Spiration Projects will be shared from your hosts the first Saturday of each month. Post times will vary. You will be able to link up from 12:00am EST on the first Saturday of the month, through midnight EST on the second Thursday from the start date – specific dates are on top of the Rafflecopter form – giving you almost two weeks to link up and enter the giveaway!
Please share projects that are family friendly, and GRANNY INSPIRED through use of regular granny square or solid granny square, granny stitch pattern or other afghan square in the form of a free pattern, pattern review, or inspiration piece. Not limited to crochet or knit.
Please make sure to link to your post, and not your home page.
*If you don’t have a blog, you can still share with us by creating a Free Flickr Account – powered by Yahoo. Add your projects there, and then come back here with the link for the project.
*Link ups cannot be to Etsy listings or Ravelry pages where patterns are sold. You can link to blog posts, Flickr or Facebook pages, Pins, etc that are directed towards it, but can’t directly link to it.
To be clearer though, Raverly pages of finished projects are okay to share. Sorry for the inconvenience! That’s per InLinkz guidelines. Thanks!
Features may be chosen at the discretion of each host. By linking up, you give us permission to feature your item.
I'm not crafting anything, really, other than some truly terrible felt toys for my cat (who enjoys the tiny bits that fall off way more, anyway!!! 😛 )
This sounds fun! I should make my cat some with some catnip in them – he would love them!
I want to finish some pillows I have the material for. I got the trim from Etsy.
Did you get to finish these pillows? I would love to see them 🙂 Would be happy to have you join my group Facebook page (link at the bottom of the post), or maybe an Instagram link to them?
cards and pillows
Homemade Christmas cards?
Pillows for me, and hats & scarves for the homeless.
I absolutely love to hear about projects made for charity! I know they will LOVE and appreciate them!!
I love this. Maybe I'll try this pattern for our new cushions on the couch <3.
Love,
Mariam
Thanks, Mariam! I have been thinking about turning my living room into a rustic/woodland theme based on this cushion.
hats, cowls and sweaters for me, my dog and my husband!
Crochet for the dog?! LOVE that!
I am making graph blankets for my grandchildren.
I love graph blankets – admiring them that is. Working them myself is such an intimidating, and frustrating thing for me. Need more practice I guess
I love this idea!
Thank you for sharing at The Really Crafty Link Party. Pinned!
(also, I hear your about weaving in the ends as you go along. Sometimes I forget to do this and then hate when I could be finished with a project…except that I still have a million of yarn bits to weave in)
One of the crochet struggles for real! I have a baby blanket in my WIPs bin that has been sitting in there for I don’t know, 3 years? because I haven’t felt like weaving in the ends…::sighs::… Lesson learned!
What a good idea to use your acorn for a cushion. Looks super.
Thanks, Ginny! I really love it. It is a regular part of our year round decor.