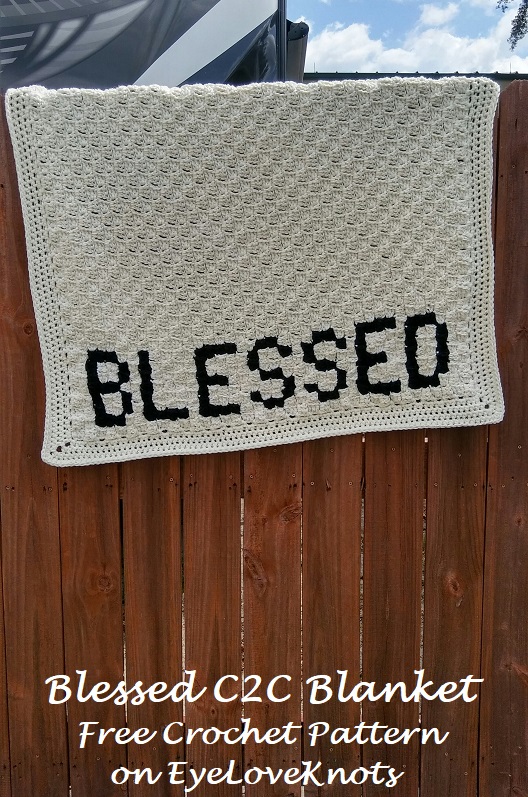
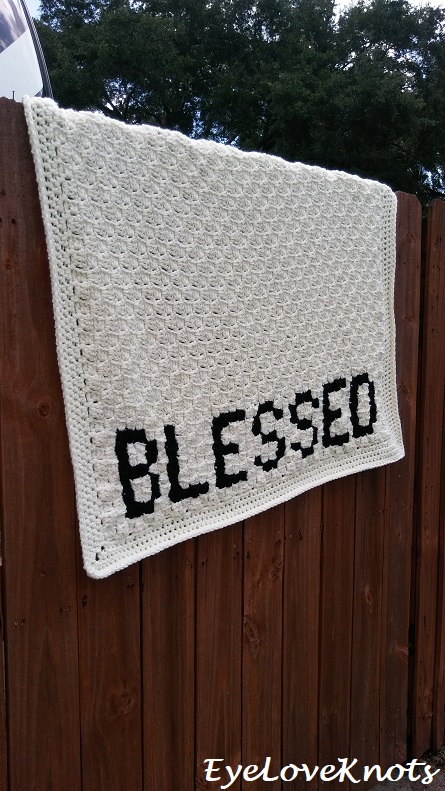
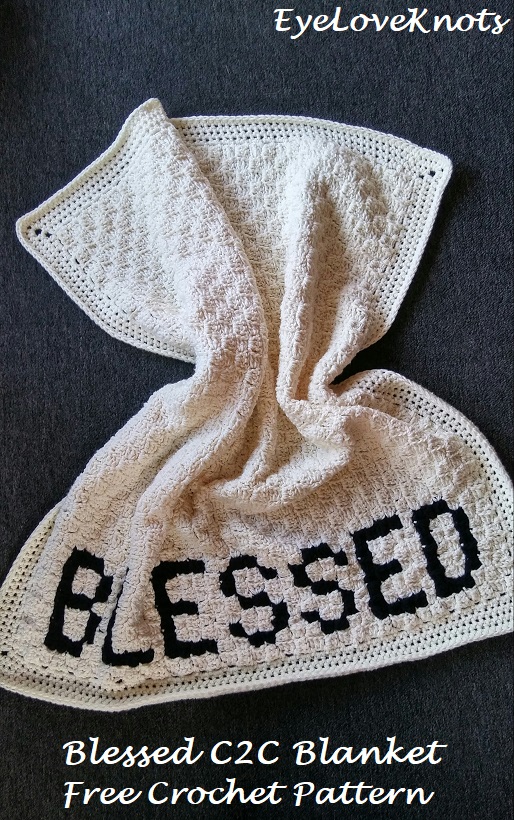
Okay, so this is the blanket I have been wanting to share with you! This is my Blessed C2C Blanket. I normally schedule my crochet posts for Saturday mornings, but I am done with this post a little early, and I really, really wanted to share it, so I am putting it out early for you!
I designed a fall themed C2C scarf that you will see later this year, but while designing, I envisioned this blanket. I couldn’t finish up the scarf fast enough to get this on my hook.
I have seen lots of items made with “Blessed” on. Have you spotted them too? Like the number of floral blouses, as well as throw pillows. Now you can add this one to the collection.
I did consider adding tassels to my corners, but opted not to when I thought about how pom poms fall apart in the wash. I haven’t attempted to wash tassels, but I didn’t want to take a chance, and did want this blanket to be machine washable.
Before we get into the pattern, I have a warning – I had 309 ends to weave in! I was bad, and saved all of the ends from the word until I finished the last letter, and ugh! I spent quite a bit of time weaving them all in. I also worked in a double strand of worsted weight yarn, and weaved each strand in individually. Read on for more information, and alternatives.
Materials:
– 2960 Yards of Worsted Weight Yarn – I used Hobby Lobby’s I Love This Yarn, about 1.5 Skeins of Black, and 7 Skeins of Ivory
– M13/9mm Crochet Hook
– Tapestry Needle for Weaving in Ends (or Small Crochet Hook)
Material Notes:
For this blanket, two strands of worsted weight yarn are held together. In it’s place, you could use one strand of super bulky (#6) yarn. Take a gauge. If you don’t mind a slight difference in measurements, gauge isn’t essential. Keep in mind, by using a bulky or super bulky yarn, you will cut down on the number of skeins to keep track of at one time, and the number of ends to weave in, which is a plus
Yarn Alternative/s (if using the worsted weight): Red Heart’s With Love.
Time Spent:
This blanket took me just over 21 and a half hours. There are lots of factors that could affect this, the main one how you choose to weave in your ends.
Measurements:
Before Border, 37.13 (1/8″) Wide by 43.5″ Tall;
With Border, 42.25″ Wide by 47.75″ Tall – this is a little larger than a toddler/child size afghan, and a little smaller than the standard throw blanket size.
R2-R6: Chain 2, turn. DC in the 2nd DC and each DC across.
Fasten Off.
Abbreviations:
SC – Single Crochet
HDC – Half Double Crochet
DC – Double Crochet
Pattern Notes:
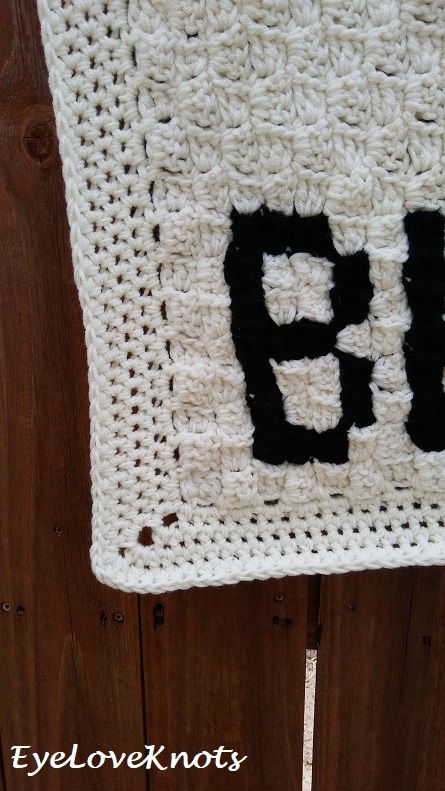
This blanket grows from the bottom left corner up to the top right corner. I suppose this is the untraditional way of working a C2C, but this is how I worked this one, and the writing matches. You may follow the chart, and work in any direction desired.
In Border, chain 1 does not count as a stitch, and join to the first stitch.
This pattern is written with colors and boxes only. If you would like more details on how to work the corner to corner technique, and how this blanket works up (without words), visit my Basic Chunky C2C Blanket Free Crochet Pattern.
Keep in mind, there will be connect points on some letters that will not be completely solid, and this is because of the direction worked. You will need to use some of your ends to cover up this gap before you weave them in. I have a photo tutorial for this – How to Cover the Gaps in C2C Letters.
Bobbins: You will need a few ongoing bobbins while working the word portion of this blanket, which is through Row 42. You will be able to carry and work over your yarn, but in some spots, like where it goes back and forth with Ivory and Black, you will need a respective number of bobbins – sometimes six or seven. Working with bobbins requires lots of patience and maneuvering so they don’t get tangled. If you need help carrying and working over your yarn, or how to determine the number of bobbins you need (or what a bobbin even is), I don’t have a tutorial for this at this time, but Mikey of The Crochet Crowd has an excellent YouTube video going over all of this – How to Crochet Corner to Corner (C2C) Graphghans for Beginners.
Work color changes in the final yarn over of the last stitch. I have a photo tutorial for this technique – How to Change Yarn Colors in Crochet the EyeLoveKnots Way. Drop old color to the back for now.
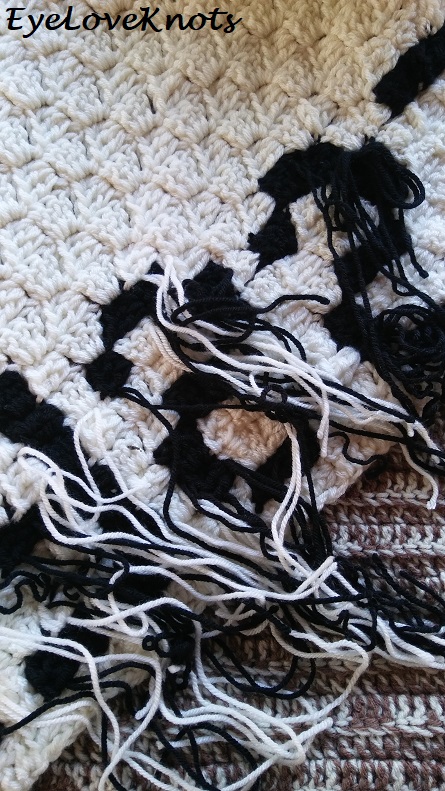
I highly recommend weaving in your ends as you go, or at least after completing row 42 where the final black is fastened off. While there technically isn’t a right or wrong side with corner to corner as it is worked turned the whole time, I still view it as odd rows being the right side, and even rows being the wrong side, this is especially true with words or images. I suggest using a smaller crochet hook to bring all of your ends to the wrong side, and weave in on this side only. Also by weaving in one end (of the two from doubling your strands) at a time, and the second in a different spot, you eliminate extra bulk.
Add Width: Altering the width of this blanket is more difficult than the length only because the “Blessed” part is centered in between two boxes on each end, and the pattern is written to reflect this. You would have to add another box on each end, which isn’t as easy as if this blanket were written in standard horizontal rows. You would need to work four rows in the beginning of the solid color, then slightly alter the pattern for the words so everything else still lines up, and then work Row 39 as an increase row, and alter the remaining bit to finished up the “B”. It’s a bit more complicated, but can be done. I’d suggest working up a new chart, as it’s much easier to follow.
Add Length: Altering the length of this blanket is super easy, done simply by working more repeats of Rows 39 and 40 in the following manner:
Row 39: Turn. Slip stitch into the 2nd stitch, and each of the next 2. Chain 2, work 3 DC into the space under the same chain joined to, skip the next 3 DC, slip stitch into the top of the next chain;
(chain 2, work 3 DC into the space under the same chain joined to, skip the next 3 DC, slip stitch into the top of the next chain) 36x;
Chain 2, work 2 DC into the space under the same chain joined to, skip the next 3 DC, DC into the top of the last stitch. (38 Boxes)
Row 40: Chain 6, and turn. DC into the 4th chain, and into each of the next 2, slip stitch into the top of the next chain 2;
(chain 2, work 3 DC into the space under the same chain joined to, skip the next 3 DC, slip stitch into the top of the next chain) 36x;
Chain 2, work 2 DC into the space under the same chain joined to, skip the next 3 DC, DC into the top of the last stitch. (38 Boxes)
Basic Graph – If you purchase the PDF for this pattern, I include a chart made using Google Sheets, that I couldn’t figure out how to add here:
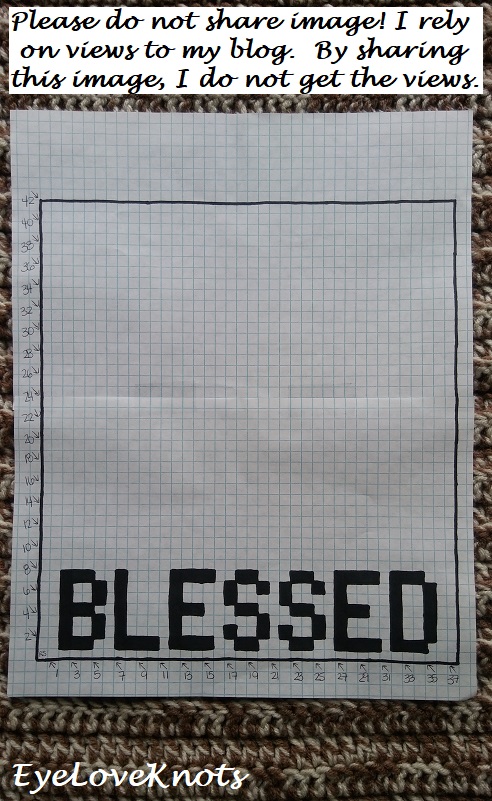
Pattern with Box Colors Only:
1 Ivory. (1 Box)
Row 2: 2 Ivory. (2 Boxes)
Row 3: 3 Ivory. (3 Boxes)
Row 4: 2 Ivory, 1 Black, 1 Ivory. (4 Boxes)
Row 5: 1 Ivory, 2 Black, 2 Ivory. (5 Boxes)
Row 6: 2 Ivory, 1 Black, 1 Ivory, 1 Black, 1 Ivory. (6 Boxes)
Row 7: 4 Ivory, 1 Black, 2 Ivory. (7 Boxes)
Row 8: 2 Ivory, 2 Black, 1 Ivory, 1 Black, 2 Ivory. (8 Boxes)
Row 9: 1 Ivory, 1 Black, 1 Ivory, 2 Black, 1 Ivory, 1 Black, 2 Ivory. (9 Boxes)
Row 10: 2 Ivory, 1 Black, 4 Ivory, 2 Black, 1 Ivory. (10 Boxes)
Row 11: 1 Ivory, 1 Black, 1 Ivory, 1 Black, 1 Ivory, 1 Black, 1 Ivory, 1 Black, 3 Ivory. (11 Boxes)
Row 12: 4 Ivory, 2 Black, 1 Ivory, 1 Black, 2 Ivory, 1 Black, 1 Ivory. (12 Boxes)
Row 13: 5 Ivory, 1 Black, 7 Ivory. (13 Boxes)
Row 14: 7 Ivory, 1 Black, 4 Ivory, 1 Black, 1 Ivory. (14 Boxes)
Row 15: 1 Ivory, 2 Black, 4 Ivory, 1 Black, 7 Ivory. (15 Boxes)
Row 16: 12 Ivory, 1 Black, 1 Ivory, 1 Black, 1 Ivory. (16 Boxes)
Row 17: 1 Ivory, 1 Black, 2 Ivory, 1 Black, 12 Ivory. (17 Boxes)
Row 18: 12 Ivory, 2 Black, 4 Ivory. (18 Boxes)
Row 19: 4 Ivory, 1 Black, 1 Ivory, 1 Black, 12 Ivory. (19 Boxes)
Row 20: 12 Ivory, 1 Black, 4 Ivory, 2 Black, 1 Ivory. (20 Boxes)
Row 21: 1 Ivory, 1 Black, 5 Ivory, 1 Black, 13 Ivory. (21 Boxes)
Row 22: 14 Ivory, 1 Black, 7 Ivory. (22 Boxes)
Row 23: 2 Ivory, 1 Black, 1 Ivory, 2 Black, 1 Ivory, 1 Black, 15 Ivory. (23 Boxes)
Row 24: 17 Ivory, 1 Black, 1 Ivory, 2 Black, 3 Ivory. (24 Boxes)
Row 25: 1 Ivory, 2 Black, 22 Ivory. (25 Boxes)
Row 26: 18 Ivory, 1 Black, 5 Ivory, 1 Black, 1 Ivory. (26 Boxes)
Row 27: 6 Ivory, 2 Black, 19 Ivory. (27 Boxes)
Row 28: 22 Ivory, 2 Black, 1 Ivory, 1 Black, 2 Ivory. (28 Boxes)
Row 29: 1 Ivory, 1 Black, 1 Ivory, 2 Black, 1 Ivory, 1 Black, 22 Ivory. (29 Boxes)
Row 30: 27 Ivory, 2 Black, 1 Ivory. (30 Boxes)
Row 31: 1 Ivory, 1 Black, 1 Ivory, 1 Black, 3 Ivory, 1 Black, 23 Ivory. (31 Boxes)
Row 32: 24 Ivory, 2 Black, 1 Ivory, 1 Black, 2 Ivory, 1 Black, 1 Ivory. (32 Boxes)
Row 33: 4 Ivory, 2 Black, 27 Ivory. (33 Boxes)
Row 34: 27 Ivory, 1 Black, 1 Ivory, 1 Black, 2 Ivory, 1 Black, 1 Ivory. (34 Boxes)
Row 35: 1 Ivory, 2 Black, 4 Ivory, 1 Black, 27 Ivory. (35 Boxes)
Row 36: 28 Ivory, 1 Black, 3 Ivory, 1 Black, 1 Ivory, 1 Black, 1 Ivory. (36 Boxes)
Row 37: 4 Ivory, 1 Black, 2 Ivory, 1 Black, 29 Ivory. (37 Boxes)
Row 38: 30 Ivory, 1 Black, 1 Ivory, 1 Black, 2 Ivory, 1 Black, 2 Ivory. (38 Boxes)
*You will no longer work increases (chain 6…) in the beginning of the odd rows. You will turn, slip stitch into the 2nd double crochet, and next 2, and then begin the boxes with a chain 2. By working in this manner, the blanket will stop getting wider, but will keep growing in length.
Row 39: 2 Ivory, 1 Black, 2 Ivory, 1 Black, 32 Ivory. (38 Boxes)
Row 40: 32 Ivory, 1 Black, 2 Ivory, 1 Black, 2 Ivory. (38 Boxes)
Row 41: 2 Ivory, 1 Black, 1 Ivory, 1 Black, 33 Ivory. (38 Boxes)
Row 42: 34 Ivory, 2 Black, 2 Ivory. (38 Boxes) Fasten Off Black.
*You will now cut each row by one box to decrease all the way down. This is done by slip stitching into the 2nd stitch at the beginning of all of the remaining rows – no more chain 6’s. By working in this manner, the blanket will stop getting taller, but will work all the way down to 1 box to match the beginning.
Row 43: 37 Ivory.
Row 44 – 79: Continue Decreasing. (1 Box at the end of Row 79)
Border: Chain 1. SC into the space between the boxes just behind your current place, chain 2, (SC into the space in between the next 2 boxes, chain 2) 36x, SC into the corner stitch, chain 2, (SC into the space in between the next 2 boxes, chain 2) 41x, SC into the corner stitch, chain 2, (SC into the space in between the next 2 boxes, chain 2) 37x, SC into the corner stitch, chain 2, (SC into the space in between the next 2 boxes, chain 2) 41x, SC into the next corner stitch, chain 2. Join. (160 SC)
Round 2: Slip stitch over into the next chain space, chain 1. Work 2 HDC into this chain space, and into each of the next 36 chain spaces, (HDC, chain 3, HDC) into the next corner stitch, 2 HDC into each of the next 41 chain spaces, (HDC, chain 3, HDC) into the next corner stitch, 2 HDC into each of the next 37 chain spaces, (HDC, chain 3, HDC) into the next corner stitch, 2 HDC into each of the next 41 chain spaces, (HDC, chain 3, HDC) into the next corner stitch, 2 HDC into the next chain space. Join. (322 HDC)
Round 3: Chain 1. HDC into the 1st HDC, and into the next 72, (HDC, chain 3, HDC) into the next chain space, HDC into the next 84 HDC, (HDC, chain 3, HDC) into the next chain space, HDC into the next 76 HDC, (HDC, chain 3, HDC) into the next chain space, HDC into the next 84 HDC, (HDC, chain 3, HDC) into the next chain space, HDC into the last 3 HDC. Join. (328 HDC)
Round 4: Chain 1. HDC into the 1st HDC, and into the next 73, (HDC, chain 3, HDC) into the next chain space, HDC into the next 86 HDC, (HDC, chain 3, HDC) into the next chain space, HDC into the next 78 HDC, (HDC, chain 3, HDC) into the next chain space, HDC into the next 86 HDC, (HDC, chain 3, HDC) into the next chain space, HDC into the last 4 HDC. Join. (336 HDC)
Round 5: Chain 1. HDC into the 1st HDC, and into the next 74, (2 HDC, chain 1, 2 HDC) into the next chain space, HDC into the next 88 HDC, (2 HDC, chain 1, 2 HDC) into the next chain space, HDC into the next 80 HDC, (2 HDC, chain 1, 2 HDC) into the next chain space, HDC into the next 88 HDC, (2 HDC, chain 1, 2 HDC) into the next chain space, HDC into the last 5 HDC. Join. (352 HDC)
Fasten Off, and Weave in Remaining End/s.
Please feel free to make and sell your own Blessed C2C Blanket using this pattern, but please DO NOT claim this pattern as your own nor should you sell my pattern, and DO NOT re-publish my photos as your own. DO NOT copy and paste my pattern anywhere, link to it instead.
Join the EyeLoveKnots Crafting Community to share your creations, and see what other’s are up to!
Share your version of this project on Ravelry – Blessed C2C Blanket. Check out the EyeLoveKnots Ravelry page to keep track of all your EyeLoveKnots favorites in your que, and share your WIPS and finished projects!
Don’t miss out on new crochet patterns, reviews, jewelry tutorials and more! Subscribe to EyeLoveKnots by using the box on the right side toolbar, or follow me via Bloglovin! You can also find me sharing on the EyeLoveKnots Facebook page, and @EyeLoveKnots on Twitter!
Linked Up To…
Craft Schooling Sunday – Creative Jewish Mom
Inspiration Monday – Scattered Thoughts of a Crafty Mom
Creative Mondays – Claire Justine
Handmade Monday #76 – Sum of Their Stories
Merry Monday Link Party #205 – A Wonderful Thought
Dagmar’s Home Link Party #211 – Dagmar’s Home
The Really Crafty Link Party #120 – Keeping it Real
Ginx Woolly Linx Party May – Ginx Craft
424th Inspire Me Tuesday – A Stroll Thru Life
Lou Lou Girls Fabulous Party #216 – Lou Lou Girls
Tutorials & Tips Link Party {353} – Home Stories A to Z
The Scoop Link Party #327 – Worthing Court Blog
Talk of the Town #124 – My Repurposed Life
The Wednesday Link Party #246 – The Stitchin’ Mommy
Sew It Cook It Craft It Link Party #55 – Sew Historically
{wow me} wednesday #352 – Ginger Snap Crafts
Your Whims Wednesday #356 – My Girlish Whims
The Linky Ladies Party #133 – The Purple Poncho
Crafty Love Link Party #33 – Jessie at Home
Scrappy Stitchers Link Party #41 – Stitches ‘N’ Scraps
Funtastic Friday 180 Link Party – Olives n Okra
Home Matters Linky Party #185 – Domestic Deadline
Simply Share Linkup – Cute Capsule Life
Friday Frenzy Link Party – 05/25/18 – Kelly Lynn’s Sweets and Treats
I’m Lovin’ It Linky Party #410 – Tidy Mom
Pin Junkie Pin Party #267 – The Pin Junkie
Best of the Weekend – Hello Little Home
Sweet Inspiration Link Party #108 – The Boondocks Blog
Sundays at Home #207 – Celebrating Everyday Life
Link Your Stuff – Anniemarie’s Haakblog
Snickerdoodle Create Bake Make Party #233 – Across the Boulevard
{nifty thrifty sunday #336} – Nifty Thrifty Things
That is a very lovely blanket and I totally get that you couldn't wait to share it 🙂
Hehe, thank you, Sigrid!
Oh those blessed ends!!! No one likes sewing in the ends do they 🙁
This is so lovely though so totally and completely worth it.
It was totally worth it, and my mom already claimed it before I had even finished. I will admit, I am one of those that does not enjoy sewing in the ends, but surprisingly, I have found quite a bit of makers that really do enjoy it. To each it’s own.
wow, I love it! and maybe not too many ends to weave in that one will go crazy altogether!
thanks so much for sharing on craft schooling Sunday, have yet to try a C2C, but your project is so inspiring I may just have to give it a try.
I am not one to like all the ends – in fact, I have many projects in my WIPs bin because of the ends, but for this blanket, I weaved all of my ends in after I finished the last color change, and then continued working the blanket. It really wasn’t that bad.
Means a lot to have you stop by! If you do get a chance to try, would love your feedback 🙂
It’s a lovely blanket, thank you for sharing the pattern at The Really Crafty Link Party.
Thank YOU, Teresa!
I don’t see words on crocheted blankets very often and this is really neat. Thanks so much for sharing it on Merry Monday.
Thanks so much, Erlene! It came from a vision I had of the word “Thankful” down the side of a scarf I was working up at the time. The word ended up being too big for the scarf, but then I saw this blanket. Came together perfectly.
Awww…such a sweet blanket!!!
My mom thought so too! She claimed it before I was even really done with it. Hehe.
What a lovely blanket. I have noticed Blessed on things, but I bet I will now. Thanks for sharing at my party.
Thanks so much for hosting! I really enjoy the fiber party.
Alex, this is so special! I would love to cozy up to this blanket on my couch at home.
I use the time to pray while weaving in my ends.
Thank you for the free pattern!
That’s so wonderful! Perfect spent time. Thanks, Lisa!