EyeLoveKnots

  • Home
  • Crochet
    • Free Crochet Patterns
      • Colin Drew Series
    • Crochet Pattern Reviews
    • Crochet 101
  • Knitting
  • Crafting
    • Plastic Canvas DIYs
    • Jewelry DIYs
    • Sewing
    • Cross Stitching
    • Upcycling
    • Other DIYs
  • Seasonal DIYs
    • 4th of July DIYs
    • Back to School DIYs
    • Christmas DIYs
    • Easter DIYs
    • Fall DIYs
    • Halloween DIYs
    • Spring DIYs
    • St. Patrick’s Day DIYs
    • Summer DIYs
    • Thanksgiving DIYs
  • Seasonal Round Ups
    • Valentine’s Day
    • St. Patrick’s Day
    • Spring
    • Easter
    • Summer
    • 4th of July
    • Fall
    • Halloween
    • Thanksgiving
    • Christmas
    • Winter
  • Home DIY & Decor
    • In the Bathroom
    • In the Bedroom
    • In the Dining Room
    • In the Kitchen
    • In the Living Room
    • Kids Room
  • Fashion
    • Nail Art
  • Recipes
  • Blogging World
  • Living the Dream
  • Fun Finds Around the Web
  • Linking Up To…
  • Privacy and Sharing Policies
  • About Our GREAT Team!
  • Work with EyeLoveKnots
  • Latest News & Links

How to Make an Invisible Join – Crochet Finishing Technique

January 23, 2020

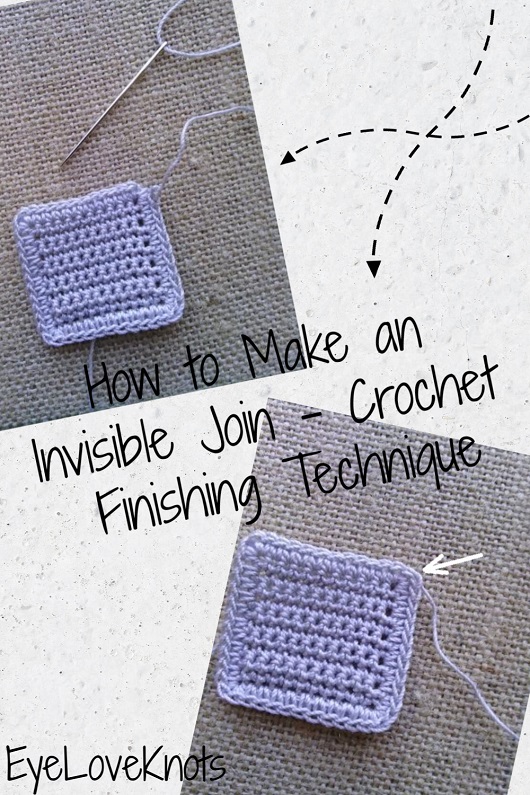
This is a photo tutorial showing how to work an invisible join to give your crocheted pieces a clean, finished look!

I have shown how to do an invisible join in many of the patterns I have shared over the years. While working on a crochet pattern for a pair of earrings I will be sharing this weekend, I found myself editing photos again for how to work the invisible join. I thought it was high time it got it’s own post.

What is an Invisible Join?

You work an invisible join in place of working a slip stitch join. It is a way of replicating the look of a stitch, as opposed to a visible join. It requires fastening off, and working with a tapestry needle.

Some makers use an invisible join when working projects that are flat, worked in the round – like a mandala, so there isn’t a visible seam. I like to use it when finishing projects (the last stitch).

Materials:

I am showing this technique with Artiste Cotton Crochet Thread in the Cloudy [Gray] colorway, and a #20 tapestry needle, but this technique works with any yarn weight/type.

You can even do it with chunky/super bulky yarn, and a small crochet hook in place of the tapestry needle.

Tutorial:

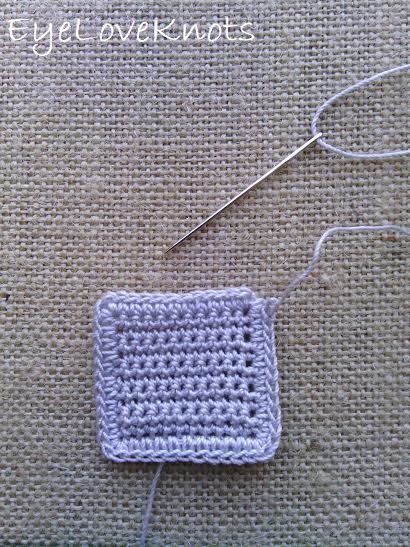
Fasten off with a long tail. Pull on your tail end so it is no longer a loop and thread it through a needle.

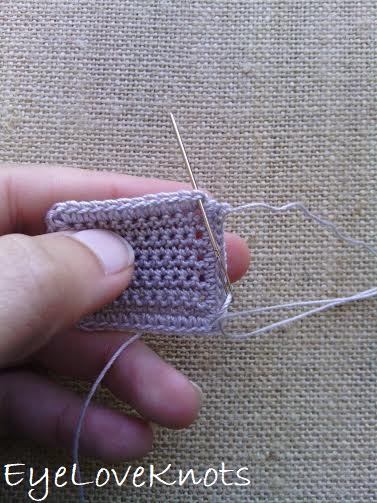
Insert the needle under both loops of the first stitch. (First leg created)

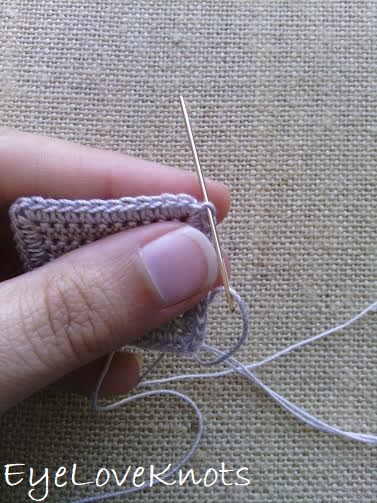
Then bring the needle down into the top V of the last stitch worked. (Second leg created)

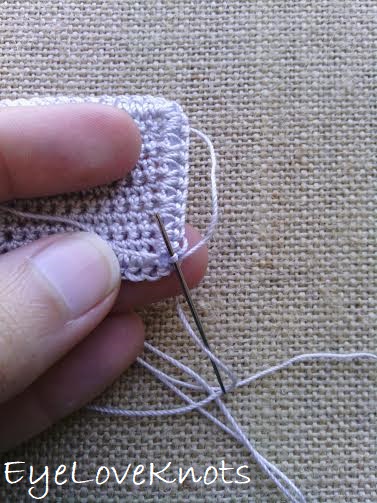
Turn to the wrong side, and weave in tail end making sure not to pull too tight as you don’t want the stitch to disappear and/or bunch.

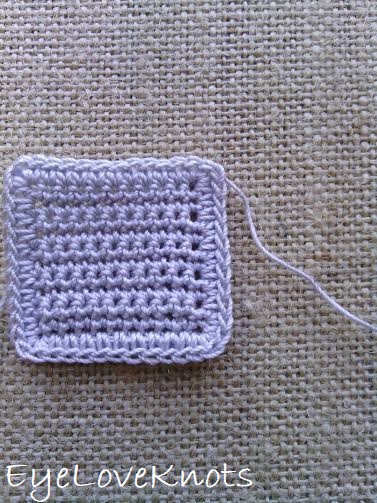
It should now look just like a stitch!

I am not reinventing the wheel here with this technique, but I did take the time to photograph, and write up this post in my own words. Please feel free to make and sell your own projects made using this tutorial. DO NOT re-publish my photos as your own. Please link to this tutorial so others can learn how to make an invisible join too!

Join the EyeLoveKnots Crafting Community on Facebook to share your creations, and see what others are up to!

Linked Up To…
{Wow Me} Wednesday #439 – Ginger Snap Crafts
Your Whims Wednesday #444 – My Girlish Whims
The Wednesday Link Party 332 – The Stitchin’ Mommy
To Grandma’s House We Go Link Party 177 – Chas’ Crazy Creations
Waste Not Wednesday 190 – Faeries and Fauna
Talk of the Town #209 – My Repurposed Life
Tuesday Turn About #33 – My Wee Abode
Hookin’ on Hump Day #207 – Moogly
534th Inspire Me Tuesday – A Stroll Thru Life
Fabulous Party #305 – Lou Lou Girls
Linky Ladies Party #177 – The Purple Poncho
Best of the Month – Calypso in the Country
Handmade & Otherwise Weekly Link Up Week 35 – Petals, Pies and Otherwise
Create, Bake, Grow and Gather Party #405 – Shabby Art Boutique
Link Your Stuff – Annemarie’s Haakblog
Snickerdoodle Create Bake Make Link Party – EyeLoveKnots
Craft Schooling Sunday – Creative Jewish Mom
Happiness is Homemade Link Party #309 – Create with Cynthia
Creative Mondays – Claire Justine
Handmade Monday #162 – Sum of their Stories
The Really Crafty Link Party #204 – Keeping it Real
Ginx Woolly Linx Party February – Ginx Craft
Craftastic Monday Link Party – Sew Can Do
Little Cottage Link Party #38 – Love my little Cottage

Filed Under: Crochet 101 Tagged With: #10 Crochet Thread, Artiste #10 Crochet Thread, Crochet 101, Crochet How To, Free Crochet Tutorial, Gray, Photo Tutorial, Shop Etsy

❮ PREVIOUS POST

Cube Organizers Are Perfect for Yarn Storage!

NEXT POST ❯

How to Cross Stitch on Crocheted Fabric – Photo Tutorial

Comments

  1. Verna Bradshaw says

    January 23, 2020 at 1:21 pm

    I love this f/o Invisible Join technique. I use it on most anything instead of it leaving that horrid bump (knot) that seems impossible to hide.
    From time to time I do need to refresh myself where to put my needle on the last stitch.
    Thanks for making it easy to find on your blog now.

    Reply
    • Alexandra says

      February 8, 2020 at 6:44 pm

      I am with you on the presentation! Much better than a disruptive bump.

      Reply
  2. T K says

    January 24, 2020 at 8:49 am

    I have done that for years. Gives a nice finished look

    Reply
    • Alexandra says

      February 8, 2020 at 6:45 pm

      Yes, definitely!

      Reply
  3. Teresa says

    February 13, 2020 at 11:10 am

    Oh, this is just perfect. It looks so much neater made like this.
    Thank you for sharing at

    Reply
  4. Ginny says

    February 29, 2020 at 4:49 am

    Thank you for the tutorial.

    Reply

Leave a Reply Cancel reply

Your email address will not be published. Required fields are marked *

This site uses Akismet to reduce spam. Learn how your comment data is processed.

Welcome!

Welcome!

Hey! I'm Alexandra, the blogger and creator behind EyeLoveKnots and On Rockwood Lane! My passion is being creative. My favorite thing to do is crochet, and you will almost always find me having a cup of coffee and working on a new crochet project, but when I'm not doing that, you might find me out at a local park rollerblading, baking some fresh cookies, picking veggies in the garden or re-decorating for a new season or holiday. My two cats are great supervisors for all my adventures (minus the being outside because they think it's too hot in Florida to be anywhere but inside), and make sure I take plenty of breaks.

Meet the Team!

Meet the Team!

Abby, Candace, Maggie & Jessica help me bring awesome crochet projects to you! They are awesome, and so talented! Click the image to learn more about them, and get their Instagram links, where they are constantly sharing tons of crochet inspiration.

Don’t Miss Out

Crochet! Magazine Spring 2023

Crochet! Magazine Spring 2023

(Affiliate Link) Click this image to get this issue now. These 22 designs are the perfect way to welcome in Spring with easy to wear layers, sweet styles amplified with striking stitch patterns, and some fun whimsical projects too.

Crochet World Autumn 2023

Crochet World Autumn 2023

(Affiliate Link) Click this image to get this issue now. There are more than 30 crochet patterns in this Autumn issue to work with the transition from Summer to Fall including catchalls and baskets to help get your stash and craft room organized, and cozy afghans, cardigans and accessories.

Gnome Caddy Pattern

Gnome Caddy Pattern

(Affiliate Link) Click this image to get a copy of this pattern! This adorable little Spring Gnome Caddy has a place for all of your crochet supplies. It's worked in a lightweight #3 yarn, but work in a worsted weight #4 yarn for even more space!

Archives

Copyright © 2023 EyeLoveKnots · Custom site by Moonsteam Design