This is the second post I’ve done for crochet edging on fleece blankets – my first being the Crochet Edging for Ultra Cuddle Fleece Boy Toddler Blanket.
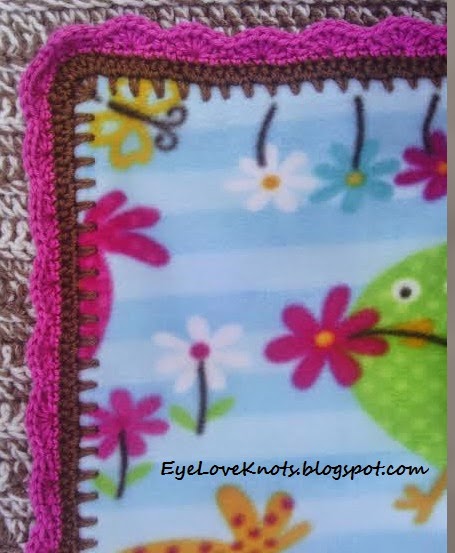
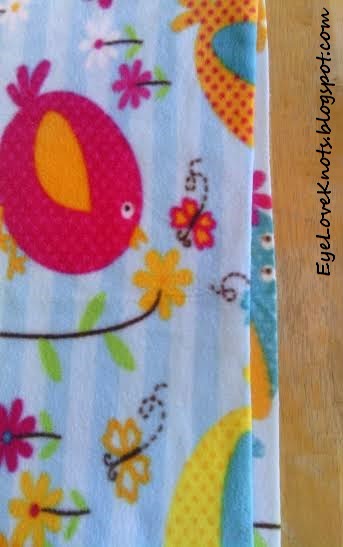
This blanket was inspired by as well as a gift to my little cousin, Madison. The fabric is so cute! I was thinking it would also make a nice gift to give at a baby shower.
Find below my free pattern and Anti Pill Fleece fabric review.
Materials:
– Anti-Pill Fleece – I was not able to find the link to the fabric I bought from JoAnn‘s so I will have to update once I find out the name
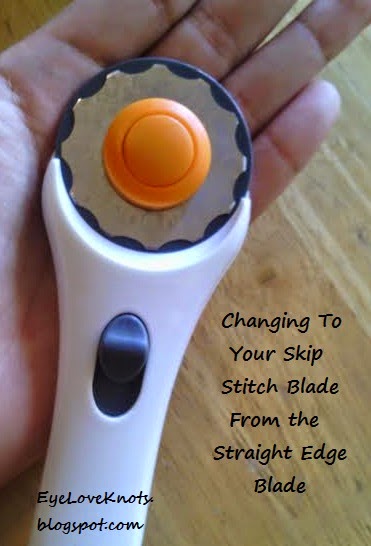
– Skip-Stitch Blade #1 (Skip-Stitch site)
– 45mm Fiskar’s Rotary Cutter (Joann’s)
– Self Healing Mat to Cut on (I didn’t have)
– 4.25mm Crochet Hook (a 4mm or 4.5mm will also work!)
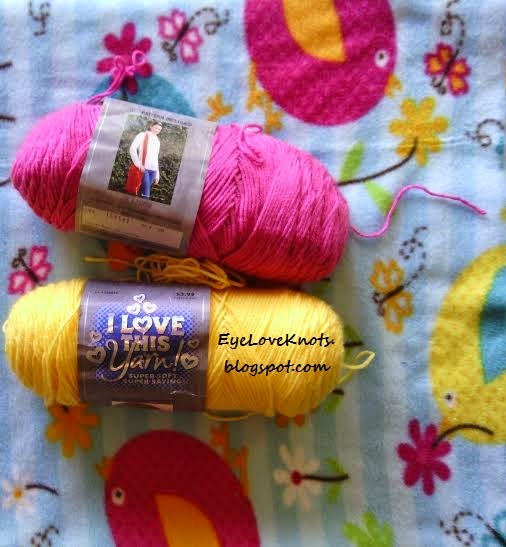
– Worsted Weight Yarn – I used about 135 yards of Red Heart Soft in Chocolate and 135 yards I Love This Yarn in Pink Neon (I tried to match the colors in the blanket.)
– Tapestry Needle for Weaving in Ends and/or for Foundation Blanket Stitch (if you don’t have/want to use the skip stitch blade)
– Ruler and/or Tape Measure
 Notes on Supplies:
Skip Stitch Blade: There are three different sizes of skip stitch blades. I choose the Blade #1 because it states that it is “perfect for perforating fleece and similar fabrics…”
On my post for the Ultra Cuddle Fleece, you will find I DO NOT recommend using the skip stitch blade for the foundation perforation as the fabric is quite fragile, however, it works perfect on the Anti-Pill Fleece!
*I do have a post on Changing the Blade on Your Rotary Cutter in case you need some help!
Ultra Cuddle Fleece: During my trip to Joann’s, I found it rather difficult to choose just two yards out of all of the great options available. My inspiration was my little cousins, Tyler and Madison. Tyler is obsessed with Star Wars hence the choice of the Star Wars fleece – you can find my post on this in the Crochet Edging for Ultra Cuddle Fleece Boy Toddler Blanket. Madison is a girly girl.
Along with all the great theme options, I also found SEVERAL different types fleece. I am not a sewer or quilter and not really familiar with the different fabric types so to guide my choice, I took a look at the No Sew Throw kits to see which type of fleece they use. Then, I went back to the fleece. I decided to get a yard of the Anti Pill fleece (same as kits) and one yard of the Ultra Cuddle Fleece so I could test the differences myself.
After working with the Ultra Cuddle Fleece and finding that it was quite fragile as it tears easily, I was a little worried that I’d go through the same thing with the Anti Pill Fleece. I found this was NOT the case at all! The Anti-Pill Fleece isn’t quite as soft as the Ultra Cuddle Fleece but it is much stronger and sturdier. I found on the Ultra Cuddle Fleece that if the hole was missing, I could simply poke my regular crochet hook through the fabric and create a hole. I tried to do this with the Anti Pill Fleece FIRST to see if it was as easy before I ran my Skip Stitch Blade across it and as hard as i tried, I was unsuccessful. There wasn’t any tearing at any point and I did not feel the need to be gentle while holding and manipulating the fabric.
CONCLUSION: Skip Stitch Blades work GREAT on Anti-Pill Fleece.
Time Spent:
It took me approximately three and a half hours to complete this blanket including the cutting and crocheting.
Measurements:
This blanket measures 40.5″ long by 31.5″ long.
*To achieve this size, I cut the fleece to these exact measurements. When you perforate it, you will take it in 1″ on each side but the border will bring it back to these measurements as it adds 1″ on each side.
Abbreviations:
SC – Single Crochet
ea – each
ST – stitch
sl st – slip stitch
CH – chain
HDC – Half Double Crochet
DC – Double Crochet
SC2TOG – Single Crochet Two Stitches Together (Decrease)
Notes for Pattern:
If you are interested in working the foundation round with a blanket stitch instead of with the skip stitch blade and your crochet hook, I found a really great tutorial courtesy of Kelli and Greta of Holiday Crafts and Creations – How to Do Blanket Stitch.
Tutorial and Pattern:
 |
| First, remove the fine print section. You will want to cut just inside of the color separation so you don’t get any of the white line. |
 |
| One of my sides looked like this – all frilly and such. I did not cut this off because I figured I’d be crocheting over it anyway. |
 |
| My fabric was only slightly uneven. I took out my scissors and cut it even. As my second go round, I found it much easier to fold the fabric in half and cut both layers together. You could also just use the straight edge that comes on the rotary cutter to cut across. (It was too late when I thought of this!) |
 |
| Instead of eyeballing it this time, I decided to use a really big ruler I found in my mom’s room – thanks Mom! and a pen to mark my line. Then, I cut just inside the line to ensure none would be left visible (but it is going to be crocheted over anyway so it doesn’t matter!) |
 |
| I had previously seen someone sew a border around the blanket and then add the foundation round just underneath the sewn stitches. I asked my mom how she normally does it and she told me she just folds over the end and crochets over it so, I measured out 1″. Then, I moved this really long ruler over just a touch and used it as a guide for my cutting. |
| I didn’t get any pictures of the rotary cutter in action on this blanket so I borrowed this one from my Ultra CuddleFleece post. Make sure to move your ruler over just a tiny bit so you are perforating at the 1″ mark and not inside of it. *NOTE: I did not have a self healing mat to do this cutting on. I took LOTS of scrap paper that I had and just stacked them on top of each other – each sheet was a piece of computer paper. I folded them in half and then stacked them in piles of 5 sheets. |
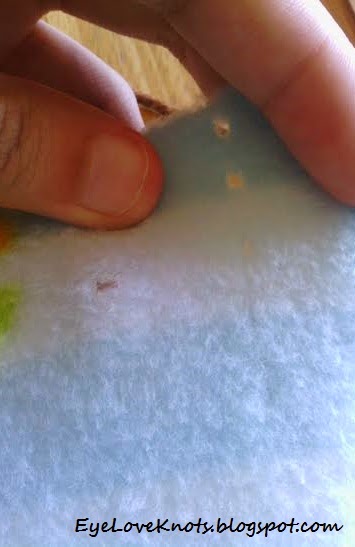 |
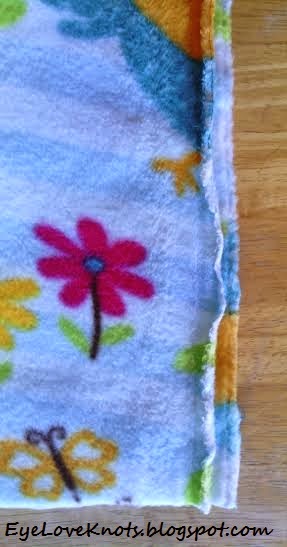
| These are what your perforations will look like. |
 |
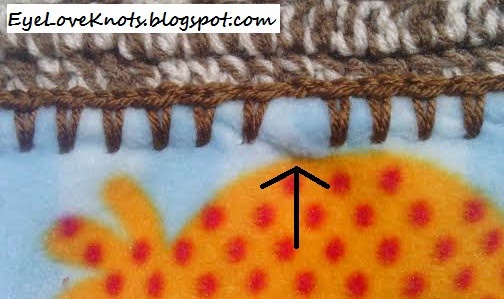
| This is a view from the backside. You will insert your hole from the right side facing you. Fold over the top edge of the fabric so that the tip lays right on top of the holes you made. You will be crocheting over this piece all the way around. This is for added security. |
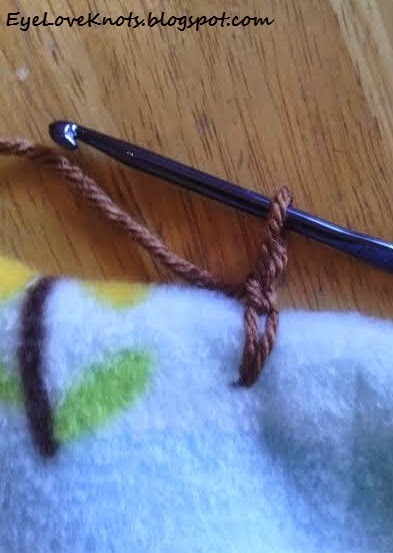 |
| Attach your yarn with a SC to the first hole (preferrably not the corner as it puts added pressure on the stitch), and then CH 1. |
 |
| Continue along side down to first corner: (SC in next hole, CH 1) across. |
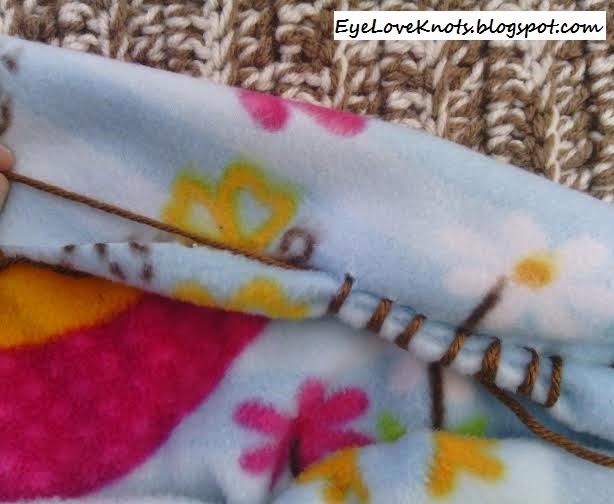 |
| This is a back view of your first few stitches. You can see my tail on the left side. I tucked this into the center of the fabric I folded over and crocheted over both together. |
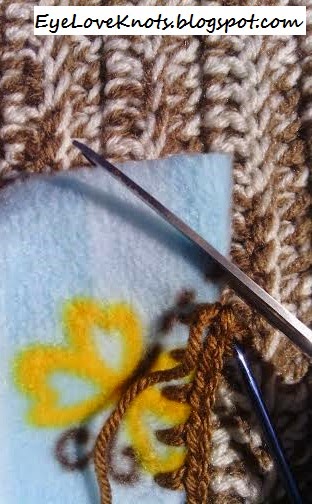 |
| On my Ultra Cuddle blanket, I just folded over the edge. It came out a little more bulky then I would have liked, so in this blanket, I decided to trim the edge. I did this at an angle. Be careful not to cut too close to the stitches. |
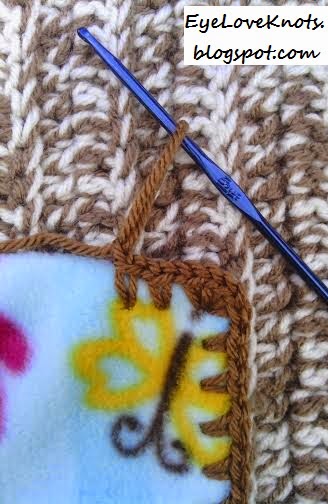 |
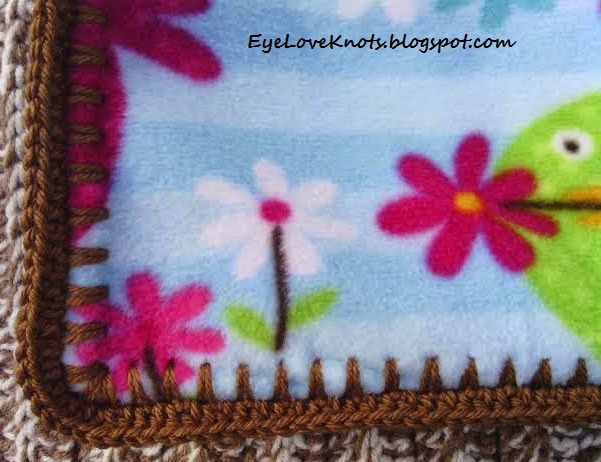
| You will still need to slightly fold over the remaining corner fabric. To work the corner: (You will have previously worked a SC, CH 1), SC, CH 1, SC, CH 1 all in same ST. Then, continue working the side as previously done (SC, CH 1) across. |
 |
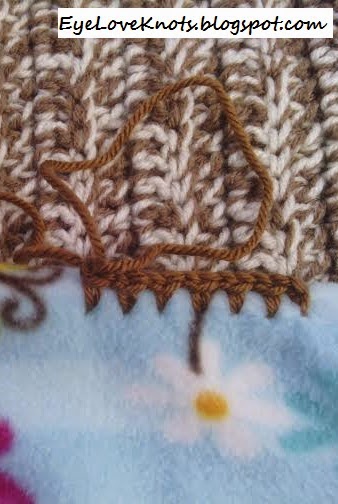
| Once all the way around, Join to the first ST and CH 1.
You’ve finished the foundation round of your blanket! |
 |
| I had one odd piece in which one hole did not get made by my Skip Stitch Blade. To compensate, I CHd 2 (instead of 1). It does stick out a little here, but with the rest of the crocheting, you won’t even notice it! I did try to poke a hole in it with one of my sharper crochet hooks, and was unsuccessful. |
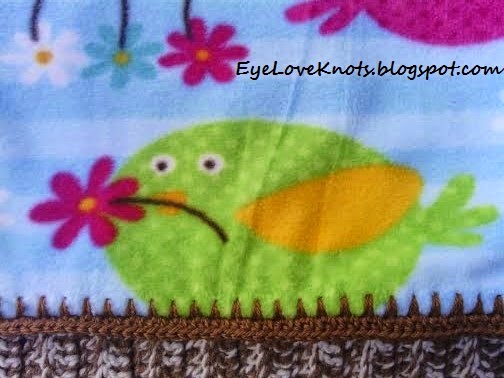 |
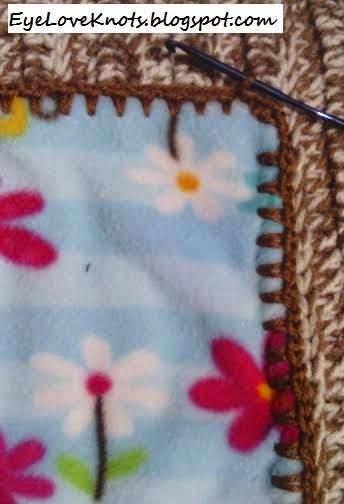
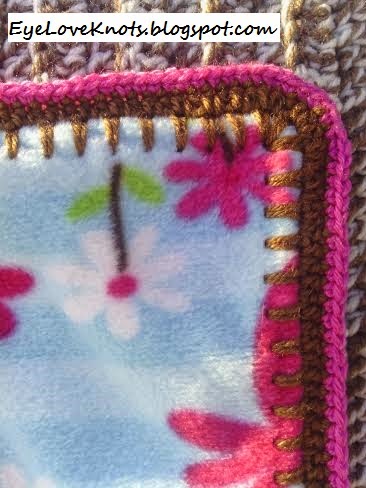
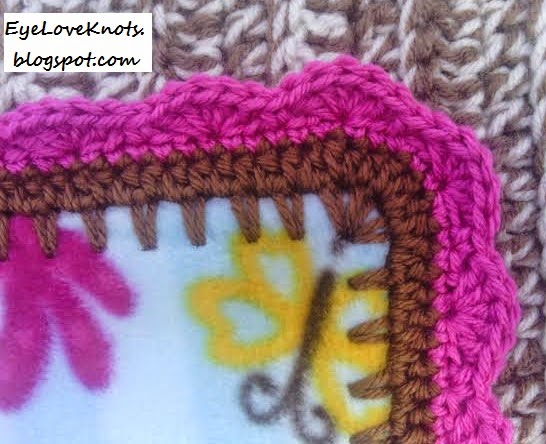
| Round 1: From the previous CH 1: (HDC in ea HDC and CH 1 sp across to corner, 2 HDC in ea HDC of the corner, 1 HDC in CH 1 sp of corner) around blanket. Join to first HDC, CH 1. For the next round, I changed to pink. You can continue on with the first color if you like. *For my first blanket, I did my first round with SCs. It came out thin so I decided with this one, I wanted more substance choosing a HDC to do so. |
 |
| You’ve finished the first round of your blanket! You can leave your blanket like this if you want. OR, you can continue on… |
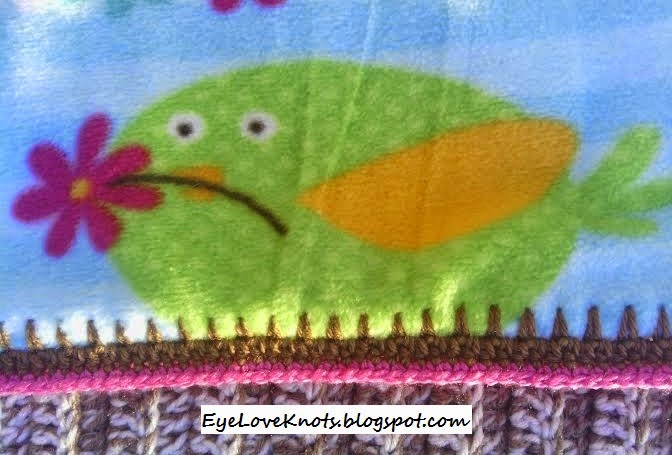 |
| To complete Round 2: CH 1, [(SC in ea HDC across to corner, (2 SC in next ST of corner, SC in ea of next 2 HDC of corner, repeat twice more)] around blanket. Join to first SC, CH 1. For Round 3, I changed to a Shell border, that’s why I only made this round in SC. If you don’t want to do the shells, but want to continue on, just do so in same manner (with increases in each corner). |
 |
| You’ve finished the second round of your blanket! You can leave your blanket like this if you want. OR, you can continue on… |
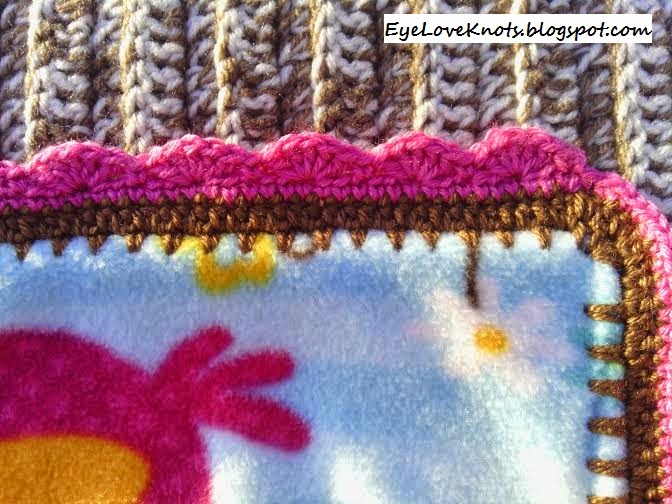 |
| Round 3: To work the Shell: SC in the first ST, then (SK 2 SCs, 5 DC in next SC, SK 2 SCs, SC in next SC) around entire blanket. There will be no increases done at the corners but it will still lay flat. *I did not have the extra number of STs needed to evenly work the shells around so to correct this, for the last four SCs, I worked a SC2TOG (decrease). Join to first ST. Fasten off. Weave in ends. |
 |
| Finished Round 3!
I stopped here. Initially, I did not plan on doing the last round |
Don’t Crochet but Interested in Purchasing an Anti-Pill Fleece Blanket with a Crochet Edge?
I will be adding this blanket and more to my Etsy shop!
Find some options here: Anti Pill Fleece, I Love This Yarn (for border), Red Heart Soft (for border). Feel free to send in your custom requests! Visit my Etsy shop for other baby blankets!
*JoAnn’s also sells licensed fabrics (ie Disney, Hasbro, Nickelodeon, NHL, MLB, etc), however, licensed fabrics are not to be used for commercial purposes so I will not be able to sell any of these.
Any licensed fabric blanket would be a great gift to donate to a local children’s hospital. Make sure to contact the volunteering department of the hospital first for rules and regulations for handmade items. I plan on making some to donate!
Linked Up To…
10 Simple DIY Projects, I’m Lovin It – Tidy Mom
Kitchen Fun and Craft Friday #28 – Kitchen Fun with My 3 Sons
Wonderful Blog Hop #5 – A Mother’s Shadow
Yarn Fanatic Party #4 – The Philosopher’s Wife
Sharing Time Week 5 – Raising Memories
Creative Collection Link Party – Blooming Homestead / The Cards We Drew
Best DIY Projects and Recipes #19 – The 36th Avenue
Serenity Saturday #148 – Serenity You
Craft Schooling Sunday – Creative Jewish Mom
Easy Weeknight Dinner Ideas, Inspiration Monday – Scattered Thoughts of a Crafty Mom
Grateful Heart Linky Party – It’s Overflowing
Think Pink Sunday No. 180 – Flamingo Toes
The Sunday Showcase No. 257 – By Stephanie Lynn
Cute blanket! Love the crochet edging!
Navy Wifey Peters @ The Submarine Sunday Link Party!
Thanks! It was something new to me but lots of fun. Can't wait to see my little cousin, Madison, using it.
Cute fleece and wonderful edging! Love it! Thank you for sharing.
I included your two edging posts as features in this week's Yarn Fanatic Party. Can't wait to see what you have for this week!
I'm honored! Thank you so much!
such a wonderful way to combine two of my favorites, fleece and crochet, and to make something that will ultimately very likely last much longer than a crocheted blanket, and is of course much much quicker! thanks so much for sharing on craft schooling Sunday, and now i need to add one of those cutters that make holes to my wish list!
It's been on my wish list for awhile. Glad I actually bought it! Now, I feel like putting holes in EVERYTHING and crocheting around it. Hehe.
I was going to purchase a Sharp Crochet Hook for edging blankets…then I saw this. I already have a rotary cutter, but I had no idea a skip stitch blade existed. Thanks for the info; and I love that border!
I also have a Sharp Crochet Hook on my list but for now, this helps a bunch! Thanks for visiting and taking the time to comment.