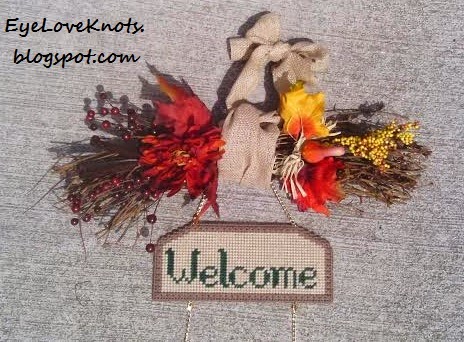
I just completed the Fall Welcome Sign to give to the HR director at my job. The pattern review for it was a bit long so I decided to post the Fall Grapevine Swag in a separate post. The pattern I purchased, does not come with instructions were creating a fall swag.
Supplies I Used – any floral pieces will work!
– 18″ Grapevine Swag (JoAnns)
– Small floral picks (JoAnns) – many of these are seasonal so if you see something you like, GET IT! It probably won’t be there for long. These range in price from $0.99 to $3.99 and are usually found in small bins in the floral department. I got all of mine on sale – 40% off! The pieces I purchased aren’t available online and don’t have names on the tags – just stock numbers.
– 16″ of Burlap Ribbon (JoAnns) – ANY decorative ribbon should work for this, just as long as it will hold the weight of the piece you’re making.
– Optional: Hot Glue and Glue Sticks
– Optional: Wire Cutters – Found in the floral or jewelry departments. You will need these if you want to trim down the stems of your floral pieces. Do NOT use your scissors – it WILL mess them up!
– Optional: Floral Wire
Time Spent:
This grapevine swag is so simple and quick! It will take you less than 10 minutes and will look great in any combination! Honestly, it will probably take you longer to decide exactly which pieces you want to put in it, than it will take you to actually put the pieces together.
Measurements:
The swag is 18″ long, and 3″ or so tall.
Assembly Notes:
I did not use the hot glue or floral wire to hold any of my pieces in. I found that the wrapping in the center of the swag was sufficient enough to hold in the floral stems.
Assembly:
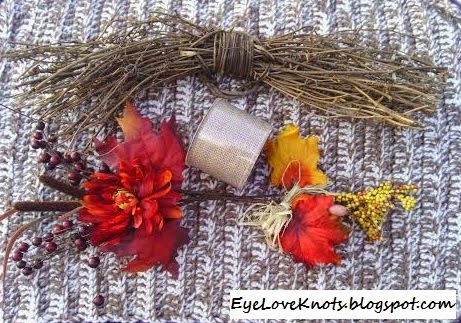 |
| First, I laid out my supplies to make sure that how I wanted them to lay on the swag. |
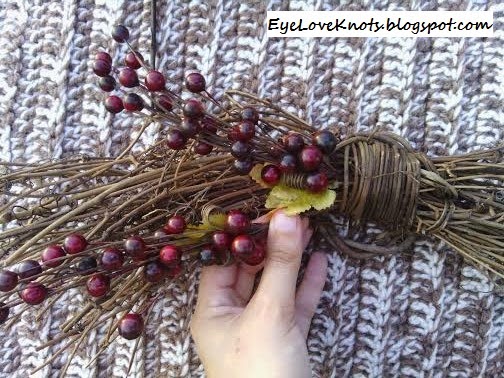 |
| I started by inserting both of my berries pieces. See picture below for a close up on where to insert them. |
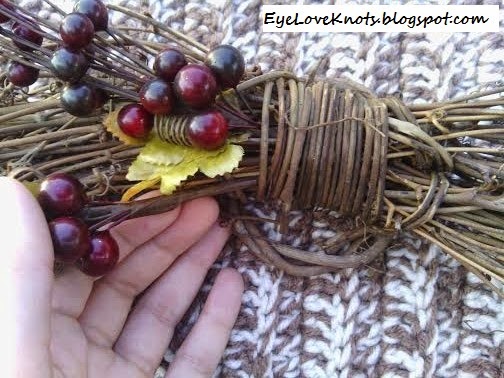 |
| Just slide the stems of your pieces into this bundle of grapevine-ness. There is so much going on in there that they will stay on their own. If you want added security, you can cut a few pieces of floral wire and wrap your floral pieces to pieces of the grapevine swag and/or to each other. You can also apply hot glue to them as an alternative. |
 |
| After the berries, I added in the big beautiful flower. It also has some cotton tail like stems to the left of it. You may be able to see the stem sticking out on the right hand side. It was a little too long for me. |
 |
| To trim your floral stems, USE WIRE CUTTERS to cut to your liking. IF YOU USE REGULAR SCISSORS (like I did), YOU WILL RUIN THEM! There is a metal wire in the stem of the floral piece. Wire cutters are much better suited to handle this cutting job. |
 |
| To balance out my swag, I added this solo piece to the right side but sliding the stem through the center of the swag just as I did the other pieces. |
 |
| The swag is finished! Minus the center part. Notice there is a ring around the center and some space to the left and right of it from where your floral pieces to cover up. Have no fear! This is where your ribbon comes in handy! |
 |
| I was in a rush when it came time to add the ribbon piece. I did not get any shots of me making it but basically I cut 16″ worth of the burlap ribbon, then I folded it in half and placed the half way crease on the bottom of the ring on the swag with the ties facing up. I wrapped the ribbon around the center twice to give it extra support (since the ring made it a little off balance). Then I tied it ONCE on the top, left a little hanging space, and then made a small bow. Trim and you’re good to go! I also tucked in the excess ribbon on the side so it wouldn’t be as wide. If you’re floral pieces are buried by your ribbon, just pull them out a little. |
 |
| I LOVE how my finished Welcome Fall Sign turned out and the HR directors LOVES it too! She put it on her door at work IMMEDIATELY. If you missed my Pattern Review on this Welcome Sign, check it out HERE. |
Linked Up To…
Yarn Fanatic Party #4 – The Philosopher’s Wife
Wonderful Wednesday Blog Hop #5 – A Mother’s Shadow
10 Simple DIY Projects, I’m Lovin It – Tidy Mom
Kitchen Fun and Craft Friday #28 – Kitchen Fun with My 3 Sons
August Share Time Week 5 – Raising Memories
Creative Collection Link Party #14 – Blooming Homestead / The Cards We Drew
Best DIY Projects and Recipes #19 – The 36th Avenue
Serenity Saturday #148 – Serenity You
Craft Schooling Sunday – Creative Jewish Mom
Easy Weeknight Dinner Ideas, Inspiration Monday – Scattered Thoughts of a Crafty Mom
Grateful Heart Linky Party – It’s Overflowing
Think Pink Sunday No. 180 – Flamingo Toes
The Sunday Showcase No. 257 – By Stephanie Lynn
Leave a Reply