EyeLoveKnots

  • Home
  • Crochet
    • Free Crochet Patterns
    • Crochet Pattern Reviews
    • Crochet 101
  • Free File Library
  • Other Crafts
    • Plastic Canvas DIYs
    • Jewelry DIYs
    • Cross Stitching
    • Knitting
    • Nail Art
    • Recipes
    • Upcycling
    • Other DIYs
  • Patterns by Season
    • 4th of July DIYs
    • Back to School DIYs
    • Christmas DIYs
    • Easter DIYs
    • Fall DIYs
    • Halloween DIYs
    • Spring DIYs
    • St. Patrick’s Day DIYs
    • Summer DIYs
    • Thanksgiving DIYs
  • Round Ups by Season
    • Valentine’s Day
    • St. Patrick’s Day
    • Spring
    • Easter
    • Summer
    • 4th of July
    • Fall
    • Halloween
    • Thanksgiving
    • Christmas
    • Winter
  • DIYs by Room
    • In the Bathroom
    • In the Bedroom
    • In the Dining Room
    • In the Kitchen
    • In the Living Room
    • Kids Room
  • Fashion
  • Blogging World
  • Living the Dream
  • Fun Finds Around the Web
  • Linking Up To…
  • Privacy and Sharing Policies
  • About Our GREAT Team!
  • Work with EyeLoveKnots
  • Latest News & Links

Forming a Wrapped Loop – Jewelry DIY

March 6, 2015

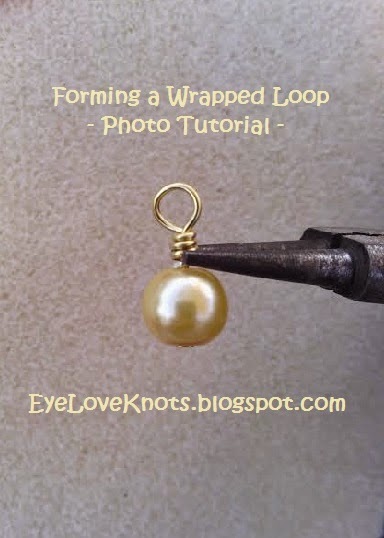
A wire wrapped loop is one of the most secure, and in my opinion, easiest ways to attach beads, charms, pendants, etc to your jewelry pieces. It’s also gives a beautiful, finished look.

One thing that is a little difficult to get just right when forming loops, is getting close enough to avoid the space that sometimes forms between your loop and bead. Using this wrapped loop technique eliminates that space by filling it with the wrapped portion.

Materials I Used:

     – 2″ long Head Pins – I used Gold Tone Head Pins by Darice (JoAnns)
     – 8mm Gold colored Glass Pearls by Darice (JoAnns)
     – Round Nose Pliers (found in Jewelry department of your local craft store)

To create a wrapped loop:

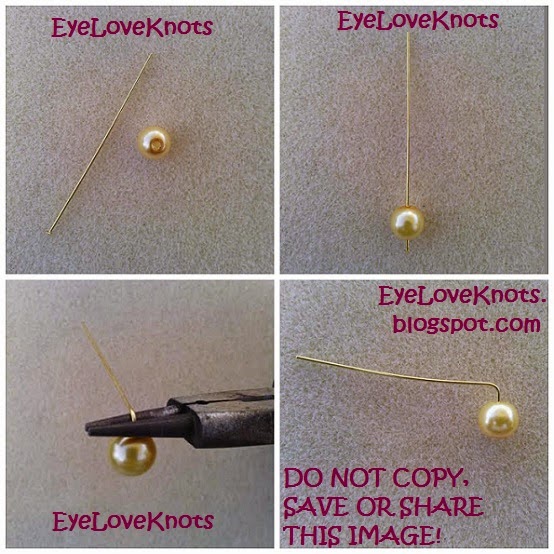
You will first want to string the bead onto the headpin.

Then, with the bottom of the bead snug to the end of the headpin,
 place your round nose pliers on top of it.

*Note: Depending on where you place your pliers, 
will determine the size of the wrapped loop.

Bend the headpin 90 degrees to the left.

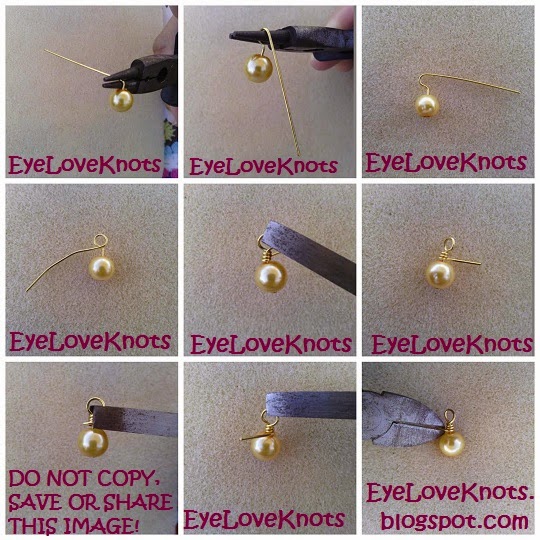
Replace your pliers at the bend, this time turning your pliers from just 
above the bead onto the other part of the headpin.

Grab the end of the headpin, and wrap it around the 
pliers until it’s almost point down

I’ve included the last photo on the top row to show the curve in the bend from the pliers, form the first part of the loop. You will want the end pulled down more than that though.

Next, you’ll reposition your pliers by turning them 180 degrees
– the part of the pliers that was on the bottom, should now be on the top – 
and then continue to pull the end of the headpin around (1st Photo, 2nd Row).

Now starts the wrapping process –
You should be able to use your fingers to pull the wire around, while hold the top of the loop steady with your pliers.

I like to wrap about 3 times, and then use my wire cutters to cut the remaining headpin.
Make sure when using your wire cutters, the flush/flat side is across your piece.
After cutting the excess off, use your pliers to 
press down the end so no sharp pieces are sticking out.

Linked Up To…
Link Your Stuff Party – Lunamon Design
Friday Finds Link Party 5.1.15 – Craftaholics Anonymous
Creativity Unleashed Link Party No. 67 – Practically Functional
The Creative Exchange Link Party #50 – Happy Scraps
Cool Summer Sips, I’m Lovin’ It {linky party} – Tidy Mom
Pin Junkie Pin Party #115 – The Pin Junkie

Craft Schooling Sunday – Creative Jewish Mom
Snickerdoodle Sunday Link Party #79 – 2 Crochet Hooks, Sadie Seasongoods
My Favorite Things Sunday #73–5/2 – Budget Girl
Share It One More Time #9 – Vintage, Paint and More

Filed Under: Jewelry DIYs, Uncategorized Tagged With: Charms, Jewelry DIY, Jewelry Technique, Pendant

❮ PREVIOUS POST

WIPS Wednesday – Too Many Project

NEXT POST ❯

Red Heart Golden Pearl Drop Earrings – Easy Jewelry DIY

Comments

  1. Monica Gullesen Hansen says

    May 6, 2015 at 7:07 am

    Thank you for sharing at my link up last week. Today a new party.
    You are more than welcom to share, Have a nice day.

    Reply
    • knots1prime says

      June 3, 2015 at 1:22 am

      Thanks 🙂

      Reply

Leave a Reply Cancel reply

Your email address will not be published. Required fields are marked *

This site uses Akismet to reduce spam. Learn how your comment data is processed.

Welcome!

Welcome!

Hey! I'm Alexandra, the blogger and designer behind EyeLoveKnots! Grab a cup of coffee, and let's crochet something awesome together!

Subscribe to My Newsletter

Subscribe to My Newsletter

Click on the image to subscribe to my newsletter list. A new window will open up for your name and email address, then just click the Subscribe button and check your email for a confirmation!

Meet the Team!

Meet the Team!

Abby, Candace, Maggie & Jessica help me bring awesome crochet projects to you! They are awesome, and so talented! Click the image to learn more about them, and get their Instagram links, where they are constantly sharing tons of crochet inspiration.

Granny Square Afghan

Granny Square Afghan

(Affiliate Link) I am so in love with the new Granny Square Afghan Kit Club from Annie's Kit Clubs! Granny squares have always held a special place in my heart, and I love the variety! In fact, there are over 90 unique granny squares in here! This club spans 12 months. Each month, you get a new set of instructions and yarn. There are also video tutorials to walk you through each step. Don't want to make an afghan? This is still a great kit to learn different granny stitch patterns, and the squares so versatile! Sew them together to make a scarf, tote bag, cardigan and so much more! Click this image to get more details and join this club!

Archives

Copyright © 2025 EyeLoveKnots · Custom site by Moonsteam Design