EyeLoveKnots

  • Home
  • Crochet
    • Free Crochet Patterns
    • Crochet Pattern Reviews
    • Crochet 101
  • Knitting
  • Crafting
    • Plastic Canvas DIYs
    • Jewelry DIYs
    • Sewing
    • Cross Stitching
    • Upcycling
    • Other DIYs
  • Seasonal DIYs
    • 4th of July DIYs
    • Back to School DIYs
    • Christmas DIYs
    • Easter DIYs
    • Fall DIYs
    • Halloween DIYs
    • Spring DIYs
    • St. Patrick’s Day DIYs
    • Summer DIYs
    • Thanksgiving DIYs
  • Holidays/Seasonal
    • Valentine’s Day
    • St. Patrick’s Day
    • Spring
    • Easter
    • Summer
    • 4th of July
    • Fall
    • Halloween
    • Thanksgiving
    • Christmas
    • Winter
  • Home DIY & Decor
    • In the Bathroom
    • In the Bedroom
    • In the Dining Room
    • In the Kitchen
    • In the Living Room
    • Kids Room
  • Fashion
    • Nail Art
  • Recipes
  • Living the Dream
  • Fun Finds Around the Web
  • Linking Up To…
  • Latest News & Links
  • Privacy and Sharing Policies
  • About Our GREAT Team!
  • Latest News & Links

Bubble Dress for Dress-Up Doll – Crochet Pattern Review – Family Bugs

May 21, 2015

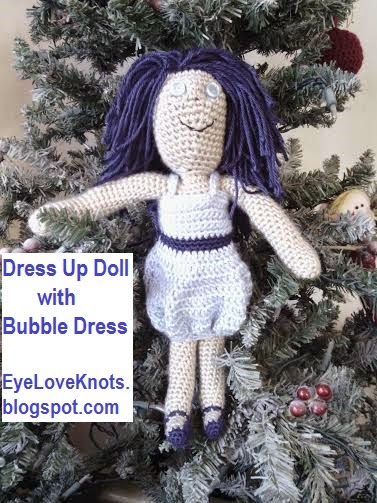
On Sunday, I shared my Crochet Pattern Review for the Dress Up Doll by Sarah of Family Bugs. As promised, today I am sharing my Crochet Pattern Review for the Bubble Dress.

Materials I Used:
  – Small Amount of Simply Soft Yarn in Soft Blue & Dark Country Blue (JoAnns)
  – G6/4.25mm Crochet Hook
  – Tapestry Needle for Weaving in Ends
  – Bubble Dress Pattern (Paid Pattern)

Pattern Notes:
     A loop is formed on the first row of the dress to attach to a button to hold the back of the dress shut. I did not add this button, but you may choose to. 

Time Spent:
     I was able to finish the dress in just over an hour – pre-embellishments.

The Polka Dots took me just over half an hour to finish. This time includes the sewing and weaving of the ends – estimated.

The Shamrock, Heart and Tiny Flower each took just five minutes to work up, sew on and weave in ends.

Measurements: 
     My dress measures 6.25″ in length.

Pattern Notes:
     I did work up each of the embellishments just so I could test out the pattern as written, but I did not end up adding any of the embellishments to my dress as I really liked it as is with just the belt.
I do like simplicity and ease of the embellishment pieces though, and I will be using them for other uses in the future.

     I worked my dress a little differently than written because I could get the back to fit right – specifically the arm holes, and the back opening.

My Adjustments:
I worked the beginning chain as 32, but went right into the second chain of the piece omitting the loop that is created by working into the fifth chain, and continued single crochet down the row.
I worked Round 2 – 7 as written, with a 31 stitch count, and worked two single crochet decreases in Round 8 to get back on track according to the pattern.

At the end of Round 8, I laid the piece with the wrong side facing and pulled the ends of my rectangle piece around to form a link shape. I then overlapped the last two stitches, and then worked the first round of the belt with the right side of the dress facing. The first two stitches went through both layers of the piece. I joined to the first stitch at the end of the round, and worked all the remaining rounds with a join. This join was earlier than suggested in the pattern, but I did so because I thought it made the belt area look better – otherwise it is open, see photo below.

The arrow indicates the row that I joined.
You can see where the join was done according to the pattern 
with the light blue part.
I just didn’t like the belt part being open.
This image shows the gap that would have existed had I left the top as is and attached a button at the top – shown by my thumb. 

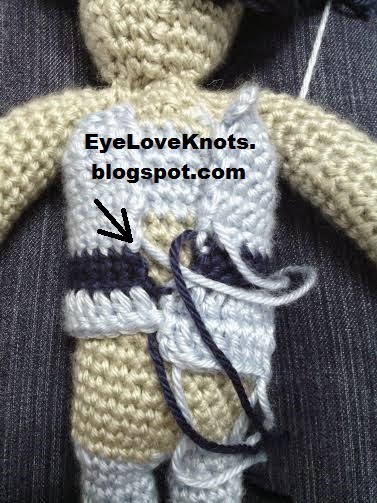
With the overlapping of the two ends, I didn’t have to worry about the back of the dress looking stretched out as it did previously, and it keeps the whole back covered without the need of attaching a button. 
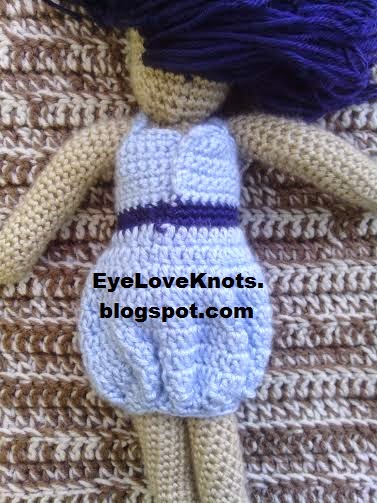
My version is shown above, with no need of a button.


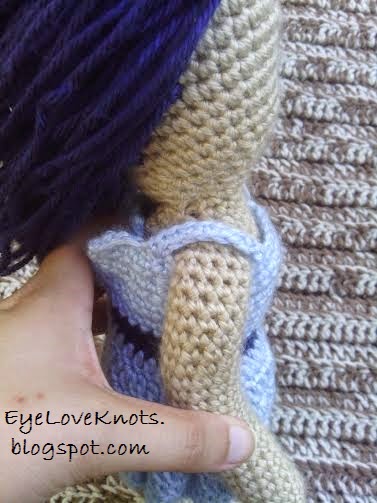
For the straps, I put the dress on the doll, and then eye balled it. 

With the dress laying back side up, attach yarn in the fifth stitch to the left of the opening, chain 6 for the strap, skip 7 stitches, slip stitch into the next stitch, chain 1, single crochet in the back bumps of the chains, slip stitch into the first stitch. Fasten Off.

With the dress laying back side up, attach yarn in the fourth stitch to the right of the opening, chain 6, skip 7 stitches, slip stitch into the next stitch, chain 1, single crochet in the back bumps of the chains, slip stitch into the first stitch. Fasten Off.

OVERALL, it was a fun project to work up – different from what I have been working. If you are interested in purchasing a finished Dress Up Doll with Bubble Dress, feel free to send me a message with your custom request. I am undecided whether these will be added to the shop. I will definitely be buying some more outfits for the doll, and working up some more Pattern Reviews.
You can find several options in the Family Bugs Ravelry Shop.

Are you interested in having someone test out your patterns? Or share Pattern Reviews on your patterns? Please contact me! I LOVE sharing the talents of other designers 🙂 And trying new projects and patterns.

Filed Under: Crochet Pattern Reviews, Uncategorized Tagged With: 4/G6, Blue, Caron, Child, Doll Clothing, Family Bugs, Gift for Girls, Girl, Pattern Review Crochet, Simply Soft, Toys

❮ PREVIOUS POST

Yarn Fanatic Party #37 – String Theory Hand Dyed Yarn Sponsored Giveaway

NEXT POST ❯

Yarn Fanatic Party #38 – String Theory Hand Dyed Yarn Sponsored Giveaway

Leave a Reply Cancel reply

Your email address will not be published. Required fields are marked *

This site uses Akismet to reduce spam. Learn how your comment data is processed.

Welcome!

Welcome!

Hey! I'm Alexandra, the blogger and creator behind EyeLoveKnots and On Rockwood Lane! My passion is being creative. My favorite thing to do is crochet, and you will almost always find me having a cup of coffee and working on a new crochet project, but when I'm not doing that, you might find me out at a local park rollerblading, baking some fresh cookies, picking veggies in the garden or re-decorating for a new season or holiday. My two cats are great supervisors for all my adventures (minus the being outside because they think it's too hot in Florida to be anywhere but inside), and make sure I take plenty of breaks.

Meet the Team!

Meet the Team!

On the left, Abby is the maker behind A Stitch Shy of Normal, and on the right Jessica is the maker behind Nice and Knotty and Candace is the maker behind TandC Crafters.

Together, they help me bring awesome crochet projects to you! Click the image to learn more about them, and get their Instagram links, where they are constantly sharing tons of crochet inspiration.

Don’t Miss Out

Crochet! Magazine Spring 2023

Crochet! Magazine Spring 2023

(Affiliate Link) Click this image to get this issue now. These 22 designs are the perfect way to welcome in Spring with easy to wear layers, sweet styles amplified with striking stitch patterns, and some fun whimsical projects too.

Crochet World April 2023

Crochet World April 2023

(Affiliate Link) Click this image to get this issue now. These 21 designs are the perfect way to welcome in Spring with fun pops of color, sweet crochet thread projects, and fresh takes on the classic granny stitch pattern.

Gnome Caddy Pattern

Gnome Caddy Pattern

(Affiliate Link) Click this image to get a copy of this pattern! This adorable little Spring Gnome Caddy has a place for all of your crochet supplies. It's worked in a lightweight #3 yarn, but work in a worsted weight #4 yarn for even more space!

Archives

Copyright © 2023 EyeLoveKnots · Custom site by Moonsteam Design