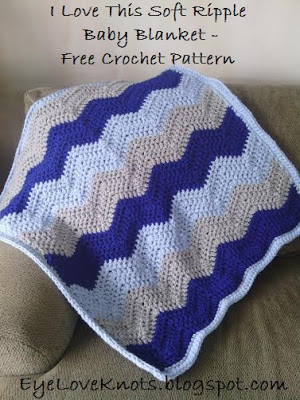
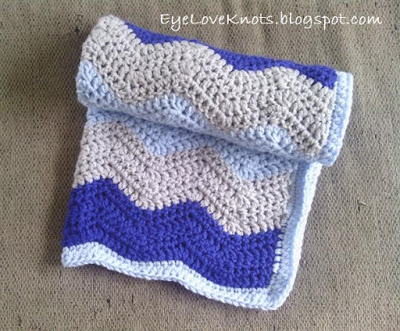
A few weeks ago I shared a free crochet pattern for the It’s Great to Be a Grenadier Slanted Shell Afghan. In the makes of the second afghan that I made to donate to my old high school, I stopped to work up this I Love This Soft Ripple Baby Blanket.
This blanket would be a great baby shower gift, or as part of your baby nursery. The size makes it great for changing baby’s diaper, tummy time and cuddling.
Materials:
– 1050 yards of Worsted Weight Yarn – I used almost one skein each of Hobby Lobby’s I Love This Yarn in Royal Blue, Soft Blue and Light Gray
– M13/9mm Crochet Hook
– Tapestry Needle for Weaving in Ends – I like to use a #18, or #20
Material Notes:
Chunky/Bulky yarn will also work since this blanket is made using two strands held together.
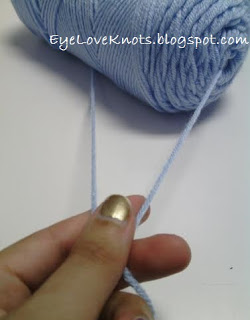
You may opt to purchase two skeins of the same color and hold the strands both from the center pull, but I did it the hard way and held the strands from either end of the skein. You can see a photo of this in the Pattern Notes section.
Time Spent:
I worked up this blanket in about five hours, including the weaving of my ends.
Measurements:
29″ Wide by 30″ in Length
R2-R6: Chain 2, turn. DC in the 2nd DC and each DC across.
Fasten Off.
Abbreviations:
SC – Single Crochet
HDC – Half Double Crochet
DC – Double Crochet
dc3tog – Double Crochet Three Stitches Together (also called a decrease)
To work a dc3tog: Yarn over, insert hook into the first stitch, yarn over, pull through (3 loops on hook), yarn over, pull through two loops on hook, yarn over, insert hook into next stitch, yarn over, pull through (4 loops on hook), yarn over, pull through two loops on hook, insert hook into next stitch, yarn over, pull through (5 loops on hook), yarn over, pull through two loops on hook, yarn over, pull through all 4 loops on the hook.
 Pattern Notes:
Use two strands held together. As mentioned above – I held the strands from both ends of the skein – shown to the right. To make it easier on yourself, you can unwind the skein and rewind with both strands together. I don’t do this, but it would definitely help with the tangling.
Ripple Pattern can be made bigger or smaller by adding or subtracting 12 chains.
Blanket can be made longer or shorter by adding or subtracting 2 rows – two rows together measures 1.75″ in length.
I suggest leaving the color changes on even rows, as I have, otherwise the sides of your blanket will have a funny little visible yarn change thing going on – I learned this the hard way on another project I worked. It’s not real obvious, but was obvious enough for me not to try it again.
You have three options for the tails of the color change: fasten off and weave in ends, fasten off and work over tails or carry yarn up the side and work over the tails.
I chose to fasten off and weave in my ends. Yes, it is quite a bit of time dedicated to weaving in ends (about 30) but I don’t like carrying my yarn up the side because of the tangling that usually happens within the skeins from turning at the end of each round, plus you don’t know what the yarn is going to look like when you try to crochet over as one may be too dark or light and show through your stitches, and I don’t like to work over my tails because it creates a puckering on that one side, and makes the blanket more rigid on that side. Working over one tail such as working over the beginning tail when working the border on the opposite side of the foundation chain is nothing and can be done care free, but when I get into several ends as on the one side of the blanket, I weave. It’s also more secure.
I worked my final join as an invisible one. You can view a photo tutorial of this in my Newborn Twin Chunky Beanie post.
Pattern:
In Royal, Chain 64. DC in the 4th chain from the hook (counts as a 1st DC), (DC in the next 4 stitches, dc3tog, DC in the next 4 stitches, 3 DC in the next stitch) 4 times, DC in the next 4 stitches, dc3tog, DC in the next 4 stitches, 2 DC in the last stitch. (61)
R2 – 4: Chain 2, turn. DC in the 1st DC and the next 4 DC’s, (dc3tog, DC in the next 4 DC’s, 3 DC in the next DC, DC in the next 4 DC’s) 4 times, dc3tog, DC in the next 4 DC’s, 2 DC in the last DC. Change to Light Gray.
R5 – 8: In Light Gray, Chain 2 and turn. DC in the 1st DC and the next 4 DC’s, (dc3tog, DC in the next 4 DC’s, 3 DC in the next DC, DC in the next 4 DC’s) 4 times, dc3tog, DC in the next 4 DC’s, 2 DC in the last DC. Change to Soft Blue.
R9 – 12: In Soft Blue, Chain 2 and turn. DC in the 1st DC and the next 4 DC’s, (dc3tog, DC in the next 4 DC’s, 3 DC in the next DC, DC in the next 4 DC’s) 4 times, dc3tog, DC in the next 4 DC’s, 2 DC in the last DC. Change to Royal.
R13 – 16: In Royal, Chain 2 and turn. DC in the 1st DC and the next 4 DC’s, (dc3tog, DC in the next 4 DC’s, 3 DC in the next DC, DC in the next 4 DC’s) 4 times, dc3tog, DC in the next 4 DC’s, 2 DC in the last DC. Change to Light Gray.
R17 – 20: In Light Gray, Chain 2 and turn. DC in the 1st DC and the next 4 DC’s, (dc3tog, DC in the next 4 DC’s, 3 DC in the next DC, DC in the next 4 DC’s) 4 times, dc3tog, DC in the next 4 DC’s, 2 DC in the last DC. Change to Soft Blue.
R21 – 24: In Soft Blue, Chain 2 and turn. DC in the 1st DC and the next 4 DC’s, (dc3tog, DC in the next 4 DC’s, 3 DC in the next DC, DC in the next 4 DC’s) 4 times, dc3tog, DC in the next 4 DC’s, 2 DC in the last DC. Change to Royal.
R25 – 28: In Royal, Chain 2 and turn. DC in the 1st DC and the next 4 DC’s, (dc3tog, DC in the next 4 DC’s, 3 DC in the next DC, DC in the next 4 DC’s) 4 times, dc3tog, DC in the next 4 DC’s, 2 DC in the last DC. Change to Light Gray.
R29 – 32: In Light Gray, Chain 2 and turn. DC in the 1st DC and the next 4 DC’s, (dc3tog, DC in the next 4 DC’s, 3 DC in the next DC, DC in the next 4 DC’s) 4 times, dc3tog, DC in the next 4 DC’s, 2 DC in the last DC. Change to Soft Blue for Border.
Border – Add’s 2″ to Each Side
R1: In Soft Blue, Chain 1 and turn. Work 2 SC in the 1st DC, SC in the next 59 DC’s, 3 SC in the next DC – corner – evenly SC down the side in the next 62 stitches, 3 SC in the next stitch – corner – working on the opposite side of the foundation chain, SC in the next 59 stitches, 3 SC in the next stitch – corner, evenly SC up the side in the next 62 stitches, 1 SC in the last/first stitch. Join to the 1st SC.
R2: Chain 1, DO NOT TURN. Work 2 HDC in the 1st SC, HDC in the next 61 SC’s, 3 HDC in the next SC – corner – HDC in the next 64 stitches, 3 HDC in the next SC – corner – HDC in the next 61 SC’s, 3 HDC in the next SC – corner – HDC in the next 64 stitches, 1 SC in the last/first stitch. Join to the 1st HDC.
Fasten Off and Weave in Ends – I worked my last join as an invisible join. See Pattern Notes for link to photo tutorial.
Please feel free to make and sell your own Baby Ripple Blanket, but please DO NOT claim this pattern as your own nor should you sell my pattern, and DO NOT re-publish my photos as your own. DO NOT copy and paste my pattern anywhere, link to it instead.
*If you would like a PDF version of this post, you may get one through my Etsy shop for a small fee. This fee is to compensate for the view/s lost once you no longer need to return to the blog for the information, as you will have your own copy. Plus! It helps fund supplies for new projects to share with you!
Shop EyeLoveKnots – I Love This Soft Ripple Baby Blanket.
*I am now on Ravelry! Check out my EyeLoveKnots Ravelry Shop for all EyeLoveKnots Free Crochet Patterns in one place, add to your que and add photos of your WIPS and finished projects there too!
Don’t miss out on new crochet patterns, reviews, jewelry tutorials and more! Subscribe to EyeLoveKnots by using the box on the right side toolbar, or follow me via Bloglovin!


Leave a Reply