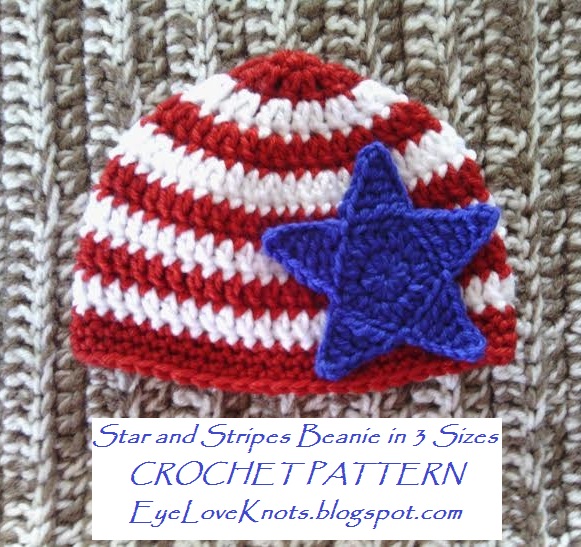
I had a request for some patriotic hats for a 3 month old baby boy 4th of July photo shoot, so I got to work on some ideas, this Star and Stripes Beanie being one of them.
I have three sizes available for you below, Newborn, 3-6 Months and 6-12 Months. I do plan on working up other sizes. If you would like to see the other sizes before I get to them, please leave me a comment below!
Materials:
– Lightweight Worsted Weight Yarn – I used Deborah Norville‘s Everyday Soft in Snow White, Royal Blue and Really Red
– I9/5.5mm Crochet Hook (for hat)
– F5/3.75mm Crochet Hook (for star applique)
– Tapestry Needle – an 18″ or 20″ will work well for this!
Material Notes:
Yarn Alternatives: Caron’s Simply Soft, Caron’s Party Yarn, Hobby Lobby’s I Love This Cotton Yarn, Hobby Lobby’s Soft Secret, Lion Brand’s Wool Ease.
You will want a yarn that is soft to the touch for babies soft, sensitive skin, and acrylic or cotton are the best options to avoid allergens so the Wool Ease and the Party Yarn really aren’t the best option for babies.
I was working multiple projects at once so I am not sure exactly on the yardage but with one 4 oz/203 skein of each color, you will be able to work up 4-5 hats.
Time Spent:
The newborn size was ready in just under an hour, the 3-6 month size in just about an hour, and the 6-12 month size in just over an hour.
If you don’t work the striped pattern, you can expect to work up the hats in about half that time.
Measurements:
The Newborn Size has a crown of 4.25″ in diameter, a circumference of nearly 13.5″ to fit a head size of 13″ – 14″, and is 5″ in length.
The 3-6 Month Size has a crown of 4.75″ in diameter, a circumference of nearly 15″ to fit a head size of 15″ – 16″, and is also 5″ in length.
The 6-12 Month Size has a crown of 5.25″ in diameter, a circumference of nearly 16.5″ to fit a head size of 17″ – 19″, and is 5.5″ in length.
*Stretch depends on your yarn brand selected. The Everyday Soft yarn has about an inch to an inch and a half, while a yarn such as Hobby Lobby’s I Love This Yarn has about two inches worth.
Gauge:
With Everyday Soft and an I9/5.5mm Crochet Hook = 4″ x 4″:
Chain 19, DC in the 4th chain, and in each stitch across. (16 DC)
R2 – R8: Chain 2, turn. DC in the 2nd DC and in each DC across.
Fasten Off.
Abbreviations:
SC – Single Crochet
HDC – Half Double Crochet
DC – Double Crochet
TR – Triple Crochet [yarn over twice, insert hook into stitch, yarn over, pull through (4 loops on hook), (yarn over, pull through two loops) 3x]
QUAD – Quadruple Crochet [yarn over three times, insert hook into stitch, yarn over, pull through (5 loops on hook), (yarn over, pull through two loops) 4x]
Pattern Notes:
Join to the first stitch, not the beginning chain.
Work color change in last part of stitch. For assistance, see my How to Change Colors in Crochet the EyeLoveKnots Way post.
I finished my hat with an invisible join. To see a photo tutorial of this technique, see the Pattern Notes section of my Newborn Twin Chunky Hat post.
Pattern for Star Applique is listed below. Use an F5/3.75mm crochet hook. You could use a bigger hook size, but remember a bigger hook size will produce a bigger star and it may or may not fit on the little hat.
Pattern:
Newborn:
With Red: Chain 4, work 9 DC into the 1st chain. Join. (9 DC)
R2: Chain 2. Work 1 DC into the first stitch, 2 DC in each of the next 8 DCs, and 1 DC into the last stitch. Join, with White. (18 DC)
R3: With White: Chain 2. Work 1 DC into the first two stitches, (2 DC into the next stitch, 1 DC into the next stitch) 8x, 1 DC into the last stitch. Join, with Red. (27 DC)
R4: With Red: Chain 2. Work 1 DC into the first three stitches, (2 DC into the next stitch, 1 DC into each of the next 2 stitches) 8x, 1 DC into the last stitch. Join, with White. (36 DC)
R5: With White: Chain 2. Work 1 DC into the first stitch, and each stitch around. Join, with Red.
R6: With Red: Chain 2. Work 1 DC into the first stitch, and each stitch around. Join, with White.
R7: With White: Chain 2. Work 1 DC into the first stitch, and each stitch around. Join, with Red.
R8: With Red: Chain 2. Work 1 DC into the first stitch, and each stitch around. Join, with White.
R9: With White: Chain 2. Work 1 DC into the first stitch, and each stitch around. Join, with Red.
R10 – 11: With Red: Chain 1, Work 1 SC into the first stitch, and each stitch around. Join – I did so with an invisible join. For a photo tutorial of this technique, see Pattern Notes.
Fasten Off, Weave in Ends.
3-6 Months:
With Red: Chain 3, work 6 HDC into the 1st chain. Join. (6 HDC)
R2: Chain 2. Work 1 DC into the first stitch, 2 DC in each of the next 5 HDCs, and 1 DC into the last stitch. Join, with White. (12 DC)
R3: With White: Chain 2. Work 1 DC into the first stitch, 2 DC in each of the next 11 DCs, and 1 DC into the last stitch. Join, with Red. (24 DC)
R4: With Red: Chain 2. Work 1 DC into the first two stitches, (2 DC into the next stitch, 1 DC into the next stitch) 11x, 1 DC into the last stitch. Join, with White. (36 DC)
R5: With White: Chain 2. Work 1 DC into the first three stitches, (2 DC into the next stitch, 1 DC into each of the next 2 stitches) 11x, 1 DC into the last stitch. Join, with Red. (48 DC)
R6: With Red: Chain 2. Work 1 DC into the first stitch, and each stitch around. Join, with White.
R7: With White: Chain 2. Work 1 DC into the first stitch, and each stitch around. Join, with Red.
R8: With Red: Chain 2. Work 1 DC into the first stitch, and each stitch around. Join, with White.
R9: With White: Chain 2. Work 1 DC into the first stitch, and each stitch around. Join, with Red.
R10 – 11: With Red: Chain 1, Work 1 SC into the first stitch, and each stitch around. Join – I did so with an invisible join. For a photo tutorial of this technique, see Pattern Notes.
Fasten Off, Weave in Ends.
6-12 Months:
With Red: Chain 4, work 10 DC into the 1st chain. Join, with White. (10 DC)
R2: With White: Chain 2. Work 1 DC into the first stitch, 2 DC in each of the next 9 DCs, and 1 DC into the last stitch. Join, with Red. (20 DC)
R3: With Red: Chain 2. Work 1 DC into the first two stitches, (2 DC into the next stitch, 1 DC into the next stitch) 9x, 1 DC into the last stitch. Join, with White. (30 DC)
R4: With White: Chain 2. Work 1 DC into the first three stitches, (2 DC into the next stitch, 1 DC into each of the next 2 stitches) 9x, 1 DC into the last stitch. Join, with Red. (40 DC)
R5: With Red: Chain 2. Work 1 DC into the first four stitches, (2 DC into the next stitch, 1 DC into each of the next 3 stitches) 9x, 1 DC into the last stitch. Join, with White. (50 DC)
R6: With White: Chain 2. Work 1 DC into the first stitch, and each stitch around. Join, with Red.
R7: With Red: Chain 2. Work 1 DC into the first stitch, and each stitch around. Join, with White.
R8: With White: Chain 2. Work 1 DC into the first stitch, and each stitch around. Join, with Red.
R9: With Red: Chain 2. Work 1 DC into the first stitch, and each stitch around. Join, with White.
R10: With White: Chain 2. Work 1 DC into the first stitch, and each stitch around. Join, with Red.
R11 – 12: With Red: Chain 1, Work 1 SC into the first stitch, and each stitch around. Join – I did so with an invisible join. For a photo tutorial of this technique, see Pattern Notes.
Fasten Off, Weave in Ends.
Star Applique:
Chain 4. Join to form a ring. Chain 1, work 10 HDC into the ring. Join. (10 HDC)
R2: Chain 1, HDC in the 1st HDC, 2 HDC in each of the next 9 HDCs, HDC in the last HDC. Join. (20 HDC)
R3: (Chain 6 and work down the chain, SC in the 2nd chain, HDC in the 3rd chain, DC in the 4th chain, TR in the 5th chain and QUAD in the 6th chain; Back to the circle, skip the first stitch that the chain 6 is coming out of, and next three HDCs, slip stitch in the 5th stitch) 5x, ending with your slip stitch in the same stitch as you began the round.
Fasten Off, and Weave in Ends.
Sew on Star Applique:
Once I settled on star placement, I weaved my blue (matching) yarn in and out on the wrong side to secure and then starting sewing on my star applique with the same worsted weight Royal Blue yarn. I sewed all the way around the perimeter of the star working my stitches into the chain stitches.
Weave final end and trim tail.
Please feel free to make and sell your own Star and Stripes Hat using this pattern, but please DO NOT claim this pattern as your own nor should you sell my pattern, and DO NOT re-publish my photos as your own. DO NOT copy and paste my pattern anywhere, link to it instead.
*If you would like a PDF version of this post, you may get one through my Etsy shop for a small fee. This fee is to compensate for the view/s lost once you no longer need to return to the blog for the information, as you will have your own copy. Plus! It helps fund supplies for new projects to share with you!
Shop EyeLoveKnots – Star and Stripes Beanie.
With so many size, yarn type and color options, I would love to see them! Please share your photos on my EyeLoveKnots Facebook page!
I am on Ravelry! Check out the EyeLoveKnots Ravelry page to keep track of all your EyeLoveKnots favorites in your que, and share your WIPS and finished projects!
Don’t miss out on new crochet patterns, reviews, jewelry tutorials and more! Subscribe to EyeLoveKnots by using the box on the right side toolbar, or follow me via Bloglovin!
Very nice 🙂 Keep up the good work 🙂
Thanks Paula!
Cute!! Thanks for sharing the pattern with us at Brag About It! Pinned to share.
This is adorable! Pinning. Thanks for partying with us!