EyeLoveKnots

  • Home
  • Crochet
    • Free Crochet Patterns
    • Crochet Pattern Reviews
    • Crochet 101
  • Knitting
  • Crafting
    • Plastic Canvas DIYs
    • Jewelry DIYs
    • Sewing
    • Cross Stitching
    • Upcycling
    • Other DIYs
  • Seasonal DIYs
    • 4th of July DIYs
    • Back to School DIYs
    • Christmas DIYs
    • Easter DIYs
    • Fall DIYs
    • Halloween DIYs
    • Spring DIYs
    • St. Patrick’s Day DIYs
    • Summer DIYs
    • Thanksgiving DIYs
  • Holidays/Seasonal
    • Valentine’s Day
    • St. Patrick’s Day
    • Spring
    • Easter
    • Summer
    • 4th of July
    • Fall
    • Halloween
    • Thanksgiving
    • Christmas
    • Winter
  • Home DIY & Decor
  • Fashion
    • Nail Art
  • Recipes
  • Living the Dream
  • Fun Finds Around the Web
  • Linking Up To…
  • Latest News & Links
  • Privacy and Sharing Policies
  • About Our GREAT Team!
  • Latest News & Links

Framed Solid Granny Square Earrings in 2 Sizes – Free Crochet Pattern & Jewelry DIY

August 6, 2015

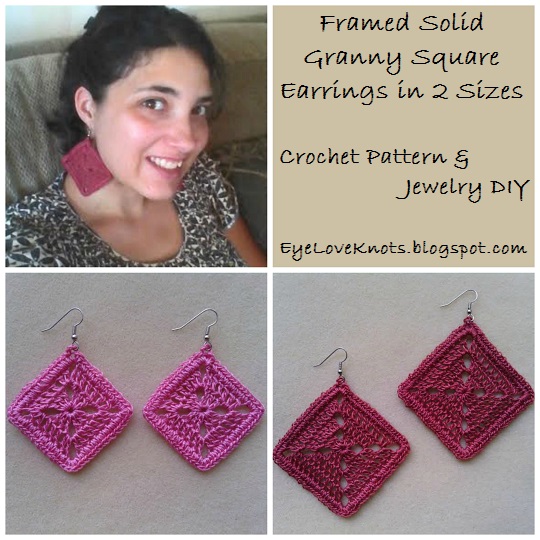
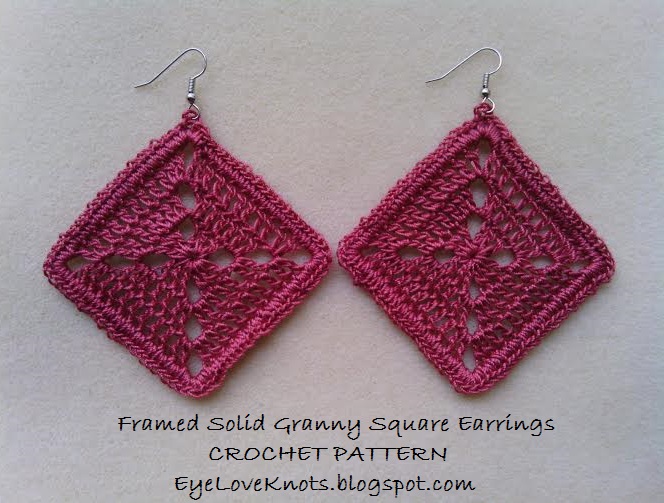
Last week I shared a Free Crochet Pattern & Jewelry DIY for Framed Granny Square Earrings. This week, I thought I’d create some similar earrings using the Solid Granny Square pattern instead.

You could make these in multiple colors, or just the solid as I have done.

These earrings are easy to work up and work up fairly quickly, are flexible, very lightweight and have a fun finishing with the frame.

Alternatively, you could make a larger granny square and use it as a pendant for a necklace 🙂

Materials:
     – 250-350″ of #10 Crochet Thread – I used artiste 100% Mercerized Egyptian Cotton in Country Rose and Tropical Pink – Hobby Lobby
     – 2.35mm Crochet Hook
     – Small Tapestry Needle for Weaving in Ends – I used a #22
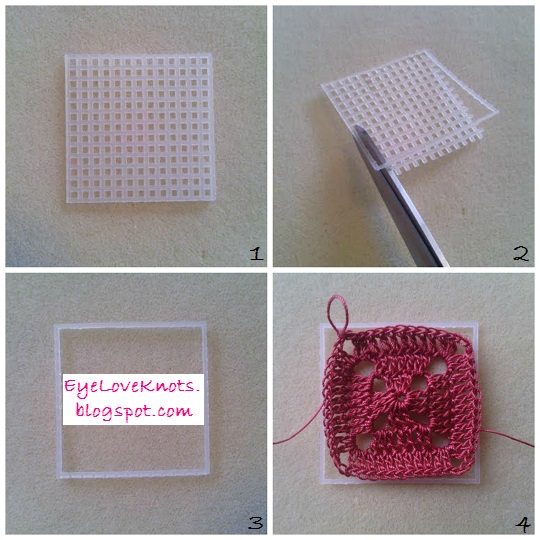
     – Small Amount of soft 7 Mesh Plastic Canvas – Hobby Lobby
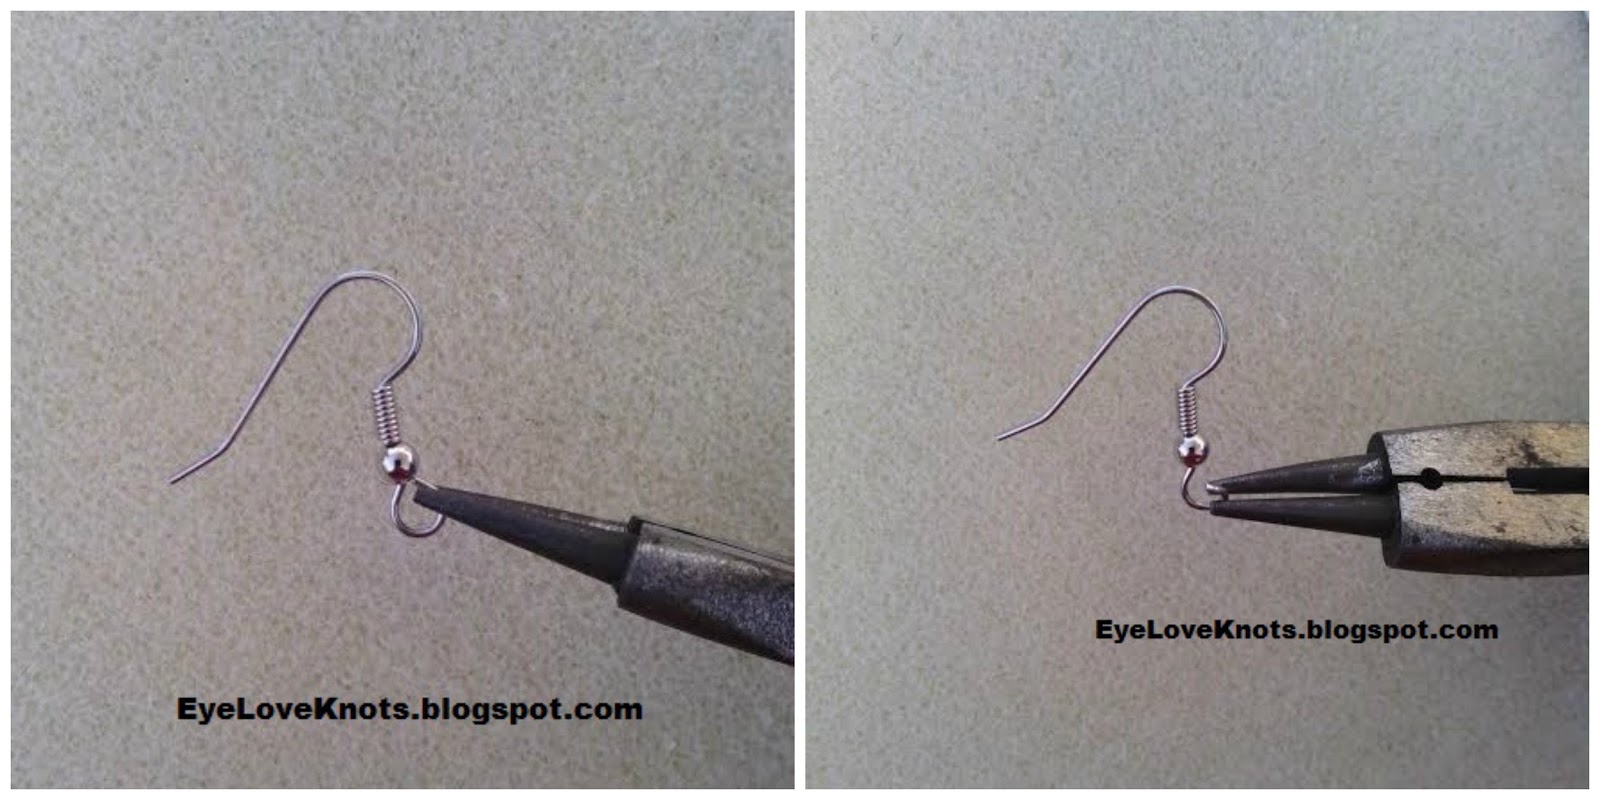
     – 2 Earring Wires – I used the 20mm Stainless Steel Ear Wires from AliCsSupplyShop
     – Jewelry Pliers

Material Notes:
     With one skein of thread, you could make practically a million earrings 😉

     I used #10 crochet thread, but you really could use and thread like #3 size or embroidery floss to make a pair of earrings too. You could also use sock weight, baby weight or even DK weight yarns. They may work up in a different size though, so just keep track of that.

     I used clear plastic canvas, but you could easily use any color you have on hand. I suggest using a soft plastic canvas and not the stiff as you want to have the flexibility for cutting and you don’t want the edges to be poking out of your earrings.

Time Spent:
      I was able to work up the smaller pair in about 45 minutes, and the larger pair in about an hour.

Measurements:
     The smaller square measures 1 7/8″ across square center, but dangles 2.5″, and the larger square measures 2.5″ across square center, but dangles 3 3/8″.

Gauge:
With artiste #10 Cotton Thread and a 2.35mm Hook = 1″ x 1″
     Chain 10, DC in the 4th stitch, and in each stitch across. (8 DC)
     R2 – R3: Chain 2, turn. DC in the 2nd stitch, and each stitch across.
     Fasten Off.

Abbreviations:
     SC – Single Crochet
     DC – Double Crochet

Pattern Notes:
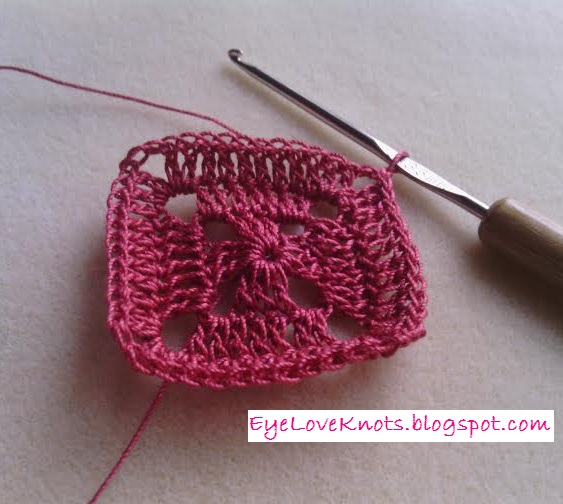
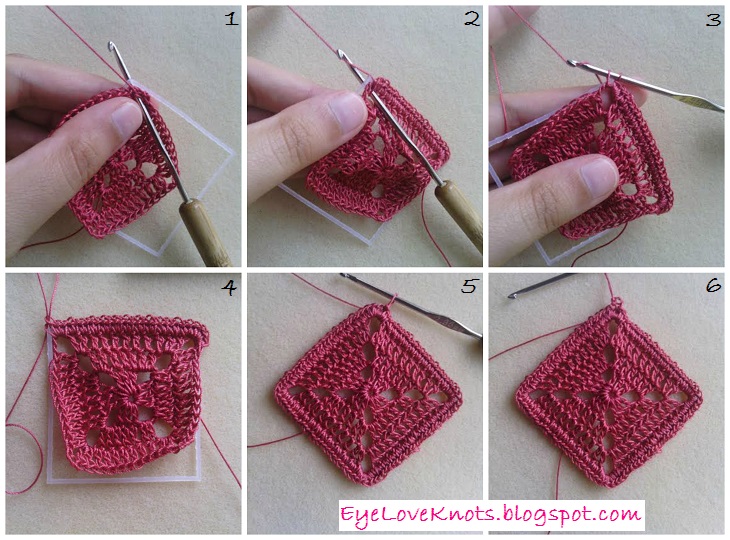
     I have a photo tutorial on How to Work a Solid Granny Square. Beginner friendly.

     Beginning chain 5 counts as last double crochet and chain 3.

     Joining will be done to the 2nd chain of the beginning chain 5, or top of the first double crochet if working the final round.

     In the pattern section, you’ll find two sizes. After you are finished with the square of your desired measurement, continue onto the frame.

     To work the frame, hold your crocheted piece up to the frame (cut to my measurements if following along, or customized to your crocheted piece), and work through both “layers” at once, beginning in the granny square and through the frame.

To Open Loop of Earring Wire:
Grab one end of your earring wire with your round nose pliers. 
You will need to grab the other end with another pair of pliers or your fingers for leverage and stability.
Pull open the loop TOWARDS you, not side to side.
Close the same way.


Pattern:
     
Smaller:
Chain 4. Join to form a ring. Chain 5, (3 DC into the ring, chain 3) 3x, 2 DC into the ring. Join.

R2: Slip stitch into the chain space. Chain 2, DC in chain space, chain 3, (2 DC into the chain space, DC in each of the next 3 DCs, 2 DC into the next chain space, chain 3) 3x, 2 DC into the chain space, DC in each of the next 3 DCs. Join. Slip stitch into chain space/corner.

Larger: 
Chain 4. Join to form a ring. Chain 5, (3 DC into the ring, chain 3) 3x, 2 DC into the ring. Join.

R2: Slip stitch into the chain space. Chain 5, (2 DC into the chain space, DC in each of the next 3 DCs, 2 DC into the next chain space, chain 3) 3x, 2 DC into the chain space, DC in each of the next 3 DCs, 1 DC into the chain space. Join. Slip stitch into chain space/corner.

R3: Slip stitch into the chain space. Chain 2, DC in chain space, chain 3, (2 DC into the chain space, DC in each of the next 7 DCs, 2 DC into the next chain space, chain 3) 3x, 2 DC into the chain space, DC in each of the next 7 DCs. Join. Slip stitch into chain space/corner.

The reason I added the plastic canvas frame was because
my finished granny square was not really laying flat, and since I am
not a blocker, I thought of the frame so it would keep it’s shape
and still be lightweight and flexible. 
Cut a 10 x 10 piece of plastic canvas out for the smaller square, and a 14 x 14 piece of plastic canvas out for the larger square; then cut all of the insides out so you are left with just the outer frame. This should be about the size of your granny square unstretched. 
To begin, hold your crocheted piece up to the square, and beginning in the corner:
Smaller Frame:

Chain 1, 3 SC into the chain space, 2 SC into each stitch over to the next corner, (3 SC into the corner, 2 SC into each stitch over to the next corner) 3x, 1 SC into the beginning corner. Join to the first SC.

Larger Frame:
Chain 1, 4 SC into the chain space, 2 SC into each stitch over to the next corner, (5 SC into the corner, 2 SC into each stitch over to the next corner) 3x, 2 SC into the beginning corner. Join to the first SC.

Loop:
     Chain 3, slip stitch into the next stitch.

Fasten Off and Weave in Ends. Open loop of jump ring, and hook into loop.
Please feel free to make and sell your own Framed Solid Granny Square Earrings using this pattern, but please DO NOT claim this pattern as your own nor should you sell my pattern, and DO NOT re-publish my photos as your own. DO NOT copy and paste my pattern anywhere, link to it instead. 

With so many size, yarn type and color options, I would love to see them! Please share your photos on my EyeLoveKnots Facebook page!

I am on Ravelry! Check out the EyeLoveKnots Ravelry page to keep track of all your EyeLoveKnots favorites in your que, and share your WIPS and finished projects!


Don’t miss out on new crochet patterns, reviews, jewelry tutorials and more! Subscribe to EyeLoveKnots by using the box on the right side toolbar, or follow me via Bloglovin!

Filed Under: Free Crochet Patterns, Jewelry DIYs, Uncategorized Tagged With: #10 Crochet Thread, 2.35mm Hook, AliCsSupplyShop, artiste, Dangle, Earrings, Free Crochet Pattern, Gift for Her, Granny Square, Hobby Lobby, Jewelry DIY, Pendant, Photo Tutorial, Pink, Plastic Canvas, Teen, Woman

❮ PREVIOUS POST

Cat Face Coasters – Free Crochet Pattern

NEXT POST ❯

Yarn Fanatic Party #46 – Week 4 – NeverEnoughThymeYarn Giveaway!!

Leave a Reply Cancel reply

Your email address will not be published. Required fields are marked *

This site uses Akismet to reduce spam. Learn how your comment data is processed.

Welcome!

Welcome!

Hey! I'm Alexandra, the blogger and creator behind EyeLoveKnots and On Rockwood Lane! My passion is being creative. My favorite thing to do is crochet, and you will almost always find me having a cup of coffee and working on a new crochet project, but when I'm not doing that, you might find me out at a local park rollerblading, baking some fresh cookies, picking veggies in the garden or re-decorating for a new season or holiday. My two cats are great supervisors for all my adventures (minus the being outside because they think it's too hot in Florida to be anywhere but inside), and make sure I take plenty of breaks.

Meet the Team!

Meet the Team!

On the left, Abby is the maker behind A Stitch Shy of Normal, and on the right Jessica is the maker behind Nice and Knotty and Candace is the maker behind TandC Crafters.

Together, they help me bring awesome crochet projects to you! Click the image to learn more about them, and get their Instagram links, where they are constantly sharing tons of crochet inspiration.

Don’t Miss Out

Crochet! Magazine Winter 2022

Crochet! Magazine Winter 2022

(Affiliate Link) Click this image to get this issue now. These 26 designs are the perfect way to stay warm this winter with easy to wear layers, and some fun holiday projects too.

Crochet World December 2022

Crochet World December 2022

The new issue of Crochet World - December 2022. (Affiliate Link) Click this image to get this issue now. More than 25 crochet patterns from seasonal decorations for your home to cozy accessories and whimsical designs, there are projects to keep your hands busy all winter long!! I I can't wait to get started on the Nordic Table Runner.

Lillet Pullover

Lillet Pullover

I love this lightweight, sampler sweater. Yellow has really won over my heart in recent years, but would look lovely in any color. It's designed to be oversized and relaxed, but if you prefer more fitted, go down a size and/or hook size. (Affiliate Link) Click this image to get a copy of this pattern!

Crochet Foundry Winter 2022

Crochet Foundry Winter 2022

This Winter issue has six fun projects to wear and use in your home! This hat/cowl combo you see here is the Brüma Balaclava, and it's sized from Baby to Adult. (Affiliate Link) Click this image to get this issue now.

Archives

Copyright © 2023 EyeLoveKnots · Custom site by Moonsteam Design