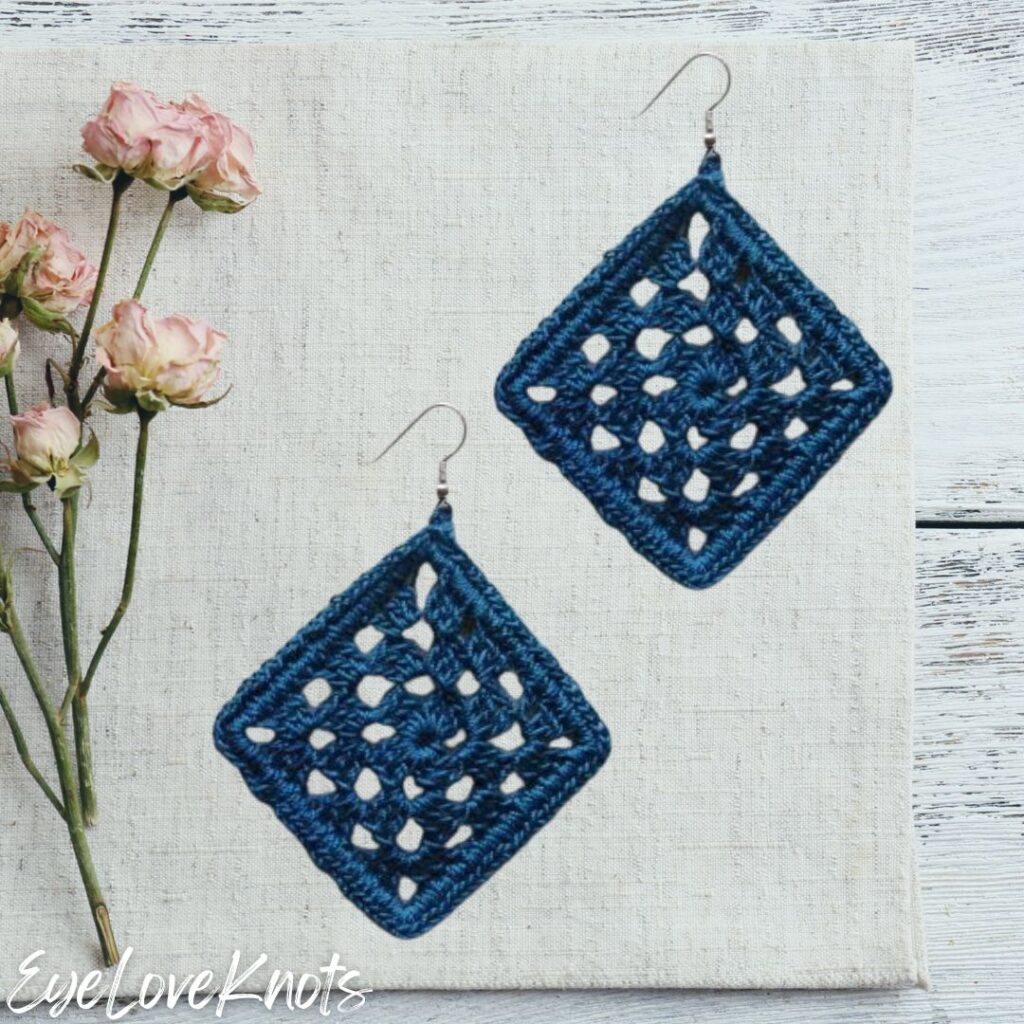
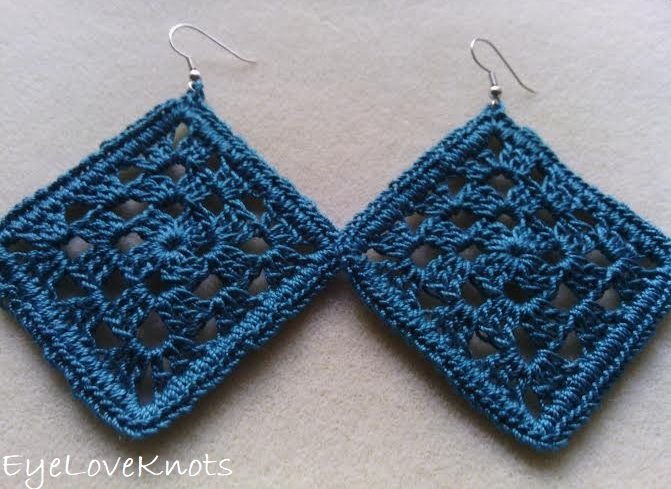
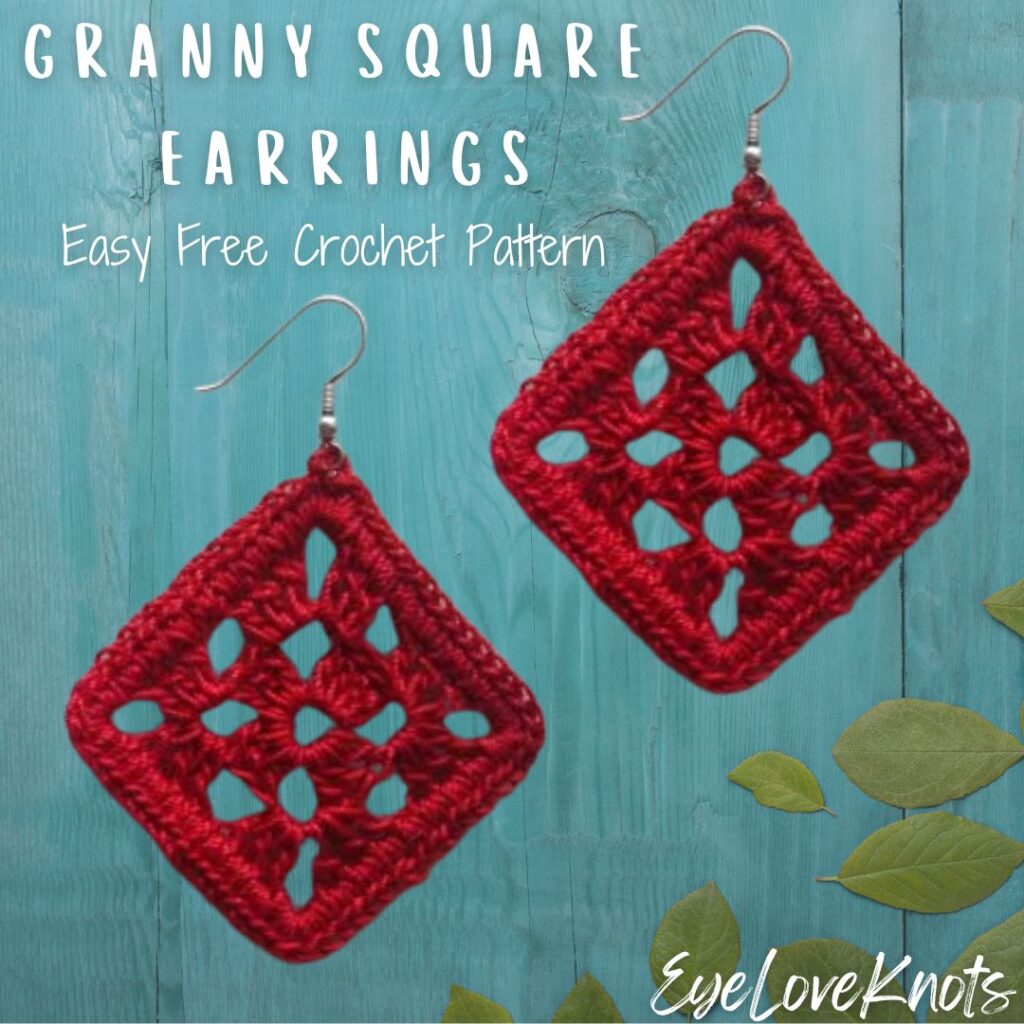
This is free crochet pattern and video tutorial showing how to crochet easy granny square earrings in 2 sizes that have a hidden, lightweight frame that helps keep the square shape without blocking!
This post contains affiliate links for Etsy and Amazon. If you make a purchase by clicking on them, I make a small commission at no extra cost to you. Thanks for your support!
Find the free crochet pattern instructions below, or purchase a printer-friendly, ad-free PDF on Ravelry by clicking here.
In a hurry? Pin this for later when you have more time.
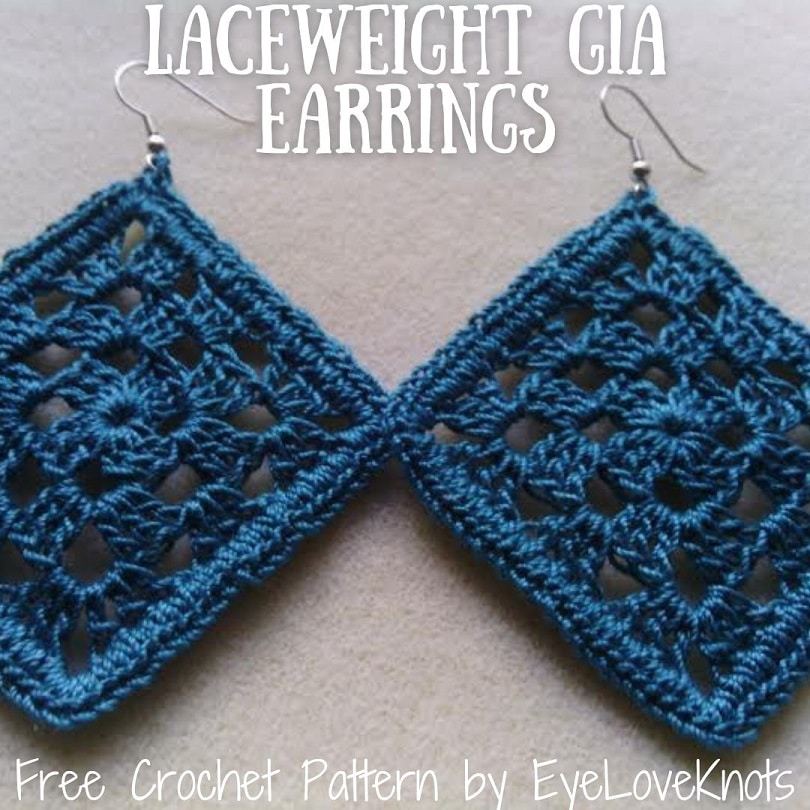
Originally designed and crocheted in 2015, these Laceweight Gia Earrings are still one of my favorite things to wear, and continue to make in 2024 as I update this post! These easy granny square earrings are so quick and easy to work up, and I just love the lightweight frame (secretly a piece of plastic canvas mesh) that helps keep it’s shape without the need for blocking (because I’m not a fan!).
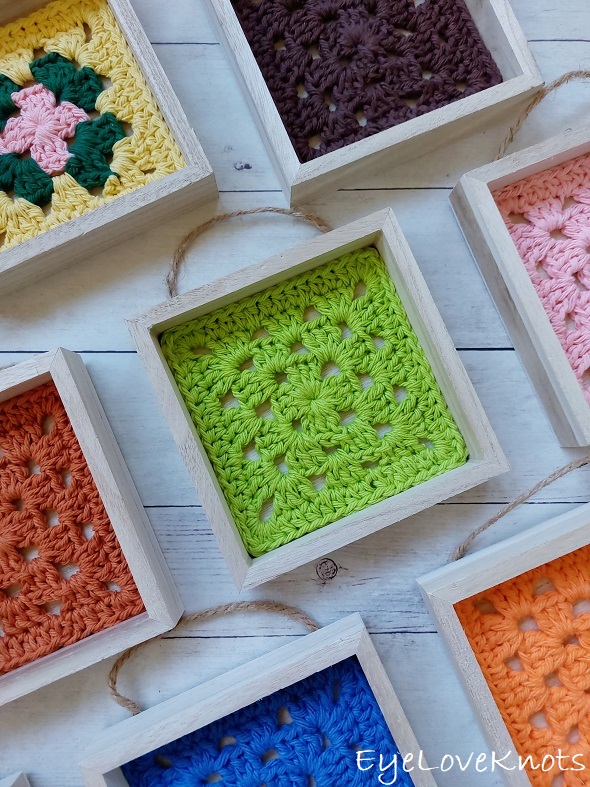
There is something special about the classic, traditional granny square that always warms my heart! I love it worked in a solid color, color blocks, or stripes, and it’s so versatile being that you can stop at the end of any round, and you basically have a finished project that can then be used in so many different ways.
I’ve turned my granny squares into earrings, but there are so many other fun ways to use them – I’ll share a few:
- use it as a charm for a necklace
- use it as a gift tag
- string a bunch up and use as garland
- don’t frame, and sew on as an applique
What is the best yarn for crocheted earrings? What thread is used for crochet earrings?
I have used #10 crochet cotton thread for my squares, which is 100% cotton, but you can easily use a fingering weight yarn or embroidery floss for similar results. Because you can custom cut the plastic canvas frame or block to the desired measurements, gauge is not essential for this project so feel free to change it up even more. This is also a great project for scraps since each round uses only a small amount of yarn.
Do I Have to Add a Border to my Granny Square?
A border on your granny square is completely up to you! I like to add a border to give the square more of a finish. The beauty of this project is it looks great without a border, with a small border as I’ve done and with a thicker border.
Do I Have to Add the Frame to my Granny Square?
Not at all! I added a plastic canvas frame to my granny square because I am not a blocker, and it helps the granny square keep it’s shape and still be lightweight and flexible.
Gia Series: Free Granny Square Projects

Gia is one of my easy, beginner friendly series that features the classic granny square in one, continuous manner, and I have several free home decor and accessory crochet patterns!
Gia Afghan: Worsted Weight Version | Super Chunky Version
Ad-Free, Printer Friendly PDF:

EyeLoveKnots newsletter subscribers get access to Exclusive Subscriber Content, like the free PDF of this pattern via the Free File Library – you’ll find the tab on the top menu. The library is password protected so sign up for my newsletter and you’ll receive a Welcome email containing this month’s password, or if you are already a blog subscriber, reference your latest newsletter for this month’s password. From the library, you’ll be able to access the PDFs via Google Drive – you do not need to have a Google Drive account to view and download the PDF.
For a Limited Time…

Through 06/16/24 at 11:59pm EST, you can grab a free copy of the PDF for the Laceweight Gia Earrings on Ravelry using code FREECROCHET202412. I earn my income from the number of pageviews my blog sees, so please do not share the code, but instead share the link to this post so others can find it. Thank you!
After 06/16/24 or for non-subscribers, if you would like a PDF version of this post, you may get one through either my Etsy Shop or Ravelry Shop for a small fee. This fee is to compensate for the views lost when you no longer need to return to the blog to for the information, as you will have your own copy.


Save this to your Favorites On: AllFreeCrochet, AllFreeJewelryMaking, FaveCrafts, Cheap Thrifty Living, DIYideaCenter and Crochet Pattern Bonanza.
Materials:
- Small Amount of #10 Crochet Thread – I used Artiste Crochet Cotton Thread in Jade Blue and Poppy Red
- 2.35mm Crochet Hook
- Tapestry Needle
- Small Amount of 7 Mesh Plastic Canvas – 10 Mesh can also work
- 2 Earring Wires – I used 20mm Stainless Steel Fishhook Ear Wires
- Jewelry Pliers
Materials Notes:
I have used #10 crochet cotton thread for my squares, which is 100% cotton, but you can easily use a fingering weight yarn or embroidery floss for similar results. Because you can custom cut the plastic canvas frame or block to the desired measurements, gauge is not essential for this project so feel free to change it up even more. They may work up in a different size though, so just take time to measure if you’re looking for a specific size. This is also a great project for scraps since each round uses only a small amount of yarn.
I used clear plastic canvas, but you could easily use any color you have on hand. I suggest using a soft plastic canvas and not the stiff as you want to have the flexibility for cutting and you don’t want the edges to be poking out of your earrings.
There is such a variety of earring findings. Feel free to use whichever you like best! Most earring findings have a loop at the bottom that easily opens to add your charm, but if you find yours doesn’t, just add a jump ring onto your earring finding and then your granny square would attach onto the jump ring.
I prefer Stainless Steel for my findings as it won’t tarnish and is hypoallergenic, but there is also a fun variety of different metals! I like to shop for jewelry supplies at either Fire Mountain Gems or Bohemian Findings.
Time Spent:
I was able to work up the smaller pair in just over half an hour, and the larger pair in about an hour.
Measurements (After Framing):
The smaller square measures 1 3/4″ across square center, but dangles 2 1/2″, and the larger square measures 2 1/4″ across square center, but dangles 3 1/4″.
Gauge (Before Frame):
Round 2 = 1 1/2″ in diameter
Abbreviations (US Terms):
- SC – Single Crochet (Photo Tutorial)
- DC – Double Crochet (Photo Tutorial)
Helpful Tutorials:
- How to Crochet a Granny Square – Photo Tutorial
- 4 Ways to Change Yarn Colors on Granny Squares – Photo Tutorial & Video Tutorial
- How to Fix Wonky Granny Squares – Photo Tutorial & Video Tutorial
- How to Add a New Ball of Yarn When You Run Out on Your Granny Square – Photo Tutorial & Video Tutorial
Pattern Notes:
If you would like to change colors to create stripes, I recommend fastening off after joining the round, and joining the new color over in the next corner chain space. This is going to give you a seamless join and clean back. If you will be using the same color in the 3rd round, you can carry it up the back, but just know you’ll have a float. For my personal earrings, floats don’t bother me, but for gifts or earrings I am selling, I don’t do the float.
In Granny Square, slip stitch join to the beginning chain 2. In Border, slip stitch join to the first stitch.
When weaving in ends, I always recommend breaking the stitch in half when you enter and exit to help capture the yarn better. Crochet thread is wound together very tight, but it’s still possible to break it in half. Have more patience with a round (duller) tapestry needle, or switch to a sharp tapestry needle.
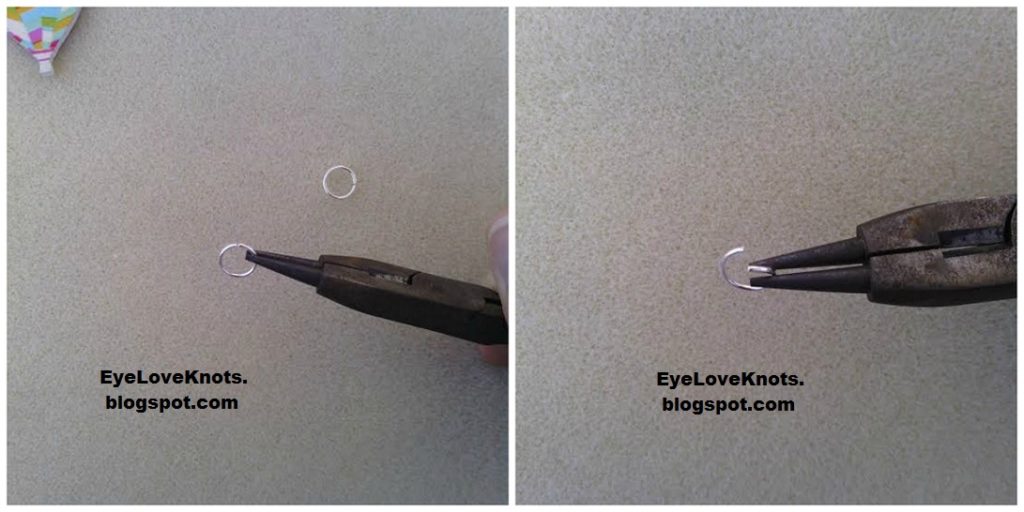
To Open Loop of Earring Wire:
Grab one end of your earring wire with your round nose pliers. You will need to grab the other end with another pair of pliers or your fingers for leverage and stability. Pull open the loop TOWARDS you, not side to side. Close the same way.
Easy Granny Square Earring Video Tutorial | Laceweight Gia Earrings Video Tutorial:
Easy Granny Square Earring Crochet Pattern | Laceweight Gia Earrings Crochet Pattern:
Chain 5. Join to form a ring. Chain 2 (doesn’t count as a stitch), (3 DC into the ring, chain 3) 3x, 3 DC into the ring, chain 2. Join to first DC. (12 DC)
R2: Slip stitch over to the chain space. Chain 2 (counts as 1 stitch), 2 DC into the chain space, chain 3, 3 DC into the same chain space, chain 1, (3 DC in the next chain space, chain 3, 3 DC into the same chain space, chain 1) 3x. Join to the first DC. Loosely slip stitch over to the corner. (24 DC)
*Stop here for Smaller size.
Larger Square:
R3: Slip stitch over to the chain space. Chain 2 (counts as 1 stitch), 2 DC into the chain space, chain 3, 3 DC into the same chain space, chain 1, 3 DC into the next chain space, chain 1, (3 DC in the next chain space, chain 3, 3 DC into the same chain space, chain 1, 3 DC into the next chain space, chain 1) 3x. Join to the first DC. (36 DC)
Border if Not Adding Frame:
I added the plastic canvas frame because I am not a blocker, and it helps the granny square keep it’s shape and still be lightweight and flexible, but if you don’t want to add the frame, just work the following border:
Chain 1. SC into the first stitch, and each of the next 2 DC, 5 SC into the next corner chain space, (SC into each DC and each chain space across to the next corner chain space, 5 SC into the next corner chain space) 3x, SC into each DC and each chain space across to the beginning. Join to the first SC.
Option 1, No Loop: Fasten off, and weave in ends.
Option 2, Hanging Loop: Slip stitch into each stitch over to the 3rd SC over the corner, chain 3 (if you are a tight crocheter, you may want to chain 4 instead), slip stitch into the next 6 stitches, which will leave you in the SC that’s just above the chain 1 space and equal to the right side. Fasten off, and weave in ends.
How to Cut the Plastic Canvas Frame:
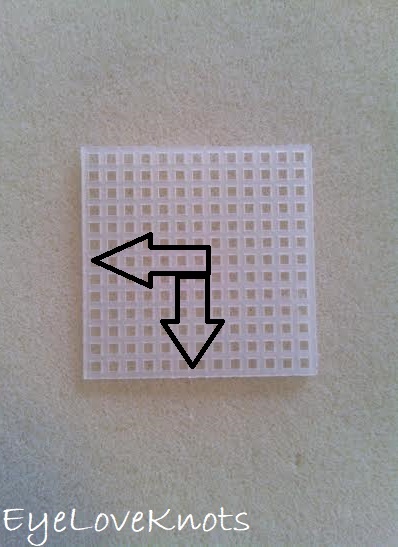
Your square may be slightly smaller or larger than mine. The plastic canvas frame can be custom cut to your square. If the frame is not cut correctly, it will not sit properly – it will cave in on itself if it’s too large, or the center will puff out if it’s too small. To custom cut the frame: lay the square on top of the plastic canvas mesh lining it up on the inner part of the left side and bottom. Slightly stretch to the next box on the right, and that is where you will cut – on the outer part of that box.
For my squares, I’ll provide my measurements and the number of holes that I cut my frame to:
- Smaller: 1 3/4″; 10 Holes
- Larger: 2 1/4″; 14 Holes
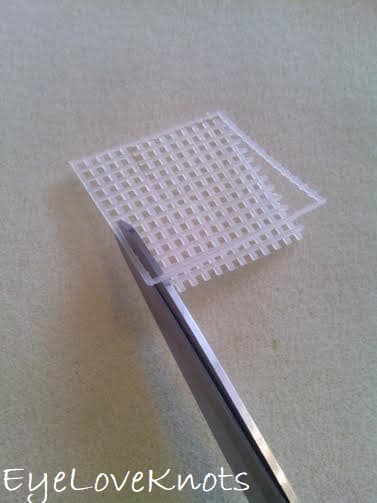
… then cut all of the insides out so you are left with just the outer frame.
This frame should be about the size of your granny square unstretched. This one shown is one hole too small for my square, but I wanted to show how to place it. You will lay the frame down first, then lay the granny square on top.
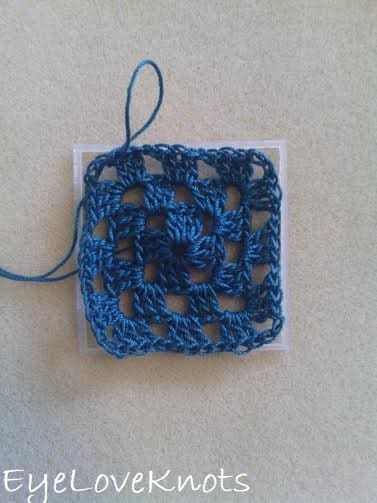
Crochet the Frame Border:

Chain 1. Working through both layers: SC into the first stitch, and each of the next 2 DC, 3 SC into the next corner chain space, position the fabric so the last SC is covering the point of the canvas, 2 SC back into the same corner chain space, (SC into each DC and each chain space across to the next corner chain space, 3 SC into the next corner chain space, stretch the fabric so the last SC is covering the point of the canvas, 2 SC back into the same corner chain space) 3x, SC into each DC and each chain space across to the beginning. Join to the first SC.
Option 1, No Loop: Fasten off, and weave in ends.
Option 2, Hanging Loop: Slip stitch into each stitch over to the 3rd SC over the corner, chain 3 (if you are a tight crocheter, you may want to chain 4 instead), slip stitch into the next 6 stitches, which will leave you in the SC that’s just above the chain 1 space and equal to the right side. Fasten off, and weave in ends.

Open the loop of earring wire, and hook into the loop of your granny square, then close and repeat for the second earring.
If you chose not to add the hanging loop onto your granny square, then you’ll want to hook your earring wire into the 3rd single crochet of one of the corners.
Please feel free to make and sell your own items made using this pattern, but keep in mind, this written pattern and my photos are protected by copyright. Please DO NOT claim this pattern as your own nor should you sell my pattern. DO NOT re-publish my photos as your own. DO NOT copy and paste my pattern anywhere, link to it instead so other’s can visit. Making videos providing instructions how to make my projects on any social media platform is also not permitted.
Join one of our awesome Facebook groups to share your creations, and see what others are up to!
– Yarn Crafts & Coffee Community
– DIY Home On Rockwood Lane
– Alexandra Lane Lifestyle
Linked Up To…
Granny-Spiration Link-Up #14 – Atelier Marie-Lucienne
Craft Schooling Sunday – Creative Jewish Mom
Sundays at Home #239 – Celebrating Everyday Life
In Stitches Party #29 – Nicki’s Homemade Crafts
Inspiration Monday – i should be mopping the floor
Creative Mondays Link Up – Claire Justine
Handmade Monday #113 – Sum of their Stories
Merry Monday #241 Link Party – A Wonderful Thought
The Really Crafty Link Party #156 – Keeping it Real
Craftastic Monday Link Party – Sew Can Do
Ginx Woolly Linx Party February – Ginx Craft
Weekday Wear Linkup – Away from the Blue
The Scoop Link Party #364 – Worthing Court Blog
Tutorials & Tips Link Party 383 – Home Stories A to Z
488th Inspire Me Tuesday – A Stroll Thru Life
Fabulous Party #254 – Lou Lou Girls
Talk of the Town 161 – My Repurposed Life
Totally Terrific Tuesday #215 – Sweet Parrish Place
Make it Pretty Monday – Week 283 – The Dedicated House
The Linky Ladies Party #152 – The Purple Poncho
Turning Heads Linkup – Elegantly Dressed and Stylish
Confident Twosday Linkup – I do deClaire
{Wow Me} Wednesday #390 – Ginger Snap Crafts
Your Whims Wednesday #394 – My Girlish Whims
Wall to Wall DIY Wednesday Week 35 – Dabbling and Decorating
DIY, Crafts, Recipes and More Link Party #126 – Hazel and Gold Designs
Crafty Love Link Party #42 – Jessie at Home
Hookin’ on Hump Day #184 – Petals to Picots
Scrappy Stitchers Link Party #49 – Stitches n Scraps
Style Me Wednesday – Shopping my Closet
Snickerdoodle Create Bake Make Link Party #271 – Across the Boulevard
Linky Ladies Party #213 – The Purple Poncho
Ginx Woolly Linx Party June – Ginx Craft
The Loop Scoop #16 – Moogly Blog
Unlimited Link Party 28 – Grammy’s Grid
You’re the Star Blog Hop – Decor Craft Design
Happiness is Homemade #380 – Decor Craft Design
Craftastic Monday Link Party – Sew Can Do
The Really Crafty Link Party #272 – Keeping it Real
Handmade Monday #233 – Sum of their Stories
The Hearth and Soul Link Party – April, the 21st Century Housewife
594th Inspire Me Tuesday – A Stroll Thru Life
Fabulous Party 377 – Lou Lou Girls
Party in Your PJs #364 – The Apple Street Cottage
{Wow Me} Wednesday #510 – Ginger Snap Crafts
Your Whims Wednesday #517 – My Girlish Whims
The Wednesday Link Party 404 – Oombawka Design Crochet
Creative Crafts Linky Party #47 – Creatively Beth
Wonderful Wednesday – Oh My Heartsie Girl
Thursday Favorite Things #495 – An Artful Mom
Creatively Crafty Link Party #281 – Life Beyond the Kitchen
Artsy-Fartsy Party #350 – Artsy-Fartsy Mama
Encouraging Hearts and Home Blog Hop – Scratch Made Food
Grace at Home No. 428 – Imparting Grace
Friday Favorites – Busy Being Jennifer
Create, Bake, Grow & Gather Party #474 – Shabby Art Boutique
Funtastic Friday Link Party #338 – Simply Beautiful by Angela
Saturday Sparks Link Party 428 – Pieced Pastimes
These are really cute. I made my first granny square the other night, but I'm nowhere ready to try earrings.
Granny squares are so much fun! Once I started, the ideas just started flying in. This is a very easy project – I hope you'll give it a try once you're a little further in your crocheting 🙂
Good idea! Again something to add to my make-list…
Please share your finished earrings with me when you complete them!
They look brilliant! I love your idea of using a canvas frame to stabilize them.
Thank you! I am glad my plastic canvas was sitting out right next to me, otherwise I may not have thought of it.
Beautiful earrings. Great idea to use a plastic framework. I don't know if I can buy it in my country, but I'll look for it. Thanks for your pattern and clear explanation.
Have a great weekend, Margaret
Thank you! You can definitely order it online from JoAnn's, Hobby Lobby, Michaels, Walmart and other craft stores as well as various Etsy stores. I don't know what is easily accessible to you, but I wish you good luck 🙂 I hope you find some, and share your finished earrings with me 🙂
Brilliant idea for the frame! And this is a great way to wear large earrings that won’t stretch out your holes as they are light. Thanks so much for sharing on craft schooling Sunday!
Thank you, Sara! Yes, I go for the light stuff because I don’t like it heavy on my ears. These you forget you are wearing them.
These are adorable! I have crocheted earrings before but never thought to frame them. How Creative! Im not a blocker either. In the past what I have done with earrings is spray them with a little spray starch, lay a damp washcloth over them and iron them. This makes them have just enough stiffness to keep their shape. I want to try it with the frame next time! You did a great job. Thanks for the tip.
Lisa
I thought about trying to get some liquid fabric stiffener or mod podge for other types of earrings that can’t easily be “framed”. I just don’t want to mess them up! I am a starch newbie, haha
I love them. I don’t have pierced ears, but I have lots of friends who do and this would be a lovely handmade gift.
Thank you for sharing at The Really Crafty link Party. Pinned.
You could always make some of these, and attach them to clip on findings!
These are so cute and the frame was a great idea to help them keep their shape! 🙂
Thank you so much for joining the #weekdayWearLinkUp 🙂 Hope that you are having a good week so far 🙂 We finally got a break in the heatwave last night and it was so welcome!
Away From The Blue
The Earrings looks beautiful.
Thank you!
These are so cute. I love the red on you and the design.
thanks for linking!
jess xx
http://www.elegantlydressedandstylish.com
Thanks, Jess! I usually only end up with red on around Valentine’s Day and Christmas, but it is a nice, fun way to add just a little pop of color. Excuse to get some matching red shoes? Hehe
They look very stylish. Great idea. Thanks for joining in my Ginx Woolly Linx Party for February.
Cute and looking stylish. Good idea of backing with plastic canvas.
Thanks! It worked out perfectly, and was so easy to do, though starching and blocking is probably just as easy – just not my cup of tea.
What a cute project. It must be very hard working this small. Thanks for joining in Ginx Woolly Linx party.
I used to think working in thread was a pain, but I actually love it. I even sometimes use sewing thread! I just try to stick to smaller projects so I don’t get overwhelmed with the amount of time a larger project would take.
Hi,
I just wanted to say thank you for your earring pattern. I am looking forward to having a go at them at some stage.
I was wondering about the backing then reading through I realised you cut the inner part away. That’s a clever way to Habe the stiffened items for those who don’t use the starch spray and blocking method.
As well as matching pendant, I was thinking about other types of matching jewellery that the granny squares could be used for and cane up with matching maybe bracelets, headbands, hair clips, ankle bracelets, bangles maybe even like a chocker type of necklace, so like between 4-6 squares (depending on the size used) then the back but either hooked chain accessory or crochet type added with like hook and link fastening,
Belts would be great accessories (could utilise for future blog hop freebies maybe). But could also be used as accessory for buttons. So like a button front or to add to matching gloves or to cozies etc. So many uses, I could go in forever.
I was also thinking that if wanting to jazz up, maybe add beading or shiny buttons, or use metallic threads.
You could use Christmas wool like the King Coke Glitz type but that is double knit so would be slightly thicker but then, might be able to seperate the yarn to create your own threads etc. Never know, king Cole might create embroidery thread or crochet thread for this purpose by the time I get to make them.
I have visual issues at present, so I’m not sure if I will get these made soon or whether will be very late in the year or next year even, only time will tell – but I’m really looking forward to having a go at them as they look so good, I’ve made a list of who will get them and what colours they will be in. At least I can take the time where I cannot do them to locate the plastic mesh, the ear clips and the pendant chains.
Mind you, could look at perhaps creating a chain out of wool with just doing the links as the chain ir if a thicker chain, perhaps creating it with either slip stitch or SC. Do you think that will work?
So thank you, you have inspired me to have a go at making jewellery gifts, perhaps adding them to handmade crackers for added enjoyment.
There are so many fun ways to customize them, and I just love that! Not only about this pattern, but crochet and making in general. I love to see other makers takes on projects 🙂 Thanks so much sharing with me!
I just got this pattern and am intrigued with the idea of using plastic mesh. I live in a remote mountain desert region in New Mexico, USA. 19 people live in my town, 75 miles to get to a store to buy the plastic mesh. Hope to get to a store without too much delay to find the mesh.
“
Hi Carol! The plastic mesh has been a game changer for me – I hate blocking. I have linked to the mesh in the post if you use Amazon. Walmart sometimes carries it. Where my aunt lives in a small town, the local hardware store has a small craft section. Would love to know what you think after you’ve had a chance to try it out.