This is a crochet pattern review of the Ceres Top from MermaidCatDesigns WITH Strap Adjustment Details.
This post contains affiliate links for LoveCrochet. If you make a purchase by clicking on them, I make a small commission at no extra cost to you. Thanks for your support!

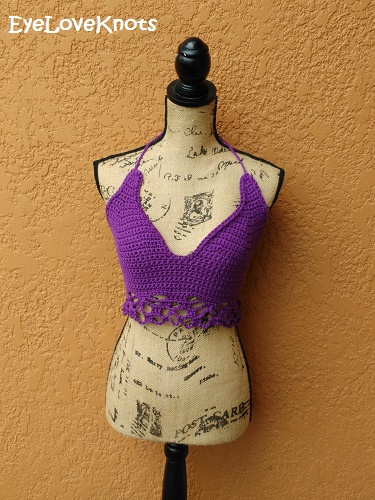
Mid May, I shared my original Crochet Review for the Ceres Top. I revisited the pattern when I received a special request in my EyeLoveKnots Etsy shop for a different type of back strap.

This post is how to work the strap adjustment. For full pattern review, visit my Ceres Top – Crochet Pattern Review – MermaidCatDesigns.
Materials I Used:
- About 150 Yards of Handicrafter Delux in Purple (from JoAnn’s)
- H8/5mm Crochet Hook (as recommended in pattern)
- #18 Tapestry Needle
- Optional, Jewelry Pliers
- Ceres Top, Paid Crochet Pattern from MermaidCatDesigns
Material Notes:
Yarn Alternatives: Bernat Handicrafter, Paintbox Yarns Cotton Aran, Rico Creative Cotton Aran, Lily Sugar n Cream, Crafter’s Secret Cotton Yarn (from Hobby Lobby)
Jewelry pliers are an excellent tool to use to help weave in ends, as cotton yarn can be quite tough on the fingers when weaving in with just fingers and a tapestry needle.
Time Spent:
I had my top ready in about two hours.
My Gauge:
13 SC by 14 Rows = 4″
Abbreviations:
- SC – Single Crochet
- sc2tog – Single Crochet Two Stitches Together (to Decrease)
Strap Notes:
I worked four rows of 13 single crochet for each side flap, then worked…
R5: Turn, no chain. Slip stitch into the 2nd, 3rd, 4th, and 5th stitches. Chain 1. SC in this and the next 4 stitches.
R6: Chain 1, turn. SC across; *1st side, Fasten Off after R6. 2nd side work through R7
R7: Chain 1, turn. SC in the 1st 2 stitches, slip stitch into the 3rd stitch, chain 73, slip stitch down the chain in the back bumps and into the initial stitch, SC into the next stitch, 2 SC into the corner, SC in the next stitch, sc2tog on corner and next piece, SC in next 2 stitches, 2 SC in corner, SC in next 3 stitches, pick up on pattern at the sc2tog and worked across to the next sc2tog, SC in next 3 stitches, 2 SC in next corner, SC in next 3 stitches, sc2tog, 2 SC in next corner, SC in next stitch, slip stitch in next, ch 73, slip stitch down the chain in the back bumps and into the initial stitch, SC in next, 2 SC in next, sc2tog, SC in next 2, 2 SC in next, SC in next 56 along the opposite side of the foundation chain, 2 SC in the next, SC in the next 3, sc2tog, SC in 1st. Join.
Fasten Off and Weave in Ends.
Join the EyeLoveKnots Crafting Community on Facebook to share your creations, and see what others are up to!
Leave a Reply