EyeLoveKnots

  • Home
  • Crochet
    • Free Crochet Patterns
    • Crochet Pattern Reviews
    • Crochet 101
  • Knitting
  • Crafting
    • Plastic Canvas DIYs
    • Jewelry DIYs
    • Sewing
    • Cross Stitching
    • Upcycling
    • Other DIYs
  • Seasonal DIYs
    • 4th of July DIYs
    • Back to School DIYs
    • Christmas DIYs
    • Easter DIYs
    • Fall DIYs
    • Halloween DIYs
    • Spring DIYs
    • St. Patrick’s Day DIYs
    • Summer DIYs
    • Thanksgiving DIYs
  • Holidays/Seasonal
    • Valentine’s Day
    • St. Patrick’s Day
    • Spring
    • Easter
    • Summer
    • 4th of July
    • Fall
    • Halloween
    • Thanksgiving
    • Christmas
    • Winter
  • Home DIY & Decor
    • In the Bathroom
    • In the Bedroom
    • In the Dining Room
    • In the Kitchen
    • In the Living Room
    • Kids Room
  • Fashion
    • Nail Art
  • Recipes
  • Living the Dream
  • Fun Finds Around the Web
  • Linking Up To…
  • Latest News & Links
  • Privacy and Sharing Policies
  • About Our GREAT Team!
  • Latest News & Links

Pumpkin Pixel Art – Free Crochet Pattern

October 6, 2017

This pattern first appeared on The Stitchin’ Mommy where I was a contributor.

Yay! This is the 10th post of the year for the 2017 GrannySpiration Challenge! I am so excited to see what everyone has been working on, especially you! At the end of this post, you will find the information for this month’s giveaway, and link up.

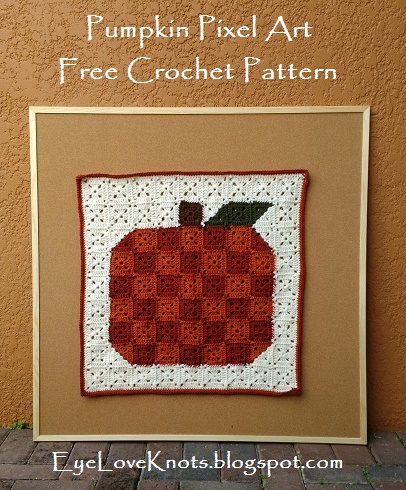
This Pumpkin Pixel Art is worked in the same manner as the Acorn Square Pixel Art that I shared last week with two round Solid Granny Squares and the Pull Loop Through (PLT) Join-As-You-Go method, however, worked in worsted weight yarn as opposed to lightweight yarn. It could be worked in any weight yarn you like though with respective hook.

Men’s Granny Square Scarf (Free Crochet Pattern) from Atelier Marie-Lucienne, Crocheted Turban (Crochet Inspiration with Pattern Link) from Mariam’s Creations, Grannies in the Window Cowl (Free Crochet Pattern) from Rhelena, Granny’s Stashbusting Tissue Box Cover (Free Crochet Pattern) from EyeLoveKnots (that’s me!), Crochet Night Light (Crochet Inspiration with Pattern Links) from Hakelfieber Austria and Granny Panel Blanket (Free Crochet Pattern) from Crochet is the Way.

Please make sure to stop by our other co-host and see what they’ve been working on too. In the image above, you’ll find their projects (and mine) from last month’s challenge.


Marjan from Atelier Marie-Lucienne
Sandra from Hakelfieber Austria (in German)
Jenny from Crochet is the Way
Rhelena from Crochet n Crafts
Mariam from Mariam’s Creations: Recycle and Create

Materials:
     – Worsted Weight Yarn – I used Hobby Lobby’s I Love This Yarn in Ivory 355 Yards (355 Yards), Terracotta (175 Yards), Burnt Pumpkin (175 Yards) and Small Amounts of Brown (for 1 Square) and Dark Green (for 3 Squares)
     – I9/5.5mm Crochet Hook
     – #18 Tapestry Needle for Weaving in Ends

Material Notes:
     Yarn Alternatives: Berroco’s Vintage Yarn, Red Heart’s With Love.

Time Spent:
     This square took me about 8 hours, 45 minutes worked in several seatings.

Measurements:
     27″ Square

Gauge:
     14 DC by 8 Rows = 4″

*Gauge for this project isn’t essential, as long as your squares are consistent in size. Keep in mind, smaller or larger squares will produce smaller or larger projects.

Abbreviations:
     – DC – Double Crochet
     – SC – Single Crochet
     – sc2tog – Single Crochet Two Together/Decrease
     – PLT – Pull Loop Through (Join)

       To PLT: After DC, pull up a loop, insert hook from front through the corresponding stitch on MB and pull loop through

Pattern Notes:
The beginning chain 5 counts as a double crochet plus a chain 3, and the beginning chain 2 counts as the first double crochet.


Join to the second chain of the beginning chain, not the first stitch, except in the border – here you’ll join to the first single crochet.


You may work this art piece with a variety of joining methods, but I joined mine using the Pull Loop Through Method, and this pattern will be written as such. If you choose to work all the squares first, and then sew them together, you will need: 19 in Burnt Pumpkin, 2 in Half Ivory and Half Burnt Pumpkin, 19 in Terracotta, 2 in Half Ivory and Half Terracotta, 1 in Brown, 1 in Green, 2 in Half Ivory and Half Green, and 35 in Ivory.


In the instructions, I refer to MA, MB and MD. These are the motifs. MA is the current motif you are working on. MB is the first one you join to, MC is skipped and MD is the second one you join to, which is diagonal from MB. I only refer to these motifs in the one and two join instructions.
I also mention MC in the bi-colored square instructions. Here, this refers to Main Color.
I highly recommend weaving in your ends as you complete each row, otherwise, at the end you could be left with so many ends, this square may end up in your WIPs bin, instead of being completed.


Pattern:

Work 1 complete 3” Solid Granny Square in Ivory.
    Chain 5. Join to form a ring. Chain 5, work (3 DC, chain 3) into the ring 3x, 2 DC into the ring and Join. (12 DC)


R2: Chain 2. Work (2 DC, chain 3, 2 DC) into the chain space, [DC into the next 3 DCs, (2 DC, chain 3, 2 DC) into the next chain space] 3x, DC into the next 2 DCs and Join. (28 DC)


Fasten Off, and Sew in Ends.


*This square will be the bottom right square of the piece.


Working with the Join-As-You-Go PLT Method, you will have squares that require one join, and squares that require two joins – these are described below.      


To Work Square with 1 Join:
    Chain 5. Join to form a ring. Chain 5, work (3 DC, chain 3) into the ring 3x, 2 DC into the ring and Join. (12 DC)


R2: Chain 2. Work 2 DC into the chain space, chain 1, working from behind SC into chain space of MB, chain 1, [(DC into chain space of MA, PLT) 2x, (DC into next stitch of MA, PLT) 3x, (DC into chain space of MA, PLT) 2x, chain 1, working from behind SC into chain space of MB, chain 1]; 2 DC into the same chain space, [DC into the next 3 DCs, (2 DC, chain 3, 2 DC) into the next chain space] 2x, DC into the last 2 DCs and Join, and Fasten Off. (28 DC)


Fasten Off, and Sew in Ends.

To Work Square with 2 Joins:
    Chain 5. Join to form a ring. Chain 5, work (3 DC, chain 3) into the ring 3x, 2 DC into the ring and Join. (12 DC)


R2: Chain 2. Work 2 DC into the chain space, chain 1, working from behind SC into chain space of MB, chain 1, [(DC into chain space of MA, PLT) 2x, (DC into next stitch of MA, PLT) 3x, (DC into chain space of MA, PLT) 2x, chain 1, working from behind SC into chain space of MD, chain 1];

[(DC into chain space of MA, PLT) 2x, (DC into next stitch of MA, PLT) 3x, (DC into chain space of MA, PLT) 2x, chain 1, working from behind SC into chain space of MD, chain 1];
2 DC into the same chain space, [DC into the next 3 DCs, (2 DC, chain 3, 2 DC) into the next chain space], DC into the last 2 DCs and Join, and Fasten Off. (28 DC)
Fasten Off, and Sew in Ends.

Following this chart, continue working solid granny squares and joining them as outlined above. I began with Row 1, and my first completed square being the square closest to the “R1”. The purple line shows that the second square worked (to the left of the 1st) only requires 1 join, as does the 3rd and so on in Row 1. Beginning in Row 2, you will start working with 2 joins. The first square worked of Row 2 (furthest right square) only requires 1 join to the 1st square of Row 1, but each square after requires 2 joins.
I worked from the furthest right square of each row all the way to the end of the row, and weaved in my ends at the end of each row.
Bi-colored squares are highlighted in the image. #11 and #17 are half Ivory and half Burnt Pumpkin, #56 and #62 are half Ivory and half Terracotta, and #65 and #67 are half Ivory and half Dark Green. Using the instructions below, work in your bi-colored squares. Take note that Round 1 of each of these is the same as the 3” Bi-Colored Solid Granny Square listed below, but Round 2 varies as they are worked to best suit working in the manner as I have outlined. If you are working them differently, you will need to adjust as best for you.
*I am including the pattern for the single bi-colored solid granny square. If you are working individual squares and using a different joining method, like a Single Crochet Join, then you will need to follow the single instructions to make your square. A photo tutorial can be found on my EyeLoveKnots blog, 3” Bi-Colored Solid Granny Square the EyeLoveKnots Way. Replace “MC” with the one you will be using.
3” Bi-Colored Solid Granny Square (See Note Above):
    With MC, Chain 5. Join to form a ring. Chain 2, 2 DC into the ring, chain 3, 3 DC into the ring, pull Ivory through, [holding Ivory over index finger and MC between middle finger and thumb, insert hook under MC to pull up a loop on hook, pull up Ivory over hook and complete chain. Move the MC strand behind the Ivory strand] 2x, yarn over, insert hook into the ring, yarn over, pull through, yarn over, pull through 2 loops, hold strands the same as before and complete the DC. Move the MC strand to the back, work 2 DC, chain 3, 2 DC over the MC tail, yarn over, insert hook into the ring, yarn over, pull through, hold the strands the same as before, pull over the MC, yarn over and complete the 1st half of the DC, move the MC strand to the back and repeat to complete the 2nd half of the DC, but don’t move the MC strand. Drop Ivory, pull through MC to complete 1 chain, chain 2. Join, and fasten off both strands.
R2: With MC, attach slip knot to hook. Chain 2. Yarn over, insert hook into the chain space just finished and complete DC, DC into the same chain space and the next 3 stitches, (2 DC, chain 3, 2 DC) into the next chain space, DC into the next 3 stitches, 2 DC into the next chain space, pull Ivory through and fasten off MC. Chain 2, 2 DC into the same chain space, DC into the next 3 stitches, (2 DC, chain 3, 2 DC) into the next chain space, DC into the next 3 stitches, 2 DC into the 1st chain space. Join. Fasten Off.
#11:
    Follow Round 1 Instructions from 3” Bi-Colored Solid Granny Square above.
R2: In Ivory, Attach slip knot to hook. From behind, SC into the chain space of #2, chain 1, yarn over, insert hook into the 2nd chain space to the left of the one just finished on MA and complete the DC, DC into the same chain space on MA, PLT (into #2), [DC into the next DC of MA, PLT (into #2)] 3x, [DC into the chain space of MA, PLT (into #2)] 2x, chain 1.
From behind, SC into the chain space of #10, chain 1, [(DC into the chain space on MA, PLT (into #10)] 2x, [DC into the next DC of MA, PLT (into #10)] 3x, [DC into the chain space of MA, PLT (into #10)] 2x. Pull Burnt Pumpkin through and fasten off Ivory.
Chain 2, 2 DC into the chain space of MA, DC into the next 3 DCs, (2 DC, chain 3, 2 DC) into the next chain space, DC into the next 3 DCs, 2 DC into the chain space, slip stitch to the chain space of #2.
#17:
    Follow Round 1 Instructions from 3” Bi-Colored Solid Granny Square above.
R2: With Ivory, attach slip knot to hook. Chain 2. Yarn over, insert hook into the 2nd chain space to the left of the chain space just finished on MA and complete DC. DC into the same chain space, and the next 3 DCs, 2 DC into the next chain space, chain 1.
From behind SC into the chain space of #8, chain 1, [DC into the chain space on MA, PLT (into #8)] 2x, [DC into the next DC of MA, PLT (into #8)] 3x, [DC into the chain space of MA, PLT (into #8)] 2x.
Insert hook into the chain space of #16. Pull Burnt Pumpkin through, and complete the SC, chain 1, [DC into the chain space on MA, PLT (into #16)] 2x, [DC into the next DC of MA, PLT (into #16)] 3x, [DC into the chain space of MA, PLT (into #16)] 2x, chain 1.
From behind, SC into the chain space of #16, chain 1, 2 DC into the chain space of MA, DC into the next 3 DCs, 2 DC into the next chain space. Join to the 1st chain of the beginning chain 2.
#56:
    Follow Round 1 Instructions from 3” Bi-Colored Solid Granny Square above.
R2: With Terracotta, attach slip knot to hook. Chain 2. Yarn over, insert hook into the chain space just finished and complete DC. DC into the same chain space, and the next 3 DCs, 2 DC into the next chain space, chain 1.
From behind SC into the chain space of #47, chain 1, [DC into the chain space on MA, PLT (into #47)] 2x, [DC into the next DC of MA, PLT (into #47)] 3x, [DC into the chain space of MA, PLT (into #47)] 2x.
Insert hook into the chain space of #55. Pull Ivory through, and complete the SC, chain 1, [DC into the chain space on MA, PLT (into #55)] 2x, [DC into the next DC of MA, PLT (into #55)] 3x, [DC into the chain space of MA, PLT (into #55) 2x, chain 1.
From behind, SC into the chain space of #55, chain 1, 2 DC into the chain space of MA, DC into the next 3 DCs, 2 DC into the next chain space. Join to the 1st chain of the beginning chain 2.
#62:
    Follow Round 1 Instructions from 3” Bi-Colored Solid Granny Square above.
In Terracotta, Attach slip knot to hook. From behind, SC into the chain space of #53, chain 1, yarn over, insert hook into the chain space just finished on MA and complete the DC, DC into the same chain space on MA, PLT (into #53), [DC into the next DC of MA, PLT (into #53)] 3x, [DC into the chain space of MA, PLT (into #53)] 2x, chain 1.
From behind, SC into the chain space of #63, chain 1, [DC into the chain space on MA, PLT (into #63)] 2x, [DC into the next DC of MA, PLT (into #63)] 3x, [DC into the chain space of MA, PLT (into #63)] 2x. Pull Ivory through and fasten off Terracotta.
From behind, SC into the chain space of #63, chain 1, 2 DC into the chain space of MA, DC into the next 3 DCs, (2 DC, chain 3, 2 DC) into the next chain space, DC into the next 3 DCs, 2 DC into the chain space, slip stitch to the chain space of #53.
#65:
    Follow Round 1 Instructions from 3” Bi-Colored Solid Granny Square above.
R2: In Ivory, Attach slip knot to hook. From behind, SC into the chain space of #56, chain 1, yarn over, insert hook into the 2nd chain space to the left of the one just finished on MA and complete the DC, DC into the same chain space on MA, PLT (into #56), [DC into the next DC of MA, PLT (into #2)] 3x, [DC into the chain space of MA, PLT (into #56)] 2x, chain 1.
From behind, SC into the chain space of #64, chain 1, [DC into the chain space on MA, PLT (into #64)] 2x, [DC into the next DC of MA, PLT (into #64)] 3x, [DC into the chain space of MA, PLT (into #64)] 2x. Pull Green through and fasten off Ivory.
Chain 2, 2 DC into the chain space of MA, DC into the next 3 DCs, (2 DC, chain 3, 2 DC) into the next chain space, DC into the next 3 DCs, 2 DC into the chain space, slip stitch to the chain space of #56.
#67:
    Follow Round 1 Instructions from 3” Bi-Colored Solid Granny Square above.
In Green, Attach slip knot to hook. From behind, SC into the chain space of #58, chain 1, yarn over, insert hook into the chain space of MA just finished and complete the DC, DC into the same chain space on MA, PLT (into #58), [DC into the next DC of MA, PLT (into #58)] 3x, [DC into the chain space of MA, PLT (into #58)] 2x, chain 1.
From behind, SC into the chain space of #66, chain 1, [DC into the chain space on MA, PLT (into #66)] 2x, [DC into the next DC of MA, PLT (into #66)] 3x, [DC into the chain space of MA, PLT (into #66) 2x. Pull Ivory through and fasten off Green.
From behind SC into the chain space of #66, chain 1, 2 DC into the chain space of MA, DC into the next 3 DCs, (2 DC, chain 3, 2 DC) into the next chain space, DC into the next 3 DCs, 2 DC into the chain space, slip stitch to the chain space of #58.


Border:
    With Ivory, join yarn to top right corner. Chain 1. [SC in chain space, chain 3, SC in the same chain space, SC into the next 8 stitches, SC2tog over both squares chain spaces, (SC in the same chain space just worked and the next 8 stitches, SC2tog over both squares chain spaces) 7x, SC into the same chain space just worked and the next 7 stitches] 4x. Join with Burnt Pumpkin. (356 SC)
R2: With Burnt Pumpkin, Chain 1. SC into the 1st SC and into the chain space, chain 3, SC into the same chain space, [SC into the next 89 SCs, SC into the chain space, chain 3, SC into the same chain space] 3x, SC into the next 88 SCs. Join with Terracotta. (364 SC)
R3: With Terracotta, Chain 1. SC into the 1st 2 SCs and into the chain space, chain 3, SC into the same chain space, [SC into the next 91 SCs, SC into the chain space, chain 3, SC into the same chain space] 3x, SC into the next 89 SCs. Join. (372 SC)
Fasten Off, and Sew in Ends.
To display my Pumpkin Pixel Art, I purchased a 36” x 36” cork board from Hobby Lobby, and hung from the chain spaces of the top row using some white thumb tacks from my local Dollar Tree. I chose this method because I wanted a way of displaying the piece without permanently attaching it, so I could take it down and change it out or use it in a different manner in the future.
For a more permanent thing, I think attaching it to a burlap covered canvas would also make for a really great piece, or to a large picture frame.

Please feel free to make and sell your own Pumpkin Pixel Art project using this pattern, but please DO NOT claim this pattern as your own nor should you sell my pattern, and DO NOT re-publish my photos as your own. DO NOT copy and paste my pattern anywhere, link to it instead.

*If you would like a PDF version of this post, you may get one through my EyeLoveKnots Etsy Shop or EyeLoveKnots Craftsy Shop for a small fee. This fee is to compensate for the view/s lost once you no longer need to return to the blog for the information, as you will have your own copy. Plus! It helps fund supplies for new projects to share with you!
Shop EyeLoveKnots Etsy – Pumpkin Pixel Art; 
or EyeLoveKnots Craftsy – Pumpkin Pixel Art.

With so many size, yarn type and color options, I would love to see them! Join the EyeLoveKnots Crafting Community to share your creations, and see what other’s are up to! 

Share your version of this project on Ravelry – Pumpkin Pixel Art. Check out the EyeLoveKnots Ravelry page to keep track of all your EyeLoveKnots favorites in your que, and share your WIPS and finished projects!

Don’t miss out on new crochet patterns, reviews, jewelry tutorials and more! Subscribe to EyeLoveKnots by using the box on the right side toolbar, or follow me via Bloglovin! You can also find me sharing on the EyeLoveKnots Facebook page, and @EyeLoveKnots on Twitter


Linking Up To…
Funtastic Friday 147 Link Party – Olives n Okra
Best of the Weekend – Hello Little Home 
Home Matters Linky Party #156 – Domestic Deadline 
Sweet Inspiration Link Party #77 – The Boondocks Blog 
October 2017 Sharing Time – Raising Memories 
{nifty thrifty sunday #303} – Nifty Thrifty Things 
Craft Schooling Sunday – Creative Jewish Mom
The Creative Corner Link Up Party – 10/08/17 – Curly Crafty Mom
5 Pretty Pumpkin Projects for Fall + Inspiration Monday – Scattered Thoughts of a Crafty Mom 
Create Link Inspire Linky Party #202 – The Crafty Blog Stalker 
Inspire Me Monday – Week 301 – Create With Joy 
Made by You Monday – Skip to my Lou 
Tutorials & Tips Link Party {326} – Home Stories A to Z 
Bee Party #34 – My Busy Beehives 
Creative Mondays 10/09/2017 – Claire Justine 
Handmade Monday #46 – Sum of their Stories 
The Scoop Link Party #296 – Worthing Court Blog 
Dagmar’s Home Link Party #186 – Vintage Buttons – Dagmar’s Home 
The Really Crafty Link Party #88 – Keeping it Real
394th Inspire Me Tuesday – A Stroll Thru Life 
From Dream to Reality #283 – The DIY Dreamer 
Show and Tell Link Party – Flamingo Toes 
Lou Lou Girls Fabulous Party 184 – Lou Lou Girls 
Fiber Tuesday 130 – Quilting Room with Mel 
TOO Cute Tuesday: Linky Par-Tay! #357 – Funky Polkadot Giraffe 
The Wednesday Link Party – Oombawka Design 
The Linky Ladies Party #117 – The Purple Poncho 
Talk of the Town #93 – Sadie Seasongoods 
Sew It Cook It Craft It Link Party #26 – Sew Historically
Hookin’ on Hump Day #152 – Petals to Picots 
Your Whims Wednesday #324 – My Girlish Whims 
{Wow Me} Wednesday #320 – Ginger Snap Crafts
Funtastic Friday 148 Link Party – Olives n Okra 
Best of the Weekend – Hello Little Home 
Home Matters Linky Party #157 – Domestic Deadline 
Friday Feature Linky Party – Oh My Heartsie Girl 
Link Your Stuff Party – Annemarie’s Haak Blog
Nifty Thrifty Sunday #304 – Nifty Thrifty Things 
Craft Schooling Sunday – Creative Jewish Mom 
The Creative Corner Link Up Party 10/15/17 – Curly Crafty Mom
Inspiration Monday Party 10.15.17 – Scattered Thoughts of a Crafty Mom 
Create Link Inspire Linky Party #203 – The Crafty Blog Stalker 
Inspire Me Monday – Week 302 – Create With Joy 
Made by you Monday – Skip to my Lou 
Tutorials & Tips Link Party {327} – Home Stories A to Z 
Creative Mondays, and Featured Blogs (16/10/2017) – Claire Justine 
Handmade Monday #47 – Sum of their Stories 
Simple Fall Decor & MM #176 – A Wonderful Thoughts 
The Scoop Link Party #297 – Worthing Court 
The Really Crafty Link Party #89 – Keeping It Real
395th Inspire Me Tuesday – A Stroll Thru Life 
From Dream to Reality #284 – The DIY Dreamer 
Show and Tell Link Party – Flamingo Toes 
Lou Lou Girls Fabulous Party #185 – Lou Lou Girls 
The Wednesday Link Party – Oombawka Design 
TOO Cute Tuesday Link Par-Tay! #358 – Funky Polkadot Giraffe 
Talk of the Town #94 – Sadie Seasongoods 
You’re the Star Linky Party Week 55 – Let It Shine
Fiber Tuesday 131 – The Quilting Room with Mel
Hookin’ on Hump Day #153 – Petals to Picots 

Your Whims Wednesday #325 – My Girlish Whims 

This Month’s Giveaway is sponsored by [R]Helena of Crochet N’ Crafts! There will be two winners this month! Prize is a $10 Gift Certificate to the Crochet N’ Crafts Pattern Shop. Patterns shown are just examples of what could be chosen, and include the CNC Fashion Doll Collection, the CNC Hat & Cowl Collection, and the CrochetN’Crafts Bag Collection.


a Rafflecopter giveaway

Must be 18 or older to enter. Open to all countries. Void where prohibited. Winner has 48 hours to respond to email notification, or another winner will be chosen. Helena of Crochet N’ Crafts is responsible for prize fulfillment.

The two most viewed projects from last month’s challenge can be found in the image above. From left to right: Granny Square Sling Bag – Crochet DIY from Si Nanay Madel, and Granny Square Scrubby – Free Crochet Pattern from Picot Pals.

Now, Share Your Granny-Spiration Project With Us!


New Granny-Spiration Projects will be shared from your hosts the first Saturday of each month. Post times will vary. You will be able to link up from 12:00am EST on the first Saturday of the month, through midnight EST on the second Thursday from the start date – specific dates are on top of the Rafflecopter form – giving you almost two weeks to link up and enter the giveaway!

Please share projects that are family friendly, and GRANNY INSPIRED through use of regular granny square or solid granny square, granny stitch pattern or other afghan square in the form of a free pattern, pattern review, or inspiration piece. Not limited to crochet or knit.

Please make sure to link to your post, and not your home page. 

*If you don’t have a blog, you can still share with us by creating a Free Flickr Account – powered by Yahoo. Add your projects there, and then come back here with the link for the project.


*Link ups cannot be to Etsy listings or Ravelry pages where patterns are sold. You can link to blog posts, Flickr or Facebook pages, Pins, etc that are directed towards it, but can’t directly link to it. 

To be clearer though, Raverly pages of finished projects are okay to share. Sorry for the inconvenience! That’s per InLinkz guidelines. Thanks!

Features may be chosen at the discretion of each host. By linking up, you give us permission to feature your item.

An InLinkz Link-up


Filed Under: Free Crochet Patterns, Uncategorized Tagged With: 5.5/I9 Hook, Free Crochet Pattern, Granny Square, GrannySpirationChallenge2017, I Love This Yarn, Picot Pals, Pixel Art, Pumpkin, Si Nanay Madel, Solid Granny Square, Worsted Weight Yarn

❮ PREVIOUS POST

Autumn Leaves – Crochet Pattern Review

NEXT POST ❯

Slow-Cooker Cheesy Chicken Enchilada Pasta – Recipe Review – Betty Crocker

Comments

  1. Sigrid Swinnen says

    October 6, 2017 at 11:41 am

    Your pumpkin is even more beautiful than your acorn! Nice!!!
    Can't wait to see what the others have made 🙂

    Reply
    • knots1prime says

      October 9, 2017 at 2:10 am

      Thanks! I got lucky with my color combo. Gonna pop over and see what you have been up to.

      Reply
  2. San dra says

    October 6, 2017 at 12:11 pm

    Your blanket is soo nice – I want to make a pixel blanket since I started to crochet, but I'm afraid of having to sew too many loose ends…
    And it matches perfectly with your acorn blanket! =)

    So I'm going to prepare my post for this month – also a blanket! =))
    Bye bye,
    Sandra

    Reply
    • knots1prime says

      October 9, 2017 at 2:09 am

      This pumpkin was one that I waited until the very of the project to weave in all the ends, and boy was that a mistake! I highly recommend the pixel project as it is soooo fun! But definitely recommend weaving in the ends as you go or at least per row.

      Reply
  3. Marjan Hoebeke-Pfaff says

    October 7, 2017 at 11:43 am

    Awesome! Even like this one more than the acorn!

    Reply
    • knots1prime says

      October 9, 2017 at 2:11 am

      Thanks! I had a lot of fun with this one 🙂

      Reply
  4. Hilde haakt says

    October 9, 2017 at 2:24 pm

    Hi Alexandra, I wanted to post another photo of the African flower square. Can you delete this one?

    Reply
    • knots1prime says

      October 9, 2017 at 4:24 pm

      Done 🙂

      Reply
  5. Christina Makri says

    October 11, 2017 at 10:12 am

    Very beautiful pattern and so many details… thank you for sharing at Sweet Inspiration Link Party

    http://www.artdecorationcrafting.gr

    Reply
  6. Teresa B says

    October 12, 2017 at 10:52 am

    So cute! Thank you for sharing the pattern at The Really Crafty Link Party this week. Pinned!

    Reply
  7. Natas Nest says

    October 14, 2017 at 6:49 am

    What a wonderful pumpkin motif! Super ♥. Thanks for sharing and as well thanks for your kind invitation to the link party, I'm very pleased! Happy weekend xxx

    Reply
  8. Clairejustine oxox says

    October 15, 2017 at 10:28 am

    This looks beautiful 🙂 What a lovely idea. Thanks for sharing at Creative Mondays 🙂 Hope you can join us tomorrow.

    Reply
  9. Sum of their Stories says

    October 21, 2017 at 1:41 pm

    This is so clever. What a lovely piece of art to bring out at this time of year.

    Reply
  10. Miaismine says

    October 25, 2017 at 4:20 am

    cute – so cute pumpkin! Thank you for sharing!

    Reply

Leave a Reply Cancel reply

Your email address will not be published. Required fields are marked *

This site uses Akismet to reduce spam. Learn how your comment data is processed.

Welcome!

Welcome!

Hey! I'm Alexandra, the blogger and creator behind EyeLoveKnots and On Rockwood Lane! My passion is being creative. My favorite thing to do is crochet, and you will almost always find me having a cup of coffee and working on a new crochet project, but when I'm not doing that, you might find me out at a local park rollerblading, baking some fresh cookies, picking veggies in the garden or re-decorating for a new season or holiday. My two cats are great supervisors for all my adventures (minus the being outside because they think it's too hot in Florida to be anywhere but inside), and make sure I take plenty of breaks.

Meet the Team!

Meet the Team!

On the left, Abby is the maker behind A Stitch Shy of Normal, and on the right Jessica is the maker behind Nice and Knotty and Candace is the maker behind TandC Crafters.

Together, they help me bring awesome crochet projects to you! Click the image to learn more about them, and get their Instagram links, where they are constantly sharing tons of crochet inspiration.

Don’t Miss Out

Crochet! Magazine Spring 2023

Crochet! Magazine Spring 2023

(Affiliate Link) Click this image to get this issue now. These 22 designs are the perfect way to welcome in Spring with easy to wear layers, sweet styles amplified with striking stitch patterns, and some fun whimsical projects too.

Crochet World April 2023

Crochet World April 2023

(Affiliate Link) Click this image to get this issue now. These 21 designs are the perfect way to welcome in Spring with fun pops of color, sweet crochet thread projects, and fresh takes on the classic granny stitch pattern.

Gnome Caddy Pattern

Gnome Caddy Pattern

(Affiliate Link) Click this image to get a copy of this pattern! This adorable little Spring Gnome Caddy has a place for all of your crochet supplies. It's worked in a lightweight #3 yarn, but work in a worsted weight #4 yarn for even more space!

Archives

Copyright © 2023 EyeLoveKnots · Custom site by Moonsteam Design