
I received a request from my friend Jeff for some Round Facial Scrubbies. I used my Rainbow Bright Round Facial Scrubbies pattern to fulfill his request. I did, however, adjust it a little bit and that can be found below.
These facial scrubbies are great for cleaning and exfoliating – I use a set paired with some rubbing alcohol to clean my face every morning – but they are also great for removing make up.
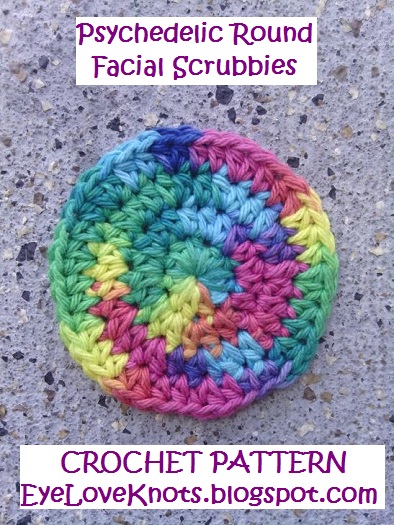
You could also use them as a small coaster, or attach a dish scrubbie to one side to make it perfect for dishes.
Materials:
– 45 yards of Worsted Weight Cotton – I used Lily Sugar n Cream in Psychedelic (JoAnn’s)
– G6/4.25mm Crochet Hook
– #18 Tapestry Needle
– Opt. Flat Nose Pliers (found in the Jewelry section of your craft store)
Material Notes:
Yarn Alternatives: Bernat Handicrafter Yarn will also work great! Lion Brand Kitchen Cotton will work up a tad bit bigger.
I do not recommend using Hobby Lobby’s I Love This Cotton. It’s too soft, and isn’t as durable.
My local JoAnn’s stores carry larger skeins of Lily Sugar n Cream Yarn. With one 3 oz skein, you will be able to make 8-10 of these round facial scrubbies.
Cotton yarn is a little tougher when it comes to weaving in your ends. You will want a tapestry needle with a larger eye, and duller point otherwise, it will take you longer to weave in your ends and hurt your fingers from tugging at the needle and yarn.
Flat nose pliers are great for use with chunky and super bulky weight yarns as well as cotton. Insert the needle as you normally would for weaving but instead of struggling to get it out the other side, use the pliers to pull it out. Works like a charm!
Care Instructions:
Lily Sugar n Cream yarn is machine washable and dryable. Throw them in with the rest of your clothing, but you may want to put them in a lingerie bag to keep track of them, and then lay flat to dry.
Time Spent:
I worked up the set of four in about fourty five minutes.
Measurements:
These scrubbies measure 3.5″ across.
Gauge:
Using an G6/4.25mm Hook and Lily Sugar n Cream – 4″ x 3.75″
Chain 17, DC in the 4th chain, and each chain across. (15 DC)
R2 – 7: Chain 1, turn. DC in the 1st stitch, and in each stitch.
Fasten Off.
Abbreviations:
HDC – Half Double Crochet
DC – Double Crochet
Pattern Notes:
Work with a loose tension, otherwise, the ends of the scrubbie will curl up.
Normally, you would chain 1 at the beginning of each round when working in Half Double Crochets, however, working with the chain 2 in this pattern helps keep the looser tension on the scrubbies.
Having the beginning increase split on either side of the beginning chain helps keep the seam straight, and also adds to the ease of keeping a looser tension.
Joining is to be done into the first half double crochet, not the beginning chain.
Pattern:
CH 5. Join to form a ring. Chain 1, 10 HDC in ring. Pull center tail tight to close center hole.
R2: Chain 2, HDC in the first HDC, 2 HDC in each of the next 9 stitches around, HDC in the same stitch as the first HDC. Join. (20 HDC)
R3: Chain 2, HDC in the first HDC and in the next, (2 HDC in next HDC, HDC in next HDC) 9x, HDC in the same stitch as the first HDC. Join. (30 HDC)
R4: Chain 2, HDC in the first HDC and in the next two, (2 HDC in next HDC, HDC in next 2 HDC’s) 9x, HDC in the same stitch as the first HDC. Join. (40 HDC).
Fasten Off and Weave in Ends. I worked an invisible join. You can see a photo tutorial of this technique in my Newborn Twin Chunky Beanie post.
Please feel free to make and sell your own Round Facial Scrubbies using this pattern, but please DO NOT claim this pattern as your own nor should you sell my pattern, and DO NOT re-publish my photos as your own. DO NOT copy and paste my pattern anywhere, link to it instead.
With so many size, yarn type and color options, I would love to see them! Please share your photos on my EyeLoveKnots Facebook page!
I am on Ravelry! Check out the EyeLoveKnots Ravelry page to keep track of all your EyeLoveKnots favorites in your que, and share your WIPS and finished projects!
Don’t miss out on new crochet patterns, reviews, jewelry tutorials and more! Subscribe to EyeLoveKnots by using the box on the right side toolbar, or follow me via Bloglovin!
Leave a Reply