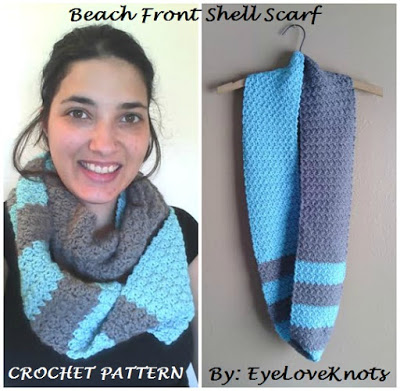
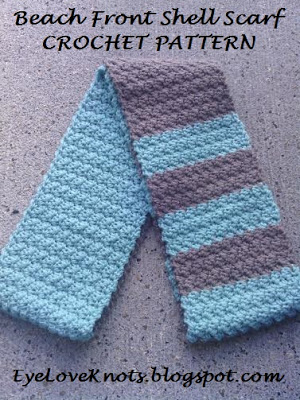
Materials:
– 270 yards of Worsted Weight Yarn – I used about 3/4 of a skein of each of Hobby Lobby‘s I Love This Yarn in Turquoise and Graphite
– I9/5.5mm Crochet Hook
– Tapestry Needle for Weaving in Ends
Material Notes:
Yarn Alternatives: Red Heart’s With Love, Purl Essence Sincerely Everyday (JoAnn’s).
Time Spent:
This scarf took me just over four hours to complete.
Measurements:
61″ in Circumference by 5.75″ in Width
Gauge:
With I Love This Yarn and an I9/5.5mm Hook = 4″ x 4″
Chain 16, DC in the 4th stitch, and in each stitch across. (14 DC)
R2 – R8: Chain 2, turn. DC in the 2nd stitch, and each stitch across.
Fasten Off.
Abbreviations:
SC – Single Crochet
DC – Double Crochet
Pattern Notes:
Typically, the slanted shell pattern is worked into the 2nd chain of an even numbered chain. I, however, feel that working into this stitch causes the project to come out uneven and bunched up. You will find my pattern is worked into the 3rd chain of an odd numbered chain.
Color changes are usually worked in the last yarn over of the stitch, but I found that my edges were looking a little funny because of this so instead, I worked as: fasten off at the end of the row, pull loop up to secure final stitch, attach new color to that final stitch, chain 1, hold both color tails in place with your left hand index finger and work first cluster over tails. Continue on with row. This created a nice, consistent edge throughout the piece and practically invisible color change.
Alternatively, you can work your color change in the last yarn over of the stitch, carry your yarn up the sides and then add a border around the scarf to cover the carries. This way you’ll avoid having to weave in lots of ends. I don’t like to carry my yarn though, and I didn’t want to add a border. I really like the slight uneven edge created by the clusters.
If you don’t want an infinity scarf, simply leave off the whipstitch join at the end. If you do so, add two more rows of turquoise at the beginning, and leave off the last two rows of turquoise (or your color of choice!).
Pattern:
With Turquoise, Chain 21. (SC, DC) in the 3rd chain from the hook, [skip the next chain, (SC, DC) in the next chain] across. (10 clusters)
R2 – 52: Chain 1, (SC, DC) in the 2nd stitch stitch, [skip the next stitch, (SC, DC) in the next stitch] across.
*Change to Gray.
R53 – 58: Chain 1, (SC, DC) in the 2nd stitch stitch, [skip the next stitch, (SC, DC) in the next stitch] across.
*Change to Turquoise.
R59 – 64: Chain 1, (SC, DC) in the 2nd stitch stitch, [skip the next stitch, (SC, DC) in the next stitch] across.
*Change to Gray.
R65 – 70: Chain 1, (SC, DC) in the 2nd stitch stitch, [skip the next stitch, (SC, DC) in the next stitch] across.
*Change to Turquoise.
R71 – 76: Chain 1, (SC, DC) in the 2nd stitch stitch, [skip the next stitch, (SC, DC) in the next stitch] across.
*Change to Gray.
R77 – 82: Chain 1, (SC, DC) in the 2nd stitch stitch, [skip the next stitch, (SC, DC) in the next stitch] across.
*Change to Turquoise.
R83 – 88: Chain 1, (SC, DC) in the 2nd stitch stitch, [skip the next stitch, (SC, DC) in the next stitch] across.
*Change to Gray.
R89 – 94: Chain 1, (SC, DC) in the 2nd stitch stitch, [skip the next stitch, (SC, DC) in the next stitch] across.
*Change to Turquoise.
R95 – 100: Chain 1, (SC, DC) in the 2nd stitch stitch, [skip the next stitch, (SC, DC) in the next stitch] across.
*Change to Gray.
R101 – 106: Chain 1, (SC, DC) in the 2nd stitch stitch, [skip the next stitch, (SC, DC) in the next stitch] across.
*Change to Turquoise.
R107 – 112: Chain 1, (SC, DC) in the 2nd stitch stitch, [skip the next stitch, (SC, DC) in the next stitch] across.
*Change to Gray.
R113 – 166: Chain 1, (SC, DC) in the 2nd stitch stitch, [skip the next stitch, (SC, DC) in the next stitch] across.
*Change to Turquoise.
R167 – 168: Chain 1, (SC, DC) in the 2nd stitch stitch, [skip the next stitch, (SC, DC) in the next stitch] across.
Fasten Off with a long tail and whipstitch the ends closed, making sure the scarf isn’t twisted beforehand (unless this is the look you’re going for).
Originally, I laid my scarf down so the Right Sides were facing and then slip stitched across joining both layers, but I didn’t like how this created a visible seam and ridge so I would recommend the whipstitch method.
Weave in Ends.
Please feel free to make and sell your own [Beach Front] Slanted Shell Infinity Scarf using this pattern, but please DO NOT claim this pattern as your own nor should you sell my pattern, and DO NOT re-publish my photos as your own. DO NOT copy and paste my pattern anywhere, link to it instead.
*If you would like a PDF version of this post, you may get one through my EyeLoveKnots Etsy Shop or EyeLoveKnots Craftsy Shop for a small fee. This fee is to compensate for the view/s lost once you no longer need to return to the blog for the information, as you will have your own copy. Plus! It helps fund supplies for new projects to share with you!
Shop EyeLoveKnots Etsy – Beach Front Shell Scarf;
or EyeLoveKnots Craftsy – Beach Front Shell Scarf.
With so many size, yarn type and color options, I would love to see them! Please share your photos on my EyeLoveKnots Facebook page!
Check out the EyeLoveKnots Ravelry page to keep track of all your EyeLoveKnots favorites in your que, and share your WIPS and finished projects!
Don’t miss out on new crochet patterns, reviews, jewelry tutorials and more! Subscribe to EyeLoveKnots by using the box on the right side toolbar, or follow me via Bloglovin!


I love the pretty crochet stitch, color choice of yarn and you did a great job making this. Take care and happy crocheting.
Julie xo
Thanks so much Julie! It was a fun project to work up 🙂
Beautiful scarf, Alexandra! Lovely colors too! Thanks for sharing great tutorial!
Hope you have a wonderful week!
Hugs and love from Portugal,
Ana Love Craft
http://www.lovecraft2012.blogspot.com
Thanks for stopping by to visit and for your kind comment!
Love this!! I love how you did the color blocks!
Thanks! Was trying to go for something a little different. It worked out perfectly.
Beautiful pattern – the colors and stitch used make this just gorgeous!
Thanks! It came out better than I imagined 🙂
SO NEAT! THANKS FOR SHARING !
[email protected]
Thanks for stopping by 🙂 If you've had a chance to make one of these, I would love to see!