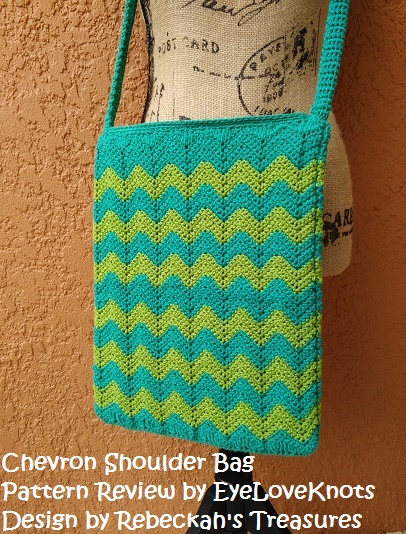
This is a crochet pattern review of the Chevron Shoulder Bag from Rebeckah’s Treasures.
This post contains affiliate links for Yarnspirations. If you make a purchase by clicking on them, I make a small commission at no extra cost to you. Thanks for your support!

I pattern tested this Chevron Shoulder Bag for my friend Rebeckah of Rebeckah’s Treasures.
This testing began back in November of 2014, and definitely shouldn’t have taken this long to complete and post, but a couple things caused this to remain in the WIPs bin:
- The time it took to complete because of the yarn used;
- Blocking;
- Adding a zipper.
The last two things here intimidated me, and after all this time, I worked around it. Keep in mind that you can adjust anything in a pattern with just a little brainstorming. Don’t let it deter you from completing anything – especially a bag as beautiful as this one!
Materials I Used:
- Two skeins of Cotton(ish) Yarn (a lightweight #3 yarn that has been discontinued) in Jade Jersey and Cotton Field (lime green)
- F5/3.75mm Crochet Hook
- #18 Tapestry Needle
- For Lining: Half a skein of Embroidery Floss – I used a green, but it doesn’t matter because it isn’t visible, 2 Sheets of Stiff 7 Mesh Plastic Canvas, and Two Sheets of Eco-Felt in the Sandstone color
- Chevron Shoulder Bag, Free Crochet Pattern by Rebeckah’s Treasures
Material Notes:
Yarn Alternatives: Bernat’s Softee Baby Cotton, Lion Brand’s Comfy Cotton, Paton’s Grace Yarn.
The original shoulder bag made by Rebeckah was made with #10 crochet thread. For the testing, I was asked to work the same pattern using lightweight yarn to see what the measurements would be. With this being said – you can use any weight yarn from #10 crochet thread to #6 super bulky.
Plastic Canvas: I used stiff, but I do not recommend it! I recommend using the soft kind.
Time Spent:
Based on my previous and current notes, I am estimating that this bag took me just over 8 hours to complete – done in a few seatings.
Measurements:
My finished bag came out to be 21″ Wide by 14.25″ Tall, with the strap measuring 1″ Wide by 17″ Tall.
My Gauge:
10 sc x 10 rows = 2″ x 2″
Pattern Notes:
When I began testing this bag, this was my first ripple stitch project, and I loved the pattern! It was a lot easier than I thought it’d be, and the ripple effect really does look neat. I have since worked several ripple projects, which can be found at the end of this post, but not in the chevron pattern as this is done in.

The chevron pattern made my fabric become very wavy – which honestly, drove me crazy! I added the plastic canvas to my bag to make the bag stiffer and straighter, without having to block the bag. If I worked this bag again, I would omit the plastic canvas to allow more stretch within the bag and add comfort, but keep the lining to prevent too much stretch. The bag would have to be blocked though to take out the wave.
To add the plastic canvas and lining, I cut two pieces of plastic canvas out 65 holes wide by 90 holes tall, and one long piece of felt to 10″ wide by 28″ tall. I folded the felt in half hamburger style, and then blanket stitched the sides closed with the embroidery floss. I placed the two sheets of plastic canvas into the bag, and then added the felt lining in between them and stitched similarly to a running stitch through the felt into the top holes of the plastic canvas and finally around the stitches of the last row crocheted. I have used this technique in my Little Girls Purse Crochet Review and have photos there showing this process.
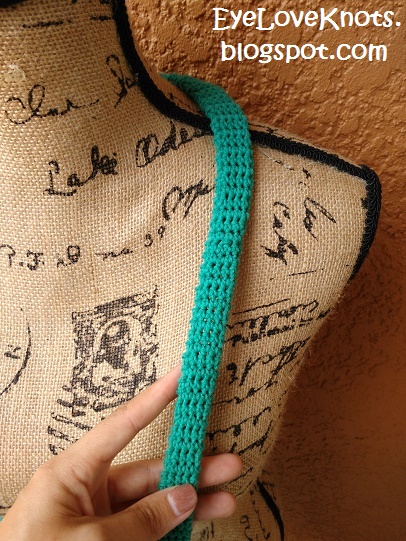
I doubled the width of my strap (9 SC’s across) so I could fold in half and double the thickness when attached to the bag. It also lessens the stretch of the bag. Even so, expect about 10″ of stretch when items are in bag. To lessen stretch more, you can line the strap. I did buy enough felt to do so, but did not think I could cut it well enough to add so I didn’t line. I worked my strap to 169 rows for a length of 34″.
After I sewed it onto the bag, I folded the strap in half and whipstitched the sides closed.
I added two rows of single crochet in the back loop to the top of the bag to help hide the top of the felt lining. I like the added texture and dimension it gave.
I opted not to add a pocket as well as zipper. I did purchase the zipper to add, but it was very intimidating to me and was one of the reasons it took me so long to finish the bag. I do think a clasp of some sort would be a nice finishing touch to the bag – if I were to work another, I would add either a flap, or a button closure of some sort.
Join the EyeLoveKnots Crafting Community on Facebook to share your creations, and see what others are up to!
I really ADORE how your version of the chevron bag came out! Thanks so much!
Thanks 🙂 It was a great piece to challenge my crochet skills, and produced a beautiful bag (which my mom is very much enjoying).