Materials I Used:
– Light Worsted Weight Yarn (#3) – I used about 155 yards of Bernat Softee Baby in Princess Pebbles Ombre (JoAnn’s)
– H8/5mm Crochet Hook
– #20 Tapestry Needle for Weaving and Sewing
– 8″ x 10″ Eco-Friendly Felt – I already threw out my label and cannot find it online so I am not sure of the color, but I held up the skein of Princess Pebbles Ombre to the different pink felt options to bought the one that was closest to the pink within it.
– 7 Mesh Soft, Clear Plastic Canvas
– 1 Button – I used a 7/8″ (22m) White Colored Button from Crafting with Buttons [found at JoAnn’s, but not available for purchase online from JoAnn’s.]
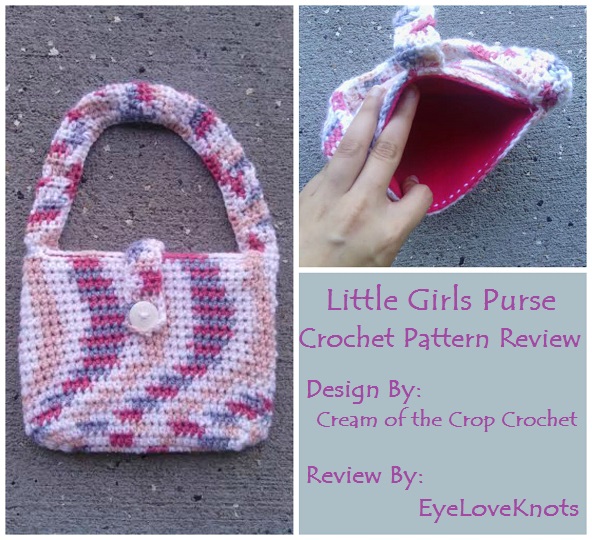
– Little Girls Purse, Free Crochet Pattern from Cream of the Crop Crochet
Material Notes:
I say about 155 yards for the yarn used as an estimate. These skeins have quite a bit of yarn, and though I cannot say for sure, I believe I would be able to make a second purse with the remaining ombre yarn.
The felt and plastic canvas are optional – I used them to create a lining for the purse.
The button that I used isn’t one that I normally use. I bought it mistakenly a while back, and found that it is for use in button art projects. It is thinner with a flat back, and comes off to be fragile to me, but after I attached it to this little purse, I really like how it sits on the daintier yarn.
Time Spent:
I completed this Little Girls Purse in about 2 hours, 15 minutes. This time includes all pieces and the sewing in of the lining.
Measurements:
8″ Wide by 6.25″ in Length Laying Flat excluding Strap. Strap adds 5.5″.
Gauge:
Using Bernat Softee Baby & an H8/5mm Hook = 4″ Wide by 3″ in Length:
Chain 18. HDC into the 3rd chain and each chain across. (16 HDC)
R2 – 8: Chain 1, turn. HDC into the 1st HDC, and each HDC across.
Pattern Notes:
Due to the fact that I try to sew the least amount possible, I worked the straps differently than called for in the pattern.

My Strap Process:
1. Lay bag flat. Find center on sides and count out four stitches on each side of side center (8 stitches total on each side). Place stitch markers. Attach yarn, and then I followed the written pattern – 8 HDC across for 37 rows.
2 – 3. After completing the last stitch, I turned the purse inside out and slip stitched to the other side where the stitch markers (not shown) were placed.
4. I then turned bag right side out, and began single crocheting along the first half of the opening – shown by the direction of the arrows.
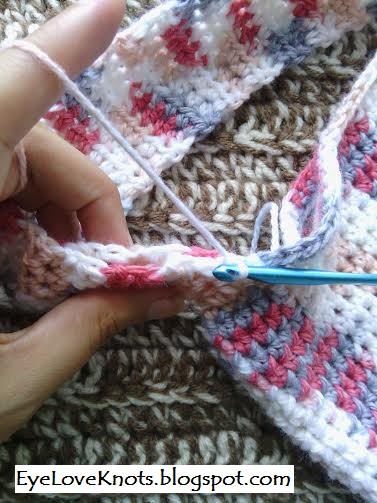
Once to the other side, I folded the strap in half, single crocheted along the bottomside of the strap working through both layers, and then finished single crocheting around the other half of the bag opening. Working this method will also limit the stretch to the purse strap.
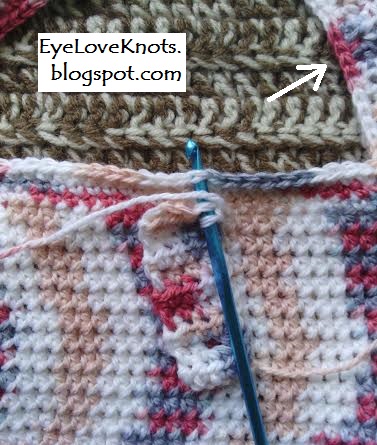
I slip stitch joined the button tab in a similar to the join of the purse straps. Take caution when attaching the tab – I was not paying attention and added it to the wrong side of the purse. If you work the straps using my method, make sure you find the right side of the purse – shown by the single crochet edging – and attach the tab to the other side of the purse.
I sewed on the button with holes at 2″ down from the top middle of the purse. I suggest laying button down first, and then seeing where your buttonhole is in comparison – Remember that the tab will stretch a little so don’t leave too much give.
After completing the purse, I noticed the purse was very floppy/flimsy so I added a lining with plastic canvas to make it sturdy.
Lining – Please forgive the dark photos! It was late when I was taking them.
I folded the felt hamburger style with the right side on the inside so it will be seen when the purse is open, cut off 2″ from one side and about a quarter of an inch off the top – I just eyeballed it, but you could measure. It ended up being 8″ wide by 5.75″ in length. I cut my plastic canvas two rows of squares smaller than the length of the felt, and one row of squares smaller than the width of the felt – 36 holes in Length by 46 holes in Width. Sit plastic canvas aside.

I kept the felt folded in half and worked a blanket stitch around the sides of the felt using a #20 tapestry needle and the same yarn used in the crocheted purse – the easiest stitch I found for someone who isn’t a sewer. Usually when beginning the blanket stitch you will leave the beginning tail and knot on the inside of the piece to hide it. In this case, you want to make sure the tail and knot is left on the outside of the two layers so it isn’t visible when you open the purse. You also don’t need to worry about making it neat because it won’t be visible.
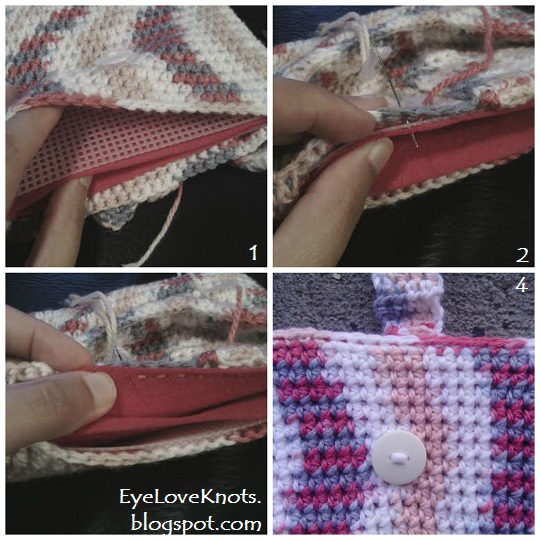
1. Put in your felt lining, and add a rectangle of plastic canvas on either side of it.
2 – 3. I lined the top of the felt up just under the top of the crochet stitches. I started in a stitch near the doubled strap, and worked a running stitch in and out of all three layers – felt, each hole of the plastic canvas and each single crochet of the purse.
4. I was a little worried that the running stitch would be really visible on the finished purse, but looking at this close up you can see this isn’t the case.
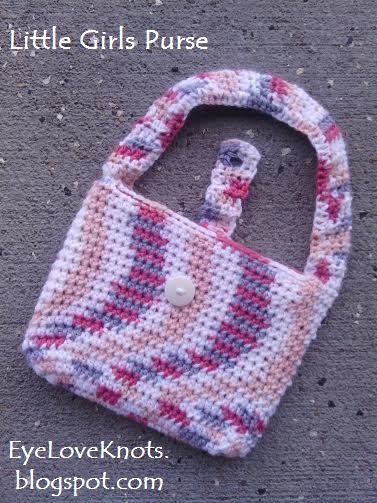
All in all, I really think this is just the cutest Little Girls Purse! Usually I prefer the sturdy-ness and quick work up of using worsted weight yarn, but after adding the lining I really fell for this purse. It’s a great size, works up fairly quickly, and the pattern is easy to read and follow.
With so many size, yarn type and color options, I would love to see them! Please share your photos on my EyeLoveKnots Facebook page!
I am on Ravelry! Check out the EyeLoveKnots Ravelry page to keep track of all your EyeLoveKnots favorites in your que, and share your WIPS and finished projects!
Don’t miss out on new crochet patterns, reviews, jewelry tutorials and more! Subscribe to EyeLoveKnots by using the box on the right side toolbar, or follow me via Bloglovin!
You May Also Like…
So much fun, making a purse for a little girl! Almost wishing you were still a little girl yourself 😉
I had a lot of fun creating this little purse, and reminiscing on the times I would have killed for a purse like this to carry my dolls in. Hehe!