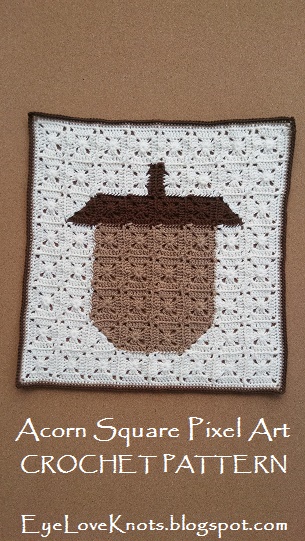
This is a free crochet pattern for how-to crochet my Acorn Square Pixel Art – a 16″ square worked in lightweight yarn.
This post contains affiliate links for LoveCrafts. If you make a purchase by clicking on them, I make a small commission at no extra cost to you. Thanks for your support!
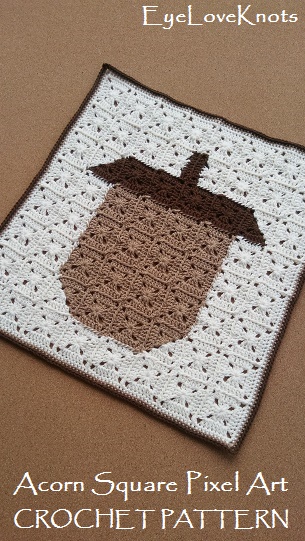
It’s here! The Acorn Square Pixel Art I’ve been sharing on social media for the last week and a half!
A few weeks ago, I got an idea that I wanted to work an Acorn Square this fall, and so I decided I would make some two round solid granny squares, use my favorite Pull Loop Through method to join my squares, and create a fall inspired pixel art piece.
Upon completing my square, I thought about what I would create with it. It could be used as a doily, as a piece of wall art if attached to a dowel or canvas, as a blouse if worked as the front piece, an afghan square to a larger blanket, the front piece to a tote bag, a rug if worked with four strands of worsted weight yarn… So many possibilities, and so many more than mentioned. If you would like to see any of these, please drop me a line below!
If you would like a PDF version of this post, you may get one through either my EyeLoveKnots Etsy Shop, Ravelry or LoveCrafts Shop for a small fee. This fee is to compensate for the views lost when you no longer need to return to the blog to for the information, as you will have your own copy. Plus! It helps fund supplies for new projects to share with you!
Shop EyeLoveKnots Etsy: Acorn Square Pixel Art.
Shop EyeLoveKnots LoveCrafts: Acorn Square Pixel Art.
Are you a Raveler? Share your version of this project on Ravelry – Acorn Square Pixel Art
Materials:
- 360 Yards of Lightweight #3 Yarn (or 119 yards each of the three colors) – I used Baby Bee Sweet Delight Yarn in Naked [Cream], Teddy [Light Brown] and Chocolate [Dark Brown]
- G6/4mm Crochet Hook
- Tapestry Needle
Material Notes:
Yarn Alternative: I Love This Sport Weight Yarn, Berroco’s Vintage DK.
Any weight yarn will also work for this project with respective crochet hook. Different weights will produce different sized squares.
Time Spent:
This square took me about 7 hours to complete – I worked about a row a day, including the weaving for that row.
Measurements:
With border, the acorn square measures 16″.
Gauge:
First square measures 2″.
Gauge for this project isn’t essential, as long as your squares are consistent in size. Keep in mind, smaller or larger squares will produce smaller or larger projects.
Abbreviations:
- DC – Double Crochet
- SC – Single Crochet
- sc2tog – Single Crochet Two Stitches Together (decrease)
- PLT – Pull Loop Through (Join)
- To PLT: After DC, pull up a loop, insert hook from front through the corresponding stitch on MB and pull loop through
Pattern Notes:
The beginning chain 5 counts as a double crochet plus a chain 3, and the beginning chain 2 counts as the first double crochet.
Join to the second chain of the beginning chain, not the first stitch, except in the border – here you’ll join to the first single crochet.
You may work this art piece with a variety of joining methods, but I joined mine using the Pull Loop Through Method, and this pattern will be written as such. If you choose to work all the squares first, and then sew them together, you will need: 14 in Teddy, 2 in half Naked and half Teddy, 4 in Chocolate, 2 in half Naked and half Chocolate split diagonally, 2 in half Naked and half Chocolate split on the side, and 40 in Naked.
In the instructions, I refer to MA, MB and MD. These are the motifs. MA is the current motif you are working on. MB is the first one you join to, MC is skipped and MD is the second one you join to, which is diagonal from MB. I only refer to these motifs in the one and two join instructions. I also mention MC in the bi-colored square instructions. Here, this refers to Main Color.
I highly recommend weaving in your ends as you complete each row, otherwise, at the end you could be left with so many ends, this square may end up in your WIPs bin, instead of being completed.
Work 1 Complete 3” Solid Granny Square in Ivory
This square will be the bottom right square of the piece. .
Chain 5. Join to form a ring. Chain 5, work (3 DC, chain 3) into the ring 3x, 2 DC into the ring and Join. (12 DC)
R2: Chain 2. Work (2 DC, chain 3, 2 DC) into the chain space, [DC into the next 3 DCs, (2 DC, chain 3, 2 DC) into the next chain space] 3x, DC into the next 2 DCs. Join, and fasten off. (28 DC)
Working with the Join-as-you-Go PLT Method, you will have squares that require one join, and squares that require two joins – these are described below.
To Work Square with 1 Join:
Chain 5. Join to form a ring. Chain 5, work (3 DC, chain 3) into the ring 3x, 2 DC into the ring and Join. (12 DC)
R2: Chain 2. Work 2 DC into the chain space, chain 1, working from behind SC into chain space of MB, chain 1, [(DC into chain space of MA, PLT) 2x, (DC into next stitch of MA, PLT) 3x, (DC into chain space of MA, PLT) 2x, chain 1, working from behind SC into chain space of MB, chain 1]; 2 DC into the same chain space, [DC into the next 3 DCs, (2 DC, chain 3, 2 DC) into the next chain space] 2x, DC into the last 2 DCs. Join, and Fasten Off. (28 DC)
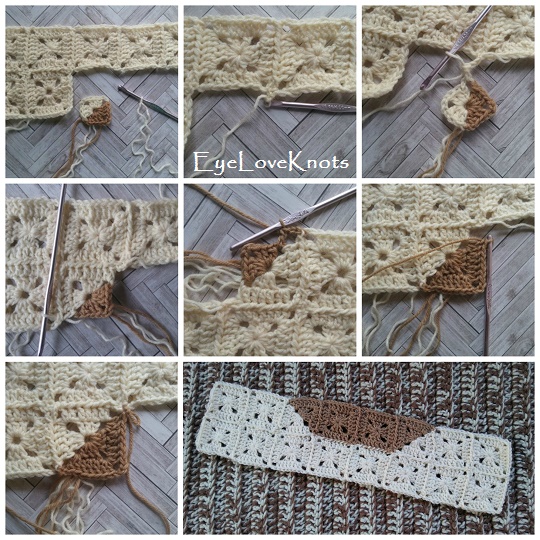
To Work Square with 2 Joins:
Chain 5. Join to form a ring. Chain 5, work (3 DC, chain 3) into the ring 3x, 2 DC into the ring and Join. (12 DC)
R2: Chain 2. Work 2 DC into the chain space, chain 1, working from behind SC into chain space of MB, chain 1, [(DC into chain space of MA, PLT) 2x, (DC into next stitch of MA, PLT) 3x, (DC into chain space of MA, PLT) 2x, chain 1, working from behind SC into chain space of MD, chain 1]; [(DC into chain space of MA, PLT) 2x, (DC into next stitch of MA, PLT) 3x, (DC into chain space of MA, PLT) 2x, chain 1, working from behind SC into chain space of MD, chain 1]; 2 DC into the same chain space, [DC into the next 3 DCs, (2 DC, chain 3, 2 DC) into the next chain space], DC into the last 2 DCs. Join, and Fasten Off. (28 DC)
Acorn Square Pixel Art Graph:
As a blogger, I rely on views to my blog to earn money from my ads. Please do NOT share my graph photo, or save to Pinterest. Doing so, would allow makers to not have to return to my blog, which would result in a loss of views and income.
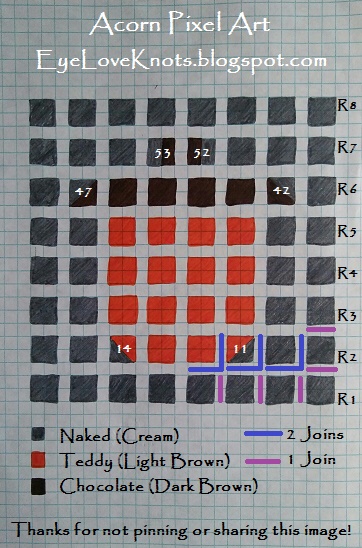
Following this chart, continue working solid granny squares and joining them as outlined above. I began with Row 1, and my first completed square being the square closest to the “R1”. The purple line shows that the second square worked (to the left of the 1st) only requires 1 join, as does the 3rd and so on in Row 1. Beginning in Row 2, you will start working with 2 joins. The first square worked of Row 2 (furthest right square) only requires 1 join to the 1st square of Row 1, but each square after requires 2 joins. I worked from the furthest right square of each row all the way to the end of the row, and weaved in my ends at the end of each row.
Bi-colored squares are highlighted in the image. #11 and #14 are half Naked and half Teddy, #42 and #47 are half Naked and half Chocolate split diagonally, and #52 and #53 are half Naked and half Chocolate as well but split horizontally.
Using the instructions below, work in your bi-colored squares. Take note that Round 1 of each of these is the same as the 3” Bi-Colored Solid Granny Square listed below, but Round 2 varies as they are worked to best suit working in the manner as I have outlined. If you are working them differently, you will need to adjust as best for you.
I am only including Round 1 for the single bi-colored solid granny square. If you are working individual squares and using a different joining method, such as a Single Crochet Join, then you will need to go to my 3” Bi-Colored Solid Granny Square the EyeLoveKnots Way for the complete pattern (two rounds), replacing the main color with the one you will be using.
Round 1 of 3″ Bi-Colored Solid Granny Square:
With MC, Chain 5. Join to form a ring. Chain 2, 2 DC into the ring, chain 3, 3 DC into the ring, pull Naked through, [holding Naked over index finger and MC between middle finger and thumb, insert hook under MC to pull up a loop on hook, pull up Naked over hook and complete chain. Move the MC strand behind the Naked strand] 2x, yarn over, insert hook into the ring, yarn over, pull through, yarn over, pull through 2 loops, hold strands the same as before and complete the DC. Move the MC strand to the back, work 2 DC, chain 3, 2 DC over the MC tail, yarn over, insert hook into the ring, yarn over, pull through, hold the strands the same as before, pull over the MC, yarn over and complete the 1st half of the DC, move the MC strand to the back and repeat to complete the 2nd half of the DC, but don’t move the MC strand. Drop Naked, pull through MC to complete 1 chain, chain 2. Join, and fasten off both strands.
Square #11:
R2: In Naked, attach slip knot to hook. From behind, SC into the center join of #2 & #3, chain 1, yarn over, insert hook into the 2nd chain space to the left of the one just finished on MA and complete the DC, DC into the same chain space on MA, PLT (into #2), [DC into the next DC of MA, PLT (into #2)] 3x, [DC into the chain space of MA, PLT (into #2)] 2x, chain 1. From behind, SC into the chain space of #10, chain 1, [DC into the chain space on MA, PLT (into #10)] 2x, [DC into the next DC of MA, PLT (into #10)] 3x, [DC into the chain space of MA, PLT (into #10)] 2x. Chain 1. From behind, SC into the chain space of #10. Pull Teddy through, and fasten off Naked. Chain 1. 2 DC into the chain space of MA, DC into the next 3 DCs, (2 DC, chain 3, 2 DC) into the next chain space, DC into the next 3 DCs, 2 DC into the chain space, slip stitch to the beginning SC. Fasten off.
Square #14:
R2: With Naked, attach slip knot to hook. Chain 2. Yarn over, insert hook into the 2nd chain space to the left of the chain space just finished on MA and complete DC. DC into the same chain space, and the next 3 DCs, 2 DC into the next chain space, chain 1. From behind SC into the chain space of #5 & #6, chain 1, [DC into the chain space on MA, PLT (into #6)] 2x, [DC into the next DC of MA, PLT (into #6)] 3x, [DC into the chain space of MA, PLT (into #6)] 2x. Insert hook into the center join of #13 & Row 1. Pull Teddy through (counts as SC) with working yarn under the work instead of over as normal to trap underneath, chain 1, [DC into the chain space on MA, PLT (into #13)] 2x, [DC into the next DC of MA, PLT (into #13)] 3x, [DC into the chain space of MA, PLT (into #13)] 2x, chain 1. From behind, SC into the chain space of #13, chain 1, 2 DC into the chain space of MA, DC into the next 3 DCs, 2 DC into the next chain space. Join to the 1st chain of the beginning chain 2. Fasten off both strands.
Square #42:
R2: With Chocolate, attach slip knot to hook. Chain 2. Yarn over, insert hook into the chain space just finished and complete DC. DC into the same chain space, and the next 3 DCs, 2 DC into the next chain space, chain 1. From behind, SC into the center join of of #34 & #35, chain 1, [DC into the chain space on MA, PLT (into #34)] 2x, [DC into the next DC of MA, PLT (into #34)] 3x, [DC into the chain space of MA, PLT (into #34)] 2x. Insert hook into the center join of #41 & Row 5. Pull Naked through with working yarn under the work instead of over as normal to trap underneath, and complete the SC, chain 1, [DC into the chain space on MA, PLT (into #41)] 2x, [DC into the next DC of MA, PLT (into #41)] 3x, [DC into the chain space of MA, PLT (into #41) 2x, chain 1. From behind, SC into the chain space of #41, chain 1, 2 DC into the chain space of MA, DC into the next 3 DCs, 2 DC into the next chain space. Join to the 1st chain of the beginning chain 2. Fasten off both strands.
Square #47:
R2: In Chocolate, attach slip knot to hook. From behind, SC into the chain space of #39, chain 1, yarn over, insert hook into the chain space just finished on MA and complete the DC, DC into the same chain space on MA, PLT (into #39), [DC into the next DC of MA, PLT (into #39)] 3x, [DC into the chain space of MA, PLT (into #39)] 2x, chain 1. From behind, SC into the chain space of #46, chain 1, [DC into the chain space on MA, PLT (into #46)] 2x, [DC into the next DC of MA, PLT (into #46)] 3x, [DC into the chain space of MA, PLT (into #46)] 2x. Pull Naked through, and fasten off Chocolate. From behind, SC into the chain space of #46, chain 1, 2 DC into the chain space of MA, DC into the next 3 DCs, (2 DC, chain 3, 2 DC) into the next chain space, DC into the next 3 DCs, 2 DC into the chain space, slip stitch to the chain space of #39.
Square #52:
R2 of this square begins in a different spot than usual. In this square, you will begin it with a chain 2 that counts as the last double crochet of the corner. You will be ending with a brown double crochet just to the right of the beginning chain 2, so begin your PLT Method in the corresponding stitch:
In Naked, Chain 5. Join to form a ring. Chain 5, work (3 DC, chain 3) into the ring 3x, 2 DC into the ring and Join. (12 DC)
R2: Loosely slip stitch into the 3rd chain of the previous chain space just worked. Chain 2. Pull up a loop, insert hook from front through corresponding stitch of #44 and pull loop through, [DC into the next DC of MA, PLT (into #44)] 3x, [DC into the chain space of MA, PLT (into #44)] 2x, chain 1. From behind, SC into the chain space of #51, chain 1, [DC into the chain space on MA, PLT (into #51)] 2x, [DC into the next DC of MA, PLT (into #51) 3x, [DC into the chain space of MA, PLT (into #51)] 2x, chain 1. From behind, SC into the chain space of #51, chain 1, 2 DC into the same chain space of MA, DC into each of the next 3 DC of MA, DC into the next chain space of MA, pull Chocolate through and fasten off Naked. DC into the same chain space of MA, chain 3, 2 DC into the same chain space of MA, DC into each of the 3 DC of MA, 2 DC into the next chain space of MA, chain 1. From behind, SC into the next chain space of #44, chain 1, DC into the same chain space of MA, PLT (Into #44) – which counts as final join. Pull finished end to the wrong side to weave in.
Square #53:
R2 of this square begins diagonally across from the usual spot. Keep in the mind the corner will end in Chocolate as 2 double crochet into the chain space, work from behind, then finish with a double crochet into the same chain space and join. The Chocolate part of this square will line up with the Chocolate part of #52 to complete the Stem:
In Naked, Chain 5. Join to form a ring. Chain 5, work (3 DC, chain 3) into the ring 3x, 2 DC into the ring and Join. (12 DC)
R2: Loosely slip stitch into the 3rd chain of the previous chain space just worked. Chain 2. DC into each of the next 3 DC of MA, 2 DC into the next chain space of MA, chain 3, 2 DC into the same chain space of MA, DC into each of the next 3 DC of MA, 2 DC into the next chain space of MA, chain 1. From behind, SC into the chain space of #45, chain 1, [DC into the chain space on MA, PLT (into #45)] 2x, [DC into the next DC of MA, PLT (into #45)] 3x, DC into the next chain space of MA, pull up a loop, insert hook from front through corresponding stitch of #45, pull Chocolate through, and fasten off Naked. DC into the same chain space of MA, pull up a loop, insert hook from front through corresponding stitch of #45, chain 1. From behind, SC into the chain space of #52, chain 1, [DC into the chain space on MA, PLT (into #52)] 2x, [DC into the next DC of MA, PLT (into #52)] 3x, [DC into the chain space of MA, PLT (into #52)] 2x, chain 1. From behind, SC into the next chain space of #52, chain 1, DC into the same chain space of MA. Join, and fasten off.
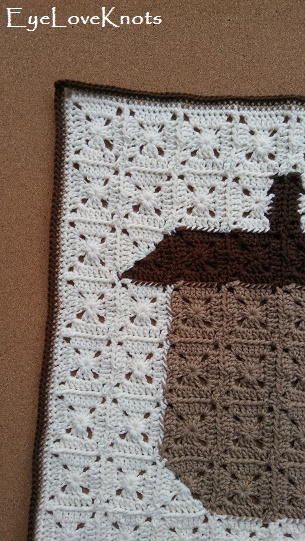
Border:
With Naked, join yarn to top right corner. Chain 1. [SC in chain space, chain 3, SC in the same chain space, SC into the next 8 stitches, SC2tog over both squares chain spaces, (SC in the same chain space just worked and the next 8 stitches, SC2tog over both squares chain spaces) 6x, SC into the same chain space just worked and the next 7 stitches] 4x. Join with Teddy, and fasten off Naked. (315 SC)
R2: With Teddy, Chain 1. SC into the 1st SC and into the chain space, chain 3, SC into the same chain space, [SC into the next 78 SCs, SC into the chain space, chain 3, SC into the same chain space] 3x, SC into the next 77 SCs. Join with Chocolate, and fasten off Teddy. (324 SC)
R3: With Chocolate, Chain 1. SC into the 1st 2 SCs and into the chain space, chain 3, SC into the same chain space, [SC into the next 80 SCs, SC into the chain space, chain 3, SC into the same chain space] 3x, SC into the next 78 SCs. Join, and fasten off. (332 SC)
Sew in Final Ends.
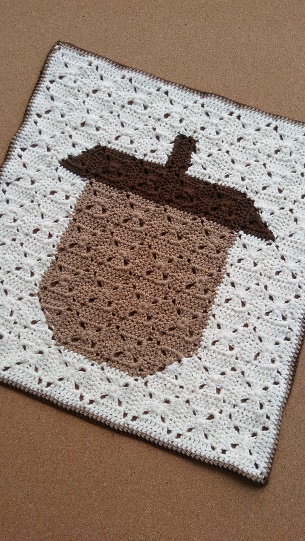
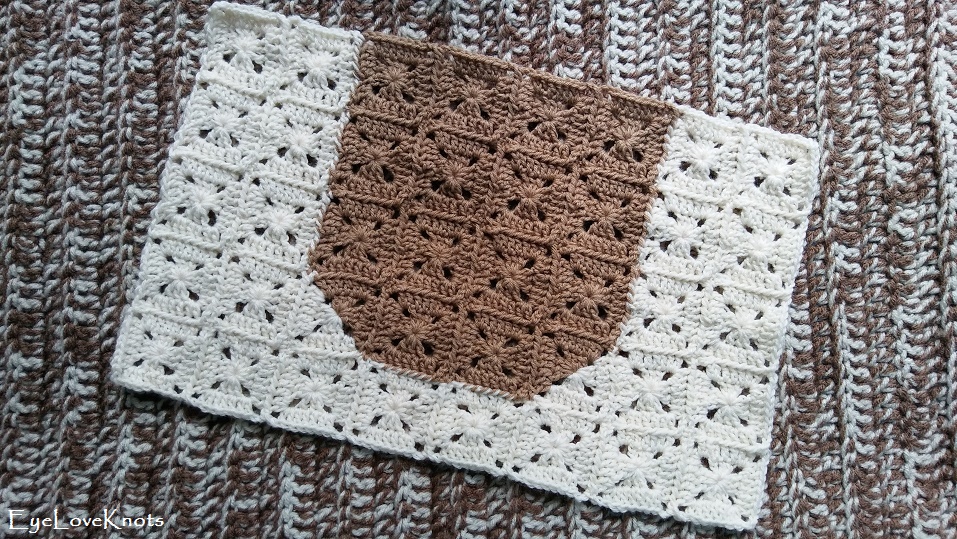
Here’s the back of my square.
Please feel free to make and sell your own Acorn Square project using this pattern, but please DO NOT claim this pattern as your own nor should you sell my pattern, and DO NOT re-publish my photos as your own. DO NOT copy and paste my pattern anywhere, link to it instead.
Join the EyeLoveKnots Crafting Community on Facebook to share your creations, and see what others are up to!
Linked Up To…
Very nice! =)
Maybe you can create a fall table cloth with it? Add some rows in one color on the left and right side and then maybe some fringes? Your design is really cool, well done and thank's for the explanation and pattern.
Have a great day, Sigrid
This is Beautiful!
I also like the back, its a very nice pattern, thank you!
Awesome! Definitely should be part of fall-decoration or a wall-hanging with bits of wood, acorns, etc dangling from it…?
It’s really so beautiful. I love this pattern. Thanks
Very welcome! Enjoy 🙂
Acorn design, would make a beautiful dish cloth and kitchen towel set.
Thank you for sharing.
You are so right! I actually do have it in washcloth form, and I am looking forward to continuing to expand the line: https://eyeloveknots.com/2019/10/c2c-acorn-washcloth-free-crochet-pattern.html