This post contains affiliate links for Happy Yarn Mail. If you make a purchase by clicking on them, I make a small commission at no extra cost to you. Thanks for your support!
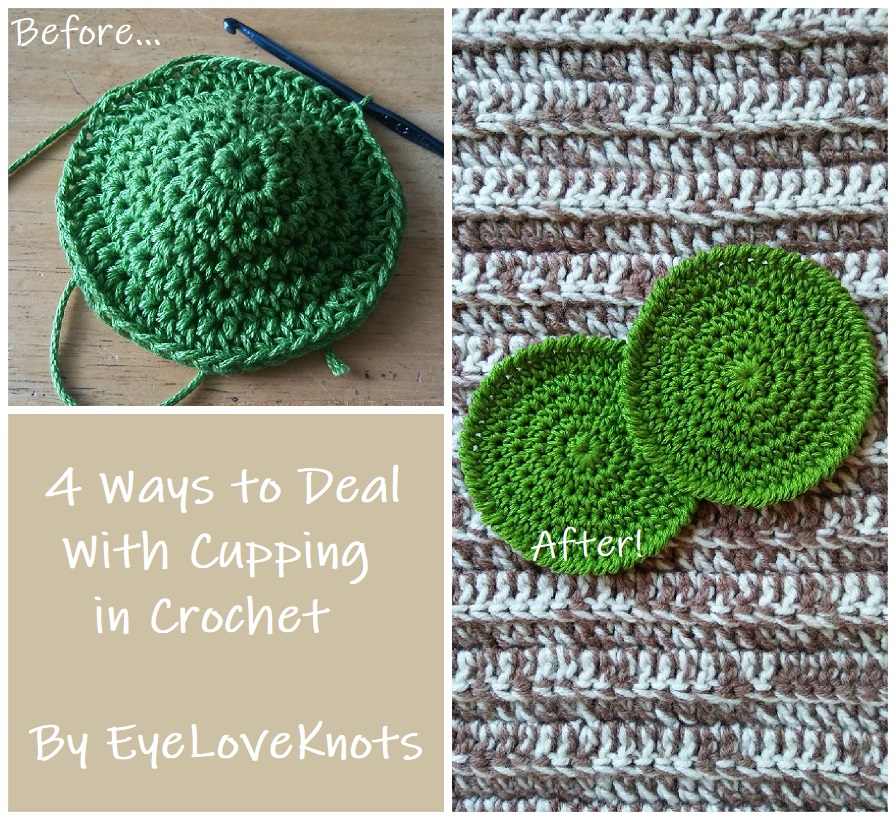
In last week’s free crochet pattern – Fresh Cut Coasters, I mentioned that I was working up my June’s Happy Yarn Mail Prickly Pear Cactus Coasters, when I experienced some cupping. I tried six ways before I finally went with the 10 half double crochets in the beginning ring, and worked as mentioned in my free crochet pattern (link above).
Trust me, I know how frustrating cupping can be, so I wanted to create a post to help you in case you find yourself experiencing a cupping issue. All of these work in different ways, and within them, it may change the finished size of your piece, so make sure to measure along the way to ensure you are where you are supposed to be.
First Off, What Is Cupping, and What Causes It?
The best example of this I can think of is a hat. When you are making a hat, you work so many rows increasing so it lays flat, and once you reach your desired size, you stop increasing, and begin working even rows around, which makes the work begin to curve inward. This curving creates like a bowl shape, and this is cupping.

Cupping can either look like the center is popping out and the sides are laying flat, or the center is laying flat, and the sides are flaring out.
The cause of cupping is not enough increases. Mostly this happens if we forget to put increases in where they are needed, but it can also be caused by simply not adding enough stitches.
It might sound funny to say, if you know the basics of increasing, how can you not add enough stitches? I will tell you! In the original pattern I was using, I started with a chain of 4, joined, and worked 8 half double crochets into the ring. I increased exactly like I was supposed to, but the problem stems from the beginning chain and round 1… 8 half double crochets was just not enough stitches for the beginning chain of 4, and therefore, it continued to not be enough stitches through the rounds of increasing, and caused the work to cup. I usually have this problem with round 1’s that have 6 to 9 stitches in them, so I tend to avoid them if I can, and stick with the 10 – 12 stitch range. Sometimes, you can’t avoid it though, and that’s where these come in!
Try Chaining Less For Your Foundation Ring (If You Don’t Use the Magic Ring)
Confession: I do not know how to do the magic ring! I have looked at a couple of photo tutorials, but it hasn’t really clicked, and I don’t care enough to pursue it, so I always start with a beginning chain, join, and work into the chain.
I find that you need about half the number of stitches in round one as your chains. I prefer to stick with 10 – 12 stitches in the beginning ring, and for these, I start with a chain 5, and join. If I were going to use less stitches, I would start with less chains in the beginning.
I will say, for the original pattern, I used a chain of 4 for my beginning ring, and didn’t care to try a chain of 3, but I am sure a chain of 3 would have worked better.
This has no affect on the finished diameter.
Try Working Round 1 in a Different Stitch
In my case, the original pattern was written all in half double crochets, and started out with eight in the ring. I tried round one in both single crochet, and double crochet. Neither of these worked this particular time, but a time when this has worked out for me is in my Basic Beanie, Newborn through Adult Large Free Crochet Pattern.
In this hat pattern, I stuck mostly to my comfortable 10 – 12 stitch range – specifically a double crochet, but for the Newborn, Child, and Adult Small sizes, I needed to use 9 stitches to achieve the correct size. Going back to the fact that I normally have trouble with 9 stitches in the beginning round, I worked these rounds in half double crochet, and then continued the rest of the rounds in double crochet. This worked out perfectly for me, and there was no cupping during the increasing portion of the hats.
Even though it might not seem like much, changing the stitch pattern of round 1 can affect the diameter, so make sure to measure.
Try Adding One or Two Stitches
Sometimes, adding one or two stitches to round one gives the piece just enough increases to lay flat. I tried round one in 9 stitches (in half double crochet as written, single crochet, and double crochet), and though better, it still wasn’t laying as flat as I wanted it to. This is when I switched to 10 half double crochets, and the piece was perfect!
Keep in mind, adding stitches can also change the diameter, so make sure to measure with this too! In my case, I worked one less round.
Try Changing Hook Sizes (Tension Related)
I don’t usually change hook sizes, unless needed to meet gauge, your hook size could also be a factor of cupping. By using a hook size that is too small for the given yarn, it could cause your tension to be tighter, which could cause cupping.
I hope this helps! Feel free to drop me a line below if one of these works for you, or if you have a different way not mentioned.
Linked Up To…
Nifty Thrifty Sunday #343 – Meet Our Life
Craft Schooling Sunday – Creative Jewish Mom
In Stitches Party #14 – Nicki’s Homemade Crafts
Inspiration Monday Party – Scattered Thoughts of a Crafty Mom
Creative Monday Bloghop – Claire Justine
Handmade Monday #84 – Sum of their Stories
Merry Monday Link Party #213 – A Wonderful Thought
The Really Crafty Link Party #128 – Keeping it Real
Ginx Woolly Linx Party July – Ginx Craft
Craftastic Monday Link Party – Sew Can Do
431st Inspire Me Tuesday – A Stroll Thru Life
Tutorials & Tips Link Party {359} – Home Stories A to Z
The Scoop Link Party #335 – Worthing Court Blog
Fabulous Party #224 – Lou Lou Girls
The Linky Ladies Party #137 – The Purple Poncho
Sew It Cook It Craft It Link Party #63 – Sew Historically
From Dream to Reality #317 – The DIY Dreamer
{wow me} wednesday #360 – Ginger Snap Crafts
Hookin’ on Hump Day #171 – Petals to Picots
Talk of the Town #132 – My Repurposed Life
Your Whims Wednesday #364 – My Girlish Whims
The Wednesday Link Party 254 – The Stitchin’ Mommy
Crafty Love Link Party #35 – Jessie at Home
Scrappy Stitchers Link Party #43 – Stitches ‘N’ Scraps
Link Your Stuff – Annemarie’s Haakblog
Create Bake Make Party #241 – Across the Boulevard
Sundays at Home #215 – Celebrating Everyday Life
Pin Junkie Pin Party #275 – The Pin Junkie
Funtastic Friday 189 Link Party – Olives n Okra
Sweet Inspiration Link Party #117 – Boondocks Blog
Friday Frenzy Link Party – Kelly Lynn’s Sweets and Treats
I bet many people will benefit from this post! I’ve struggled with crocheting circles in the beginning and found out everything myself, wished I had this explanation back then 🙂
Good job, Alexandra 😉
Thanks, Sigrid! Wish I had something like this for myself when I was learning too. Hope it does help some as well!
This is really useful, I’ve face this problem lots of times. Thank you for sharing at The Really Crafty Link Party. Pinned.
I still do sometimes! Ugh. The struggles, hehe. Thanks for visiting!
I loooove your comment on the magic ring. I’ve done it but it just doesn’t “take” in my brain. Every time I see it in a pattern I get all stressed and usually (after much unnecessary mental distress) decide to just chain and join. It works fine.
I can relate! Now, I just chain and join, and avoid all the madness. Haha
I made my furbaby a blanket and the center was cupped.. I wasn’t sure why it happened but I was freehanding it and was thinking how hard could it be to not use a pattern….LOL After all, it’s only a circle. Well, the center was extremely cupped, but so is her bed, so in this case it worked out perfectly for me.
Haha! Funny how that worked out perfectly, and I’m sure she loves it anyway.