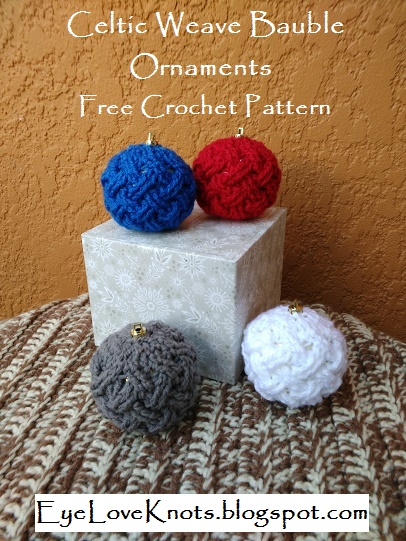
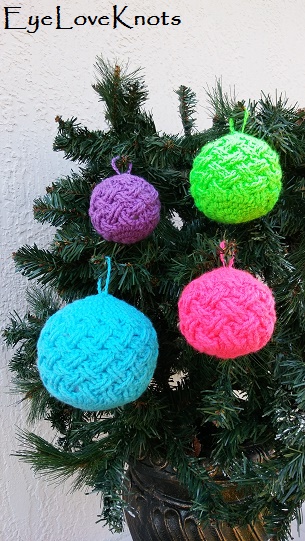
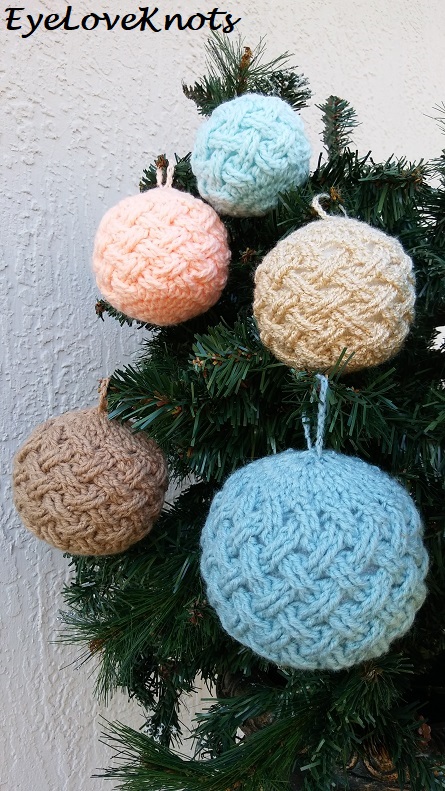
Originally, I designed this crocheted ornament to fit over some store bought ornaments, but last year (2017), I updated it to include three sizes to fit over styrofoam balls, and it was then published in the Pattern Pack Pro, Issue 39 for December 2017.
Going back to the beginning of this design… this is my second year participating in the One Artsy Mama Ornament Exchange. Last year (2015), I designed my Santa Bauble Ornaments. This year, my partner’s notes said her colors were red, white, silver and pewter, and her theme was traditional, vintage/antique. While Santa ornaments are probably considered traditional, I wanted something new and a little more elegant paired with the vintage feel, so I turned to one of my favorite stitches – the Celtic Weave.
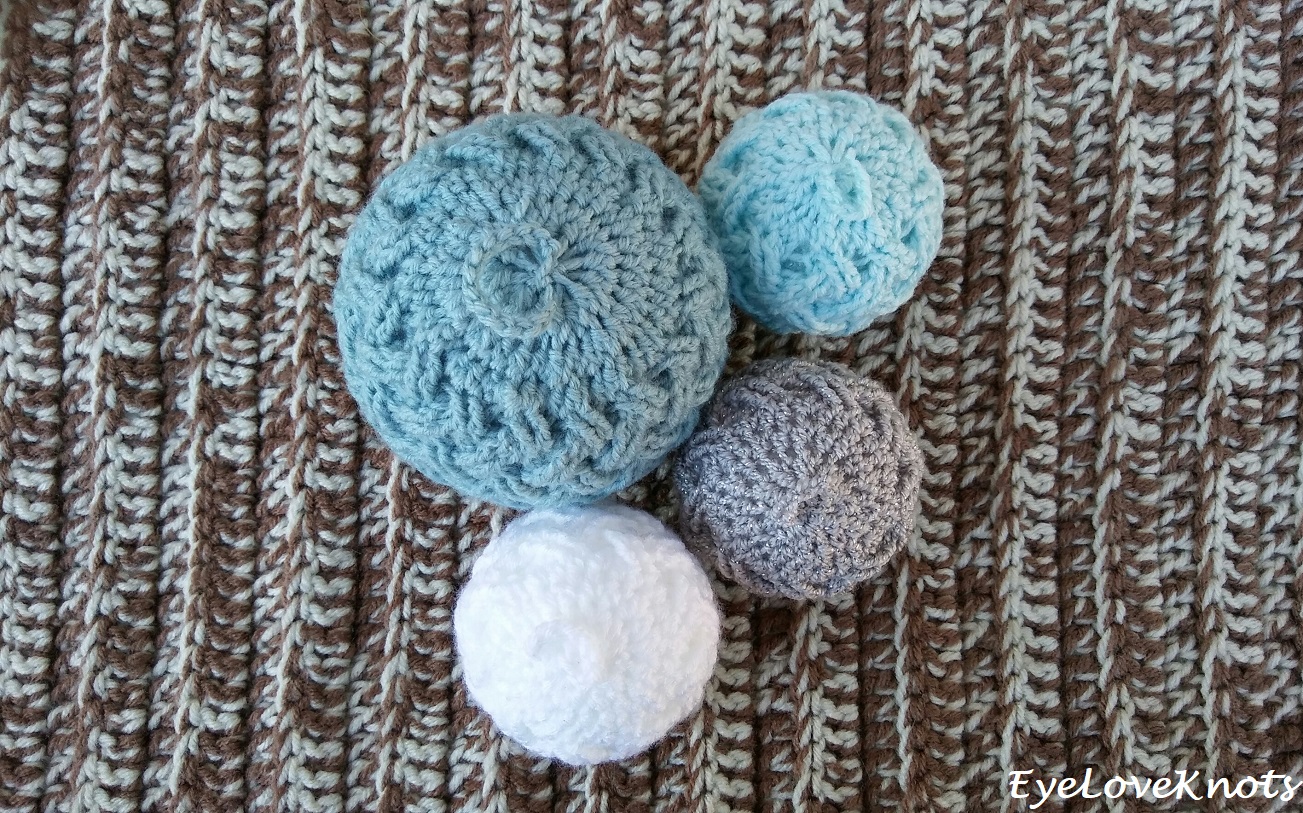
My first thought was to pull out my fiber fill, but after I worked up to the first row of the weave pattern, I realized the holes in between the clusters, which would let all of the fiber fill out (or it be poking out), so I stopped to think. First alternative that popped into my head was styrofoam balls, but I didn’t want to pay a lot for them at the time, so I went to my local Dollar Tree to see if they had any, and they did! But they were a little small… No biggie! It’s Christmas time! Bauble ornaments are everywhere, so I just picked up a tube of some neutral colored baubles, and went back home to finish up. And I just LOVE how they turned out!!
Second alternative thought of much, much later, you could stuff some old panty hoes (or similar) with the fiber fill, and that will create a pocket to hold it in so it doesn’t come out. Too much work for me, but a good alternative.
If you would like a PDF version of this post, you may get one through either my EyeLoveKnots Etsy Shop or EyeLoveKnots Craftsy Shop for a small fee. This fee is to compensate for the views lost when you no longer need to return to the blog to for the information, as you will have your own copy. Plus! It helps fund supplies for new projects to share with you!
Shop EyeLoveKnots Etsy: Celtic Weave Ornaments.
Shop EyeLoveKnots LoveCrochet: Celtic Weave Ornaments.
Are you a Raveler? Share your version of this project on Ravelry – Celtic Weave Ornaments.
Materials:
- Small Amount of Lightweight #3 Yarn – I have used Baby Bee’s Sweet Delight, Hobby Lobby’s I Love This Sportweight Yarn, and Vanna’s Glamour Yarn from Lion Brand
- G6/4mm Crochet Hook
- #20 Tapestry Needle for Sewing and Weaving
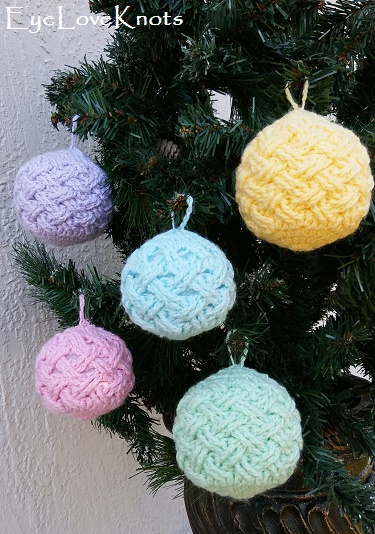
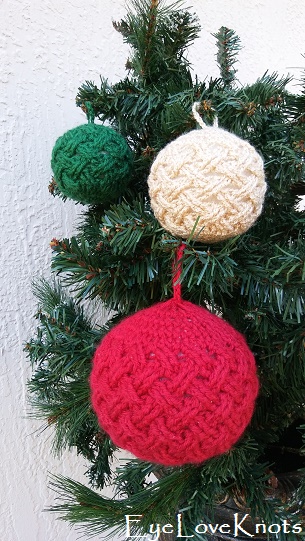
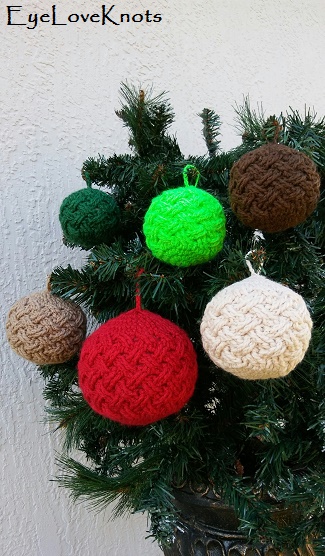
- Styrofoam Balls – 2.4″ for Small, 2.8″ for Medium, and 3.8″ for Large (Got mine from Hobby Lobby)
Material Notes:
You can absolutely use bauble ornaments in place of the styrofoam balls – that’s how I did my original set of ornaments. I had bought a tube of 7 from my local Dollar Tree, and they measured 7 1/2″ around, and was able to follow the instructions for the Small size.
Keep in mind the color of the bauble/styrofoam because some parts may show through the celtic weave pattern.
Time Spent:
The small ornament took me just over half an hour to finish – not sure on the others anymore.
Abbreviations (US Terms):
- HDC – Half Double Crochet
- FPTC – Front Post Treble Crochet
- TC – Treble Crochet (also know as a Triple Crochet)
- HDC2tog – Half Double Crochet Two Stitches Together (to Decrease)
Pattern Notes:
Beginning chain does not count as a stitch/post, and join to the first stitch, not the beginning chain.
If you need a larger diameter, I recommend first trying to go up a hook size, otherwise you will need a multiple of four to work the celtic weave stitch pattern.
Video Tutorial:
I do not have a video tutorial for the ornament itself, but I do have one showing how to do the Celtic Weave stitch pattern in the round.
Patterns:
Small – 2.4” Styrofoam Ball. Diameter at End of Round 3 is 2.38”:
Chain 5. Join to form a ring, taking care not to twist chain. Chain 1. 12 hdc into the ring. Join. (12 hdc)
R2: Chain 1. 2 hdc into the 1st hdc, and into each hdc around. Join. (24 hdc)
R3: Chain 1. 2 hdc into the 1st hdc, 1 hdc into the next hdc, [2 hdc into the next hdc, 1 hdc into the next hdc] 11x. Join, and Weave in Beginning Tail End. (36 hdc)
R4: Chain 2. Skip the 1st and 2nd posts, FPtc around each of the next 2 posts, working in front of stitches just worked: FPtc around each of the 1st two skipped posts, [skip the next 2 posts, FPtc around each of the next 2 posts, working in front of stitches just worked: FPtc around each of the two skipped posts] 8x. Join. (36 tc)
R5: Chain 2. Skip the 1st four posts, FPtc around each of the next 2 posts, working behind stitches just worked: FPtc around the last two skipped posts, [skip the next 2 posts, FPtc around each of the next 2 posts, working behind stitches just worked: FPtc around each of the two skipped posts] 8x. Join. (36 tc)
R6: Chain 2. Skip the 1st four posts, FPtc around each of the next 2 posts, working in front of stitches just worked: FPtc around the last two skipped posts, [skip the next 2 posts, FPtc around each of the next 2 posts, working in front of stitches just worked: FPtc around each of the two skipped posts] 8x. Join. (36 tc)
R7 – 8: Repeat Rounds 5 and 6. Flip piece inside out, place ball and pull piece around slightly stretching.
R9: Chain 1. Hdc2tog over the 1st two stitches, 1 hdc into the next st, [hdc2tog over the next two stitches, 1 hdc into the next stitch] 11x. Join. (24 hdc)
R10: Chain 1. Hdc2tog over the 1st two stitches, [hdc2tog over the next two stitches] 11x. Join, and Fasten Off with Long Tail approximately 20”. (12 hdc)
Medium – 2.8” Styrofoam Ball. Diameter at End of Round 4 is 2.75”:
Chain 4. Join to form a ring, taking care not to twist chain. Chain 1. 10 hdc into the ring. Join. (10 hdc)
R2: Chain 1. 2 hdc into the 1st hdc, and into each hdc around. Join. (20 hdc)
R3: Chain 1. 2 hdc into the 1st hdc, 1 hdc into the next hdc, [2 hdc into the next hdc, 1 hdc into the next hdc] 9x. Join. (30 hdc)
R4: Chain 1. 2 hdc into the 1st hdc, 1 hdc into each of the next two hdc, [2 hdc into the next hdc, 1 hdc into each of the next two hdc] 9x. Join, and Weave in Beginning Tail. (40 hdc)
R5: Chain 2. Skip the 1st and 2nd posts, FPtc around each of the next 2 posts, working in front of stitches just worked: FPtc around each of the 1st two skipped posts, [skip the next 2 posts, FPtc around each of the next 2 posts, working in front of stitches just worked: FPtc around each of the two skipped posts] 9x. Join. (40 tc)
R6: Chain 2. Skip the 1st four posts, FPtc around each of the next 2 posts, working behind stitches just worked: FPtc around the last two skipped posts, [skip the next 2 posts, FPtc around each of the next 2 posts, working behind stitches just worked: FPtc around each of the two skipped posts] 9x. Join. (40 tc)
R7: Chain 2. Skip the 1st four posts, FPtc around each of the next 2 posts, working in front of stitches just worked: FPtc around the last two skipped posts, [skip the next 2 posts, FPtc around each of the next 2 posts, working in front of stitches just worked: FPtc around each of the two skipped posts] 9x. Join. (40 tc)
R8 – 11: Repeat Rounds 6 and 7. Flip piece inside out, place ball and pull piece around slightly stretching.
R12: Chain 1. Hdc2tog over the 1st two stitches, 1 hdc into each of the next two stitches, [hdc2tog over the next two stitches, 1 hdc in each of the next two stitches] 9x. Join. (30 hdc)
R13: Chain 1. Hdc2tog over the 1st two stitches, hdc into the next stitch, [hdc2tog over the next two stitches, hdc into the next stitch] 9x. Join. (20 hdc)
R14: Chain 1. Hdc2tog over the 1st two stitches, [hdc2tog over the next two stitches] 9x. Join, and Fasten Off with Long Tail approximately 20”. (10 hdc)
Large – 3.8” Styrofoam Ball. Diameter at End of Round 5 is 3.63”:
Chain 5. Join to form a ring, taking care not to twist chain. Chain 1. 12 hdc into the ring. Join. (12 hdc)
R2: Chain 1. 2 hdc into the 1st hdc, and into each hdc around. Join. (24 hdc)
R3: Chain 1. 2 hdc into the 1st hdc, 1 hdc into the next hdc, [2 hdc into the next hdc, 1 hdc into the next hdc] 11x. Join. (36 hdc)
R4: Chain 1. 2 hdc into the 1st hdc, 1 hdc into each of the next two hdc, [2 hdc into the next hdc, 1 hdc into each of the next two hdc] 11x. Join. (48 hdc)
R5: Chain 1. 2 hdc into the 1st hdc, 1 hdc into each of the next three hdc, [2 hdc into the next hdc, 1 hdc into each of the next three hdc] 11x. Join, and Weave in Beginning Tail. (60 hdc)
R6: Chain 2. Skip the 1st and 2nd posts, FPtc around each of the next 2 posts, working in front of stitches just worked: FPtc around each of the 1st two skipped posts, [skip the next 2 posts, FPtc around each of the next 2 posts, working in front of stitches just worked: FPtc around each of the two skipped posts] 14x. Join. (60 tc)
R7: Chain 2. Skip the 1st four posts, FPtc around each of the next 2 posts, working behind stitches just worked: FPtc around the last two skipped posts, [skip the next 2 posts, FPtc around each of the next 2 posts, working behind stitches just worked: FPtc around each of the two skipped posts] 14x. Join. (60 tc)
R8: Chain 2. Skip the 1st four posts, FPtc around each of the next 2 posts, working in front of stitches just worked: FPtc around the last two skipped posts, [skip the next 2 posts, FPtc around each of the next 2 posts, working in front of stitches just worked: FPtc around each of the two skipped posts] 14x. Join. (60 tc)
R9 – 12: Repeat Rounds 7 and 8. Flip piece inside out, place ball and pull piece around slightly stretching.
R13: Chain 1. Hdc2tog over the 1st two stitches, 1 hdc into each of the next three stitches, [hdc2tog over the next two stitches, 1 hdc in each of the next three stitches] 11x. Join. (48 hdc)
R14: Chain 1. Hdc2tog over the 1st two stitches, 1 hdc into each of the next two stitches, [hdc2tog over the next two stitches, 1 hdc in each of the next two stitches] 11x. Join. (36 hdc)
R15: Chain 1. Hdc2tog over the 1st two stitches, hdc into the next stitch, [hdc2tog over the next two stitches, hdc into the next stitch] 11x. Join. (24 hdc)
R16: Chain 1. Hdc2tog over the 1st two stitches, [hdc2tog over the next two stitches] 11x. Join, and Fasten Off with Long Tail approximately 30”. (12 hdc)
Finishing:
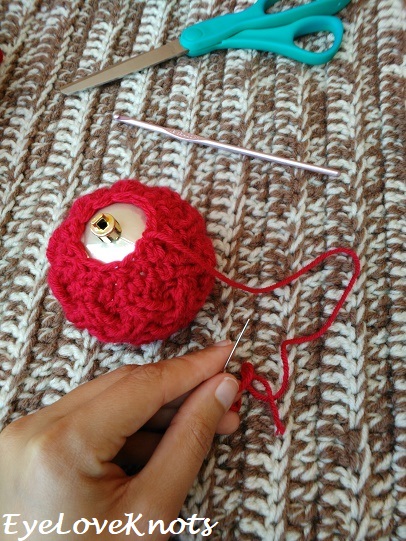
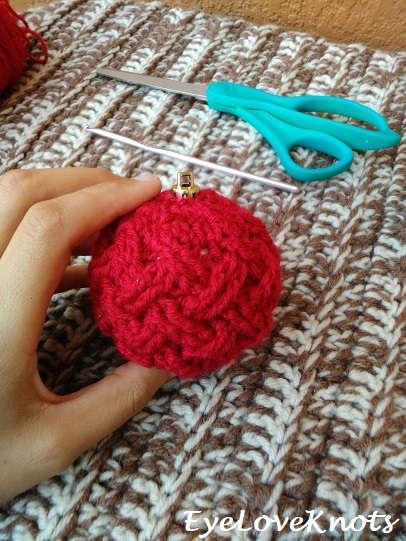
Pull up on final loop so yarn comes out. Thread tail end into needle.
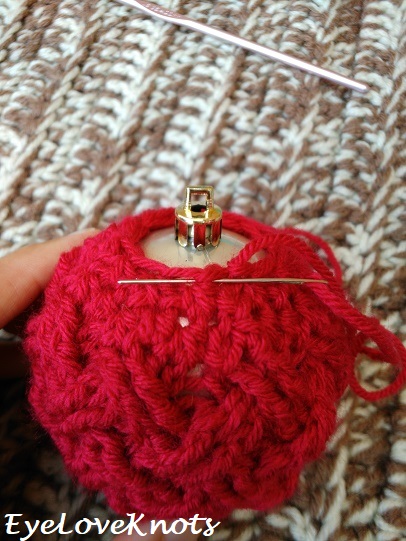
Begin weaving in and out of every other stitch around top. Once back to the beginning, tug on yarn to close top hole and then weave into the stitches to secure.
Keep tension on yarn end with left hand, and insert crochet hook underneath the center stitches with the other. Pull up a loop. Chain 10 for Small and Medium, and 15 for Large – if you want a loop large enough to hang straight from tree, add 10 more chains. Fold chain in half with wrong sides facing each other, and weave in remaining yarn to secure the loop in place.

If you are using a bauble ornament as the base, follow the same first step, however, after weaving in and out around the top, tug on the yarn to close up around the ornament hanger, and secure here. Skip the next step to make the hanger as you already have one.

Please feel free to make and sell your own items made using this pattern, but keep in mind, this written pattern and my photos are protected by copyright. Please DO NOT claim this pattern as your own nor should you sell my pattern. DO NOT re-publish my photos as your own. DO NOT copy and paste my pattern anywhere, link to it instead so other’s can visit. Making videos providing instructions how to make my projects on any social media platform is also not permitted.
Join one of our awesome Facebook groups to share your creations, and see what others are up to!
– Yarn Crafts & Coffee Community
– DIY Home On Rockwood Lane
– Alexandra Lane Lifestyle
Linked Up To…
Nifty Thrifty Sunday #362 – Meet Our Life
Craft Schooling Sunday – Creative Jewish Mom
Sundays at Home 232 – Celebrating Everyday Life
Inspiration Monday – I Should Be Mopping the Floor
Handmade Monday #103 – Sum of their Stories
Ginx Woolly Linx Party November – Ginx Craft
Creative Mondays Linkup – Claire Justine
The Really Crafty Link Party #145 – Keeping it Real
Craftastic Monday – Sew Can Do
The Linky Ladies Party #146 – The Purple Poncho
Tutorials & Tips Link Party 375 – Home Stories A to Z
The Scoop Link Party #354 – Worthing Court Blog
479th Inspire Me Tuesday – A Stroll Thru Life
Fabulous Party #243 – Lou Lou Girls
Totally Terrific Tuesday #206 – Sweet Parrish Place
The Wednesday Link Party 273 – The Stitchin’ Mommy
Your Whims Wednesday #383 – My Girlish Whims
Sew It Cook It Craft It Link Party #81 – Sew Historically
Talk of the Town 151 – My Repurposed Life
Hookin’ on Hump Day #179 – Petals to Picots
Pretty Pintastic Party #237 – Sparkle Living
Friday Frenzy Link Party – 11/30/18 – Kelly Lynn’s Sweets and Treats
Sweet Inspiration Link Party #135 – Art Decoration Crafting
Pin Junkie Pin Party #292 – The Pin Junkie
Best of the Weekend – Hello Little Home
Link Your Stuff – Anniemarie’s Haakblog
In Stitches Party #24 – Nicki’s Homemade Crafts
Snickerdoodle Create Bake Make Link Party #260 – Across the Boulevard
Crafty Love Link Party #40 – Jessie at Home
Wow, they really look good! =))
Thank you, Sandra!
What a lovely pattern, thank you.
I’ve done a few of the more traditional crochet baubles, the one that’s a version of a granny square, which are loads of fun to make. I love the texture you have on these. Pinning.
Yes, I have been wanting to make some of those!
These are just beautiful!! Thanks so much for sharing the pattern!!! So grateful for your sweet generosity!!
Your kind words are so appreciated! Thank you for stopping by, Darlene. Enjoy 🙂
These are so, so cute and clever! I’d be doing them in whites and golds!
Carrie
curlycraftymom.com
Thanks! Yes, that is one theme I didn’t cover. Vanna’s Glamour yarn (by Lion Brand) has some pretty colorways that would fit this.
I am going to try this pattern. My kids ❤️ Our Irish heritage
How wonderful! What is your go-to color/s for creating to share the Irish heritage? Different shades of green?
Love these! Thanks!
So welcome, Anne! Enjoy.
What a pretty idea! Thank you for sharing the tutorial at The Really Crafty Link Party. Pinned!
These look really great and Christmassy. Thanks for sharing the pattern.
Thanks, Ginny! I am quite proud of how they turned out.
Very nice!
Thanks, Liz!
I seriously love these lil’ guys! So adorable! Congratulations on being chosen as one of this week’s Friday Frenzy features!
Woo! Thank you so much, Colleen!
These are so cute! I have been looking for good patterns to use up some of my extra yarn (I knit and crochet) and I love the idea of making these. Thanks for the pattern!
They are definitely an excellent stash buster! Would also be a good summer project as they are small.
These are so pretty! Love them! 🙂 Lisa
Thanks, Lisa! Happy Holidays 🙂
These are so cute. I love Celtic designs. Really want to try this one.
I had sooo much fun making these – I ended up making about 20 or so!
Love Celtic designs so definitely want to try this one.
Love these bauble ornaments! They add such a nice, cozy touch to a Christmas tree. And great project for using leftover yarn too.
Thanks, Sonja! I am looking forward to turning them into some sort of decor this summer – maybe in a hurricane glass for the table?
I so wish there was a video tutorial. I’m dumb at reading patterns but absolutely love these.
I would like to start doing video tutorials, but as of right now, I don’t have the equipment to do so. Maybe this coming year!
Thanks for sharing
So welcome!
Thanks for sharing
So welcome! Happy to share 🙂
I absolutely love these but am having a great deal of difficulty making them. My biggest problem is the beginning of the rounds that skip four posts and then I am unsure how to end the round. Is there any way you could help me? I would really appreciate your advice. Thank you so much
Glad you like it! The last repeat goes all the way through to the first two skipped stitches + the last two skipped stitches, and then you join to the first treble crochet.
Thank you for the help. Finished my first one! Not quite looking like yours but I won’t give up.