This post has been sitting in my inbox since January 1st, of 2016. Sad that the only thing I needed was to add shop links, and a photo, but I’ll tell you what held me back the whole time… Weaving in the ends! Three years later, and I still hadn’t weaved them in. Holy cow. This is why I weave in as I go now because of situations like this.
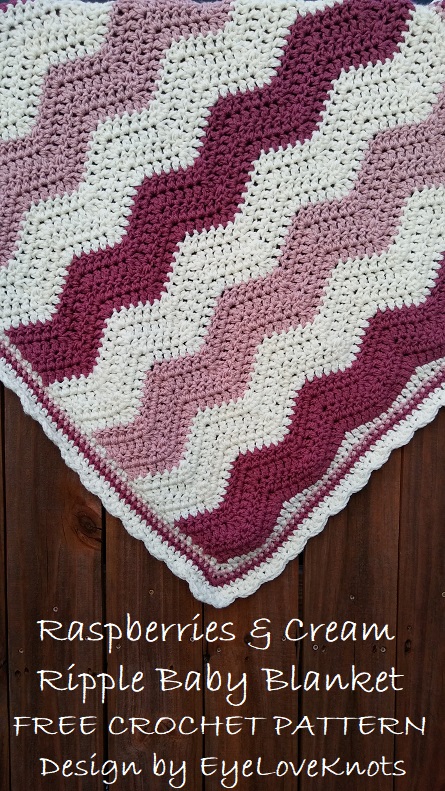
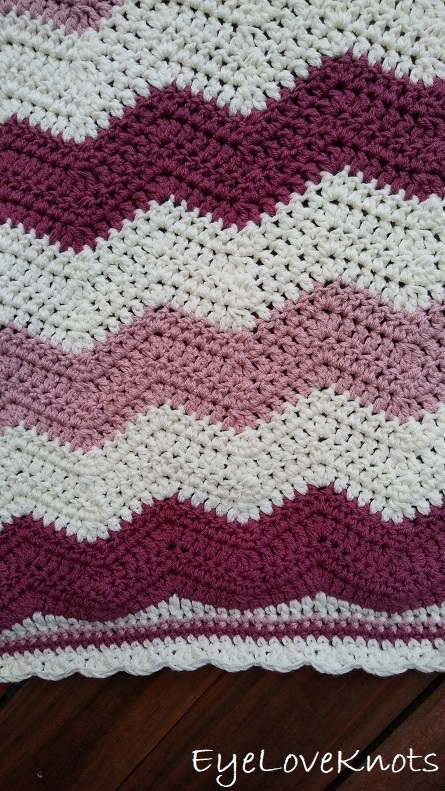
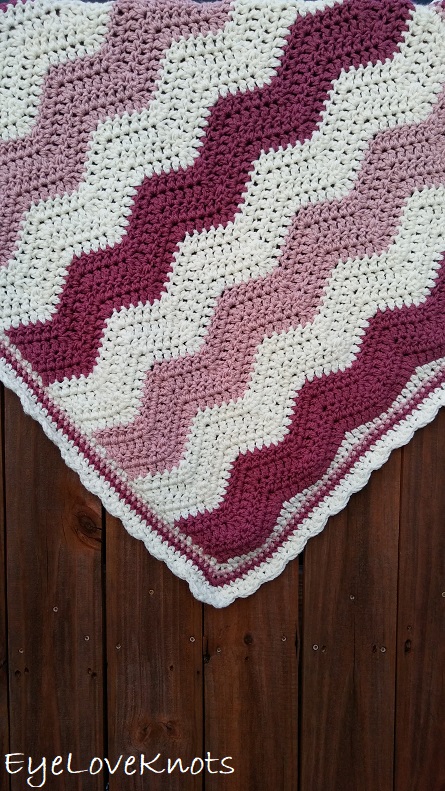
Back then: I am in love with the combination of pinks and cream here, and how the edging turned out! It gives me a vintage feel.
This blanket would be a great baby shower gift, or as part of your nursery. The size makes it great for changing baby’s diaper, tummy time and cuddling. It’s also longer than my I Love This Soft Baby Ripple Blanket so it’ll work great for toddlers and children also. I put it on the legs to see, and it covered them comfortably with my feet left hanging out. Now, I think I want one to use when I am sitting up in bed crocheting!
If you would like a PDF version of this post, you may get one through either my EyeLoveKnots Etsy Shop, Ravelry or LoveCrochet Shop for a small fee. This fee is to compensate for the views lost when you no longer need to return to the blog to for the information, as you will have your own copy. Plus! It helps fund supplies for new projects to share with you!
Shop EyeLoveKnots Etsy: Raspberries & Cream Ripple Baby Blanket.
Shop EyeLoveKnots LoveCrochet: Raspberries & Cream Ripple Baby Blanket.
Are you a Raveler? Share your version of this project on Ravelry – Raspberries & Cream Ripple Baby Blanket.
Materials:
- 1220 Yards of Worsted Weight Yarn – I used Hobby Lobby’s I Love This Yarn. About one and 2/3 skeins of Ivory, 1 full skein of Dark Raspberry, and about 3/4 skein of Rosy Cheeks
- M13/9mm Crochet Hook
- Tapestry Needle for Weaving in Ends
Material Notes:
Chunky/Bulky yarn will also work since this blanket is made using two strands held together.
You may opt to purchase two skeins of the same color and hold the strands both from the center pull, but I did it the hard way and held the strands from either end of the skein.
Time Spent:
I worked up this blanket in just over 5.5 hours, including the weaving of my ends.
Measurements:
30.5″ Wide by 36.25″ in Length with Border
Gauge:
With 2 Strands of I Love This Yarn, and M13/9mm Hook – 11 DC by 6 Rows = 5″ x 4.5″
Abbreviations:
- SC – Single Crochet
- HDC – Half Double Crochet
- DC – Double Crochet
- dc3tog – Double Crochet 3 Stitches Together to Decrease
- To work a dc3tog: Yarn over, insert hook into the first stitch, yarn over, pull through (3 loops on hook), yarn over, pull through two loops on hook, yarn over, insert hook into next stitch, yarn over, pull through (4 loops on hook), yarn over, pull through two loops on hook, insert hook into next stitch, yarn over, pull through (5 loops on hook), yarn over, pull through two loops on hook, yarn over, pull through all 4 loops on the hook.
Pattern Notes:
Use two strands held together. As mentioned above – I held the strands from both ends of the skein – shown to the right. To make it easier on yourself, you can unwind the skein and rewind with both strands together. I don’t do this, but it would definitely help with the tangling.
Ripple Pattern can be made bigger or smaller by adding or subtracting 12 chains.
Blanket can be made longer or shorter by adding or subtracting 2 rows – two rows together measures 1.75″ in length.
I suggest leaving the color changes on even rows, as I have, otherwise the sides of your blanket will have a funny little visible yarn change thing going on – I learned this the hard way on another project I worked. It’s not real obvious, but was obvious enough for me not to try it again.
Pattern:
In Raspberry, Chain 64. DC in the 4th chain from the hook (counts as a 1st DC), (DC in the next 4 stitches, dc3tog, DC in the next 4 stitches, 3 DC in the next stitch) 4 times, DC in the next 4 stitches, dc3tog, DC in the next 4 stitches, 2 DC in the last stitch. (61)
R2 – 4: Chain 2, turn. DC in the 1st DC and the next 4 DC’s, (dc3tog, DC in the next 4 DC’s, 3 DC in the next DC, DC in the next 4 DC’s) 4 times, dc3tog, DC in the next 4 DC’s, 2 DC in the last DC. Change to Ivory.
R5 – 8: In Ivory, Chain 2 and turn. DC in the 1st DC and the next 4 DC’s, (dc3tog, DC in the next 4 DC’s, 3 DC in the next DC, DC in the next 4 DC’s) 4 times, dc3tog, DC in the next 4 DC’s, 2 DC in the last DC. Change to Rosy Cheeks.
R9 – 12: In Rosy Cheeks, Chain 2 and turn. DC in the 1st DC and the next 4 DC’s, (dc3tog, DC in the next 4 DC’s, 3 DC in the next DC, DC in the next 4 DC’s) 4 times, dc3tog, DC in the next 4 DC’s, 2 DC in the last DC. Change to Ivory.
R13 – 16: In Ivory, Chain 2 and turn. DC in the 1st DC and the next 4 DC’s, (dc3tog, DC in the next 4 DC’s, 3 DC in the next DC, DC in the next 4 DC’s) 4 times, dc3tog, DC in the next 4 DC’s, 2 DC in the last DC. Change to Raspberry.
R17 – 20: In Raspberry, Chain 2 and turn. DC in the 1st DC and the next 4 DC’s, (dc3tog, DC in the next 4 DC’s, 3 DC in the next DC, DC in the next 4 DC’s) 4 times, dc3tog, DC in the next 4 DC’s, 2 DC in the last DC. Change to Ivory.
R21 – 24: In Ivory, Chain 2 and turn. DC in the 1st DC and the next 4 DC’s, (dc3tog, DC in the next 4 DC’s, 3 DC in the next DC, DC in the next 4 DC’s) 4 times, dc3tog, DC in the next 4 DC’s, 2 DC in the last DC. Change to Rosy Cheeks.
R25 – 28: In Rosy Cheeks, Chain 2 and turn. DC in the 1st DC and the next 4 DC’s, (dc3tog, DC in the next 4 DC’s, 3 DC in the next DC, DC in the next 4 DC’s) 4 times, dc3tog, DC in the next 4 DC’s, 2 DC in the last DC. Change to Ivory.
R29 – 32: In Ivory, Chain 2 and turn. DC in the 1st DC and the next 4 DC’s, (dc3tog, DC in the next 4 DC’s, 3 DC in the next DC, DC in the next 4 DC’s) 4 times, dc3tog, DC in the next 4 DC’s, 2 DC in the last DC. Change to Raspberry.
R33 – 36: In Raspberry, Chain 2 and turn. DC in the 1st DC and the next 4 DC’s, (dc3tog, DC in the next 4 DC’s, 3 DC in the next DC, DC in the next 4 DC’s) 4 times, dc3tog, DC in the next 4 DC’s, 2 DC in the last DC. Change to Ivory for Border.
Border:
R1: In Ivory, Chain 1 and turn. Work 2 SC in the 1st DC, SC in the next DC, HDC in the next 2 DCs, DC in the next 4 DCs, HDC in the next 2 DCs, (SC in the next DC, loosely slip stitch in the next 2 DCs, SC in the next DC, HDC in the next 2 DCs, DC in the next 4 DCs, HDC in the next 2 DCs) 4x, SC in the next 3 DCs, 3 SC in the last DC to form a corner; (67 stitches)
R1B: evenly SC down the side working 2 SC per DC side for a total of 70 SCs, 3 SC in the next stitch to form a corner; (73 stitches)
R1C: HDC in the next 2 stitches, SC in the next 3 stitches, (loosely slip stitch in the next stitch, SC in the next 3 stitches, HDC in the next 2 stitches, DC in the next stitch, HDC in the next 2 stitches, SC in the next 3 stitches) 4x, loosely slip stitch in the next stitch, SC in the next 3 stitches, HDC in the next 3 stitches, 3 SC in the next stitch to form a corner; (63 stitches)
**At this point, I paused on the corner to weave in the ends on this side.
R1D: …evenly SC up the side working 2 SC per DC side for a total of 71 SCs, SC in the first stitch to complete the corner. Join with Rosy Cheeks. (274 SC)
R2: With Rosy Cheeks, Chain 1, but DO NOT TURN. Work 2 SC in the first SC, SC into the next 63 SCs across, 3 SC in the next SC – corner – SC in the next 73 SCs, 3 SC in the next SC – corner – SC in the next 63 SCs, 3 SC in the next SC – corner – SC in the next 73 SCs, 1 SC in the first SC. Join with Raspberry. (284 SC)
R3: With Raspberry, Chain 1, but DO NOT TURN. Work 2 SC in the first SC, SC into the next 65 SCs across, 3 SC in the next SC – corner – SC in the next 75 SCs, 3 SC in the next SC – corner – SC in the next 65 SCs, 3 SC in the next SC – corner – SC in the next 75 SCs, 1 SC in the first SC. Join with Ivory. (292 SC)
R4: With Ivory, Chain 1, but DO NOT TURN. Work 2 SC in the first SC, SC into the next 67 SCs across, 3 SC in the next SC – corner – SC in the next 77 SCs, 3 SC in the next SC – corner – SC in the next 67 SCs, 3 SC in the next SC – corner – SC in the next 77 SCs, 1 SC in the first SC. Join. (300 SC)
Blanket looks great here! But I wanted a little frilly edge so I added a subtle shell edging.
R5: Chain 1, but DO NOT TURN. Work 1 SC in the 1st SC, skip the next SC, 3 DC in the next SC, skip the next SC, (SC in the next SC, skip the next SC, 3 DC in the next SC, skip the next SC) 74x. Join. (75 shells)
I really like the look of larger shells on chunky items, but choose not to this go ’round. Should you desire larger shells, work in the sequence of SC in the 1st/next SC, skip the next 2 SCs, 5 DC in the next SC, skip the next 2 SCs… You’ll end up with 73 shells.
Fasten Off and Weave in Ends.
Please feel free to make and sell your own Ripple Blanket using this pattern, but please DO NOT claim this pattern as your own nor should you sell my pattern, and DO NOT re-publish my photos as your own. DO NOT copy and paste my pattern anywhere, link to it instead.
Join the EyeLoveKnots Crafting Community on Facebook to share your creations, and see what others are up to!
Linked Up To…
Craft Schooling Sunday – Creative Jewish Mom
Sundays at Home #239 – Celebrating Everyday Life
In Stitches Party #29 – Nicki’s Homemade Crafts
Inspiration Monday – i should be mopping the floor
Creative Mondays Link Up – Claire Justine
Handmade Monday #113 – Sum of their Stories
Merry Monday #241 Link Party – A Wonderful Thought
The Really Crafty Link Party #156 – Keeping it Real
Craftastic Monday Link Party – Sew Can Do
Ginx Woolly Linx Party February – Ginx Craft
The Scoop Link Party #364 – Worthing Court Blog
Tutorials & Tips Link Party 383 – Home Stories A to Z
488th Inspire Me Tuesday – A Stroll Thru Life
Fabulous Party #254 – Lou Lou Girls
Talk of the Town 161 – My Repurposed Life
Totally Terrific Tuesday #215 – Sweet Parrish Place
Make it Pretty Monday – Week 283 – The Dedicated House
The Linky Ladies Party #152 – The Purple Poncho
{Wow Me} Wednesday #390 – Ginger Snap Crafts
Your Whims Wednesday #394 – My Girlish Whims
Wednesday Link Party #282 – The Stitchin’ Mommy
Wall to Wall DIY Wednesday Week 35 – Dabbling and Decorating
DIY, Crafts, Recipes and More Link Party #126 – Hazel and Gold Designs
Crafty Love Link Party #42 – Jessie at Home
Hookin’ on Hump Day #184 – Petals to Picots
Scrappy Stitchers Link Party #49 – Stitches n Scraps
Snickerdoodle Create Bake Make Link Party #271 – Across the Boulevard
I love the colors you used. I’ve made several blankets using a similar pattern, but I always used yarn scraps and they never looked so pretty.
Thank you for sharing at The Really Crafty Link Party. Pinned.
I don’t do well with scraps – I need a set pattern to follow. I think the scrap ones turn out beautifully though!
This is beautiful. My grand daughter has a afghan that her great grand mother made her, and it is falling apart. I will have to try and make her one like this! Wish me luck!!!
Hi Alex, Loving this baby blanket pattern!
Can you send me the pattern by mail
I don’t offer this service. You can purchase the PDF, then put it on a thumb drive and take it to a print shop, like UPS or Staples. This is what I do when I need hard copies made.