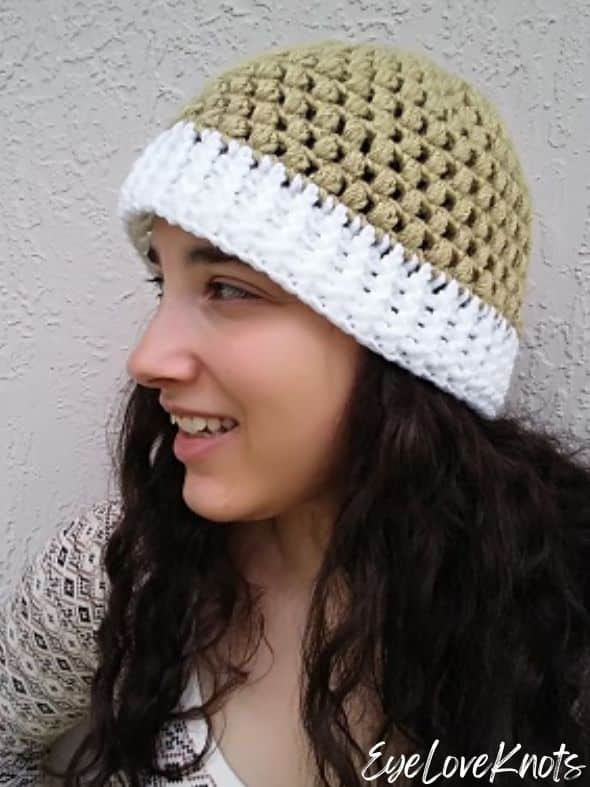
Learn how to crochet the Caden Beanie, a fun, squishy beanie worked in crochet puff stitches with this free crochet beanie hat pattern. The post stitch brim provides extra warmth over the ears and a nice texture.
This post contains affiliate links for WeCrochet, Etsy and Amazon. If you make a purchase by clicking on them, I make a small commission at no extra cost to you. Thanks for your support!
Find the free crochet pattern instructions below, or purchase a printer-friendly, ad-free PDF on Ravelry by clicking here.
In a hurry? Pin this for later when you have more time.
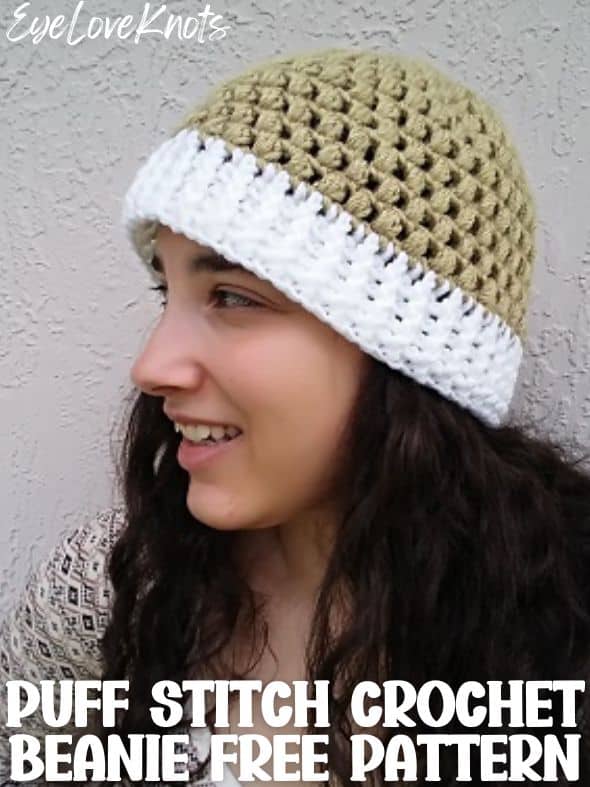
This fun puff stitch beanie was original inspired by a snow scene and named Snowcapped. I envisioned others with the white edging and made in either aqua, blue or gray puff stitch sections.
In this October 2025 update, I’ve renamed this series Caden to better fit with other colorways, and edging options, though I think the ribbed brim pairs extra well with this soft and squishy beanie because it is thick enough to cover the ears well, even though the puff stitch section has some holes in it so it provides a little extra warmth.
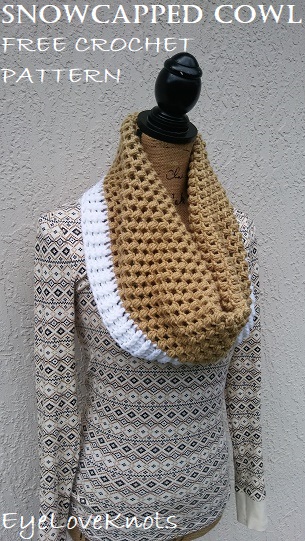
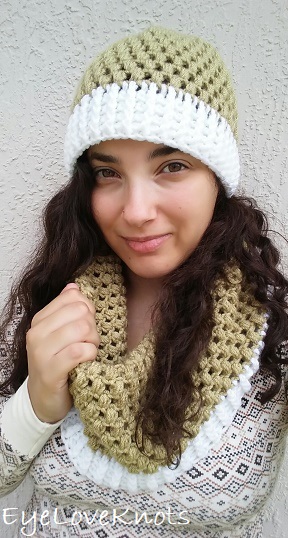
Make the matching Snowcapped Cowl (Free Crochet Pattern)!
Ad-Free, Printer Friendly PDF:

EyeLoveKnots newsletter subscribers get access to Exclusive Subscriber Content, like the free PDF of this pattern via the Free File Library – you’ll find the tab on the top menu. The library is password protected so sign up for my newsletter and you’ll receive a Welcome email containing this month’s password, or if you are already a blog subscriber, reference your latest newsletter for this month’s password. From the library, you’ll be able to access the PDFs via Google Drive – you do not need to have a Google Drive account to view and download the PDF.
For a Limited Time…

Through 11/18/25 at 11:59pm EST, you can grab a free copy of the PDF for the Caden Beanie on Ravelry using code CADEN25. I earn my income from the number of pageviews my blog sees, so please do not share the code, but instead share the link to this post so others can find it. Thank you!
After 11/18/25 or for non-subscribers, if you would like a PDF version of this post, you may get one through either my Etsy Shop, Ravelry Shop or LoveCrafts Shop for a small fee. This fee is to compensate for the views lost when you no longer need to return to the blog to for the information, as you will have your own copy. Plus! It helps fund supplies for new projects to share with you! In a hurry? Pin this for later when you have more time.


Find it on AllFreeCrochet – Snowcapped Beanie.
Materials:
- 185 Yards of Worsted Weight Yarn – I used Red Heart’s With Love in the Tan and White colorways
- K10.5/6.5mm Crochet Hook
- Tapestry Needle
- Optional, Stitch Marker
- Soft Tape Measure – Gauge is Essential
Material Notes:
I’ve learned from my friend Krissy of Krissy’s Over the Mountain Crochet that as a beanie for cancer patients, the best yarn for a sensitive head is going to be a bamboo blend, like Berroco Modern Cotton or Lion Brand Coboo. Some can tolerate 100% acrylic or wool, but not all can. With this said, if you’ll be donating your beanie, I recommend looking up the requirements from the organization. Some say not to use wool yarns. Some say not to use Red Heart Super Saver (though I think this is a great yarn that really softens nicely after washing, and wears and washes so well). Some request the beanies to be washed prior to donating. Each has it’s own set of guidelines so you’ll want to check with the organization first.
As a cold weather beanie, animal fibers are better for keeping warm against the wind, and while alpaca works great, my go-to is always a 100% superwash merino wool, like WeCrochet Swish Yarn, or a wool and acrylic blend, like Lion Brand Wool Ease and Berroco Vintage. All of these that I’ve mentioned hold up well to wear and tear and machine washing and drying.
We have lots of great crochet hooks in our Yarn Crafts and Coffee Yarn Shop. The most popular, and preferred by Candace and Emily, are the Clover Amour Crochet Hooks with the soft handles and smooth metal hook. Alexandra prefers metal crochet hooks with large, ergonomic clay handles and just loves the fun designs from SiennasBowtique and BronzeShepherdStudio! If your preference is wood, the LYKKE brand are lovely, smooth and sturdy.
Time Spent:
I worked up the small size in about an hour and a half.
Measurements:
Adult Small has a crown of 6 1/4″, which makes a circumference of nearly 19 3/4″ to fit a head size of 20″ – 22″, and is 8 1/4″ in length.
Adult Large has a crown of 6 3/4”, which make a circumference of nearly 21 1/4” to fit a head size of 22″ – 23”, and is either 8 1/4” or 9 1/4” in length.
If you are concerned with the size (or want to make a different size), take your tape measure out and measure around your head just above your eyebrows. The distance around is the circumference. You will need to use this equation to figure out what size diameter you will need: Your Circumference – 2” / 3.14 (pi) = crown diameter. 2” is the amount of stretch for acrylic, wool, and similar
Gauge (Essential):
Measured in Pattern.
Gauge it very important for beanies. If you do not meet gauge, and continue making your beanie, the finished size will either be too small or too big so make sure to stop and check it. If you’re measuring smaller than the given measurements, go up a crochet hook size, and if you’re measuring larger, go down a crochet hook size. Rework the sample, take gauge again, and see where you are.
Abbreviations:
- DC – Double Crochet (Photo Tutorial)
- fpdc – Front Post Double Crochet
- bpdc – Back Post Double Crochet
How to Puff Stitch: yarn over, insert hook into the stitch, yarn over, and pull through [3 loops on hook]. *Yarn over, insert hook into the same stitch, yarn over and pull through. Rep from * 1 more time [7 loops on hook]. Yarn over, and pull through all 7 loops. Chain 1 to secure.
Post stitches are worked around the post of the previous rounds stitch rather than into the top of the stitch. The post is found directly underneath the top of the stitch.
It’s very easy to add stitches in post stitch rounds because sometimes it’s hard to determine where to work the next stitch after the post stitch since the top of the post stitch you just finished will appear unworked. I find it the easiest in the first round of the ribbed pattern to reference the posts of the double crochets from the previous row. See where your last post stitch was worked, then move to the post of the stitch to the left, follow it up and you’ll find the top of the stitch directly above it.
To Front Post Double Crochet (worked from the front of the fabric): Yarn over, then swoop your hook downward and towards the front so your hook stays on the front side of the fabric. From the front to the back, insert your hook into the space in between the stitches so that your hook comes out just to the right of the desired stitch. Wrap the crochet hook around the back of the desired stitch. From the back to the front, insert your hook into the space in between the stitches so that your hook comes out just to the left of the desired stitch. At this point, the desired stitch will appear raised on the front of the fabric. Yarn over and pull directly through (3 loops on your hook). (Yarn over and pull through 2 loops) 2x.
To Back Post Double Crochet (worked from the back of the fabric: Yarn over, then swoop your hook downward and backward so your hook goes to the back of the fabric. From the back to the front, insert your hook into the space in between the stitches so that your hook comes out just to the right of the desired stitch. Wrap the crochet hook around the front of the desired stitch. From the front to the back, insert your hook into the space in between the stitches so that your hook comes out just to the left of the desired stitch. At this point, the desired stitch will appear raised on the back of the fabric. Yarn over and pull directly through (3 loops on your hook). (Yarn over and pull through 2 loops) 2x.
Pattern Notes:
Smallest size instructions given, with larger size in parenthesis “(…)”.
The beanie is worked mostly in a continuous round to avoid the seam. Read instructions carefully for joining instructions. In rounds not joined, you may find it beneficial to place a stitch marker, or waste yarn to keep track of your place.
Rounds 2, 3, 6 and 7 begin with a modified puff stitch to avoid a gap.
Join with a slip stitch to the first stitch, not the beginning chain.
To change yarn color, pull new color through in second half of the double crochet.
Chain 2 counts as a double crochet in the first round of ribbing round (white), and as a back post double crochet in the remaining rounds, but does not count as a stitch in the foundation round of the cowl.
To adjust the circumference, I suggest going up or down a hook size, as adding or subtracting one puff stitch will increase/decrease it by approximately half an inch.
Puff Stitch Beanie Crochet Pattern:
In Tan, chain 7. Join to form a ring, taking care not to twist chain. Chain 1. (Puff Stitch into the ring) 7x (8x). Join. [7 (8) Puff Stitches]
R2: Chain 1. Insert hook into the 1st stitch, yarn over and pull through, ( yarn over, insert hook into the same stitch, yarn over and pull through) 2x. [6 loops on hook]. Yarn over and pull through all 6 loops. Chain 1. Skip the next chain 1 space, (2 Puff Stitches into the next stitch, skip the next chain 1 space) 6x (7x). Puff Stitch MINUS the final chain 1 into the 1st stitch. Do not join. [14 (16) Puff Stitches]
R3: Insert hook into the next stitch, yarn over and pull through, (yarn over, insert hook into the same stitch, yarn over and pull through) 2x. [6 loops on hook]. Yarn over and pull through all 6 loops. Chain 1. Skip the next chain 1 space, (2 Puff Stitches into the next stitch, skip the next chain 1 space, Puff Stitch into the next stitch, skip the next chain 1 space) 6x (7x). 2 Puff Stitches into the next stitch. Do not skip the next stitch, and do not join. [21 (24) Puff Stitches]
R4: [(Puff Stitch into the next stitch, skip the next chain 1 space) 2x. 2 Puff Stiches into the next stitch, skip the next chain 1 space]. 7x (8x). Do not join. [28 (32) Puff Stitches]
R5: [(Puff Stitch into the next stitch, skip the next chain 1 space) 2x. 2 Puff Stitches into the next stitch, skip the next chain 1 space] 7x (8x). Join. [35 (40) Puff Stitches]
Checkpoint: Stop here, and measure the diameter to ensure the finished beanie will fit correctly. You’ll want your diameter to measure 6 1/4″ (6 3/4”).
R6: Chain 1. Insert hook into the next stitch, yo and pull through, (yarn over, insert hook into the same stitch, yarn over and pull through) 2x. [6 loops on hook]. Yarn over and pull through all 6 loops. Chain 1. Skip the next chain 1 space, (Puff Stitch into the next stitch, skip the next chain 1 space). 34x (39x). Do not join. [35 (40) Puff Stitches]
R7: Insert hook into the next stitch, yo and pull through, (yarn over, insert hook into the same stitch, yarn over and pull through) 2x. [6 loops on hook]. Yarn over and pull through all 6 loops. Chain 1. Skip the next chain 1 space, (Puff Stitch into the next stitch, skip the next chain 1 space) 34x (39x). Do not join. [35 (40) Puff Stitches]
The Adult Large size has the biggest range for heights, and that is that it can be either 8 1/2″ tall or 9 1/2″ tall, and this varies depending on the recipient.
R8 – 11 (13): (Puff Stitch into the next stitch, skip the next chain 1 space) 35x (40x). Do not join. [35 (40) Puff Stitches]
R12 (14): (Puff Stitch into the next stitch, skip the next chain 1 space) 35x (40x). Join with White. [35 (40) Puff Stitches]
R13 (15): In White, chain 2. DC into the 2nd stitch, and into each DC and chain 1 space around. Join. [70 (80) DC]
R14 – 16 (16 – 18): Chain 2. Fpdc around the next DC, (bpdc around the next DC, fpdc around the next DC) 34x (39x). Join, and Fasten Off. [70 (80) DC]

Please feel free to make and sell your own items made using this pattern, but keep in mind, this written pattern and my photos are protected by copyright. Please DO NOT claim this pattern as your own nor should you sell my pattern. DO NOT re-publish my photos as your own. DO NOT copy and paste my pattern anywhere, link to it instead so other’s can visit. Making videos providing instructions how to make my projects on any social media platform is also not permitted.
Join one of our awesome Facebook groups to share your creations, and see what others are up to!
– Yarn Crafts & Coffee Community
– DIY Home On Rockwood Lane
– Alexandra Lane Lifestyle
Linked Up To…
Happiness is Homemade Link Party #314 – Create with Cynthia
Handmade Monday #167 – Sum of their Stories
Ginx Woolly Linx Party March – Ginx Craft
The Really Crafty Link Party #209 – Keeping it Real
Craftastic Monday – Sew Can Do
Motivational Monday – Claire Justine
It’s a beautiful beanie! I love the contrasting colors. So unique!
Maureen | http://www.littlemisscasual.com
Thanks so much, Maureen!
Lovely!
Thanks for linking up to Creative Compulsions!
Michelle
http://mybijoulifeonline.com
These look really good together and I like the contrasting band of white. Thanks for sharing at #HomeMattersParty
Thanks, Donna!
Great looking set and looks like it is quick to make, a huge plus for most of us! Thanks so much for sharing on craft schooling sunday!
Thanks! Definitely a good long weekend set that could be done with stash yarn.
Looks nice. I need to attempt this pattern. Thanks so much for linking up with me at my #UnlimitedMonthlyLinkParty 10, open March 1 to 26. All entries shared on social media if share buttons installed.
Enjoy 🙂
Very pretty. The cap and cowl look great together.
Thanks, Ginny! I had fun putting together the set.