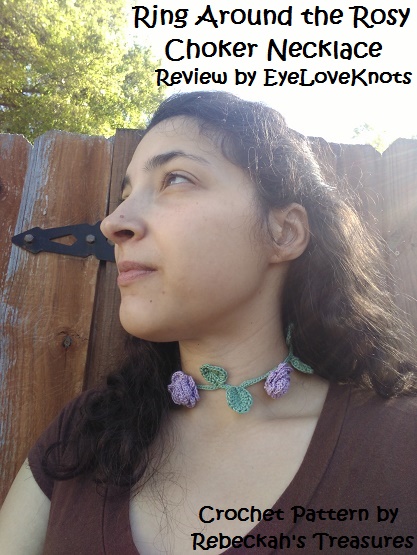
Last month I shared my Ring Around the Rose Crochet Pattern Review, which included just the sweet little rose, which was the starting point for this gorgeous Ring Around the Rosy Choker. I pattern tested this for my friend Rebeckah of Rebeckah’s Treasures. The moment I first saw hers full of beautiful color, I fell deeply in love and just had to make my own. Even the full black one of hers is just lovely!
If you aren’t about the choker, but love the idea as much as I do, you could try a headband or bracelet following the same concept.
Are you a raveler? If so, make sure to favorite this Ring Around the Rosy Choker and link up your project to it!
Don’t forget to check out Rebeckah’s Ring Around the Rosy Bookmark too!
Materials:
– Small Amount of #10 Crochet Thread – I used Hobby Lobby’s Artiste #10 Thread in the Orchid colorway & Aunt Lydia’s Fashion Thread in Sage
– 1.3mm Crochet Hook (larger than recommended)
– #20 Tapestry Needle for Weaving in Ends
– Ring Around the Rosy Choker, Crochet Pattern from Rebeckah’s Treasures
Material Notes:
The pattern calls for a smaller hook, but the smallest I had on hand was the 1.3mm that I used (and boy was that one small!). My gauge came out a little larger than Rebeckah’s with it, but usually my gauge is smaller and I have to go up a size anyway. It worked out for me.
Aunt Lydia’s Fashion Thread is a Size 3, not 10, which means it’s thicker. It was a little tough working with the small crochet hook, but I just worked slow and steady. It was what was in my stash, and I was in love with the color pair so I made it work. If you follow suit, keep the overall length in mind – see Pattern Notes below.
Written instructions are available only for purchase through the above link, BUT! You can view the full tutorial via YouTube through the above link for free 🙂
I think a fingering weight yarn or embroidery floss could also pass for this choker. Just keep measuring to make sure you are on the right path, and adjust as needed.
Time Spent:
Each rosebud took me 25 minutes, and the assembly took a little over 45 minutes for a total of just over two hours to complete the choker.
Measurements:
I followed the instructions for the standard 13″ size. My finished choker measures 15.5″ long, including the full ties – explained below.
Pattern Notes:
First things first, you’ll need to work up three rose buds. Check out my review on the Ring Around the Rose, and then come back to see how I worked the rest of the choker.
I worked my stem portion into the back bump of the chain. It gives it a nice, clean and crisp look.
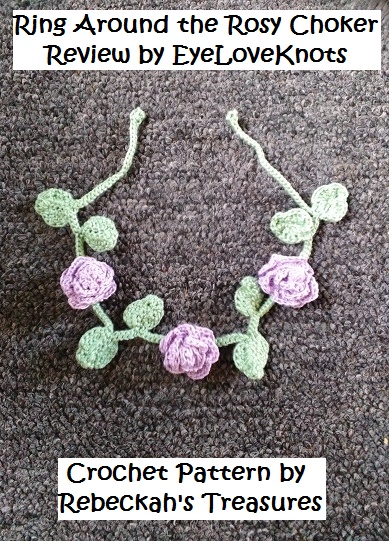
Last minute I opted not to add the jewelry clasp. I need to use surgical steel, and didn’t have any on hand and didn’t want to just put anything on it, so instead, I worked an extra 21 chains at both ends, and then into the 2nd chain, I worked 4 single crochets and joined forming a little ball and then slip stitch across as usual. This way, I could just tie it on. I have worn it around like this many times now, but if I worked another (which I plan to), I would probably add an additional 10 chains to each end to make it easier to tie and more comfortable.
Keep in mind when adding the jewelry clasp that the size matters as it will add to your finished measurements.
As mentioned, I do wear my choker – to work a bunch, and out as well. I have received many compliments on it 🙂 But also want to mention that I have found that the leaves on the top kind of get in the way, as do the leaves on the ends. I wear my choker with the top leaves tucked in so they are on the bottom with the other leaves. If I worked another, I’d omit the leaves on the ends.

With so many size, yarn type and color options, I would love to see them! Join the EyeLoveKnots Crafting Community to share your creations, and see what other’s are up to!
Don’t miss out on new crochet patterns, reviews, jewelry tutorials and more! Subscribe to EyeLoveKnots by using the box on the right side toolbar, or follow me via Bloglovin
Linked Up To…
{nifty thrifty sunday #286} – Nifty Thrifty Things
Craft Schooling Sunday – Creative Jewish Mom
The Creative Corner Link Up Party – Curly Crafty Mom
6 Gorgeous DIY Home Decor Details + Inspiration Monday Party – Scattered Thoughts of a Crafty Mom
Create Link Inspire Linky Party #185 – The Crafty Blog Stalker
{Wow Me} Wednesday #303 – Ginger Snap Crafts
Your Whims Wednesday #311 – My Girlish Whims
Sew It Cook It Craft It Link Party #9 – Sew Historically
Brag About It Link Party #24-17 – Across the Boulevard
Talk of the Town #76 – Sadie Seasongoods
Bee Party #17 – My Busy Beehive
Ultimate Easy Summer Dessert Recipes & I’m Lovin’ It – Tidy Mom
Pin Junkie Pin Party #220 – The Pin Junkie
Creativity Unleashed #177 – Practically Functional
Sweet Inspiration Link Party #61 – The Boondocks Blog
Best of the Weekend – Hello Little Home
5 Cupcake Recipes + Funtastic Friday 131 Link Party – Olives n Okra
Best Friday Features – Tatertots & Jello
No Rules Weekend Blog Party 239 – Sincerely, Paula
Your Party Ideas, Recipes & Crafts Link Party #7 – Bird’s Party
Hookin’ on Hump Day #144 – Petals to Picots
Neon Pineapples & The Blended Style Link-Up – Living on Cloud Nine
Turning Heads Link Up & Linen Dress Styled Over Pants – Elegantly Dressed and Stylish
Summer Vacation Outfit & Link Up – Lady in Violet
The Linky Ladies Party #108 – The Purple Poncho
Red Rose Day: Creative Mondays Linky Party – Claire Justine
You May Also Like…

That's so lovely Alexandra. It's totally something I would wear
It looks so pretty! You're one of my features tomorrow at Sew It Cook It Craft It!
very pretty my grandmother would always make things like this
come see us at http://shopannies.blogspot.com