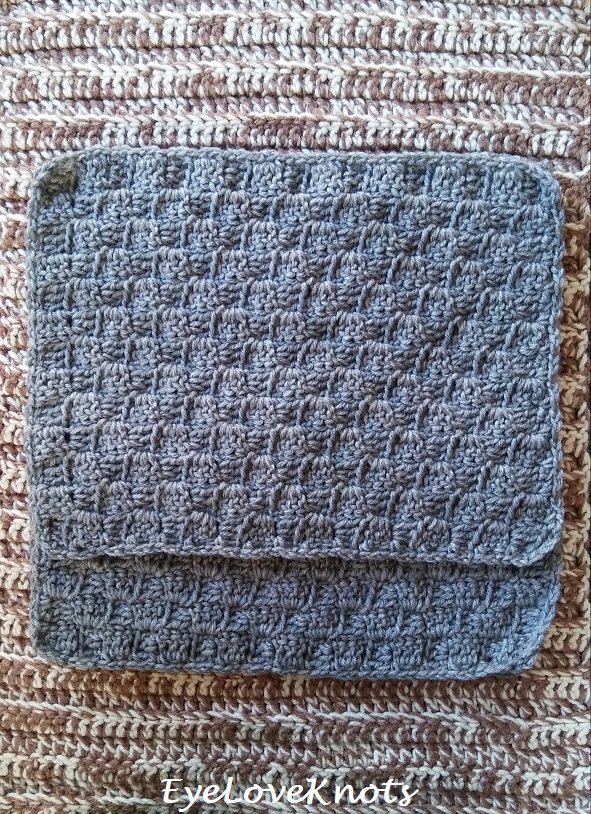
This is a free crochet pattern for how to crochet a cozy C2C envelope style throw pillow with 7 sizes available.
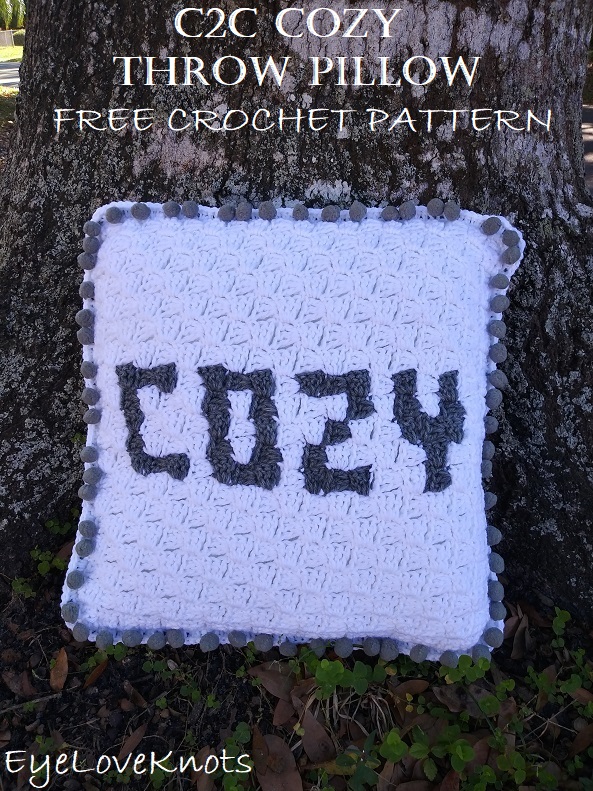
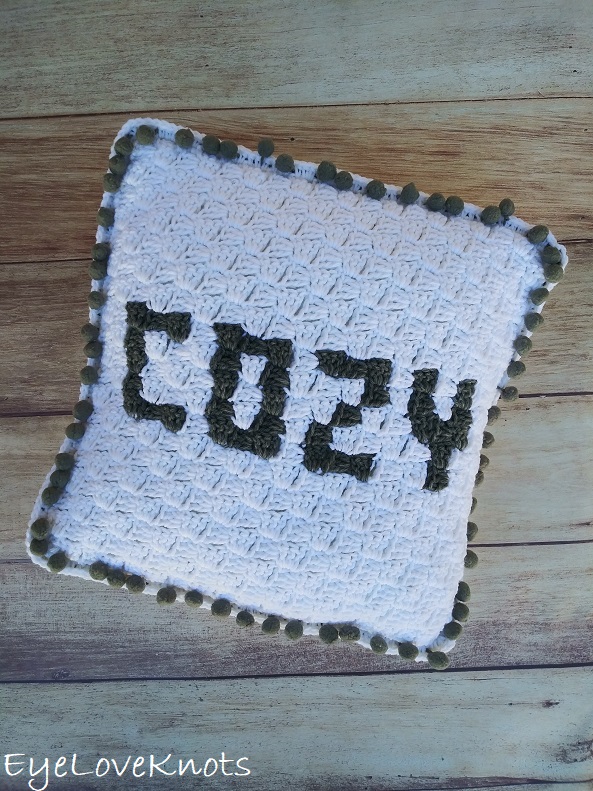
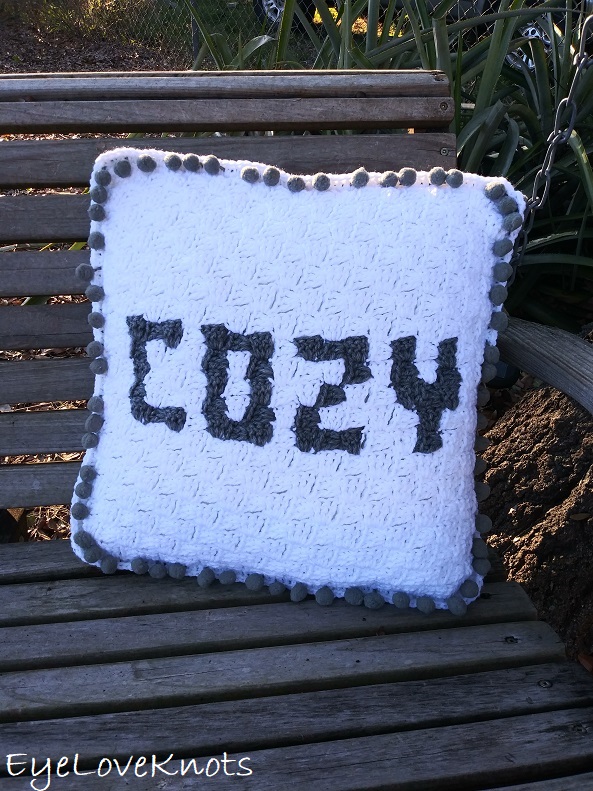
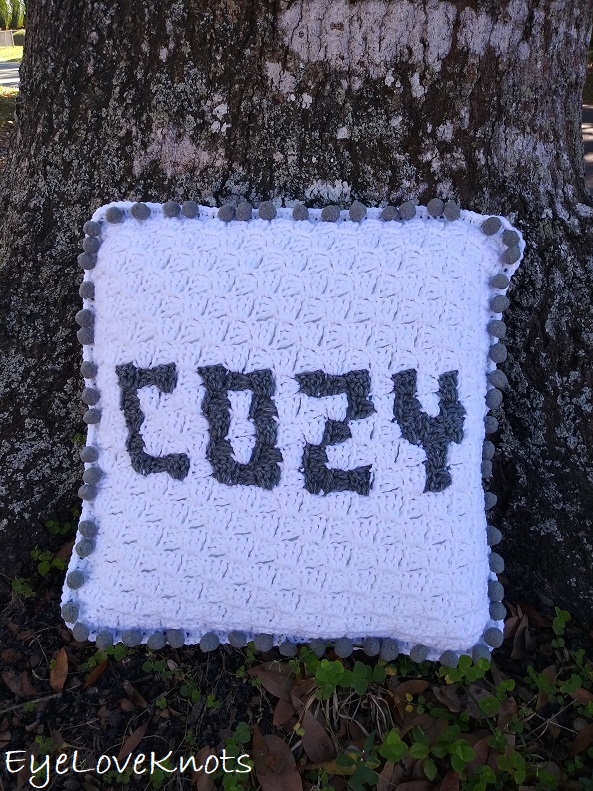
While searching through Pinterest for Winter decorating ideas, I came across a gorgeous living room – Cozy Winter Living Room Decor from Wilshire Collections. Right behind her adorable golden retriever sat a throw pillow with the simple word “cozy” on it, and the pillow edge reminded me of a pom pom trim. I fell in love, and knew I wanted to have one of those throw pillows for my home.
I turned to one of my favorite stitch patterns – corner to corner (C2C), picked up a gray pom pom trim from the sewing aisle, and got to work on my envelope style throw pillow. Instructions included for 7 sizes!
This throw pillow is part of the 2020 Make it for Me Event hosted by Elk Studio. If you aren’t familiar with it, basically it’s a event catered to designing something for ourselves to wear or display, and enjoy.
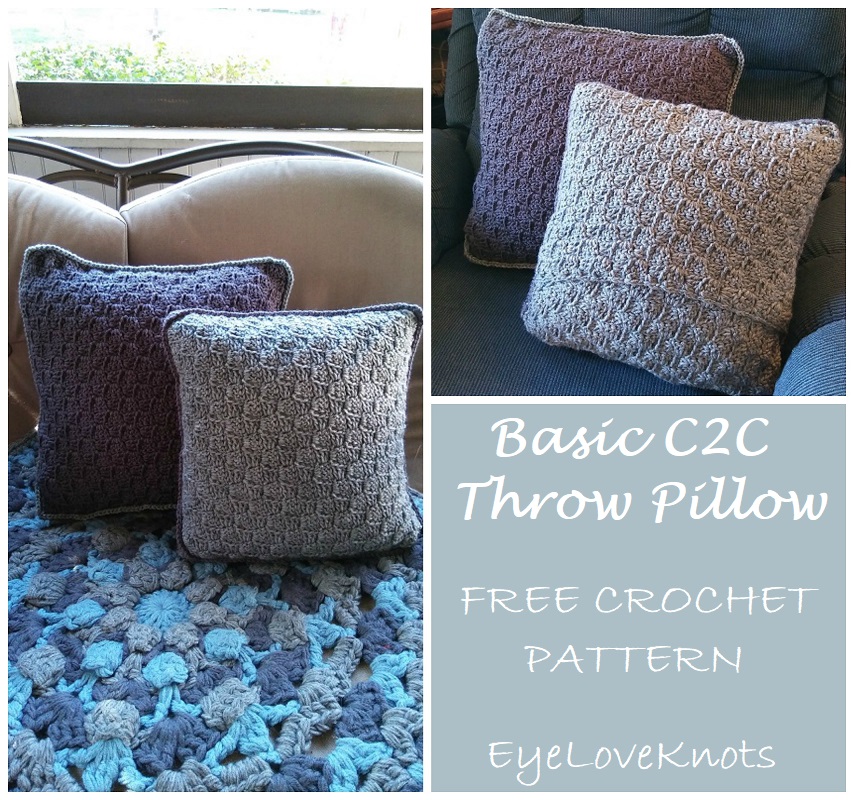
For this event last year, I shared my Basic C2C Throw Pillow (in 8 sizes). And the year before, I shared my Turqua Spring Wreath.
Ad-Free, Printer Friendly PDF:
If you would like a PDF version of this post, you may get one through either my EyeLoveKnots Etsy Shop or LoveCrochet Shop for a small fee. This fee is to compensate for the views lost when you no longer need to return to the blog to for the information, as you will have your own copy. Plus! It helps fund supplies for new projects to share with you!
Shop EyeLoveKnots Etsy: C2C Cozy Throw Pillow.
Shop EyeLoveKnots LoveCrochet: C2C Cozy Throw Pillow.
Are you a Raveler? Share your version of this project on Ravelry – C2C Cozy Throw Pillow.
Save This To Your Favorites – AllFreeCrochet, FaveCrafts, Crochet Pattern Bonanza, AllFreeHolidayCrafts.
Materials:
- Worsted Weight Yarn – I used Red Heart’s Super Saver in White and Grey Heather
- H8/5mm Crochet Hook
- Tapestry Needle for Weaving in Ends
- 1″ Wide (or Less) Gray Pom Pom Trim – Mine came from the Home Decor section at Hobby Lobby (where the outdoor fabric, and curtain items are) – You will need at least 1.5 (2, 2, 2.5, 2.5, 3, 4) Yards, but I recommend getting a little extra just in case! For the 16″ Pillow, I bought 2 Yards, and had 14″ leftover.
- Hot Glue or Sewing Needle and Thread (for Pom Pom Trim)
- Optional, Sewing Pins
Material Notes:
Yarn Alternatives: Caron’s One Pound, Bernat’s Super Value.
Really, you can use any yarn in your stash with respective crochet hook, and just make the square size to your pillow measurements, but I like Red Heart’s Super Saver for my home projects because it’s really durable, and machine washes well.
My two sample pillows were worked to fit 14″ and 16″ pillow forms, and respectively, I used 375 yards (202 grams), and 460 yards (248 grams).
Measurements:
My sample is worked to 16″ – and will stretch to fit a pillow form one inch bigger, but I have got sizes from 14″ through 27″ below to fit a square pillow form.
Gauge:
5 Boxes = 4.25″ Wide by 4.13″ Tall
Abbreviations (US Terms):
- DC – Double Crochet (Photo Tutorial)
- SC – Single Crochet (Photo Tutorial)
- HDC – Half Double Crochet
- C2C – Corner to Corner
Pattern Notes:
Pillow grows from the bottom corner upward.
This pattern is written with colors and boxes only. If you would like more details on how to work the corner to corner technique, and the basic shape of this washcloth – visit my Basic C2C Throw Pillow pattern, and follow the instructions for the respective size.
Beginning chain 2 counts as a double crochet.
A box is comprised of four double crochet’s.
The “space under the same chain joined to” is defined as the space between the last two double crochets of the previous rows box.
Working the final double crochet into the top of the chain from the previous row helps to keep the edge more even. After completing the first box, you may also need to lightly tug on it to keep it even as well.
Instructions for smallest size – 14″ shown with 16, 18, 20, 22, 24 and 27 shown in parenthesis.
In Border, chain 1 does not count as a stitch, and join to the first stitch.
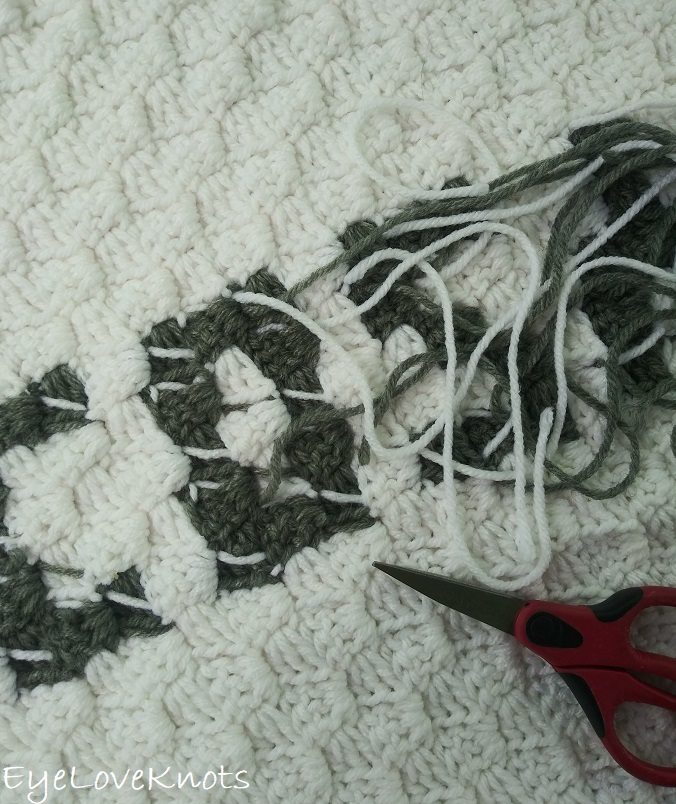
Because this pillow was made for my home, I didn’t worry about carrying my yarn along the backside of my work (you can see this especially in the letter “O” where the white strands are coming across). By doing this, I didn’t have to fasten off as much, which in turn meant less ends to weave in later.
C2C Cozy Throw Pillow Graph for 14″ Size:
As a blogger, I rely on views to my blog to earn money from my ads. Please do NOT share my graph photo, or save to Pinterest. Doing so, would allow makers to not have to return to my blog, which would result in a loss of views and income.

14″ Pattern with Box Colors Only:
R1: 1 White. (1 Box)
R2 – 8: Increase up to 8 Boxes.
R9: 6 White, 1 Gray, 2 White. (9 Boxes)
R10: 1 White, 2 Gray, 7 White. (10 Boxes)
R11: 8 White, 2 Gray, 1 White. (11 Boxes)
R12: (1 White, 1 Gray) 3x, 6 White. (12 Boxes)
R13: 6 White, 1 Gray, 2 White, 1 Gray, 3 White. (13 Boxes)
R14: 3 White, 1 Gray, 3 White, 1 Gray, 6 White. (14 Boxes; “Y” Finished)
R15: 7 White, 3 Gray, 5 White. (15 Boxes)
R16: 5 White, 1 Gray, 3 White, 1 Gray, 6 White. (16 Boxes)
R17: 6 White, 2 Gray, 2 White, 1 Gray, 6 White. (17 Boxes)
R18, Begin Decrease: 6 White, 1 Gray, (1 White, 1 Gray) 2x, 5 White. (16 Boxes; “Z” Finished)
R19: 5 White, 1 Gray, 1 White, 1 Gray, 7 White. (15 Boxes)
R20: 6 White, 1 Gray, (1 White, 1 Gray) 2x, 3 White. (14 Boxes)
R21: 2 White, 1 Gray, 2 White, 2 Gray, 6 White. (13 Boxes)
R22: 6 White, 1 Gray, 3 White, 1 Gray, 1 White. (12 Boxes; “O” Finished)
R23: 1 White, 1 Gray, 9 White. (11 Boxes)
R24: 6 White, (1 Gray, 1 White) 2x. (10 Boxes)
R25: 1 White, 2 Gray, 6 White. (9 Boxes)
R26: 6 White, 1 Gray, 1 White. (8 Boxes; “C” Finished)
R27 – 33: Decrease in White, then Proceed to Border.
C2C Cozy Throw Pillow Graph for 16″ Size:
As a blogger, I rely on views to my blog to earn money from my ads. Please do NOT share my graph photo, or save to Pinterest. Doing so, would allow makers to not have to return to my blog, which would result in a loss of views and income.
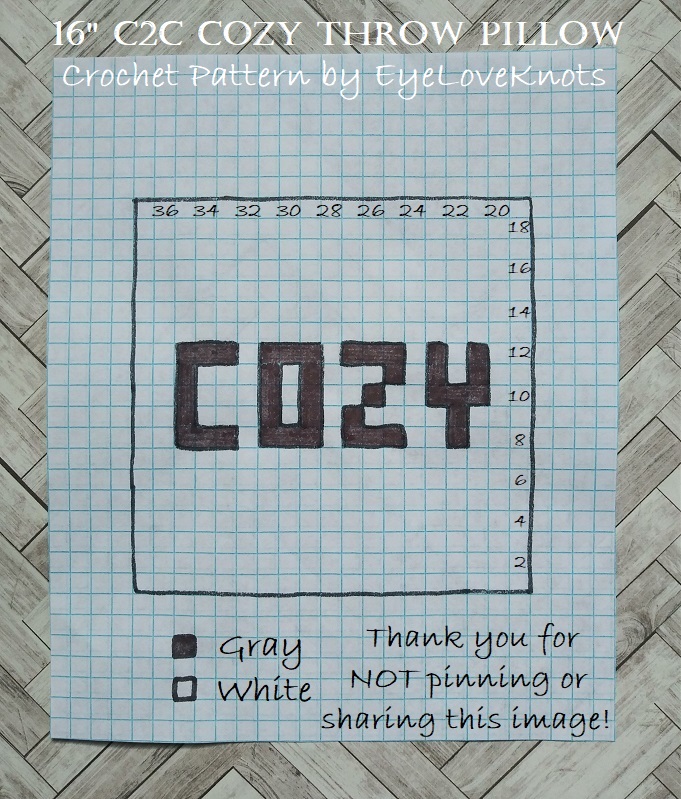
16″ Pattern with Box Colors Only:
R1: 1 White.
R2 – 10: Increase up to 10 Boxes.
R11: 7 White, 1 Gray, 3 White. (11 Boxes)
R12: 2 White, 2 Gray, 8 White. (12 Boxes)
R13: 9 White, 2 Gray, 2 White. (13 Boxes)
R14: 2 White, 1 Gray, (1 White, 1 Gray) 2x, 7 White. (14 Boxes)
R15: 7 White, 1 Gray, 2 White, 1 Gray, 4 White. (15 Boxes)
R16: 4 White, 1 Gray, 3 White, 1 Gray, 7 White. (16 Boxes; “Y” Finished)
R17: 8 White, 3 Gray, 6 White. (17 Boxes)
R18: 6 White, 1 Gray, 3 White, 1 Gray, 7 White. (18 Boxes)
R19: 7 White, 2 Gray, 2 White, 1 Gray, 7 White. (19 Boxes)
R20, Begin Decreasing: 7 White, 1 Gray, (1 White, 1 Gray) 2x, 6 White. (18 Boxes; “Z” Finished)
R21: 6 White, 1 Gray, 1 White, 1 Gray, 8 White. (17 Boxes)
R22: 7 White, 1 Gray, (1 White, 1 Gray) 2x, 4 White. (16 Boxes)
R23: 3 White, 1 Gray, 2 White, 2 Gray, 7 White. (15 Boxes)
R24: 7 White, 1 Gray, 3 White, 1 Gray, 2 White. (14 Boxes; “O” Finished)
R25: 2 White, 1 Gray, 10 White. (13 Boxes)
R26: 7 White, 1 Gray, 1 White, 1 Gray, 2 White. (12 Boxes)
R27: 2 White, 2 Gray, 7 White. (11 Boxes)
R28: 7 White, 1 Gray, 2 White. (10 Boxes; “C” Finished)
R29 – 37: Decrease in White, then Proceed to Border.
C2C Cozy Throw Pillow Graph for 18″ Size:
As a blogger, I rely on views to my blog to earn money from my ads. Please do NOT share my graph photo, or save to Pinterest. Doing so, would allow makers to not have to return to my blog, which would result in a loss of views and income.
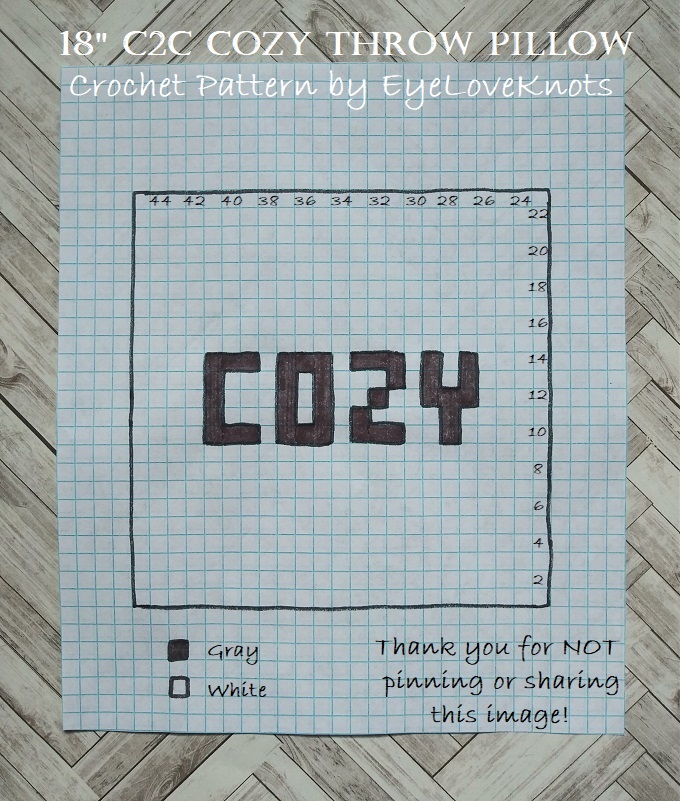
18″ Pattern with Box Colors Only:
R1: 1 White.
R2 – 14: Increase up to 14 Boxes.
R15: 9 White, 1 Gray, 5 White. (15 Boxes)
R16: 4 White, 2 Gray, 10 White. (16 Boxes)
R17: 11 White, 2 Gray, 4 White. (17 Boxes)
R18: 4 White, 1 Gray, (1 White, 1 Gray) 2x, 9 White. (18 Boxes)
R19: 9 White, 1 Gray, 2 White, 1 Gray, 6 White. (19 Boxes)
R20: 6 White, 1 Gray, 3 White, 1 Gray, 9 White. (20 Boxes; “Y” Finished)
R21: 10 White, 3 Gray, 8 White. (21 Boxes)
R22: 8 White, 1 Gray, 3 White, 1 Gray, 9 White. (22 Boxes)
R23: 9 White, 2 Gray, 2 White, 1 Gray, 9 White. (23 Boxes)
R24, Begin Decreasing: 9 White, 1 Gray, (1 White, 1 Gray) 2x, 8 White. (22 Boxes; “Z” Finished)
R25: 8 White, 1 Gray, 1 White, 1 Gray, 10 White. (21 Boxes)
R26: 9 White, 1 Gray, (1 White, 1 Gray) 2x, 6 White. (20 Boxes)
R27: 5 White, 1 Gray, 2 White, 2 Gray, 9 White. (19 Boxes)
R28: 9 White, 1 Gray, 3 White, 1 Gray, 4 White. (18 Boxes; “O” Finished)
R29: 4 White, 1 Gray, 12 White. (17 Boxes)
R30: 9 White, 1 Gray, 1 White, 1 Gray, 4 White. (16 Boxes)
R31: 4 White, 2 Gray, 9 White. (15 Boxes)
R32: 9 White, 1 Gray, 4 White. (14 Boxes; “C” Finished)
R33 – 45: Decrease in White, then proceed to Border.
C2C Cozy Throw Pillow Graph for 20″ Size:
As a blogger, I rely on views to my blog to earn money from my ads. Please do NOT share my graph photo, or save to Pinterest. Doing so, would allow makers to not have to return to my blog, which would result in a loss of views and income.
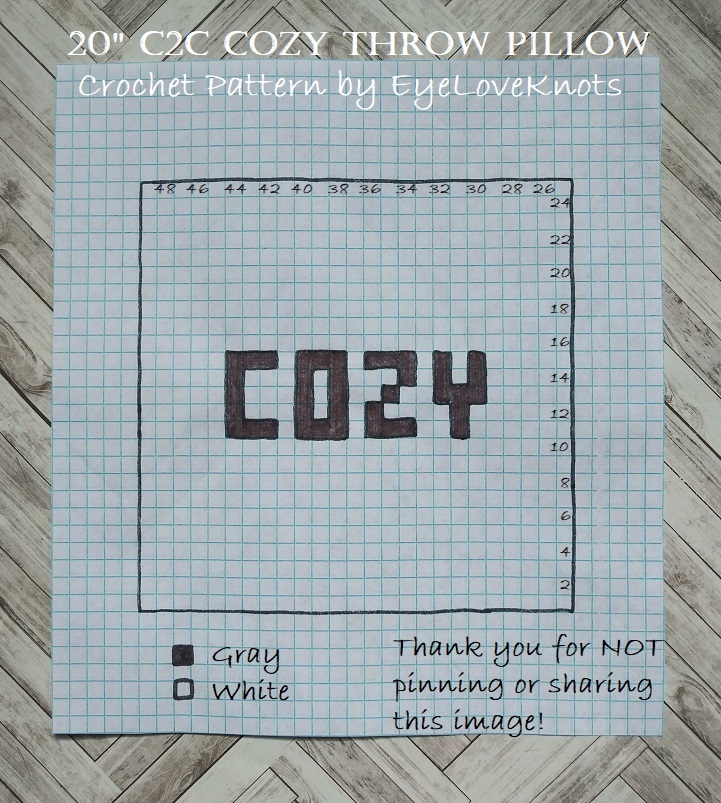
20″ Pattern with Box Colors Only:
R1: 1 White.
R2 – 16: Increase in White up to 16 Boxes.
R17: 10 White, 1 Gray, 6 White. (17 Boxes)
R18: 5 White, 2 Gray, 11 White. (18 Boxes)
R19: 12 White, 2 Gray, 5 White. (19 Boxes)
R20: 5 White, 1 Gray, (1 White, 1 Gray) 2x, 10 White. (20 Boxes)
R21: 10 White, 1 Gray, 2 White, 1 Gray, 7 White. (21 Boxes)
R22: 7 White, 1 Gray, 3 White, 1 Gray, 10 White. (22 Boxes; “Y” Finished)
R23: 11 White, 3 Gray, 9 White. (23 Boxes)
R24: 9 White, 1 Gray, 3 White, 1 Gray, 10 White. (24 Boxes)
R25: 10 White, 2 Gray, 2 White, 1 Gray, 10 White. (25 Boxes)
R26, Begin Decreasing: 10 White, 1 Gray, (1 White, 1 Gray) 2x, 9 White. (24 Boxes; “Z” Finished)
R27: 9 White, 1 Gray, 1 White, 1 Gray, 11 White. (23 Boxes)
R28: 10 White, 1 Gray, (1 White, 1 Gray) 2x, 7 White. (22 Boxes)
R29: 6 White, 1 Gray, 2 White, 2 Gray, 10 White. (21 Boxes)
R30: 10 White, 1 Gray, 3 White, 1 Gray, 5 White. (20 Boxes; “O” Finished)
R31: 5 White, 1 Gray, 13 White. (19 Boxes)
R32: 10 White, 1 Gray, 1 White, 1 Gray, 5 White. (18 Boxes)
R33: 5 White, 2 Gray, 10 White. (17 Boxes)
R34: 10 White, 1 Gray, 5 White. (16 Boxes)
R35 – 49: Decrease in White, then Proceed to Border.
C2C Cozy Throw Pillow Graph for 22″ Size:
As a blogger, I rely on views to my blog to earn money from my ads. Please do NOT share my graph photo, or save to Pinterest. Doing so, would allow makers to not have to return to my blog, which would result in a loss of views and income.
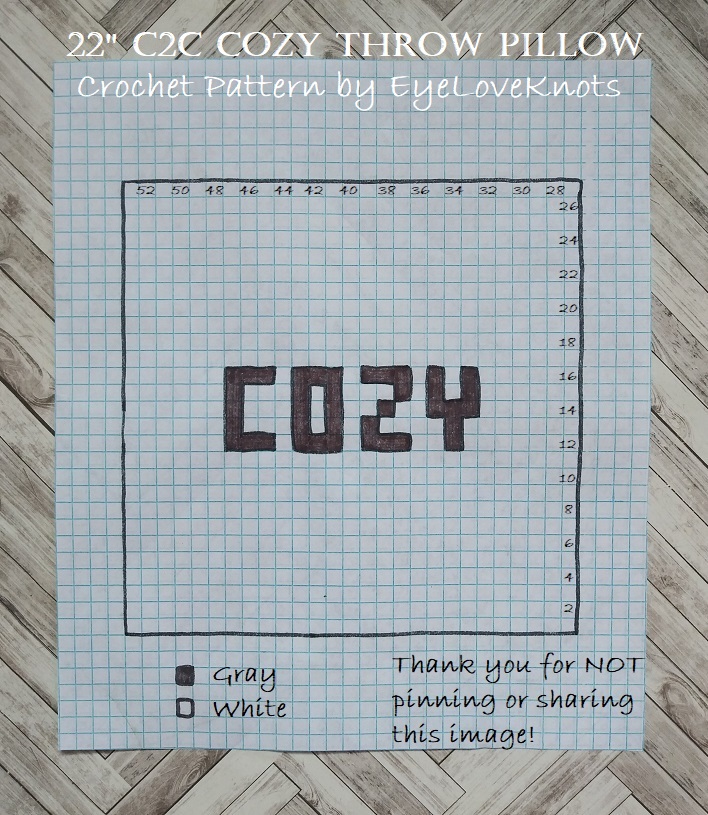
22″ Pattern with Box Colors Only:
R1: 1 White.
R2 – 18: Increase up to 18 Boxes.
R19: 11 White, 1 Gray, 7 White. (19 Boxes)
R20: 6 White, 2 Gray, 12 White. (20 Boxes)
R21: 13 White, 2 Gray, 6 White. (21 Boxes)
R22: 6 White, 1 Gray, (1 White, 1 Gray) 2x, 11 White. (22 Boxes)
R23: 11 White, 1 Gray, 2 White, 1 Gray, 8 White. (23 Boxes)
R24: 8 White, 1 Gray, 3 White, 1 Gray, 11 White. (24 Boxes; “Y” Finished)
R25: 12 White, 3 Gray, 10 White. (25 Boxes)
R26: 10 White, 1 Gray, 3 White, 1 Gray, 11 White. (26 Boxes)
R27: 11 White, 2 Gray, 2 White, 1 Gray, 11 White. (27 Boxes)
R28, Begins Decrease: 11 White, 1 Gray, (1 White, 1 Gray) 2x, 10 White. (26 Boxes; “Z” Finished)
R29: 10 White, 1 Gray, 1 White, 1 Gray, 12 White. (25 Boxes)
R30: 11 White, 1 Gray, (1 White, 1 Gray) 2x, 8 White. (24 Boxes)
R31: 7 White, 1 Gray, 2 White, 2 Gray, 11 White. (23 Boxes)
R32: 11 White, 1 Gray, 3 White, 1 Gray, 6 White. (22 Boxes; “O” Finished)
R33: 6 White, 1 Gray, 14 White. (21 Boxes)
R34: 11 White, 1 Gray, 1 White, 1 Gray, 6 White. (20 Boxes)
R35: 6 White, 2 Gray, 11 White. (19 Boxes)
R36: 11 White, 1 Gray, 6 White. (18 Boxes; “C” Finished)
R37 – 53: Decrease in White, the Proceed to Border.
C2C Cozy Throw Pillow Graph for 24″ Size:
As a blogger, I rely on views to my blog to earn money from my ads. Please do NOT share my graph photo, or save to Pinterest. Doing so, would allow makers to not have to return to my blog, which would result in a loss of views and income.
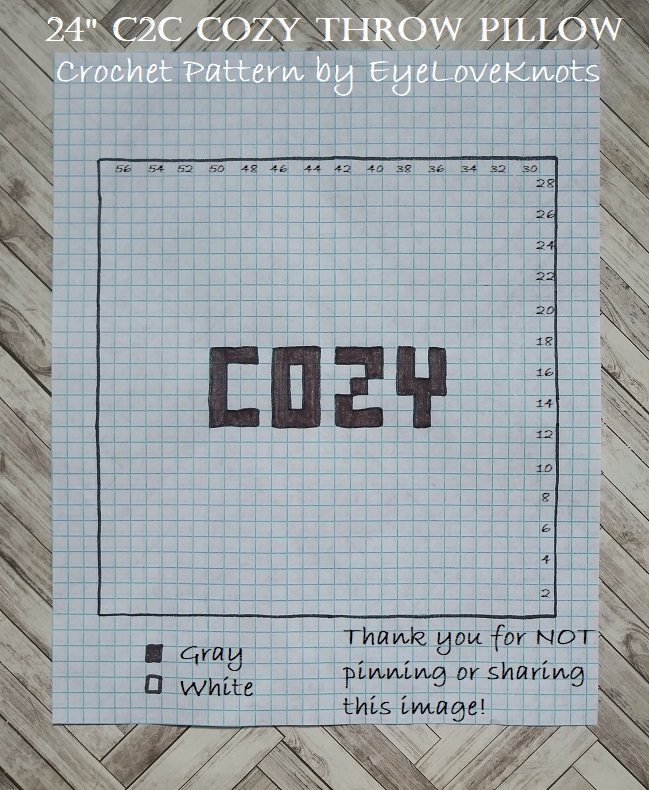
24″ Pattern with Box Colors Only:
R1: 1 White.
R2 – 20: Increase in White up to 20 Boxes.
R21: 12 White, 1 Gray, 8 White. (21 Boxes)
R22: 7 White, 2 Gray, 13 White. (22 Boxes)
R23: 14 White, 2 Gray, 7 White. (23 Boxes)
R24: 7 White, 1 Gray, (1 White, 1 Gray) 2x, 12 White. (24 Boxes)
R25: 12 White, 1 Gray, 2 White, 1 Gray, 9 White. (25 Boxes)
R26: 9 White, 1 Gray, 3 White, 1 Gray, 12 White. (26 Boxes; “Y” Finished)
R27: 13 White, 3 Gray, 11 White. (27 Boxes)
R28: 11 White, 1 Gray, 3 White, 1 Gray, 12 White. (28 Boxes)
R29: 12 White, 2 Gray, 2 White, 1 Gray, 12 White. (29 Boxes)
R30, Begin Decreasing: 12 White, 1 Gray, (1 White, 1 Gray) 2x, 11 White. (28 Boxes; “Z” Finished)
R31: 11 White, 1 Gray, 1 White, 1 Gray, 13 White. (27 Boxes)
R32: 12 White, 1 Gray, (1 White, 1 Gray) 2x, 9 White. (26 Boxes)
R33: 8 White, 1 Gray, 2 White, 2 Gray, 12 White. (25 Boxes)
R34: 12 White, 1 Gray, 3 White, 1 Gray, 7 White. (24 Boxes; “O” Finished)
R35: 7 White, 1 Gray, 15 White. (23 Boxes)
R36: 12 White, 1 Gray, 1 White, 1 Gray, 7 White. (22 Boxes)
R37: 7 White, 2 Gray, 12 White. (21 Boxes)
R38: 12 White, 1 Gray, 7 White. (20 Boxes; “C” Finished)
R39 – 57: Decrease in White, then Proceed to Border.
C2C Cozy Throw Pillow Graph for 27″ Size:
As a blogger, I rely on views to my blog to earn money from my ads. Please do NOT share my graph photo, or save to Pinterest. Doing so, would allow makers to not have to return to my blog, which would result in a loss of views and income.
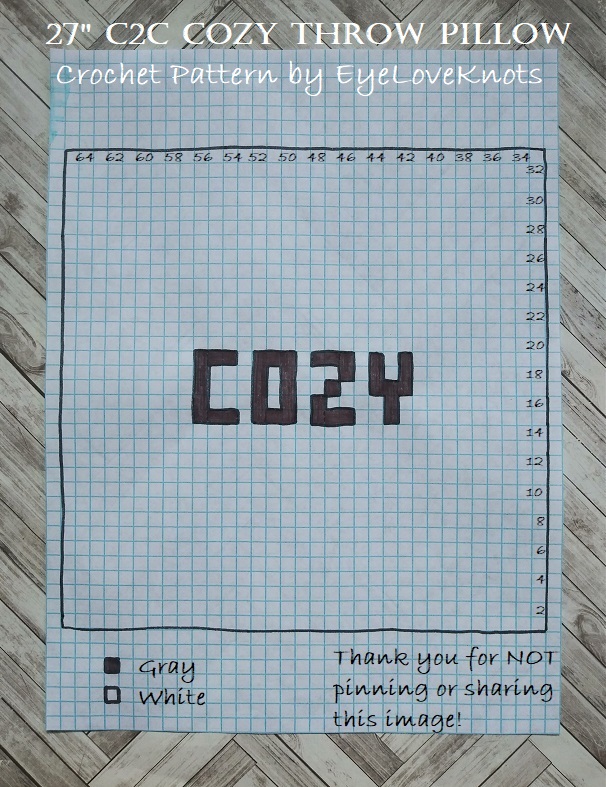
27″ Pattern with Box Colors Only:
R1: 1 White.
R2 – 24: Increase in White up to 24 Boxes.
R25: 14 White, 1 Gray, 10 White. (25 Boxes)
R26: 9 White, 2 Gray, 15 White. (26 Boxes)
R27: 16 White, 2 Gray, 9 White. (27 Boxes)
R28: 9 White, 1 Gray, (1 White, 1 Gray) 2x, 14 White. (28 Boxes)
R29: 14 White, 1 Gray, 2 White, 1 Gray, 11 White. (29 Boxes)
R30: 11 White, 1 Gray, 3 White, 1 Gray, 14 White. (30 Boxes; “Y” Finished)
R31: 15 White, 3 Gray, 13 White. (31 Boxes)
R32: 13 White, 1 Gray, 3 White, 1 Gray, 14 White. (32 Boxes)
R33: 14 White, 2 Gray, 2 White, 1 Gray, 14 White. (33 Boxes)
R34, Begin Decreasing: 14 White, 1 Gray, (1 White, 1 Gray) 2x, 13 White. (32 Boxes; “Z” Finished)
R35: 13 White, 1 Gray, 1 White, 1 Gray, 15 White. (31 Boxes)
R36: 14 White, 1 Gray, (1 White, 1 Gray) 2x, 11 White. (30 Boxes)
R37: 10 White, 1 Gray, 2 White, 2 Gray, 14 White. (29 Boxes)
R38: 14 White, 1 Gray, 3 White, 1 Gray, 9 White. (28 Boxes; “O” Finished)
R39: 9 White, 1 Gray, 17 White. (27 Boxes)
R40: 14 White, 1 Gray, 1 White, 1 Gray, 9 White. (26 Boxes)
R41: 9 White, 2 Gray, 14 White. (25 Boxes)
R42: 14 White, 1 Gray, 9 White. (24 Boxes; “C” Finished)
R43 – 65: Decrease in White, then Proceed to Border.
Border:
Chain 1. SC into the space just to the right, in between two boxes, (chain 2, SC into the next space in between boxes) around, working a single SC into each corner. When back around, work final chain 2, and then join to the 1st SC, and fasten off.
Pillow Back:
To avoid being penalized by Google for duplicate information, please see my Basic C2C Throw Pillow, Free Crochet Pattern for the Pillow Back Bottom, and Top Pieces.
Assembly:
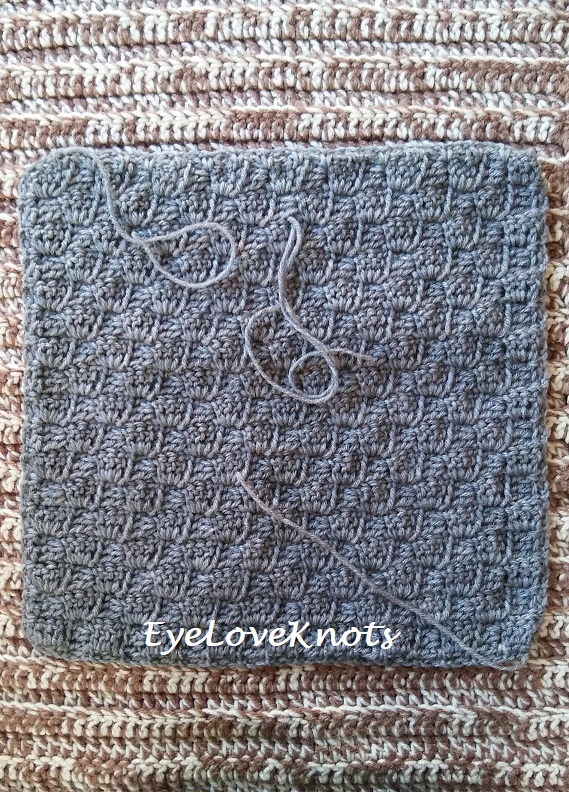
Lay the pillow front (biggest) piece down, wrong side facing up.
Lay the back bottom (smallest) piece down on top of the front with right side facing up. The bottom edges of both pieces should be aligned.
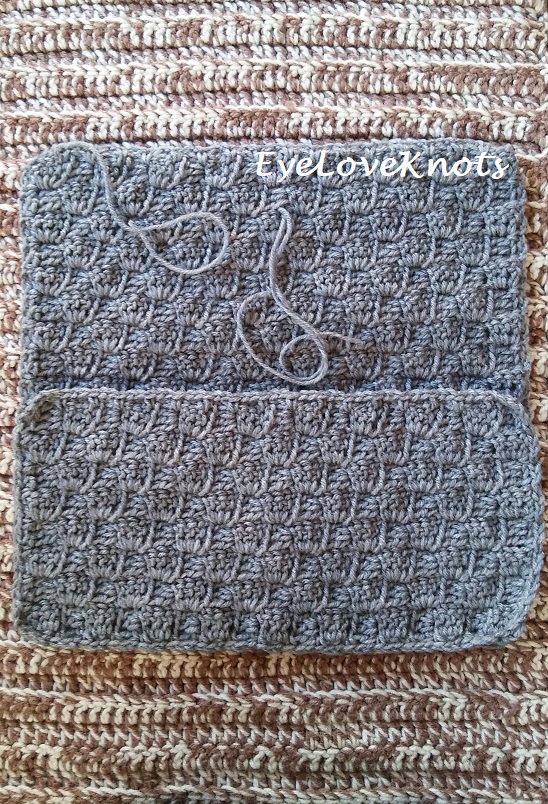
Lay the back top piece down on top of the front with right side facing up. The top edges of both pieces should be aligned, and it should overlap the back bottom piece.
Now, I recommend pinning the layers in place here as you will be crocheting through both layers (and through three layers where the layers overlap). Carefully flip over so the pillow front piece is facing you.
Pom Pom Trim:
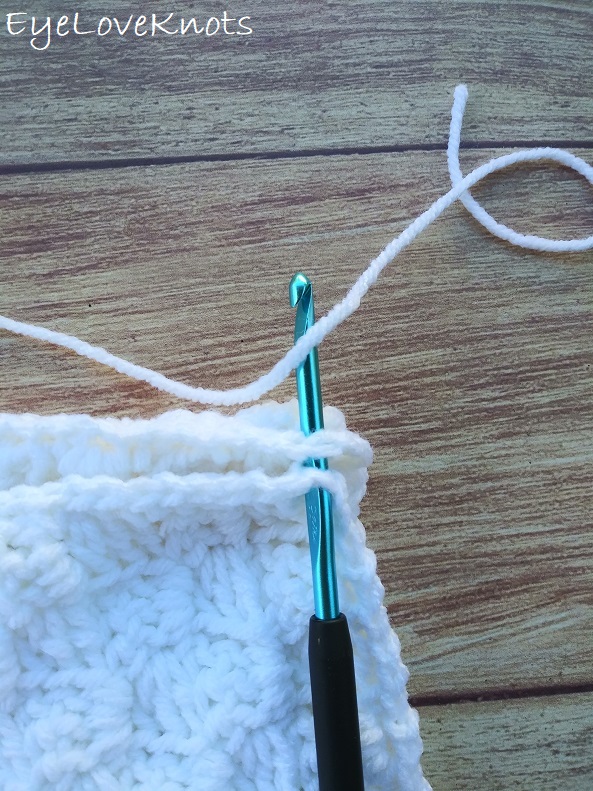
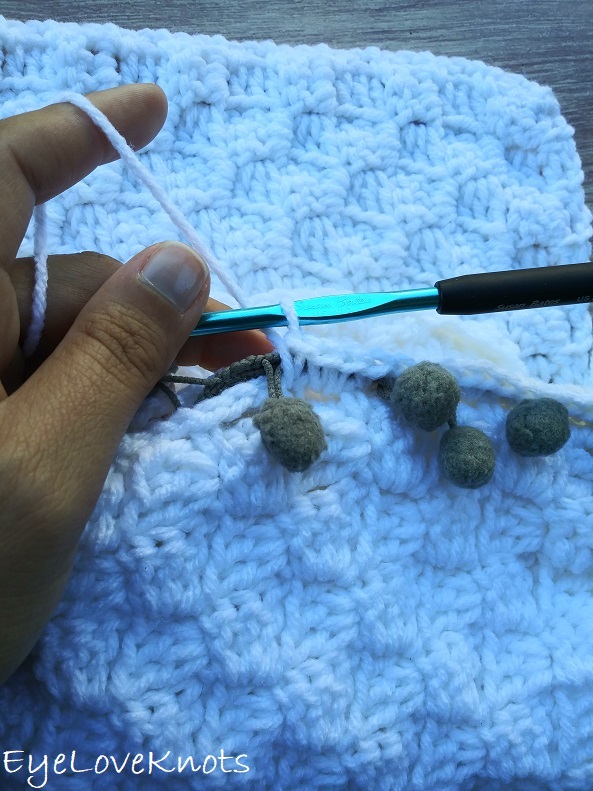
Starting in any corner single crochet, attach yarn (through both layers).
Sandwich the end of the pom pom trim between the two layers, pulling the end so the first pom pom is right up against where you’ve just joined your yarn.
Chain 1, yarn over, insert hook into the same stitch that you just joined to, working underneath the trim, and complete a HDC.
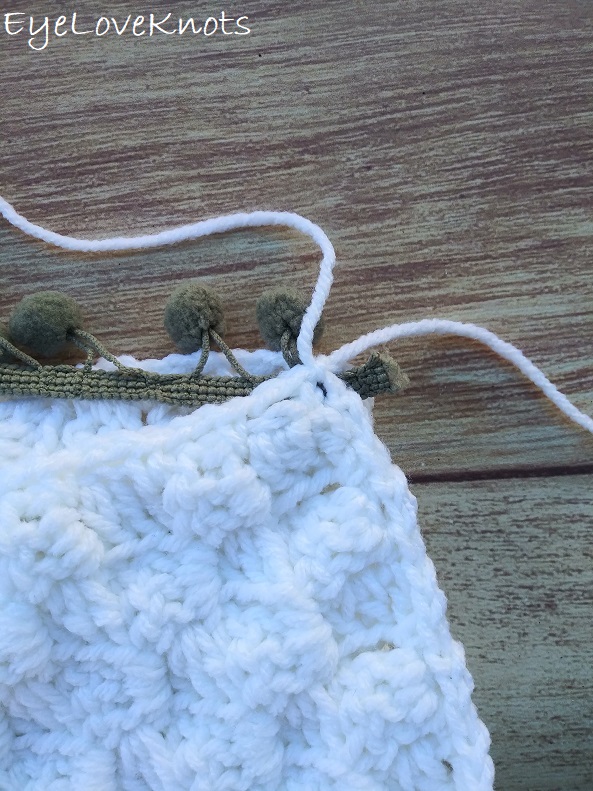
You will work two HDC’s per chain space, one HDC per single crochet, and a (HDC, chain 1, HDC) in each corner.
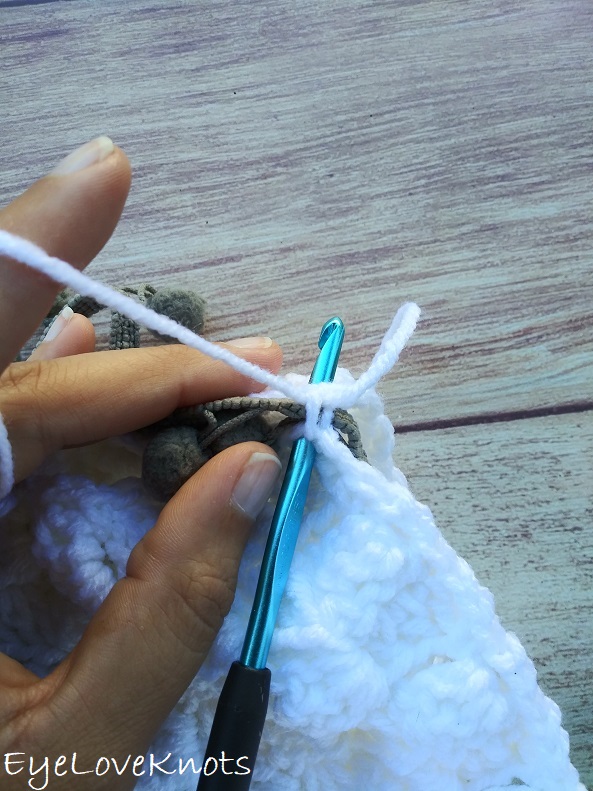
Work in pattern up to a pom pom…
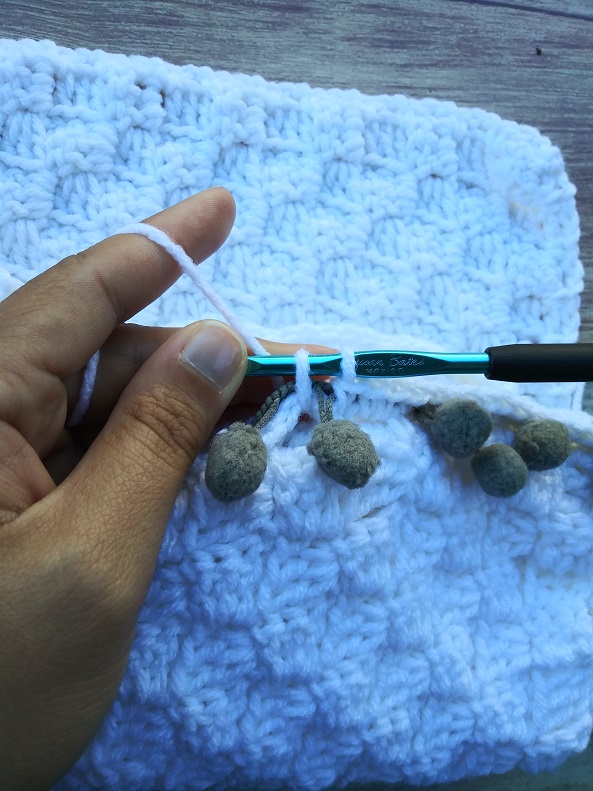
…then work the next stitch just to the left of the pom pom, catching it in between.
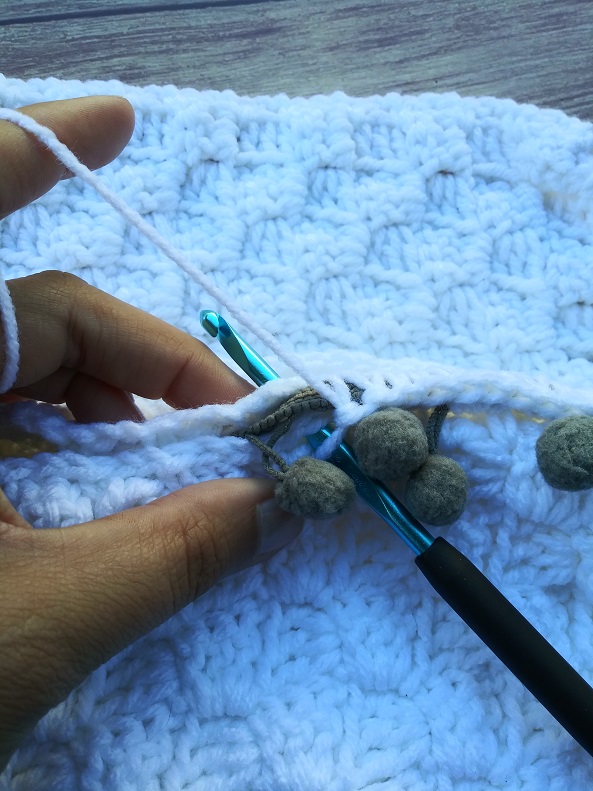
The pom pom trim will want to curl on you. Have patience, keep sandwiching it in place in between the two layers, and work over it uncurled so the edge don’t bulge.

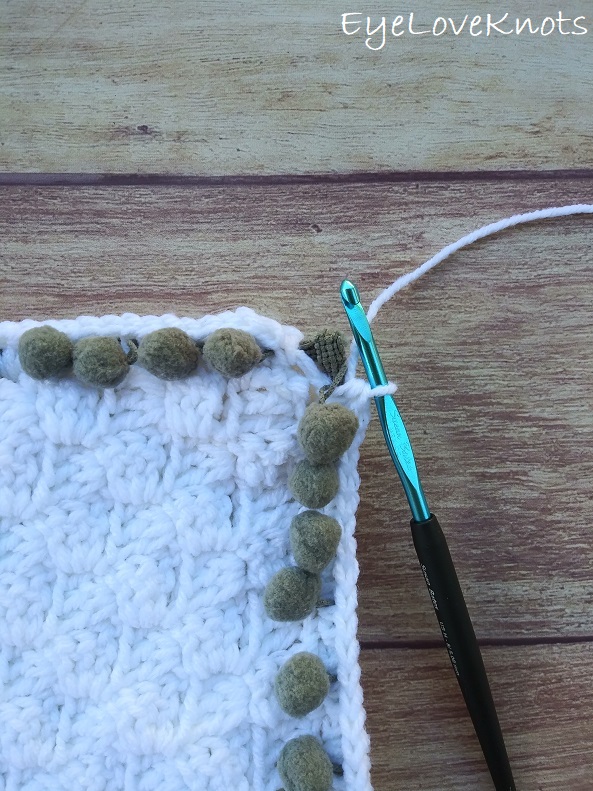
Once you are back to the starting point, BEFORE FINISHING, trim the pom pom trim so it overlaps with the beginning tail you left out, and then either sew or hot glue the ends together. Then finish your stitches, and join to the first half double crochet.
Please feel free to make and sell your own C2C Cozy Throw Pillow project using this pattern, but please DO NOT claim this pattern as your own nor should you sell my pattern, and DO NOT re-publish my photos as your own. DO NOT copy and paste my pattern anywhere, link to it instead.
DIY Lovers: Join the EyeLoveKnots Crochet & DIY Community on Facebook to share your creations, and see what others are up to!
Home Decor Lovers: Join the DIY Home On Rockwood Lane Facebook group to share, and see what others are up to!
Linked Up To…
535th Inspire Me Tuesday – A Stroll Thru Life
Fabulous Party #306 – Lou Lou Girls
One More Row, Free Pattern Link Party #15 – Loops and Love Crochet
All About Home #26 – Common Ground
Linky Ladies Party #178 – The Purple Poncho
Put Your Best Hook Forward Free Crochet Pattern Party #14 – Edyth Blayn
{Wow Me} Wednesday #441 – Ginger Snap Crafts
Hookin’ on Hump Day #208 – Moogly Blog
Your Whims Wednesday #446 – My Girlish Whims
The Wednesday Link Party 334 – The Stitchin’ Mommy
To Grandma’s House We Go 179 – Chas’ Crazy Creations
Waste Not Wednesday 192 – Faeries and Fauna
Talk of the Town #211 – My Repurposed Life
Tuesday Turn About #35 – My Wee Abode
Thursday Favorite Things #426 – An Artful Mom
Creatively Crafty Link Party #210 – Life Beyond the Kitchen
Traffic Jam Weekend #221 – My Bijou Life
Creative Compulsions Linky Party #46 – My Bijou Life
Scrappy Stitchers Link Party #60 – Stitches n Scraps
Pin Party #335 – The Pin Junkie
Best of the Month Link Party – Calypso in the Country
Home Matters Linky Party #269 – Modern on Monticello
Create, Bake, Grow and Gather Party #406 – Shabby Art Boutique
Snickerdoodle Create Bake Make Link Party 322 – EyeLoveKnots
Link Your Stuff – Annemarie’s Haakblog
Craft Schooling Sunday – Creative Jewish Mom
Unlimited Monthly Link Party 9 – Grammy’s Grid
Creative Monday – Claire Justine
Handmade Monday #163 – Sum of their Stories
The Really Crafty Link Party #205 – Keeping it Real
Craftastic Monday Link Party Time – Sew Can Do
Happiness is Homemade Link Party #310 – Create with Cynthia
Ginx Woolly Linx Party February – Ginx Craft
I love how you detailed all the different sizes to meet anyone’s needs. The pom-pom edge looks like fun!!!!
Thanks, Verna! It wasn’t an easy task to do, but I like to try and have something for everyone.
My grandmother loved the crochet but I only learned how to make a chain – lol #trafficjamweekend
HEHE! Well, that’s a good start 😉
Love the pillow and the stitches!! Thanks so much for linking up with me at my #UnlimitedMonthlyLinkParty 9 where I comment on and share on social media if share option is available, open February 1 to 26. My themed party 11 for Handcrafted Jewelry is open February 15 to 25 if you have any appropriate posts.
Thanks, Dee! I worked hard to bring this to life, and I love how it turned out!
What a cute pillow! The crochet was gorgeous even before you added “cozy” to it.
Thank you for linking up to Creative Compulsions!
Michelle
http://mybijoulifeonline.com
Thanks so much, Michelle! C2C is one of my favorite stitch patterns – I love the look, and texture it creates.
Cute! I have yet to try a C2C project, somehow I keep thinking it’s going to turn out too wonky…one of these days, maybe.
Thank you for sharing at The Really Crafty Link Party. Pinned.
Sometimes it does, but crochet is pretty forgiving.