Yesterday, I posted on a Mug Cozy and Coaster Gift Set, which I gave to each of my co-workers on Three King’s Day.
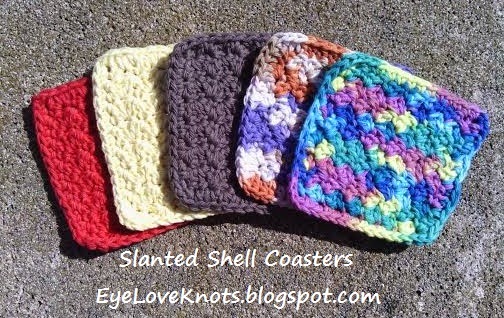
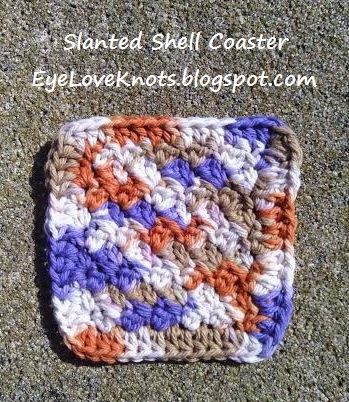
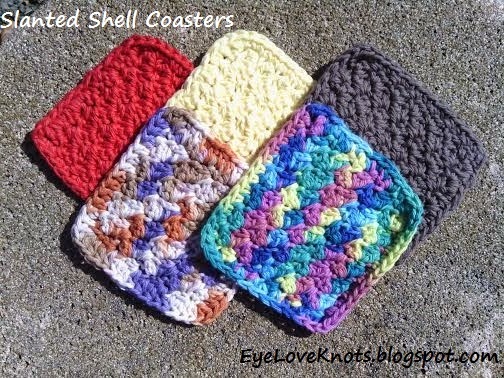
As promised, here is the free pattern for the Slanted Shell Coasters.
Tomorrow, you will find the free pattern for the Slanted Shell Mug Cozy.
Materials:
– Worsted Weight Cotton Yarn – I used Lily Sugar n Cream in Psychedelic, Oriental Ochre, Yellow, Red, and Brown
– H8/5mm Hook
– Tapestry Needle for Weaving in Ends – I like to use a #18, or #20.
Materials Notes:
With one three ounce skein, you will be able to make 6-8 coasters.
Bernat Handicrafter Yarn will also work great! Lion Brand Kitchen Cotton will work up a tad bit bigger.
Cotton yarn is a little tougher when it comes to weaving in your ends. You will want a tapestry needle with a larger eye, and duller point otherwise, it will take you longer to weave in your ends and hurt your fingers from tugging at the needle and yarn.
Time Spent:
I was able to work up a set of four in just under an hour.
Measurements:
Pre-Border, these coasters measure 3.5″ across. With the half double crochet border, they measure 4.25″ across.
*See pattern notes if interested in a 4″ square instead.
Gauge:
Using an H8/5mm Hook and Lily Sugar n Cream – 4″ x 4″
Chain 17, HDC in the 2nd chain, and each chain across. (16 HDC)
R2 – 10: Chain 1, turn. HDC in the 1st stitch, and in each stitch.
Fasten Off.
Abbreviations:
R… – Indicates Row/Round Number
…(…) – Indicates Stitch Count
(…) – Indicates Repeat Pattern
SC – Single Crochet
HDC – Half Double Crochet
DC – Double Crochet
Pattern Notes:
Typically, the slanted shell pattern is worked into the 2nd chain of an even numbered chain. I, however, feel that working into this stitch causes the project to come out uneven and bunched up.
You will find my pattern is worked into the 3rd chain of an odd numbered chain.
When working the border, make sure after working down the first side that your corner is worked into the first chain that was created when we skipped it in the beginning of the pattern by working into the 3rd chain from the hook. This will keep your coaster from pulling up on the ends, and from the border coming out uneven.
If you would like your coasters to be a little smaller (4″), you can use a SC in the border.
You may choose to work your final join as an invisible join.
Not sure how? Find photo how-to below the pattern.
Pattern:
Chain 13. SC & DC in the 3rd chain from the hook, (skip next stitch, SC & DC in the next stitch) across. (6 clusters)
R2 – R9: Chain 1, turn. SC & DC in the 2nd stitch, (skip next stitch, SC & DC in the next stitch) across.
Border: Chain 1, turn. HDC in each stitch across, add two HDC in the last stitch to form a corner, evenly HDC down the first side, add two HDC in the last stitch to form another corner, evenly HDC along the opposite side of the foundation chain, add two HDC in the last stitch to form another corner, evenly HDC up the second side, add one HDC in the last stitch to form the final corner. Join to the first HDC.
Fasten Off, and Weave in Ends (or work an invisible join – find photo how-to below).
Invisible Join – Shown on the Mug Cozy that you will see tomorrow!
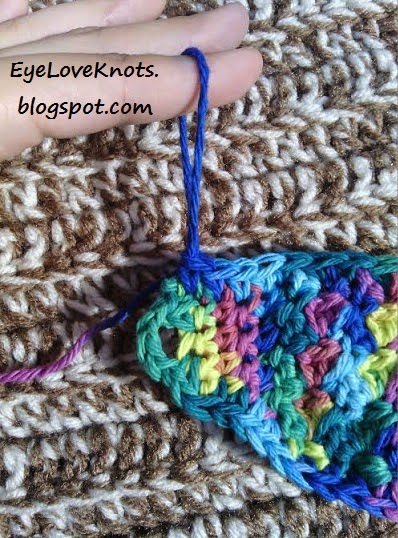 |
| After working the last stitch, cut your yarn and then pull up on the loop. |
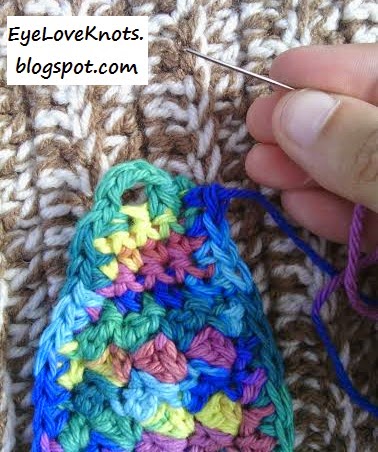 |
| Thread the tail into a needle. I like to use a #18 or #20 tapestry needle. |
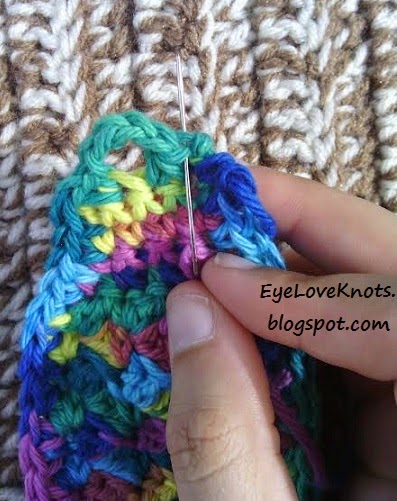 |
| Insert the needle under both loops of the first stitch. |
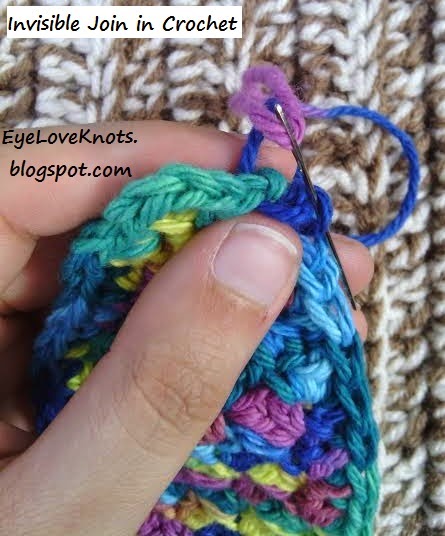 |
| Take the needle down the center of the last stitch. |
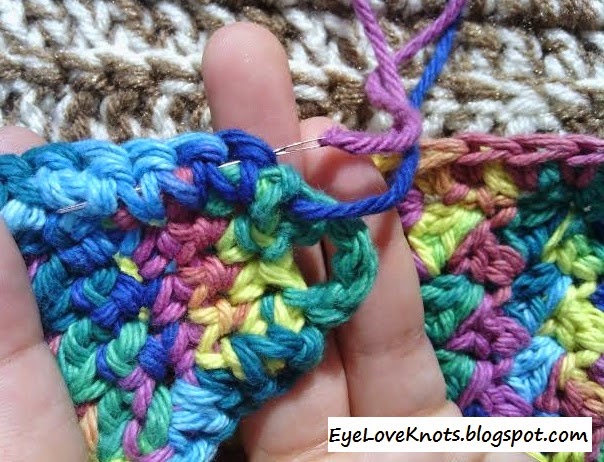 |
| When I take my needle down the center of the last stitch, I like to also run it down in my stitches to begin the weaving process. |
Please feel free to make and sell these coasters, but please DO NOT claim this pattern as your own nor should you sell my pattern, and DO NOT re-publish my photos as your own. DO NOT copy and paste my pattern anywhere, link to it instead.
*If you would like a PDF version of this post, you may get one through my Etsy shop for a small fee. This fee is to compensate for the view/s lost once you no longer need to return to the blog for the information, as you will have your own copy. Plus! It helps fund supplies for new projects to share with you!
Shop EyeLoveKnots – Slanted Shell Coasters.
Check back in tomorrow for the Slanted Shell Mug Cozy free crochet pattern!
You May Also Like:
 |
| Rainbow Bright Ombre Crochet Coasters |
 |
| DIY Ceramic Tile Coasters |
Friday Finds Link Party 01.09.15 – Craftaholics Anonymous
Best of the Weekend – Little Miss Celebration
January 2015 Sharing Time Week 2 – Raising Memories
Link Party Palooza – Tater Tots and Jello
The Sunday Showcase No. 271 – By Stephanie Lynn
Everything in it’s Place, Share Your Creativity Link Party No 146 – It’s Overflowing
Creative Collection Link Party – Blooming Homestead / The Cards We Drew
Best DIY Project and Recipe Party – The 36th Avenue
The Party Bunch Linky Party – The Idea Room
Craft Schooling Sunday – Creative Jewish Mom
Share Your Creativity – From Dream to Reality #150 – The DIY Dreamer
Hit Me With Your Best Shot #51 – One Krieger Chick / Just a Girl and her Blog
Motivational Monday 19 – Dwelling in Happiness
Awesome Things Tuesday – Krafting Kreations / Sowdering About in Seattle
The Creative Link Exchange #36 – The Happy Scraps
Hookin On Hump Day #87 – Moogly / Petals to Picots
Take-a-Look Tuesday – Sugar Bee Crafts
Made by You Monday – Skip to my Lou
Tutorials & Tips Link Party #193 – Home Stories A to Z
253rd Inspire Me Tuesday – A Stroll Thru Life
Super cute project! Lovely yarns too. Thanks for sharing pattern.
Have a wonderful week!
Hugs and love from Portugal,
Ana Love Craft
http://www.lovecraft2012.blogspot.com
Thank you for stopping by, and taking the time to comment – it's very much appreciated.
I love this stitch and use it all the time on blankets etc. but I would like to make a hat out of this stitch and cannot find a pattern. I have a basic pattern in DC to increase to required size of 60 stitches but not sure if I can do this pattern for the rest of the hat. Any suggestions would be appreciated. Thanks [email protected]
Hello Christine! I sent you an email last night 🙂 I think a beanie with this stitch would be just lovely! And with great texture. And fun to make – I kind of feel like making one in each size (in each color!). Please share your finished hat with us 🙂
For anyone else curious, basically I suggested working the crown of a beanie in your choice of stitches (HDC or DC), and then beginning the slanted shell stitch pattern on the next round. Make sure to start with a pattern of even stitches.
Because the slanted shell pattern is so thick and cushiony, I would suggest using worsted weight yarn for the cooler weather hat, and no more than a lightweight yarn for the warmer weather.