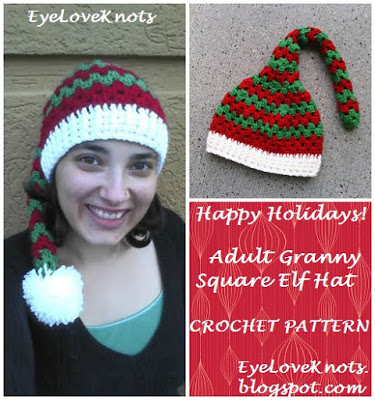
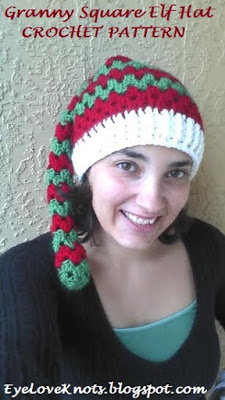
I have recently updated my Adult Granny Square Beanie, but haven’t found the right time to share it. Just a few days ago, someone asked me about it and I thought I’d go ahead and post it this week, but since I posted my Santa Bauble Ornament Crochet Pattern last week and Christmas was just next week, I decided I wanted to post another Christmas-y crochet project. Originally, I was going to remake the Granny Square Beanie in Christmas colors to post, but once I got started I jumped to an Elf Hat and absolutely LOVE how it came out! I even wore it out the very day I finished and thank goodness! It was very windy that night.
Materials:
– 350 yards of Worsted Weight Yarn – I used about half a skein each of Hobby Lobby’s I Love This Yarn in Red and Jelly Bean [Green], and a small amount of White
– I9/5.5mm Crochet Hook – I used my new ergonomic Heaven for Hands Crochet Hooks!
– #18 or #20 Tapestry Needle for Weaving in Ends
Material Notes:
Yarn Alternatives: Red Heart’s With Love.
Keep in mind that different yarns will work up a little bit differently in the sizing. This particular pattern was written using Hobby Lobby’s I Love This Yarn because this is one of the yarns that I use the most. Working with other worsted weight yarns could produce a slightly smaller or larger product so make sure to check your gauge!
Time Spent:
I had this hat ready to go in just about two hours including my weaving.
Measurements:
The hat has a crown of 6.75″ in diameter, a circumference of nearly 21.25″ to fit a head size of 22-23″, and is 25″ in length.
*Stretch depends on your yarn brand selected. The I Love This Yarn and Red Heart’s With Love have about two inches worth, while a yarn such as Deborah Norville’s Everyday Soft yarn has about an inch to an inch and a half.
Gauge:
With I Love This Yarn and an I9/5.5mm Hook = 4″ x 4″
Chain 16, DC in the 4th stitch, and in each stitch across. (14 DC)
R2 – R8: Chain 2, turn. DC in the 2nd stitch, and each stitch across.
Fasten Off.
Abbreviations:
DC – Double Crochet
FPDC – Front Post Double Crochet
FPSC – Front Post Single Crochet
Pattern Notes:
Join to the first stitch.
Beginning chain 2 does not count as stitch unless otherwise stated.
The pattern is written to reflect my joining. The portion in brackets { } is only to be followed in the first round of the group, since the rounds are in groups of two. I suggest changing colors in each space, rather than the slip stitch join – I did so in the last slip stitch of the next round. If you decide to fasten off at the end of each color change, join new color in a space.
My suggestion to working in multiple colors though would be to carry up the yarn so you don’t end up with a bunch of ends to weave in. Check out my How to Carry Up Yarn in the Round the EyeLoveKnots Way post for my trick!
Pattern:
With I9/5.5mm hook and Green, Chain 4. Join to form a ring. Chain 2, work 12 DC into the ring. Join. (12 DC)
R2: Chain 2. 2 DC in the first DC, skip 2 DCs, (3 DC into the next DC, skip the next 2 DCs) 3x. Join to the first DC. Join. (4 Clusters)
R3: Slip stitch over into next space. Chain 2. 2 DC in the same space. (3 DC into the next space) 3x. Join.
R4 – 5: Slip stitch over into next space {and Join in Red}. Chain 2. 2 DC in the same space. (3 DC into the next space) 3x. Join.
*I suggest turning piece inside out and weaving in beginning tail, and tail of Red yarn (or your second color of choice).
R6 – 7: Slip stitch over into next space {and Join in Green}. Chain 2. 2 DC in the same space. (3 DC into the next space) 3x. Join.
R8 – 9: Slip stitch over into next space {and Join in Red}. Chain 2. 2 DC in the same space. (3 DC into the next space) 3x. Join.
R10 – 11: Slip stitch over into next space {and Join in Green}. Chain 2. 2 DC in the same space. (3 DC into the next space) 3x. Join.
R12 – 13: Slip stitch over into next space {and Join in Red}. Chain 2. 2 DC in the same space. (3 DC into the next space) 3x. Join.
R14 – 15: Slip stitch over into next space {and Join in Green}. Chain 2. 2 DC in the same space. (3 DC into the next space) 3x. Join.
R16 – 17: Slip stitch over into next space {and Join in Red}. Chain 2. 2 DC in the same space. (3 DC into the next space) 3x. Join.
R18 – 19: Slip stitch over into next space {and Join in Green}. Chain 2. 2 DC in the same space. (3 DC into the next space) 3x. Join.
R20 – 21: Slip stitch over into next space {and Join in Red}. Chain 2. 2 DC in the same space. (3 DC into the next space) 3x. Join.
R22 – 23: Slip stitch over into next space {and Join in Green}. Chain 2. 2 DC in the same space. (3 DC into the next space) 3x. Join.
R24 – 25: Slip stitch over into next space {and Join in Red}. Chain 2. 2 DC in the same space. (3 DC into the next space) 3x. Join.
R26 – 27: Slip stitch over into next space {and Join in Green}. Chain 2. 2 DC in the same space. (3 DC into the next space) 3x. Join.
R28 – 29: Slip stitch over into next space {and Join in Red}. Chain 2. 2 DC in the same space. (3 DC into the next space) 3x. Join.
R30: Slip stitch over into next space {and Join in Green}. Chain 2. 2 DC in the same space, 3 DC into the next space, chain 1, 3 DC into the same space, 3 DC into the next space, 3 DC into the next space, chain 1, 3 DC into the same space. Join. (6 clusters)
R31: Slip stitch over into next space. Chain 2. 2 DC in the same space. (3 DC into the next space) 5x. Join.
R32 – 33: Slip stitch over into next space {and Join in Red}. Chain 2. 2 DC in the same space. (3 DC into the next space) 5x. Join.
R34: Slip stitch over into next space {and Join in Green}. Chain 2. 2 DC in the same space, 3 DC into the next space, chain 1, 3 DC into the same space, 3 DC into the next space, 3 DC into the next space, 3 DC into the next space, chain 1, 3 DC into the same space, 3 DC into the next space. Join. (8 clusters)
R35: Slip stitch over into next space. Chain 2. 2 DC in the same space. (3 DC into the next space) 7x. Join.
R36 – 37: Slip stitch over into next space {and Join in Red}. Chain 2. 2 DC in the same space. (3 DC into the next space) 7x. Join.
R38: Slip stitch over into next space {and Join in Green}. Chain 2. 2 DC in the same space, (3 DC into the next space, chain 1, 3 DC into the same space, 3 DC into the next space) 3x, 3 DC into the next space, chain 1, 3 DC into the same space. Join. (12 clusters)
R39: Slip stitch over into next space. Chain 2. 2 DC in the same space. (3 DC into the next space) 11x. Join.
R40: Slip stitch over into next space {and Join in Red}. Chain 2. 2 DC in the same space, (3 DC into the next space, chain 1, 3 DC into the same space, 3 DC into the next space, 3 DC into the next space) 3x, 3 DC into the next space chain 1, 3 DC into the same space, 3 DC into the next space. Join. (16 clusters)
R41: Slip stitch over into next space. Chain 2. 2 DC in the same space. (3 DC into the next space) 15x. Join.
R42: Slip stitch over into next space {and Join in Green}. Chain 2. 2 DC in the same space, (3 DC into the next space, chain 1, 3 DC into the same space, 3 DC into the next space, 3 DC into the next space, 3 DC into the next space) 3x, 3 DC into the next space chain 1, 3 DC into the same space, 3 DC into the next space, 3 DC into the next space. Join. (20 clusters)
R43: Slip stitch over into next space. Chain 2. 2 DC in the same space. (3 DC into the next space) 19x. Join.
R44: Slip stitch over into next space {and Join in Red}. Chain 2. 2 DC in the same space, (3 DC into the next space, chain 1, 3 DC into the same space, 3 DC into the next space, 3 DC into the next space, 3 DC into the next space, 3 DC into the next space) 3x, 3 DC into the next space chain 1, 3 DC into the same space, 3 DC into the next space, 3 DC into the next space, 3 DC into the next space. Join. (24 clusters)
R45: Slip stitch over into next space. Chain 2. 2 DC in the same space. (3 DC into the next space) 23x. Join.
R46 – 47: Slip stitch over into next space {and Join in Green}. Chain 2. 2 DC in the same space. (3 DC into the next space) 23x. Join.
R48 – 50: Slip stitch over into next space {and Join in Red}. Chain 2. 2 DC in the same space. (3 DC into the next space) 23x. Join.
R51: With White, Chain 2 (counts as a DC). DC into each DC around. Join and switch to H8/5mm hook. (72 DC)
R52 – 54: With H8/5mm hook, Chain 2 (will count as a BPDC). FPDC around the next post, (BPDC around the next post, FPDC around the next post) around. Join. (72 DC)
R55 : Chain 1. (FPSC around next FPDC, SC into the next stitch) around. Join. (72 SC)
Fasten Off, and Weave in Remaining Ends.
Embellishments:
Originally, I wasn’t going to add a pom pom because I don’t like not being able to throw my hat in the wash, but when I put it on I knew it needed it to be complete. I simply wrapped the yarn around four of my fingers 100 times and then completed the pom pom process, trimmed and sewed onto the end of the hat. Feel free to leave off, hot glue on a store bought pom pom or add a fun tassel.
Please feel free to make and sell your own Granny Square Elf Hat using this pattern, but please DO NOT claim this pattern as your own nor should you sell my pattern, and DO NOT re-publish my photos as your own. DO NOT copy and paste my pattern anywhere, link to it instead.
*If you would like a PDF version of this post, you may get one through my EyeLoveKnots Etsy Shop or EyeLoveKnots Craftsy Shop for a small fee. This fee is to compensate for the view/s lost once you no longer need to return to the blog for the information, as you will have your own copy. Plus! It helps fund supplies for new projects to share with you!
Shop EyeLoveKnots Etsy – Adult Granny Square Elf Hat;
or EyeLoveKnots LoveCrafts – Adult Granny Square Elf Hat.
You May Also Like…
SO cute. I think I'll make a bunch of these for NEXT Christmas. All my little grandkids would look cute in these. Thanks so much!!!!
Love the excitement! Thanks, Bev! I would love to see you finished hats and the different color combinations.
Thank you
Your welcome! Enjoy.