EyeLoveKnots

  • Home
  • Crochet
    • Free Crochet Patterns
    • Crochet Pattern Reviews
    • Crochet 101
  • Knitting
  • Crafting
    • Plastic Canvas DIYs
    • Jewelry DIYs
    • Sewing
    • Cross Stitching
    • Upcycling
    • Other DIYs
  • Seasonal DIYs
    • 4th of July DIYs
    • Back to School DIYs
    • Christmas DIYs
    • Easter DIYs
    • Fall DIYs
    • Halloween DIYs
    • Spring DIYs
    • St. Patrick’s Day DIYs
    • Summer DIYs
    • Thanksgiving DIYs
  • Holidays/Seasonal
    • Valentine’s Day
    • St. Patrick’s Day
    • Spring
    • Easter
    • Summer
    • 4th of July
    • Fall
    • Halloween
    • Thanksgiving
    • Christmas
    • Winter
  • Home DIY & Decor
    • In the Bathroom
    • In the Bedroom
    • In the Dining Room
    • In the Kitchen
    • In the Living Room
    • Kids Room
  • Fashion
    • Nail Art
  • Recipes
  • Living the Dream
  • Fun Finds Around the Web
  • Linking Up To…
  • Latest News & Links
  • Privacy and Sharing Policies
  • About Our GREAT Team!
  • Latest News & Links

Women’s Basic Beanie – Free Crochet Pattern & Step-by-Step Photo Tutorial

January 21, 2017

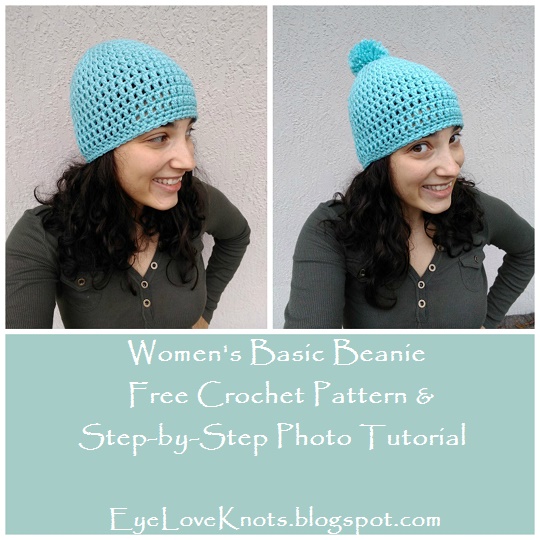
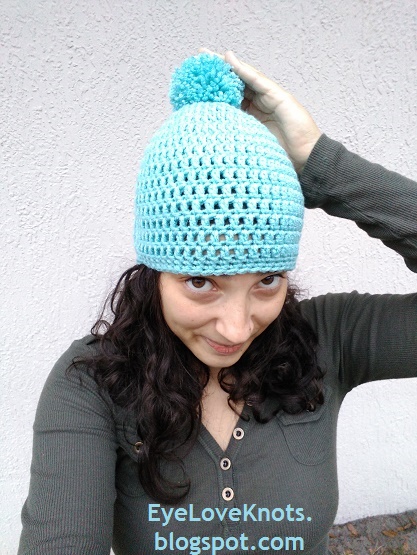
I have gotten so many requests from friends to show them how to make a beanie, and each time, I write everything down really detailed for them, but sometimes it’s better to see it being done. Now, anyone can work up their own beanie following along with this tutorial 🙂

This tutorial has been an idea in the works for a while now, but a couple weeks ago, I lost my favorite crochet hook (my ergonomic I9/5.5mm) so I held off. I ended up going out and buying one from JoAnn’s, and then… Poof! Lost that one too not even haven taken it out of the package! Yesterday I was determined to work on this though, so I decided to go to JoAnn’s again and buy a new skein of yarn to start with, and another hook. It was a gloomy day aaaalllll day so the lighting wasn’t that great, but finally it’s all done!

If you would like to see any other patterns done step-by-step, or have any other size requests, drop me a line 🙂


Want to make a Basic Beanie in a different size? I have a Basic Beanie Free Crochet Pattern containing Newborn through Adult Large sizes.

This pattern is written assuming you know how to do the basic techniques and stitches of making a slip knot, chaining, joining, working a single crochet and double crochet, and fastening off. I do have tutorials coming soon for these, but for now, feel free to send me an email or leave a comment below with any questions.

*Please be respectful of my work – do not copy and paste it anywhere, or pin or share any photo of my progress. Link to this post so others can come here and learn how to make their own beanie.

Materials:
     – 185 yards of Worsted Weight Yarn – I used about half a skein (or a little less) of Red Heart’s With Love in Iced Aqua
     – I9/5.5mm Crochet Hook
     – #18 Tapestry Needle for Weaving in Ends

Material Notes:
     I’ve also had the same results with Hobby Lobby’s I Love This Yarn, and JoAnn’s Sincerely. I also enjoy using Deborah Norville’s Everyday Soft, but have to tweek things a little as I find the yarn to be a tad thinner.

Time Spent:
     I have my basic women’s beanies done in about an hour and a half.

Measurements:
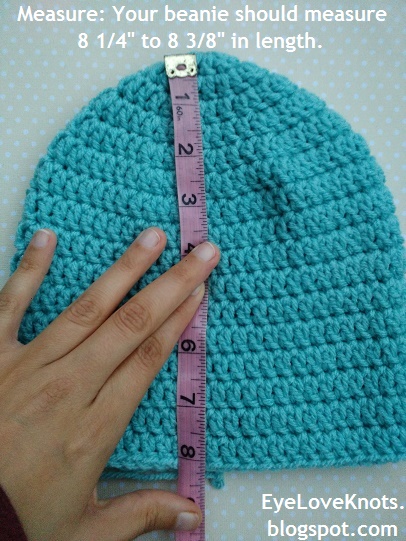
     This hat will have a crown of about 6.25″ in diameter, a circumference of nearly 19.75″ to fit a head size of 20-22″, and fall 7.75″ – 8.5″ in length – all to fit the average teen and woman’s head.

*If you are concerned with the size (or want to make a different size), take your tape measure out and measure around your head just above your eyebrows. The distance around is the circumference. If it does not fall in the range of 20-22″ (average teen/woman’s head), you will need to use this equation to figure out what size diameter you will need:

Your Circumference / 3.14 (pi) = diameter


Gauge:
With With Love Yarn and an I9/5.5mm Hook = 4″ x 4″
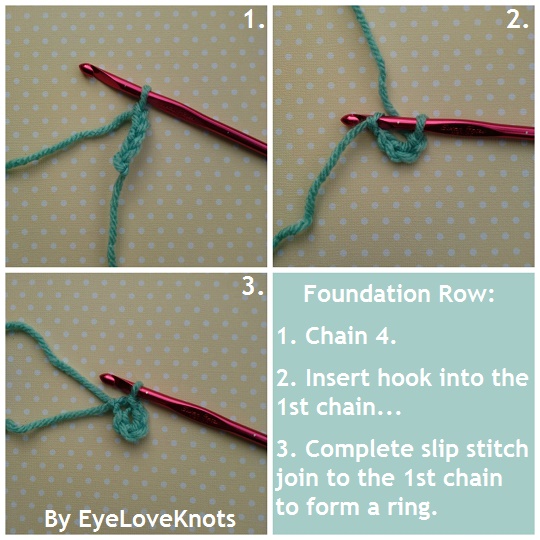
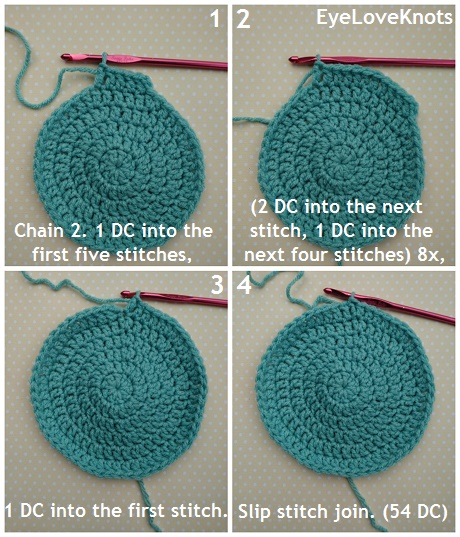
     Chain 16, DC in the 4th stitch, and in each stitch across. (14 DC)
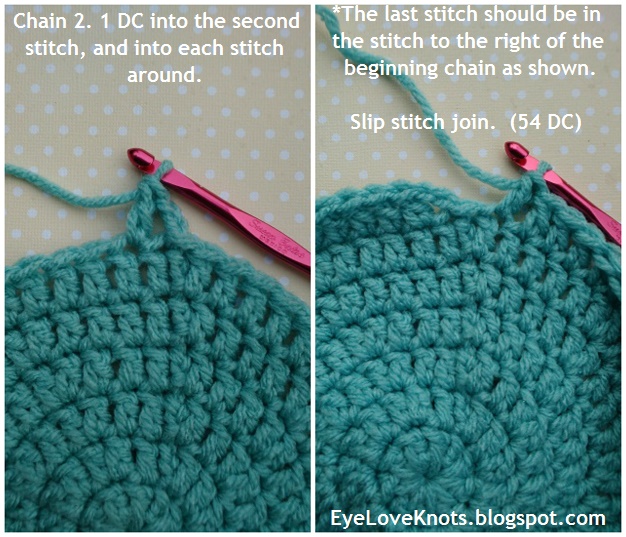
     R2 – R8: Chain 2, turn. DC in the 2nd stitch, and each stitch across.
     Fasten Off.

Abbreviations:
     SC – Single Crochet
          To SC: Insert hook into the stitch, yarn over and pull through (two loops on hook), yarn over and pull through both loops.

     DC – Double Crochet
          To DC: Yarn over. Insert hook into the stitch, yarn over and pull through (three loops on hook), yarn over and pull through two loops, yarn over and pull through last two loops.

Pattern Notes:
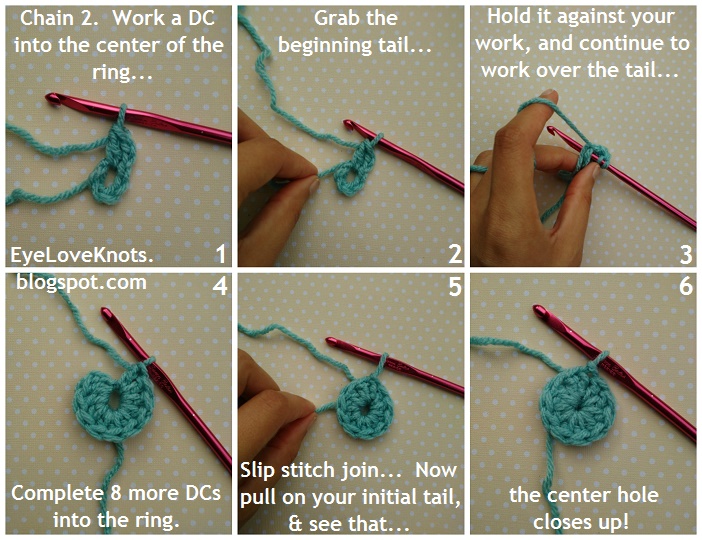
     As I’ve said before, I work my crown and body differently than most to help keep my seam straight, and it will be written and photographed as such.

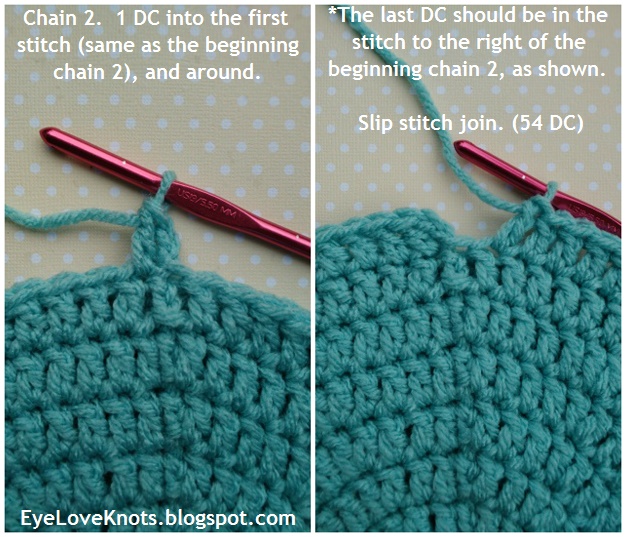
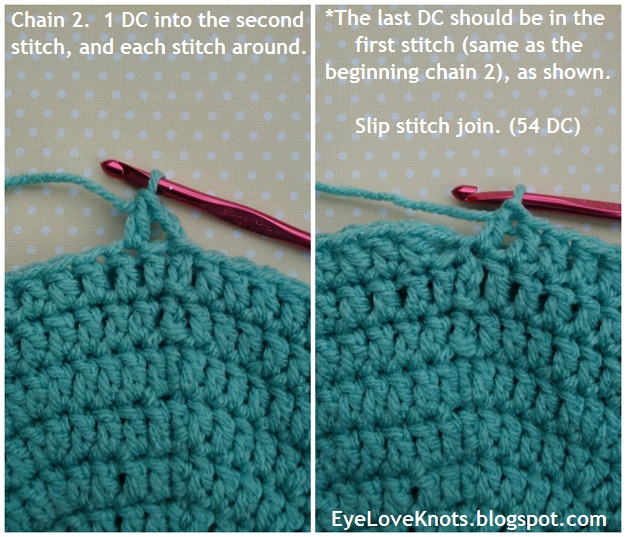
In the crown, the beginning chain 2 does not count as a stitch, but in the body, the chain 2 does count.

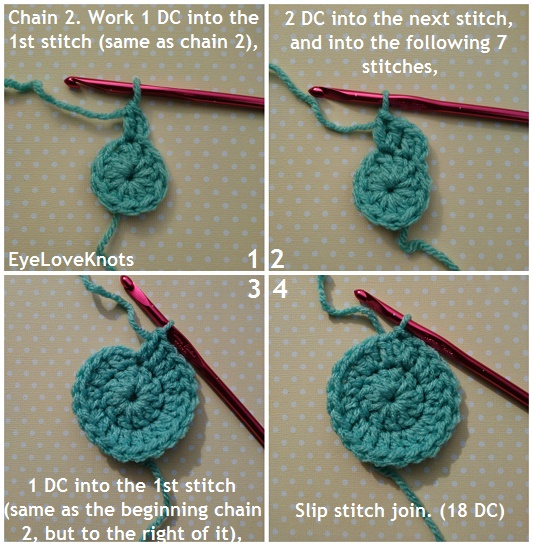
Join to the first stitch, not the beginning chain 2.

I finished my hat with an invisible join (though pattern states to slip stitch join). To see a photo tutorial of this technique, see the Pattern Notes section of my Newborn Twin Chunky Hat post.

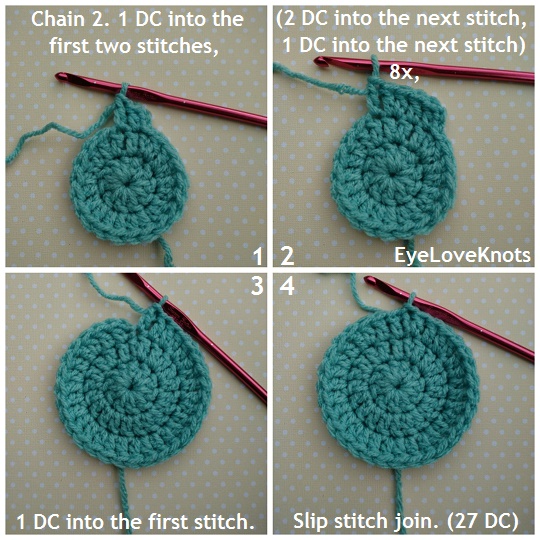
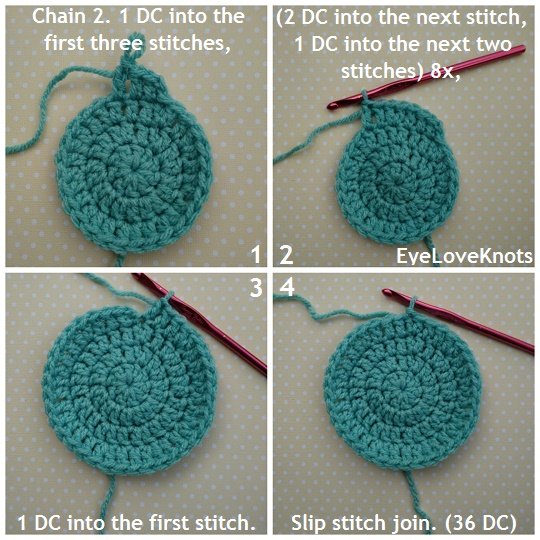
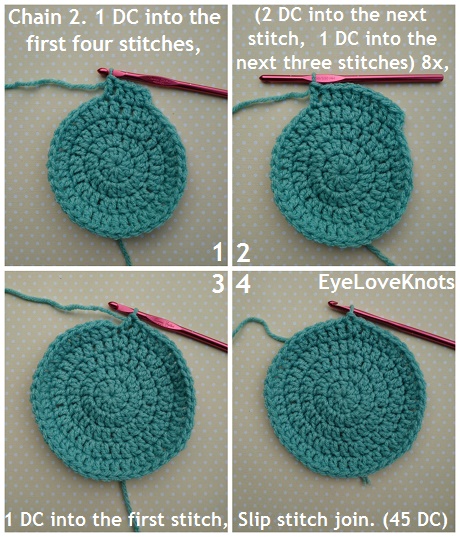
Numbers on photos correspond to notes provided. You may click any photo to view larger.


Pattern:

Chain 4. Join to form a ring. 
R1: Chain 2. 9 DC into the ring. Join. (9 DC)
R2: Chain 2. Work 1 DC into the first stitch, 2 DC in each of the next 8 DCs, and 1 DC into the last stitch. Join. (18 DC)
R3: Chain 2. Work 1 DC into the first two stitches, (2 DC into the next stitch, 1 DC into the next stitch) 8x, 1 DC into the last stitch. Join. (27 DC)
Take this moment to measure the diameter (distance across center).
 
We need a diameter of either 3.25″ (3 1/4″) or 3.38″ (3 3/8″)
to achieve the correct circumference.
 
I have found using a I9/5.5mm hook, and working beanies in this double crochet pattern, that each of my rounds increases by 1″, so it’s easy to see at this point if I am on the right path or not. If you are not on the right point, and have met my gauge, you may need to take your work out and either add a stitch to your beginning round, or take out a stitch (depending on what you are currently measuring).
R4: Chain 2. Work 1 DC into the first three stitches, (2 DC into the next stitch, 1 DC into each of the next 2 stitches) 8x, 1 DC into the last stitch. Join. (36 DC)
R5: Chain 2. Work 1 DC into the first four stitches, (2 DC into the next stitch, 1 DC into each of the next 3 stitches) 8x, 1 DC into the last stitch. Join. (45 DC)
R6: Chain 2. Work 1 DC into the first five stitches, (2 DC into the next stitch, 1 DC into each of the next 4 stitches) 8x, 1 DC into the last stitch. Join. (54 DC)
Let’s measure our diameter again! 
 
We need a diameter of either 6.25″ (6 1/4″) or 6.38″ (6 3/8″)
to achieve the correct circumference.
 
Refer back to the last gauge check if you are not meeting the correct diameter.
 
At this point, we have met our needed diameter, so we no longer need to increase (gain stitches). We’ll continue on with the pattern to work the body of the hat. Make sure you keep count! Each of the remaining rounds should have 54 stitches each.
R7: Chain 2. Work 1 DC into the second DC, and each DC around. Join. (54 DC)
R8: Chain 2. Work 1 DC into the first DC, and each DC around. Join. (54 DC)
R9: Chain 2. Work 1 DC into the second DC, and each DC around. Join. (54 DC)
R10 – 16: Repeat Rounds 8 and 9, ending with a Round 8.
Join final round (#16) to the top of the beginning chain two.
 
*At this point, your beanie should measure 8.25″ (8 1/4″) to 8.38″ (8 3/8″) in length, from top of crown to bottom of last row.
R17 – 18: Chain 1. 1 SC into the first stitch, & each stitch around. Join. (54 SC)
 
*If your beanie measures 8.25″ long like mine, work the two rows of single crochet as I have done, but if your beanie measures 8.38″ in length, you will only need one row of single crochet to achieve a finished length of 8.5″ (8 1/2″).
Fasten off, weave in your ends, then your new hat is ready to wear!
 
Want to go a step further by adding a pom pom to the top? Follow along below to make your own.
1. Cut a 12″ piece of yarn (to later be used to wrap yarn ball and sew on pom pom). Set aside.
 
2. Take yarn from skein, place across palm leaving a 3-4″ yarn tail.
 
3. Wrap yarn around palm/fingers 100 times. Try it keep it consistent in size – I open my fingers a little to do so. (If you want a bigger pom pom, just wrap more times).
 
4. Take 12″ piece and wrap around center of yarn ball – I use my tapestry needle to do this by threading it, and then just inserting it between my middle and ring finger making sure not to catch wrapped yarn. Be care if using your tapestry needle not to get yourself!
From here, I tie the yarn around my yarn ball and then pull off my fingers.
 
5. Tie really tight (might need an extra set of hands to help), and square knot three times.
 
6. Grab the center two strands (part of the 12″ piece), and begin cutting through the loops on both side of the yarn ball. Make sure NOT to cut the two strands of the 12″ piece because you will need these strands to sew the pom pom on.
 
7. Continue giving your pom pom a haircut to shape it.
 
Now thread each of your strands (one at a time), and sew your pom pom on!
Wow! That was a little long to follow, but you survived and now you have a cute new warm beanie to wear during the cooler seasons.
 

Please feel free to make and sell your own Basic Beanie using this pattern, but please DO NOT claim this pattern as your own nor should you sell my pattern, and DO NOT re-publish my photos as your own. DO NOT copy and paste my pattern anywhere, link to it instead.

*If you would like a PDF version of this post, you may get one through my EyeLoveKnots Etsy Shop or EyeLoveKnots Craftsy Shop for a small fee. This fee is to compensate for the view/s lost once you no longer need to return to the blog for the information, as you will have your own copy. Plus! It helps fund supplies for new projects to share with you!
Shop EyeLoveKnots Etsy – Women’s Basic Beanie; 
or EyeLoveKnots Craftsy – Women’s Basic Beanie.

With so many size, yarn type and color options, I would love to see them! Please share your photos on my EyeLoveKnots Facebook page, or join the EyeLoveKnots Crafting Community to share your creations, and see what other’s are up to!

Share your version of this beanie on Ravelry – Women’s Basic Beanie. Check out the EyeLoveKnots Ravelry page to keep track of all your EyeLoveKnots favorites in your que, and share your WIPS and finished projects!

Don’t miss out on new crochet patterns, reviews, jewelry tutorials and more! Subscribe to EyeLoveKnots by using the box on the right side toolbar, or follow me via Bloglovin


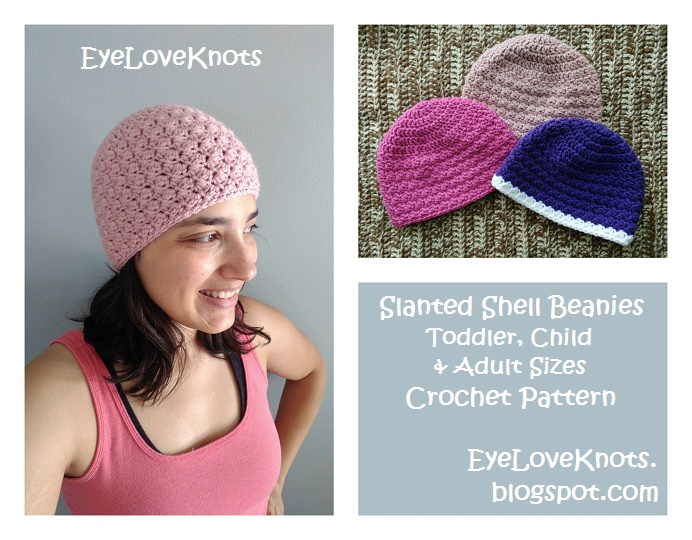
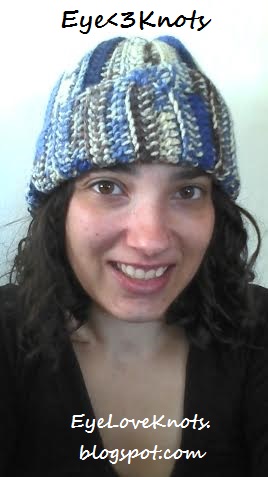
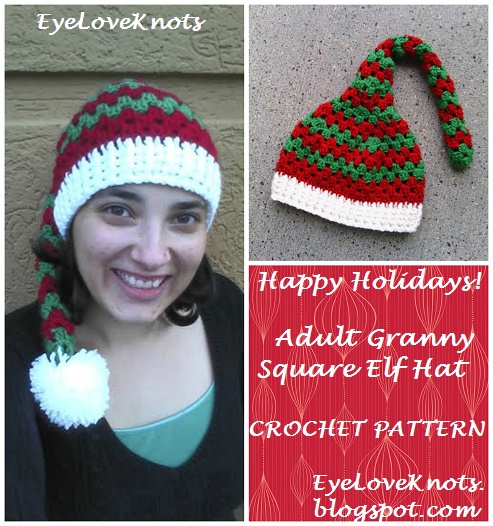
You May Also Like These Other Women’s Hats…

Slanted Shell Beanies – EyeLoveKnots Free Crochet Pattern
Adult Ribbing Slouch Hat – EyeLoveKnots Free Crochet Pattern 
Adult Granny Square Elf Hat – EyeLoveKnots Free Crochet Pattern
The Sherwood Forest Beret – EyeLoveKnots Free Crochet Pattern

Filed Under: Free Crochet Patterns, Uncategorized Tagged With: 5.5/I9 Hook, Adult, Beginning Crochet, Free Crochet Pattern, Hat/Beanie, Joann, One Skein, Photo Tutorial, Pom Pom, Red Heart With Love, Teen/Woman Accessories, Worsted Weight Yarn

❮ PREVIOUS POST

January 2017 Granny-Spiration Challenge – Last Few Days to Share & Enter

NEXT POST ❯

Lucky Charms Hat & Cowl – Crochet Pattern Review – ACCROchet

Comments

  1. Holly Carter says

    January 21, 2017 at 5:38 pm

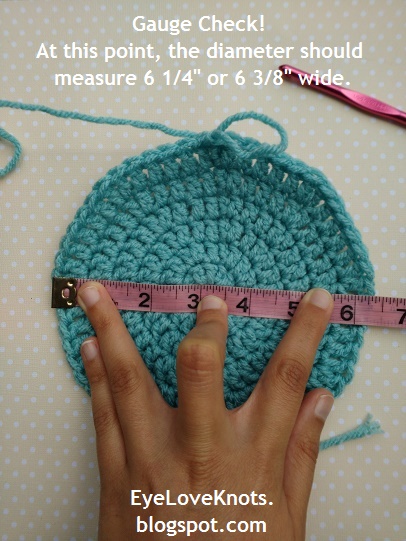
    I think you got the measurements wrong on the rows 17&18. It should be the 8 something inches not 6 something, shouldn't it?

    Reply
    • knots1prime says

      January 21, 2017 at 5:40 pm

      Oops! Thanks 🙂 Copy and paste from other diameter check.

      Reply
  2. Holly Carter says

    January 21, 2017 at 6:08 pm

    No problem! It's very cute. I'm gonna have to try it. I always have a problem with my seams.

    Reply
  3. Julie D says

    January 24, 2017 at 1:42 am

    What an awesome tutorial! This is perfect for me to send newbie crocheters to. Or just when I need a refresher; I crochet so infrequently these days that I usually need to be reminded of how to do it! Thanks for posting!

    Reply

Leave a Reply Cancel reply

Your email address will not be published. Required fields are marked *

This site uses Akismet to reduce spam. Learn how your comment data is processed.

Welcome!

Welcome!

Hey! I'm Alexandra, the blogger and creator behind EyeLoveKnots and On Rockwood Lane! My passion is being creative. My favorite thing to do is crochet, and you will almost always find me having a cup of coffee and working on a new crochet project, but when I'm not doing that, you might find me out at a local park rollerblading, baking some fresh cookies, picking veggies in the garden or re-decorating for a new season or holiday. My two cats are great supervisors for all my adventures (minus the being outside because they think it's too hot in Florida to be anywhere but inside), and make sure I take plenty of breaks.

Meet the Team!

Meet the Team!

On the left, Abby is the maker behind A Stitch Shy of Normal, and on the right Jessica is the maker behind Nice and Knotty and Candace is the maker behind TandC Crafters.

Together, they help me bring awesome crochet projects to you! Click the image to learn more about them, and get their Instagram links, where they are constantly sharing tons of crochet inspiration.

Don’t Miss Out

Crochet! Magazine Spring 2023

Crochet! Magazine Spring 2023

(Affiliate Link) Click this image to get this issue now. These 22 designs are the perfect way to welcome in Spring with easy to wear layers, sweet styles amplified with striking stitch patterns, and some fun whimsical projects too.

Crochet World April 2023

Crochet World April 2023

(Affiliate Link) Click this image to get this issue now. These 21 designs are the perfect way to welcome in Spring with fun pops of color, sweet crochet thread projects, and fresh takes on the classic granny stitch pattern.

Gnome Caddy Pattern

Gnome Caddy Pattern

(Affiliate Link) Click this image to get a copy of this pattern! This adorable little Spring Gnome Caddy has a place for all of your crochet supplies. It's worked in a lightweight #3 yarn, but work in a worsted weight #4 yarn for even more space!

Archives

Copyright © 2023 EyeLoveKnots · Custom site by Moonsteam Design