EyeLoveKnots

  • Home
  • Crochet
    • Free Crochet Patterns
    • Crochet Pattern Reviews
    • Crochet 101
  • Knitting
  • Crafting
    • Plastic Canvas DIYs
    • Jewelry DIYs
    • Sewing
    • Cross Stitching
    • Upcycling
    • Other DIYs
  • Seasonal DIYs
    • 4th of July DIYs
    • Back to School DIYs
    • Christmas DIYs
    • Easter DIYs
    • Fall DIYs
    • Halloween DIYs
    • Spring DIYs
    • St. Patrick’s Day DIYs
    • Summer DIYs
    • Thanksgiving DIYs
  • Holidays/Seasonal
    • Valentine’s Day
    • St. Patrick’s Day
    • Spring
    • Easter
    • Summer
    • 4th of July
    • Fall
    • Halloween
    • Thanksgiving
    • Christmas
    • Winter
  • Home DIY & Decor
    • In the Bathroom
    • In the Bedroom
    • In the Dining Room
    • In the Kitchen
    • In the Living Room
    • Kids Room
  • Fashion
    • Nail Art
  • Recipes
  • Living the Dream
  • Fun Finds Around the Web
  • Linking Up To…
  • Latest News & Links
  • Privacy and Sharing Policies
  • About Our GREAT Team!
  • Latest News & Links

Chunky Cabled Capelet – Free Crochet Pattern

January 6, 2018

You may remember me mentioning this feature back in October of 2016 when I first told you this design was featured in the Happily Hooked Magazine Issue #30 – You can read that post here, and see some of my favorites from the issue – and now I can finally share it with you here! Enjoy 🙂
 
Two things inspired the designing of this capelet:
  1. I worked the Cowl Shoulder Cozy back in January of last year. This design was by Salena Baca for Red Heart Yarns, and I was in love with the design and how wonderful it was to wear around.
  2. This design was only my second project worked with cables, my first being the Cable Twist Hat that I shared back in April of last year. Up until I tried this hat, I was super intimidated by crochet cables. If you are like I was – don’t be! It is so easy to work, and create an amazing look and texture. I knew once I completed my Cable Twist Hat that I wanted to design a cabled capelet and so I set out to do so!


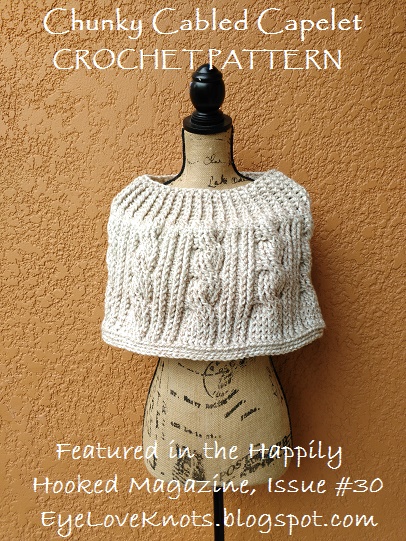
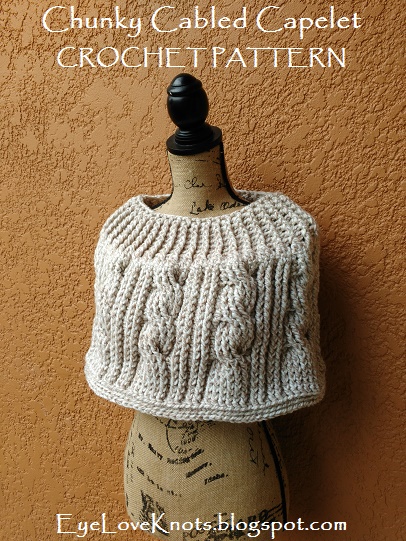
Upon completion of my design, I found a submission call for the Happily Hooked Magazine to the theme of Rustic Autumn and so I sent it in, and it was chosen!

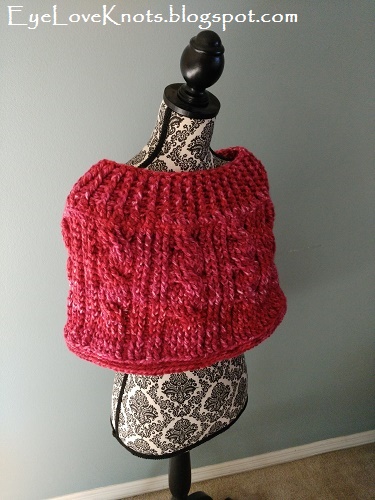
Originally I worked my design in the redish-pinkish colorway you see to the left, since that is what I had on hand, but then worked the Oatmeal colorway after chosen. Lighter and solid colors will show the cable design the best (and are easier to photograph). This being said, you can find this design in the Happily Hooked Magazine for the Rustic Autumn, Issue #30, which features some gorgeous garments, accessories and home decor.

Materials:
    – 545 – 763 yards of Chunky/Bulky Weight Yarn – I used five skeins each of Deborah Norville’s Serenity Chunky Yarn in the Oatmeal colorway. The L/XL size will require 7 skeins.
    – L11/8mm Crochet Hook
    – #18 Tapestry Needle for Weaving in Ends
Material Notes:
    Yarn Alternatives: Red Heart’s Medley Yarn, Hobby Lobby’s I Love This Chunky Yarn, Michaels Loops & Threads Charisma Yarn, Paton’s Classic Wool Bulky
Time Spent:
    I worked on this piece for several days, a little bit at a time. It took me about 3 hours, 45 minutes to work up the S/M size.
Measurements:
    In Circumference: 44.5”, 54.5”; Length: 13”
Gauge:
7 DC by 4 Rows = 3”
 
Abbreviations:
    FDC – Foundation Double Crochet – See Special Stitches
    SC – Single Crochet
    HDC – Half Double Crochet
    DC – Double Crochet
    FPDC – Front Post Double Crochet
    BPDC – Back Post Double Crochet
    Cr6F – Cable Over 6 Stitches – See Special Stitches
    yo – Yarn Over
    BLO – Back Loop Only
    DC2tog – Double Crochet Decrease Over Two Stitches
 
Special Stitches:
Foundation stitches are worked sideways and include the foundation chain and respective stitch. This is a great technique to use is: 1.) You are working something in the round that needs some added flexibility within the beginning chain, such as a hat worked bottom up, wrist warmers, shirts, pants, etc; 2.) You are working a project like a scarf, but don’t know how many stitches you need. You can work the foundation stitch up until it’s long enough.
        To FDC: Chain 3 (counts as a stitch here). Yo, insert hook into the first chain, yo, pull through (3 loops on hook), yo, pull through first loop (to create foundation chain), yo, pull through two loops (2 loops on hook), yo, pull through remaining two loops. First chain and DC created. Looking at the stitch in your hand, you should see the top of the DC to the right, and parallel on the left side, it should look like the opposite side of the beginning foundation chain. You will be working in these stitches on the left. To create the next stitch and each stitch after, yo, insert hook under both loops of the foundation chain (left side), yo, pull through (3 loops on hook), yo, pull through first loop (to create foundation chain), yo, pull through two loops (2 loops on hook), yo, pull through remaining two loops.         
Cable Stitches are fun, but can also be intimidating. No worries – it’s easy! My tips for working the row immediately following the Cable row is to go slow, pull the stitches apart to see them clearly and make sure you are working into the posts, and not the stitches. It may look wonky at first, but just keep working through the series up to the next cable row and it will all fall into place. Keep in mind that the rows following the Cable row are all worked regularly around, not in the order that you worked the Cable row.
You will work into the posts of the previous row to create the cable using a FPDC.
To Cr6F: Skip the next three posts, FPDC around the next three posts. Working in front of the stitches just created, FPDC around each of the skipped three posts starting with the one furthest right.
Pattern Notes:
    Joining will be to the first stitch of each row, not the beginning chain, unless otherwise stated.
Beginning chain 1 counts towards final stitch count, unless otherwise stated.
Instructions for S/M size given, with L/XL size in parenthesis.
Brackets and Parenthesis both show repeats.
You can easily work this capelet up longer by working more repeats, or wider by using a larger crochet hook or adding 13 more chains to beginning.
Pattern:
    Chain 3. FDC 116 (142). Join. (117, 143 DCs)
R2:  Chain 2. (FPDC around the next 2 posts, HDC into the next stitch) 2x, FPDC around the next 6 posts, (HDC into the next stitch, FPDC around the next 2) 2x, [HDC into the next stitch, FPDC around the next 6 posts, (HDC into the next stitch, FPDC around the next 2 posts) 2x] 7x (9x), HDC into the next stitch, FPDC around the last 6 posts. Join. (117, 143 stitches)
R3, Cable Foundation:  Chain 2 (doesn’t count as a stitch). [(FPDC around the next 2 posts, HDC into the next stitch) 2x, Cr6F over the next 6 posts, HDC into the next stitch)] 8x (10x), (FPDC around the next 2 posts, HDC into the next stitch) 2x, Cr6F over the next 6 posts, HDC into the 1st stitch. Join. (117, 143 stitches)
R4 – 7: Chain 2 (doesn’t count as a stitch). [(FPDC around the next 2 posts, HDC into the next stitch) 2x, FPDC around the next 6 posts, HDC into the next stitch] 8x (10x), (FPDC around the next 2 posts, HDC into the next stitch) 2x, FPDC around the next 6 posts, HDC into the 1st stitch. Join. (117, 143 stitches)
R8 – 17: Repeat Rounds 3 – 7, 2x.
R18 – 19: Repeat Round 4, 2x.
R20 – 21: Chain 1. Working into the BLO, SC into the 1st stitch, and each stitch around. Join. (117, 143 SCs)
Fasten Off. I weaved in all of my ends up to this point right now.
Ribbing: Attach yarn to the opposite side of the foundation chain.
S/M R1: Chain 2. DC2tog, (DC into the next stitch, DC2tog) 38x. Join. (78 DCs)
L/XL R1: Chain 2. DC into the 1st stitch, (DC into the next stitch, DC2tog) 47x. Join. (96 DCs)
R2: Chain 2. FPDC around the next post (which is the decrease from Round 1), (BPDC around the next post, FPDC around the next post) 38x (47x). Join. (78, 96 stitches)
R3 -8: Chain 2. FPDC around the next post, (BPDC around the next post, FPDC around the next post) 38x (47x). Join. (78, 96 stitches)
    
Fasten Off and Weave in Remaining Ends. I worked an invisible join. You can see a photo tutorial of this technique in my Newborn Twin Chunky Beanie post.

Please feel free to make and sell your own Chunky Cabled Capelet using this pattern, but please DO NOT claim this pattern as your own nor should you sell my pattern, and DO NOT re-publish my photos as your own. DO NOT copy and paste my pattern anywhere, link to it instead.

*If you would like a PDF version of this post, you may get one through my EyeLoveKnots Etsy Shop or EyeLoveKnots Craftsy Shop for a small fee. This fee is to compensate for the view/s lost once you no longer need to return to the blog for the information, as you will have your own copy. Plus! It helps fund supplies for new projects to share with you!
Shop EyeLoveKnots Etsy – Chunky Cabled Capelet; 
or EyeLoveKnots Craftsy – Chunky Cabled Capelet.

With so many size, yarn type and color options, I would love to see them! Please share your photos on my EyeLoveKnots Facebook page, or join the EyeLoveKnots Crafting Community to share your creations, and see what other’s are up to!

Share your version of this capelet on Ravelry – Chunky Cabled Capelet. Check out the EyeLoveKnots Ravelry page to keep track of all your EyeLoveKnots favorites in your que, and share your WIPS and finished projects!

Don’t miss out on new crochet patterns, reviews, jewelry tutorials and more! Subscribe to EyeLoveKnots by using the box on the right side toolbar, or follow me via Bloglovin! You can also find me sharing on the EyeLoveKnots Facebook page, and @EyeLoveKnots on Twitter!

Filed Under: Free Crochet Patterns, Uncategorized Tagged With: 8/L11 Hook, Autumn, Bulky/Chunky, Cables, Capelet, Free Crochet Pattern, Happily Hooked Magazine, Poncho, Ribbing, Rustic, Serenity Chunky, Shoulder Wrap, Teen/Woman Accessories, Winter, Women's Fall Fashion

❮ PREVIOUS POST

Oreo Peppermint Crunch Cookies – Recipe Review – Inside BruCrew Life

NEXT POST ❯

Gradually Cowl – Crochet Pattern Review – ACCROchet

Comments

  1. Laura Waterfield says

    July 16, 2021 at 6:12 pm

    Thank you. I love this.

    Reply
    • Alexandra says

      October 5, 2021 at 3:26 pm

      So happy to hear 🙂

      Reply

Leave a Reply Cancel reply

Your email address will not be published. Required fields are marked *

This site uses Akismet to reduce spam. Learn how your comment data is processed.

Welcome!

Welcome!

Hey! I'm Alexandra, the blogger and creator behind EyeLoveKnots and On Rockwood Lane! My passion is being creative. My favorite thing to do is crochet, and you will almost always find me having a cup of coffee and working on a new crochet project, but when I'm not doing that, you might find me out at a local park rollerblading, baking some fresh cookies, picking veggies in the garden or re-decorating for a new season or holiday. My two cats are great supervisors for all my adventures (minus the being outside because they think it's too hot in Florida to be anywhere but inside), and make sure I take plenty of breaks.

Meet the Team!

Meet the Team!

On the left, Abby is the maker behind A Stitch Shy of Normal, and on the right Jessica is the maker behind Nice and Knotty and Candace is the maker behind TandC Crafters.

Together, they help me bring awesome crochet projects to you! Click the image to learn more about them, and get their Instagram links, where they are constantly sharing tons of crochet inspiration.

Don’t Miss Out

Crochet! Magazine Spring 2023

Crochet! Magazine Spring 2023

(Affiliate Link) Click this image to get this issue now. These 22 designs are the perfect way to welcome in Spring with easy to wear layers, sweet styles amplified with striking stitch patterns, and some fun whimsical projects too.

Crochet World April 2023

Crochet World April 2023

(Affiliate Link) Click this image to get this issue now. These 21 designs are the perfect way to welcome in Spring with fun pops of color, sweet crochet thread projects, and fresh takes on the classic granny stitch pattern.

Gnome Caddy Pattern

Gnome Caddy Pattern

(Affiliate Link) Click this image to get a copy of this pattern! This adorable little Spring Gnome Caddy has a place for all of your crochet supplies. It's worked in a lightweight #3 yarn, but work in a worsted weight #4 yarn for even more space!

Archives

Copyright © 2023 EyeLoveKnots · Custom site by Moonsteam Design