This is a free crochet pattern for how to crochet a farmhouse inspired Valentine’s heart quilt using solid granny squares.
This post contains affiliate links for LoveCrafts. If you make a purchase by clicking on them, I make a small commission at no extra cost to you. Thanks for your support!
I have had this Heart Pixel Art Square on my mind for a while, so when I started brainstorming what I wanted to share in the month of January, and had Valentine’s on my brain, I knew it was the perfect time to make this square happen.
Though a little time consuming, pixel art projects are so fun! I think I like most that it kind of resembles a quilt, but also that it uses my favorite join-as-you method – the Pull Loop Through Method! Makes for an easy join, and no worrying about how to assemble later – can’t say I enjoy sewing squares together. BUT! If you do, you could always make the squares separately, and then use the mattress stitch (or your preferred technique) to join them later.
What can we do with this square? It’s the perfect size for a 16″ throw pillow (see my Acorn Throw Pillow Free Crochet Pattern to see how to do this), use it as an afghan square, and build a blanket, add more squares all around to make a larger blanket, use it as a doily, attach it to a dowel rod, and hang it, use it as the star of the show for a sweater/top, even changing up the weight of yarn used will open doors!
If you would like a PDF version of this post, you may get one through either my EyeLoveKnots Etsy Shop, Ravelry or LoveCrafts Shop for a small fee. This fee is to compensate for the views lost when you no longer need to return to the blog to for the information, as you will have your own copy. Plus! It helps fund supplies for new projects to share with you!
Shop EyeLoveKnots Etsy: Heart Pixel Art Square.
Shop EyeLoveKnots LoveCrafts: Heart Pixel Art Square.
Share your version of this project on Ravelry – Heart Pixel Art Square
Save this to your Favorites – AllFreeCrochet, FaveCrafts, Crochet Pattern Bonanza, AllFreeHolidayCrafts.
Materials:
- 640 Yards of Lightweight #3 Yarn – I used Baby Bee Sweet Delight Yarn in Cloudy [Gray] (210 Yards), and I Love This Sport Weight Yarn in Red (225 Yards), and Cranberry (205 Yards)
- G6/4mm Crochet Hook
- Tapestry Needle
Material Notes:
Yarn Alternative: Berroco’s Vintage DK, Stylecraft Special DK (this one has similar colors to those used, I’m thinking Matador, Raspberry and Silver)
If the finished size isn’t essential to you, you can use any weight yarn for this project with respective crochet hook.
Time Spent:
This square took me about 7 hours to complete – I worked about a row a day, including the weaving for that row.
Measurements:
With border, the heart square measures 16″.
Gauge:
First square measures 2″.
Gauge is only essential if your finished project size is. If it’s not, the most important thing is consistent sized squares.
Abbreviations:
- DC – Double Crochet
- SC – Single Crochet
- sc2tog – Single Crochet Two Stitches Together (decrease)
- PLT – Pull Loop Through (Join)
- To PLT: After DC, pull up a loop, insert hook from front through the corresponding stitch on MB and pull loop through
Pattern Notes:
The beginning chain 5 counts as a double crochet plus a chain 3, and the beginning chain 2 counts as the first double crochet.
Join to the second chain of the beginning chain, not the first stitch, except in the border – here you’ll join to the first single crochet.
You may work this art piece with a variety of joining methods, but I joined mine using the Pull Loop Through Method, and this pattern will be written as such. If you choose to work all the squares first, and then sew them together, you will need: 34 in Cloudy, 5 in half Cloudy and Red split diagonally, 4 in half Cloudy and Cranberry split diagonally, 9 in Cranberry, and 10 in Red.
In the instructions, I refer to MA, MB and MD. These are the motifs. MA is the current motif you are working on. MB is the first one you join to, MC is skipped and MD is the second one you join to, which is diagonal from MB. I only refer to these motifs in the one and two join instructions. I also mention MC in the bi-colored square instructions. Here, this refers to Main Color.
I highly recommend weaving in your ends as you complete each row, otherwise, at the end you could be left with so many ends, this square may end up in your WIPs bin, instead of being completed.
Work 1 Complete 3” Solid Granny Square in Gray
This square will be the bottom right square of the piece.
Chain 5. Join to form a ring. Chain 5, work (3 DC, chain 3) into the ring 3x, 2 DC into the ring and Join. (12 DC)
R2: Chain 2. Work (2 DC, chain 3, 2 DC) into the chain space, [DC into the next 3 DCs, (2 DC, chain 3, 2 DC) into the next chain space] 3x, DC into the next 2 DCs. Join, and fasten off. (28 DC)
Working with the Join-as-you-Go PLT Method, you will have squares that require one join, and squares that require two joins – these are described below.
To Work Square with 1 Join:
Chain 5. Join to form a ring. Chain 5, work (3 DC, chain 3) into the ring 3x, 2 DC into the ring and Join. (12 DC)
R2: Chain 2. Work 2 DC into the chain space, chain 1, working from behind SC into chain space of MB, chain 1, [(DC into chain space of MA, PLT) 2x, (DC into next stitch of MA, PLT) 3x, (DC into chain space of MA, PLT) 2x, chain 1, working from behind SC into chain space of MB, chain 1]; 2 DC into the same chain space, [DC into the next 3 DCs, (2 DC, chain 3, 2 DC) into the next chain space] 2x, DC into the last 2 DCs. Join, and Fasten Off. (28 DC)
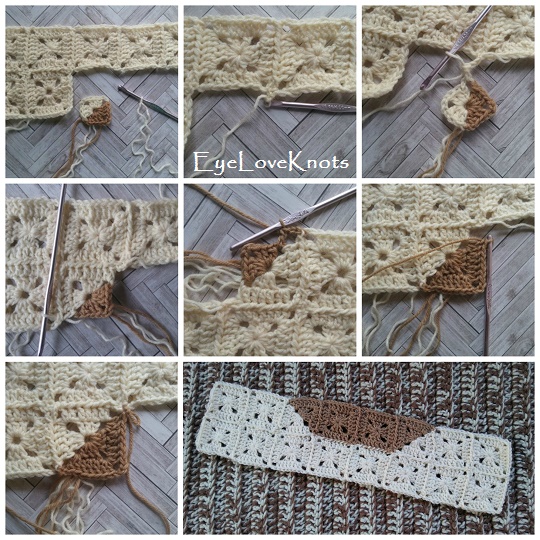
To Work Square with 2 Joins:
Chain 5. Join to form a ring. Chain 5, work (3 DC, chain 3) into the ring 3x, 2 DC into the ring and Join. (12 DC)
R2: Chain 2. Work 2 DC into the chain space, chain 1, working from behind SC into chain space of MB, chain 1, [(DC into chain space of MA, PLT) 2x, (DC into next stitch of MA, PLT) 3x, (DC into chain space of MA, PLT) 2x, chain 1, working from behind SC into chain space of MD, chain 1]; [(DC into chain space of MA, PLT) 2x, (DC into next stitch of MA, PLT) 3x, (DC into chain space of MA, PLT) 2x, chain 1, working from behind SC into chain space of MD, chain 1]; 2 DC into the same chain space, [DC into the next 3 DCs, (2 DC, chain 3, 2 DC) into the next chain space], DC into the last 2 DCs. Join, and Fasten Off. (28 DC)
Heart Pixel Art Square Graph:
As a blogger, I rely on views to my blog to earn money from my ads. Please do NOT share my graph photo, or save to Pinterest. Doing so, would allow makers to not have to return to my blog, which would result in a loss of views and income.
Following this chart, continue working solid granny squares and joining them as outlined above. I began with Row 1, and my first completed square being the square closest to the “R1”. The purple line shows that the second square worked (to the left of the 1st) only requires 1 join, as does the 3rd and so on in Row 1. Beginning in Row 2, you will start working with 2 joins. The first square worked of Row 2 (furthest right square) only requires 1 join to the 1st square of Row 1, but each square after requires 2 joins. I worked from the furthest right square of each row all the way to the end of the row, and weaved in my ends at the end of each row.
Bi-colored squares are highlighted in the image. #10, #19, #26, #53 and #55 are half Gray and half Red, while #13, #22, #31, #50, and #52 are half Gray and half Cranberry.
Using the instructions below, work in your bi-colored squares. Take note that Round 1 of each of these is the same as the 3” Bi-Colored Solid Granny Square listed below, but Round 2 varies as they are worked to best suit working in the manner as I have outlined. If you are working them differently, you will need to adjust as best for you.
I am only including Round 1 for the single bi-colored solid granny square. If you are working individual squares and using a different joining method, such as a Single Crochet Join, then you will need to go to my 3” Bi-Colored Solid Granny Square the EyeLoveKnots Way for the complete pattern (two rounds), replacing the main color with the one you will be using.
Round 1 of 3″ Bi-Colored Solid Granny Square:
With MC, Chain 5. Join to form a ring. Chain 2, 2 DC into the ring, chain 3, 3 DC into the ring, pull Gray through, [holding Gray over index finger and MC between middle finger and thumb, insert hook under MC to pull up a loop on hook, pull up Gray over hook and complete chain. Move the MC strand behind the Gray strand] 2x, yarn over, insert hook into the ring, yarn over, pull through, yarn over, pull through 2 loops, hold strands the same as before and complete the DC. Move the MC strand to the back, work 2 DC, chain 3, 2 DC over the MC tail, yarn over, insert hook into the ring, yarn over, pull through, hold the strands the same as before, pull over the MC, yarn over and complete the 1st half of the DC, move the MC strand to the back and repeat to complete the 2nd half of the DC, but don’t move the MC strand. Drop Gray, pull through MC to complete 1 chain, chain 2. Join, and fasten off both strands.
Squares #12 (#19 & #26) [Gray+Red]:
R2: In Gray, attach slip knot to hook. From behind, SC into the center join of #4 & #5 (#11 & #12; #18 & #19), chain 1, yarn over, insert hook into the 2nd chain space to the left of the one just finished on MA and complete the DC, DC into the same chain space on MA, PLT (into #4, (#11, #25), [DC into the next DC of MA, PLT (into #4, (#11, #25)] 3x, [DC into the chain space of MA, PLT (into #4, (#11, #25)] 2x, chain 1. From behind, SC into the chain space of #11 (#18, #25), chain 1, [DC into the chain space on MA, PLT (into #11 (#18, #25)] 2x, [DC into the next DC of MA, PLT (into #11 (#18, #25)] 3x, [DC into the chain space of MA, PLT #11 (#18, #25)] 2x. Chain 1. From behind, SC into the chain space of #11 (#18, #25). Pull Red through, and fasten off Gray. Chain 1. 2 DC into the chain space of MA, DC into the next 3 DCs, (2 DC, chain 3, 2 DC) into the next chain space, DC into the next 3 DCs, 2 DC into the chain space, slip stitch to the beginning SC. Fasten off.
Squares #13 (#22, & #31) [Gray+Cranberry]:
R2: With Gray, attach slip knot to hook. Chain 2. Yarn over, insert hook into the 2nd chain space to the left of the chain space just finished on MA and complete DC. DC into the same chain space, and the next 3 DCs, 2 DC into the next chain space, chain 1. From behind SC into the center join of #5 & #6 (#14 & #15; #23 & #24), chain 1, [DC into the chain space on MA, PLT (into #5 (#14, #23)] 2x, [DC into the next DC of MA, PLT (into #5 (#14, #23)] 3x, [DC into the chain space of MA, PLT (into #5 (#14, #23)] 2x. Insert hook into the center join of #12 & Row 1 (#21 & Row 2; #30 & Row 3). Pull Cranberry through (counts as SC) with working yarn under the work instead of over as normal to trap underneath , chain 1, [DC into the chain space on MA, PLT (into #12 (#21, #30)] 2x, [DC into the next DC of MA, PLT (into #12 (#21, #30)] 3x, [DC into the chain space of MA, PLT (into #12 (#21, #30)] 2x, chain 1. From behind, SC into the chain space of #12 (#21, #30), chain 1, 2 DC into the chain space of MA, DC into the next 3 DCs, 2 DC into the next chain space. Join to the 1st chain of the beginning chain 2. Fasten off both strands.
Square #50 [Gray+Cranberry]:
R2: With Cranberry, attach slip knot to hook. Chain 2. Yarn over, insert hook into the chain space just finished and complete DC. DC into the same chain space, and the next 3 DCs, 2 DC into the next chain space, chain 1. From behind, SC into the center join of #42 & #43, chain 1, [DC into the chain space on MA, PLT (into #42)] 2x, [DC into the next DC of MA, PLT (into #42)] 3x, [DC into the chain space of MA, PLT (into #42)] 2x. Insert hook into the center join of #49 & Row 6. Pull Gray through with working yarn under the work instead of over as normal to trap underneath, and complete the SC, chain 1, [DC into the chain space on MA, PLT (into #49)] 2x, [DC into the next DC of MA, PLT (into #49)] 3x, [DC into the chain space of MA, PLT (into #49) 2x, chain 1. From behind, SC into the chain space of #49, chain 1, 2 DC into the chain space of MA, DC into the next 3 DCs, 2 DC into the next chain space. Join to the 1st chain of the beginning chain 2. Fasten off both strands.
Square #53 [Gray+Red]:
R2: With Red, attach slip knot to hook. Chain 2. Yarn over, insert hook into the chain space just finished and complete DC. DC into the same chain space, and the next 3 DCs, 2 DC into the next chain space, chain 1. From behind, SC into the center join of #45 & #46, chain 1, [DC into the chain space on MA, PLT (into #45)] 2x, [DC into the next DC of MA, PLT (into #45)] 3x, [DC into the chain space of MA, PLT (into #45)] 2x. Insert hook into the center join of #52 & Row 6. Pull Gray through with working yarn under the work instead of over as normal to trap underneath, and complete the SC, chain 1, [DC into the chain space on MA, PLT (into #52)] 2x, [DC into the next DC of MA, PLT (into #52)] 3x, [DC into the chain space of MA, PLT (into #52) 2x, chain 1. From behind, SC into the chain space of #52, chain 1, 2 DC into the chain space of MA, DC into the next 3 DCs, 2 DC into the next chain space. Join to the 1st chain of the beginning chain 2. Fasten off both strands.
Square #52 [Gray+Cranberry]:
R2: In Cranberry, attach slip knot to hook. From behind, SC into the center join of #44 & #45, chain 1, yarn over, insert hook into the chain space just finished on MA and complete the DC, DC into the same chain space on MA, PLT (into #44), [DC into the next DC of MA, PLT (into #44)] 3x, [DC into the chain space of MA, PLT (into #44)] 2x, chain 1. From behind, SC into the center join of #51 & Row 6, chain 1, [DC into the chain space on MA, PLT (into #51)] 2x, [DC into the next DC of MA, PLT (into #46)] 3x, [DC into the chain space of MA, PLT (into #51)] 2x. Pull Gray through, and fasten off Cranberry. From behind, SC into the chain space of #51, chain 1, 2 DC into the chain space of MA, DC into the next 3 DCs, (2 DC, chain 3, 2 DC) into the next chain space, DC into the next 3 DCs, 2 DC into the chain space, slip stitch to the beginning SC. Fasten off.
Square #55 [Gray+Red]:
R2: In Red, attach slip knot to hook. From behind, SC into the center join of #47 & #48, chain 1, yarn over, insert hook into the chain space just finished on MA and complete the DC, DC into the same chain space on MA, PLT (into #47), [DC into the next DC of MA, PLT (into #47)] 3x, [DC into the chain space of MA, PLT (into #47)] 2x, chain 1. From behind, SC into the center join of #54 & Row 6, chain 1, [DC into the chain space on MA, PLT (into #54)] 2x, [DC into the next DC of MA, PLT (into #54)] 3x, [DC into the chain space of MA, PLT (into #54)] 2x. Pull Gray through, and fasten off Red. From behind, SC into the chain space of #54, chain 1, 2 DC into the chain space of MA, DC into the next 3 DCs, (2 DC, chain 3, 2 DC) into the next chain space, DC into the next 3 DCs, 2 DC into the chain space, slip stitch to the beginning SC. Fasten off.
Border:
With Gray, join yarn to top right corner. Chain 1. [SC in chain space, chain 3, SC in the same chain space, SC into the next 8 stitches, SC2tog over both squares chain spaces, (SC in the same chain space just worked and the next 8 stitches, SC2tog over both squares chain spaces) 6x, SC into the same chain space just worked and the next 7 stitches] 4x. Join with Red, and fasten off Gray. (315 SC)
R2: With Red, Chain 1. SC into the 1st SC and into the chain space, chain 3, SC into the same chain space, [SC into the next 78 SCs, SC into the chain space, chain 3, SC into the same chain space] 3x, SC into the next 77 SCs. Join with Cranberry, and fasten off Red. (324 SC)
R3: With Cranberry, Chain 1. SC into the 1st 2 SCs and into the chain space, chain 3, SC into the same chain space, [SC into the next 80 SCs, SC into the chain space, chain 3, SC into the same chain space] 3x, SC into the next 78 SCs. Join, and fasten off. (332 SC)
Sew in Final Ends.
Please feel free to make and sell your own Heart Pixel Art Square project using this pattern, but please DO NOT claim this pattern as your own nor should you sell my pattern, and DO NOT re-publish my photos as your own. DO NOT copy and paste my pattern anywhere, link to it instead.
DIY Lovers: Join the EyeLoveKnots Crochet & DIY Community on Facebook to share your creations, and see what others are up to!
Home Decor Lovers: Join the DIY Home On Rockwood Lane Facebook group to share, and see what others are up to!
Linked Up To…
Craft Schooling Sunday – Creative Jewish Mom
Creative Monday Link Up – Claire Justine
Handmade Monday #158 – Sum of their Stories
The Really Crafty Link Party #200 – Keeping it Real
Craftastic Monday Link Party – Sew Can Do
Happiness is Homemade Link Party #305 – Create with Cynthia
Ginx Woolly Linx Party January – Ginx Craft
Little Cottage Link Party #34 – Love my Little Cottage
All About Home Link Party #22 – Common Ground
531st Inspire Me Tuesday – A Stroll Thru Life
Fabulous Party #302 – Lou Lou Girls
Talk of the Town #207 – My Repurposed Life
Tuesday Turn About #31 – My Wee Abode
Your Whims Wednesday #442 – My Girlish Whims
The Wednesday Link Party 330 – The stitchin’ Mommy
To Grandma’s House We Go Link Party 175 – Chas Crazy Creations
Waste Not Wednesday 188 – Faeries and Fauna
Linky Ladies Party #176 – The Purple Poncho
Hookin’ on Hump Day #206 – Moogly
One More Row Free Pattern Link Party #14 – Loops and Love Crochet
Pin Party #351 – The Pin Junkie
Thursday Favorite Things #422 – An Artful Mom
Creatively Crafty Link Party #206 – Life Beyond the Kitchen
Best of the Month – Calypso in the Country
Home Matters Linky Party #265 – Modern on Monticello
Handmade & Otherwise Weekly Link Up Week 32 – Petals, Pies & Otherwise
Create, Bake, Grow & Gather Link Party #402 – Shabby Art Boutique
Traffic Jam Weekend #217 – My Bijou Life
Creative Compulsions Linky Party #42 – My Bijou Life
Scrappy Stitchers Link Party #59 – Stitches n Scraps
Thank Goodness It’s Finished Friday – Simply Crafting
Link Your Stuff – Annemarie’s Haakblog
Snickerdoodle Create Bake Make Link Party 318 – EyeLoveKnots
Really gorgeous! would be a sweet wall hanging! Craft Schooling sunday is back and hope to see you there! all the best in 2020!
Definitely would! I wish I had the space.
I love this pattern so much Alexandra. I must admit it’s been a while since I picked up my crochet hook but you’ve totally motivated me to try it! I’ve pinned it and will definitely be coming back for the pattern.
Glad I could provide a little inspiration 🙂
This is delightful!
Thank you, Lisa!
This is just beautiful.
I did a similar crochet blanket a few years back with squares made with 2 colours and found it really fiddly but OH SO worth it! I did say never again but you are tempting me!!
Hehe. I remember your baby blanket! At least with this one, there are less two colored squares 😉
Beautiful. Just what we need before Valentine’s day.
Thanks, Cat!
It’s beautiful. I’ve never crocheted squares like that, but I love the idea of joining as you go and not having to sew a zillion little squares together in the end. Thank you for sharing the pattern at The Really Crafty link Party. Pinned.
Oh yeah – no other way for me anymore (I guess unless it’s done with a continuous join)!
wow, this is gorgeous! not sure the size of yours, but it could certainly be a great baby blanket, or a wall hanging, or a pillow cover, or a piece of a larger blanket……gotta try it!
thanks for sharing on craft schooling Sunday!
This heart pattern is beautiful!
Thank you!!
Popping over from the Scrappy Stitchers Link Party #59
I’m hosting Thank Goodness It’s Finished Friday this week if you’d like to head over and link up your project – https://www.simply-crafting.co.uk/2020/01/reusable-face-cloths-from-baby-muslins.html
This is really pretty and unique. I’ve never done the jayg technique, but if I ever have the patience to make all these squares, I will learn it from this post. THANK YOU
I think it’s a great technique that can be used in many settings – not just this blanket. Think washcloth or scarf for a smaller scale. 😉
Really cute design! Thank you for linking up to a Creative Compulsions!
Michelle
http://mybijoulifeonline.com
This is so pretty, Alex… love that you can use it for a wall hanging for February, or even in a little girls room! I’m happy to be featuring you at Tuesday Turn About today! See you soon!
Would be so cute in a little girls room!
I can see a lot of work has gone into this pretty heart square Alexandra. Thank you for sharing your crochet pattern at Create, Bake, Grow & Gather this week. I’m delighted to be featuring it at tonight’s party and pinning too.
Hugs,
Kerryanne
Thank you for the support, and appreciation, Kerryanne!
Beautiful heart square! I selected it as one of my features at this week’s Snickerdoodle Create Bake Make Link Party!
Thank you so much, T’onna!
What a lovely blanket. Thanks for joining in Ginx Woolly Linx.
Thank you, Ginny!