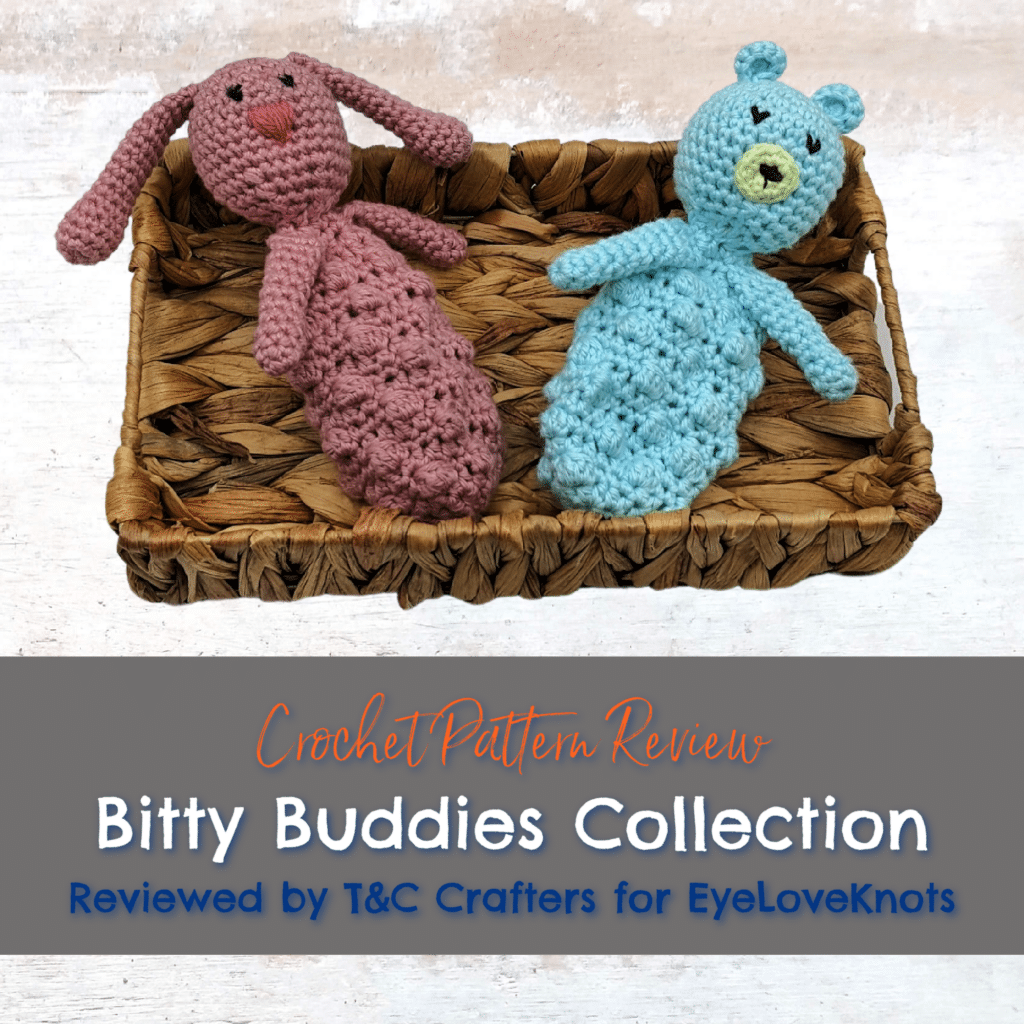
This is a crochet pattern review of the Bitty Buddies Collection including the Little Bear and Little Bunny designed by Allison Wasserman for Stuck on You Crochet. Review done by Candace of T&C Crafters for EyeLoveKnots.
This post contains affiliate links for Etsy and Amazon. If you make a purchase by clicking on them, I make a small commission at no extra cost to you. Thanks for your support!
Find the crochet pattern review below, or click here to find the pattern available for purchase on Etsy!
It’s me, Candace with T&C Crafters.
Visit with me on Facebook and Instagram for all kinds of awesome crochet makes and inspiration.
One of my favorite things to make are children’s items, so when I saw Allison from Stuck on You Crochet share her Bitty Buddies Collection, I knew I wanted to try them out! She has published patterns in multiple sizes and with multiple animals to create an entire collection of absolutely adorable stuffed toys with a lovey-blanket-like bottom that are perfect for little ones that want to cuddle a crocheted friend.
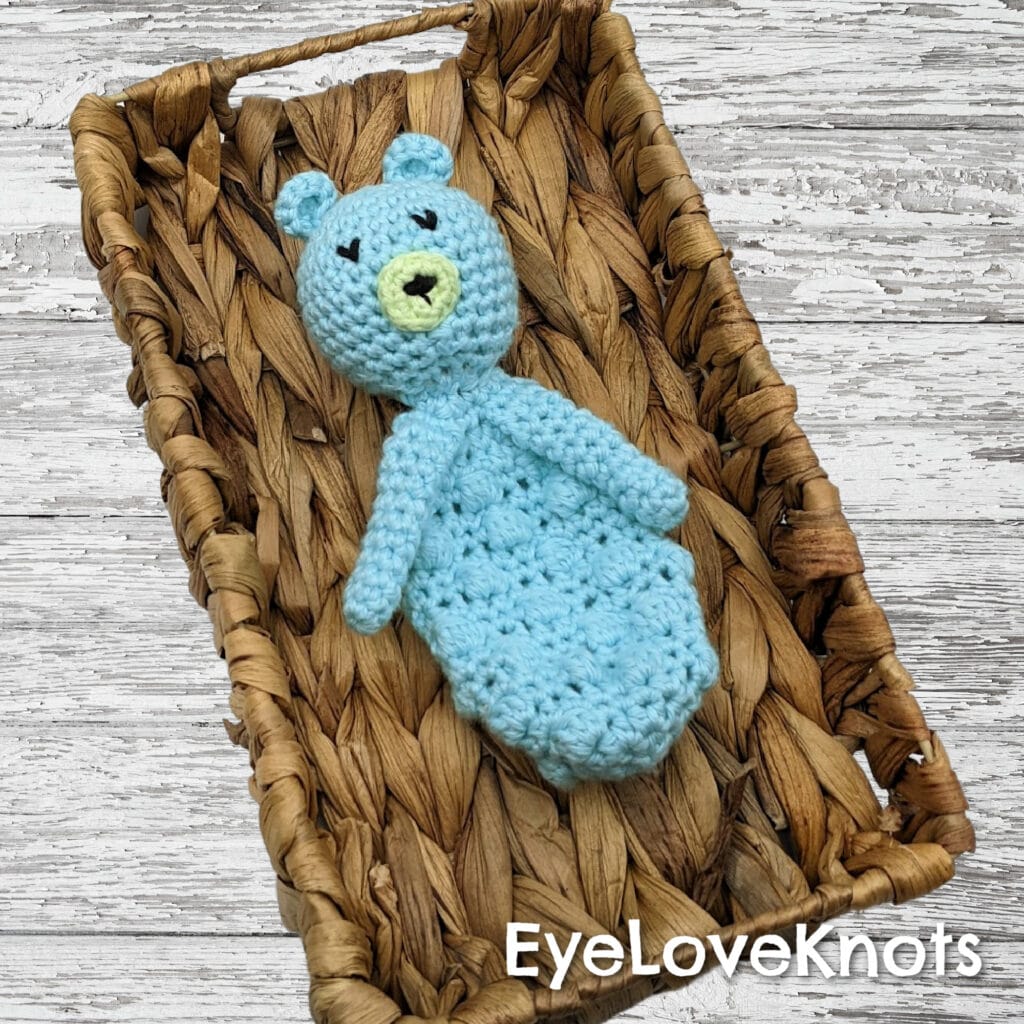
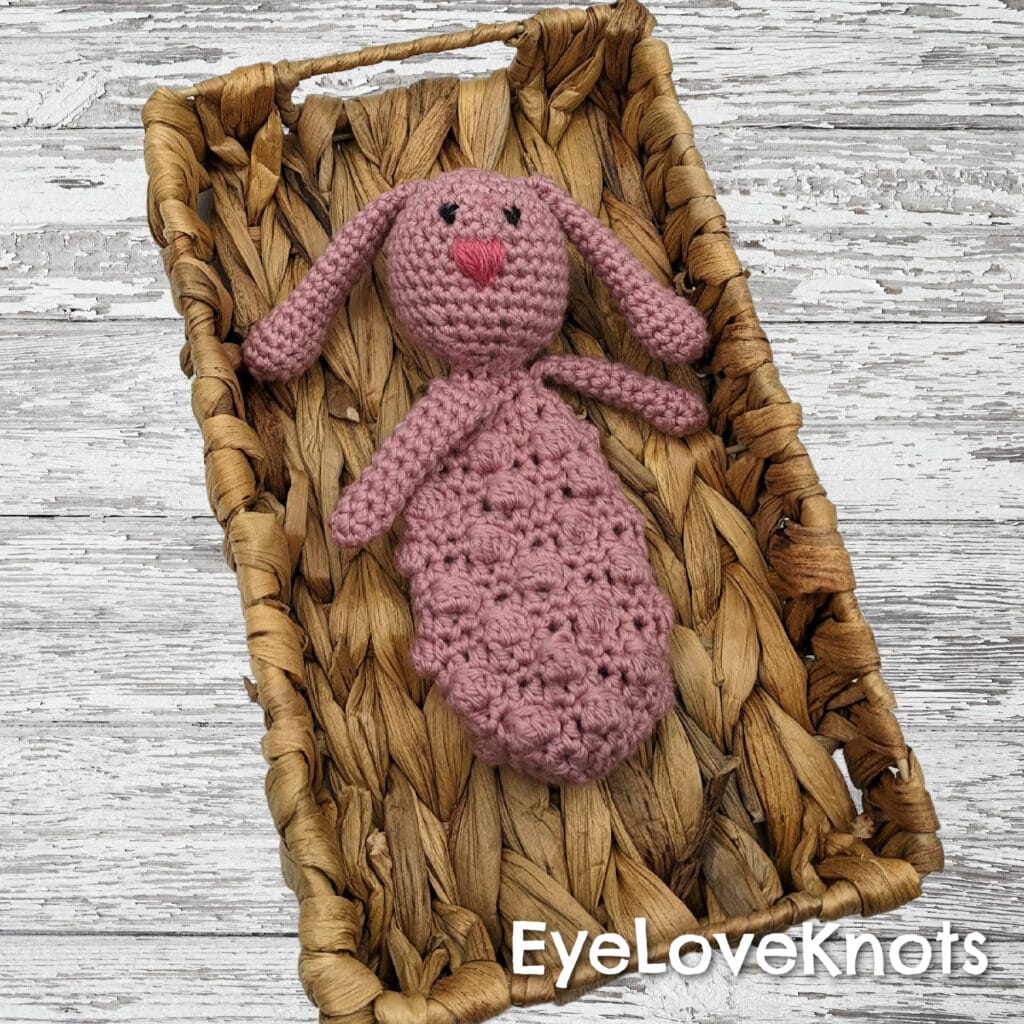
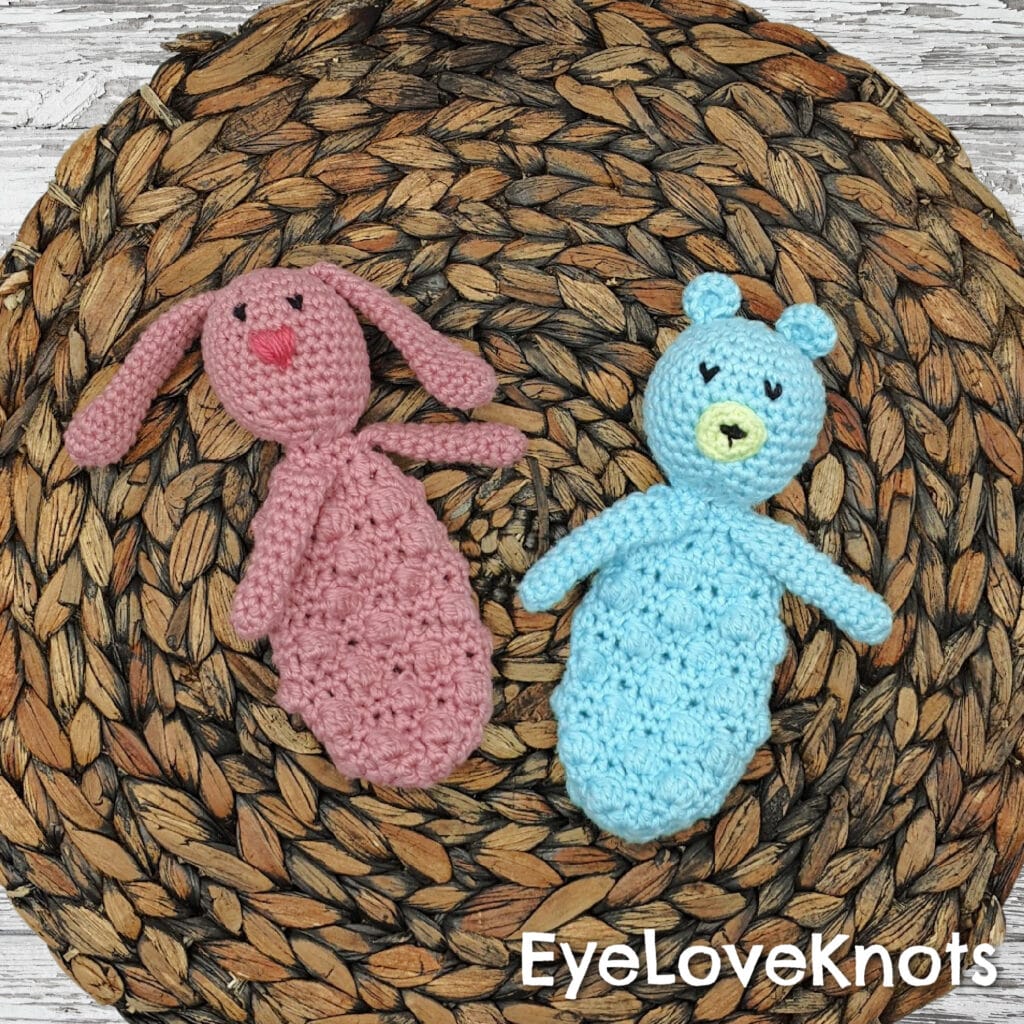
Her patterns include bunnies, lambs, bears, chicks, flamingos, unicorns, owls, cats, goats, and llamas all made with the adorable blanket-like bottom featuring bobbles to create a great sensory experience for little ones. She also offers patterns in multiple sizes. It took me awhile to decide what pattern I wanted to start with, but I finally settled on the Bitty Buddies Collection of the Little Bear and Little Bunny because I wanted to make some cute Easter gifts for little ones in my life.
The Bitty Buddies Collection does not disappoint! The finished pieces were absolutely adorable and they are the perfect gift for babies, toddlers, and little kids! I could barely keep my kids away from my finished pieces! Stuck on You Crochet created a great pattern that makes duplicating her precious little buddies easy for anyone with a bit of crocheting experience and a desire to make something adorable!
Materials I Used:
- I Love This Cotton in Rosy (Bunny), Aqua (Bear), and Pistache (Bear Muzzle)
- C2/2.75mm and G6/4.0mm Crochet Hooks
- Small Amount of Embroidery Floss
- Small Amount of Polyester Fiberfill
- Darning Needle
- Bear and Bunny Bitty Buddy Crochet Pattern Bundle, Paid Crochet Pattern by StuckonYouCrochet via Etsy
Material Notes:
The pattern recommends using I Love This Cotton since cotton holds up well for teething babies and can be washed while maintaining the integrity of the piece. The cotton yarn is a little difficult to work with, so I definitely recommend using a softer cotton yarn like I Love This Cotton if you choose to work with cotton. Any worsted weight yarn will work for this pattern so the finished piece comes out about the same size.
You will definitely need two different sizes of crochet hooks. The ears of both buddies and the muzzle on the bear require the smaller hook so that the pieces come out in the correct proportions. If you adjust your hook size for one, you will want to adjust the other as well.
The only part of this pattern that requires stuffing is the head, which only requires a really small amount. If you have just a handful of fiberfill on hand, you will have enough for this project. The embroidery floss is only needed in small quantities as well. You just need enough to embroider the eyes and nose onto the finished piece.
Time Spent:
Both of these pieces took me about three to four hours to complete. I worked on them over a period of a few days since my fingers were tired of working with the cotton yarn and tiny stitches, but you should be able to complete it in one evening if you so desire.
Measurements:
The finished bitty buddy measures approximately 7 inches long and 3 inches wide at the widest part of the body. The head is about 2.5 inches wide. They are the perfect size for little hands!
Gauge:
As with most amigurumi projects, the most important thing to remember about gauge is that you want to make sure the stuffing cannot come out of the finished piece. For these types of projects you typically use a crochet hook that is much smaller than what is recommended for the yarn so that your stitches are tight together to prevent holes from forming in your work when the piece is stuffed. I crocheted tightly and noticed that I didn’t have gaps, so I was happy with my hook size. If you are noticing gaps or are having too much trouble with a smaller hook, you can adjust your hook size accordingly.
Pattern Notes:
Both of the Bitty Buddy patterns begin with the same basic structure, but differ in the details for the head. Before making the head and the body, you want to make sure you make all the smaller pieces. For the bear, make sure you make the muzzle and the ear pieces prior to crocheting the head, so you can add the details before stuffing. For the rabbit, you want to make sure you have both ears completed before making the head.
The author’s directions are very specific about how to add the details to the finished pieces, and even include appropriate timing for stopping to add the facial details when creating the head of the buddies. Not only are there very clear pictures of what the finished pieces should look like on the pattern, but the placement is listed out with row and stitch counts to make it easy to get the perfect placement when sewing on ears, eyes, and mouths. I really appreciate the author including these directions, because it takes the guesswork out of making them look adorable.
The small parts of these projects were definitely the most challenging, in my opinion. I don’t often work with very small hook sizes, so making the ears for both the bear and the rabbit, and the muzzle for the bear with a 2.75 mm hook took some time. If you are comfortable with working with a smaller hook size, this part of the project would likely not be too difficult for you. I also think these parts of the pattern would be a little easier to complete with a softer or thinner yarn. The stiffness of the cotton yarn can be a challenge to work with. Because of this portion of the pattern, I would definitely recommend this pattern to an intermediate or advanced crocheter.
The heads and all of the small pieces of the patterns only require single crocheting, increases, decreases, and slip stitches, which makes the pattern really easy to follow. All of the pieces are worked in the round, which I really appreciate because I think consistency throughout the pattern is helpful. When making the heads for each of the buddies, I started out with the pink rabbit head. As I decreased at the bottom of the head, I did a typical decrease through both loops of the single crochets. This created some larger gaps between stitches than I would have preferred, so when I made the blue head for the bear, I used invisible decreases by only going through the front loop of each stitch when decreasing, and this looked so much better! I definitely recommend doing this when making the head of the buddies.
The body of the buddies worked up pretty quickly as it uses a mixture of single crochets, half double crochets, and bobble stitches to add bulk. This piece is also worked in the round. The bobble stitches in the body make for a textured body with lots of little bumps, which is perfect for a little one to play with. The bumps formed by the bobble stitches look the best when you make sure to pull tightly through all of the loops at the end of the stitch and make your stitch right after the bobble fairly tight. You can also use your finger to push out on the bobble stitch from inside the body to help shape it more as you go.
When making the body, it is important that you have the arms finished before starting, as you will crochet the arms to the body near the end so that you don’t have to sew them on later. This made the arms really secure, in addition to making sure they were angled just the right way to look perfect on the body. I really love that part of the pattern because normally arms and other body parts can be really difficult to attach correctly when making stuffed toys.
The body piece has some gaps as it is crocheted, but that is totally fine since it is not stuffed. Since little ones sometimes enjoy putting their fingers through gaps in crocheted blankets, I’m sure the gaps in this part of the piece would be beneficial more than anything! The bobbles help to make these little buddies have squishy bodies without the need for stuffing. They really are a perfect mix between a stuffed toy and a lovey.
If you have some experience crocheting and making amigurumi-style pieces with smaller hooks, I would definitely recommend this as a super cute project for a baby gift! While some parts can prove to be a little challenging, I think the cuteness aspect outweighs the difficulty! I had originally planned to give these little cuties to some of the little ones in our friend circle for Easter, but my own kids snatched them up right away, so I guess I will be making some more in the near future! I definitely have these patterns marked as a go-to baby gift!
If you check out Stuck on You Crochet’s social media, you will see some pictures of different color combinations and different animal variations for these little buddies. I’m looking forward to trying out some different color combinations and playing around with some other yarn types to see what I like the best. What color and animal would you make? I’d love to hear in the comments below!
If you decide to make one of these adorable bitty buddies, be sure to tag @stuckonyoucrochet, @eyeloveknots, and @tandc_crafters on social media so we can see your finished pieces!
Don’t forget to visit with me on Instagram for all kinds of awesome crochet makes and inspiration.
Join one of our awesome Facebook groups to share your creations, and see what others are up to!
– EyeLoveKnots Crochet & DIY Community
– DIY Home On Rockwood Lane
– Alexandra Lane Lifestyle
Linked Up To…
Linky Ladies Party #222 – The Purple Poncho
The Happy Now Blog Link Up #311 – JENerally Informed
Talent Sharing Tuesdays Link-Up 10 – Scribbling Boomer
Fabulous Party 414 – Lou Lou Girls
Anything Goes Linky 322 – My Randon Musings
Hello Monday – Pink Lady
You’re the Star Blog Hop – Decor Craft Design
Happiness is Homemade Link Party #419 – Decor Craft Design
Craftastic Monday Link Party – Sew Can Do
Link-Up Potpourri #34 – My Bijou Life
The Really Crafty Link Party #306 – Keeping it Real
Handmade Monday #269 – Sum of their Stories
Spread the Kindness Link Up #265 – Shelbee on the Edge
{Wow Me} Wednesday #545 – Ginger Snap Crafts
The Loop Scoop #33 – Moogly Blog
The Wednesday Link Party 441 – Oombawka Design Crochet
Wonderful Wednesday – Oh My Heartsie Girl
Wonderful Wednesday Blog Hop – My Life Abundant
Team Creative Crafts Link Party #82 – Artsy-Fartsy Mama
Creatively Crafty Link Party #318 – Try It – Like It – Create It
Encouraging Hearts & Home Blog Hop – My Slices of Life
Karins Kottage Spring Linky Party – Karins Kottage
Traffic Jam Weekend Link Party #314 – My Bijou Life
Create, Bake, Grow & Gather Party #510 – Shabby Art Boutique
Funtastic Friday Link Party #375 – Simply Beautiful by Angela
A Morning Cup of Joe – The Cottage Market
Saturday Sparks Link Party 505 – Pieced Pastimes
Craft Schooling Sunday – Creative Jewish Mom
Happiness is Homemade Link Party #418 – Decor Craft Design
Share the Wealth Link Party #14 – Big Fat Menopausal Life
These are so cute!
xoxo
Lovely
http://www.mynameislovely.com
Thank you so much! They were fun to make!
These are adorable! So many babies and toddlers like to hold a blanket when they’re going to sleep. The soft, flexible part of the bitty buddy would be just right. Thank you for participating in Talent-Sharing Tuesdays 10.
Carol
http://www.scribblingboomer.com
Thank you so much! They really are great for little hands. My daughter is one, and she is obsessed with the bunny one.
These really are very cute. Great tips and advice for these patterns too, thanks.
Thank you so much! I’m glad it was helpful!