This is a free crochet pattern showing how to crochet an adorable, soft and quick to make koala pillow perfect for a nursery, baby shower gift or for any koala lover!
This post contains affiliate links for WeCrochet and Etsy. If you make a purchase by clicking on them, I make a small commission at no extra cost to you. Thanks for your support!
Find the free crochet pattern instructions below, or purchase a printer- friendly, ad-free PDF on Etsy by clicking here.
In a hurry? Pin this for later when you have more time.
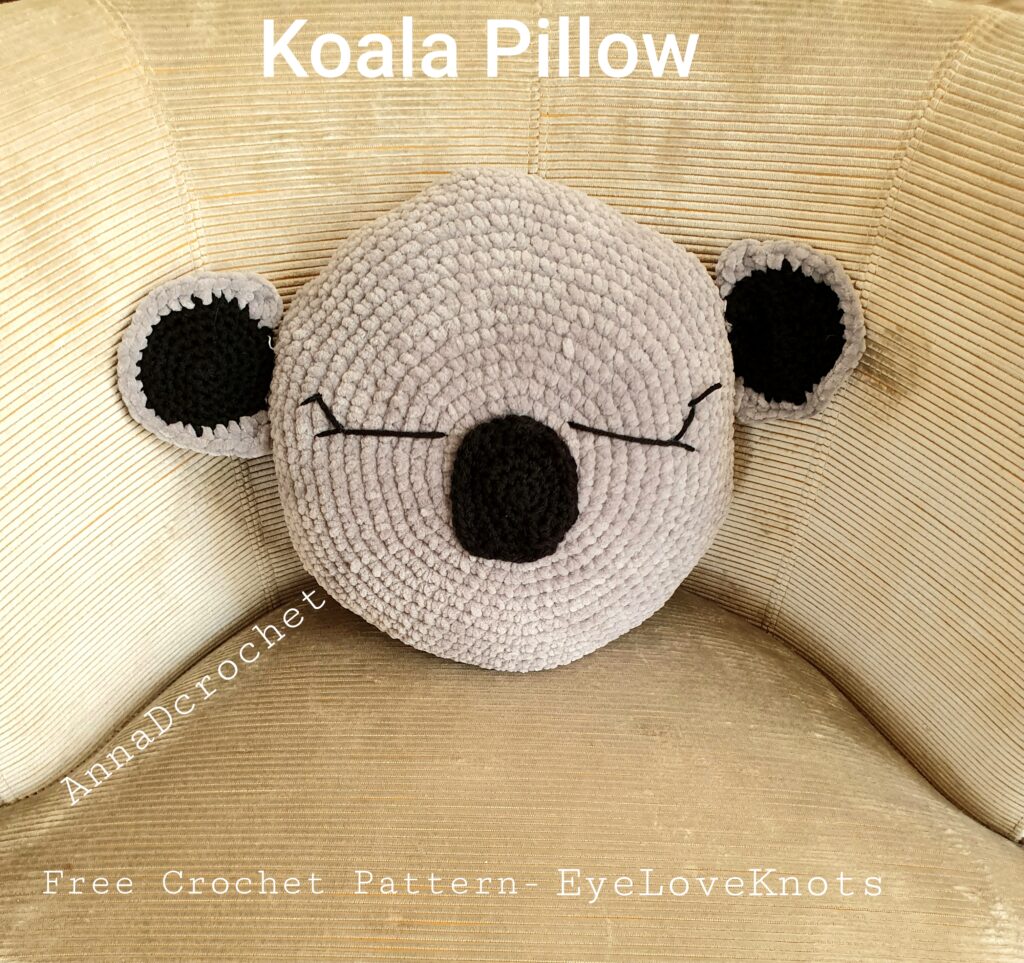
Today, I want to share with you my new favorite project – a koala pillow. This pillow isn’t just incredibly soft and cozy; it’s also quick to make! Ready for a moment of relaxation and crafting joy?
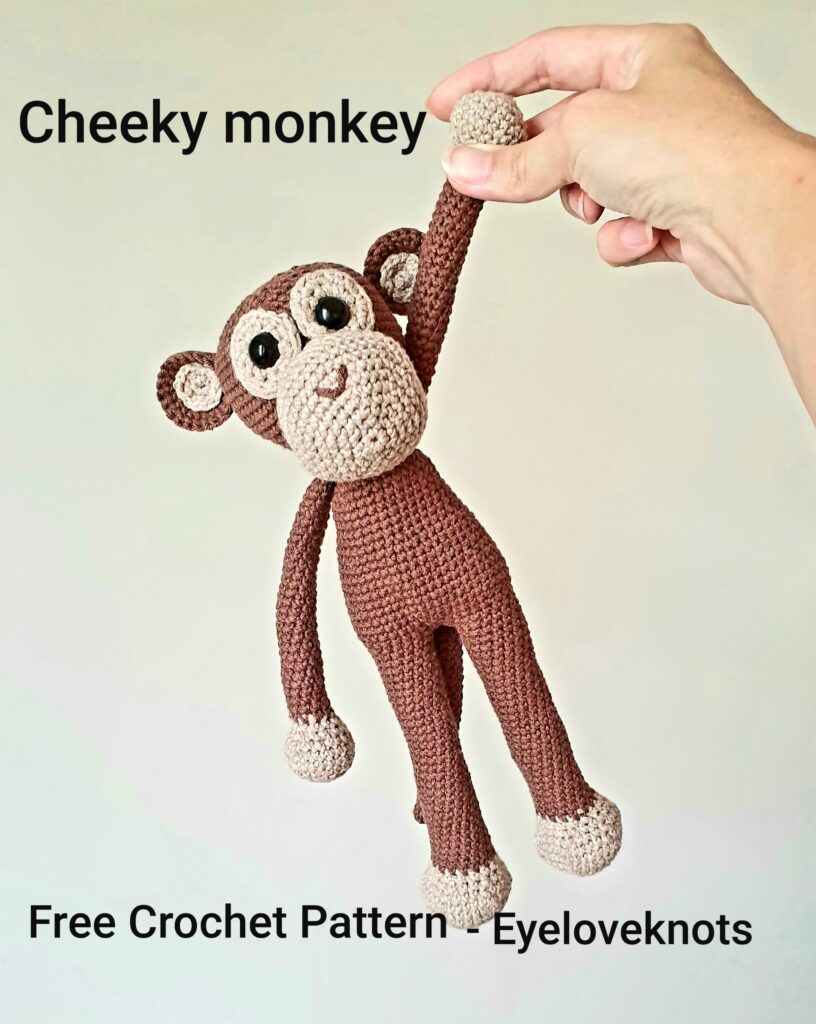
You may also like this adorable Cheeky Monkey that Anna also shared.
Ad-free printer friendly PDF:

If you would like a PDF version of this post, you may get one through the AnnaDcrochet Etsy Shop for a small fee. This fee is to compensate for the views lost when you no longer need to return to the blog to for the information, as you will have your own copy. In a hurry? Pin this for later when you have more time!


What Supplies do I need to crochet a round pillow?
- 131 yards (120m) of chunky #5 grey yarn. I used 1 ball Cygnet Jelly Baby Chunky Chenille, colour Pearl Grey 012. I used almost every bit of grey yarn. I suggest buying a second ball in case you use a bigger hook.
- 45 yds (40m) black DK #3 yarn
- 7/ 4.5mm crochet hook
- Poly-fil Stuffing
- crochet needle
- stitch marker
- scissors
How long does it take to create a pillow?
It took me about 2-3 hours to create this pillow.
Measurements:
Finished Koala is about 11 inch / 28 cm.
Gauge- not essential:
15 sc = 4 inch / 10 cm
Abbreviations ( US terms):
- SC – Single Crochet (Photo Tutorial)
- HDC – Half Double Crochet (Photo Tutorial)
- Sc2tog – Single Crochet 2 Stitches Together (to decrease)
- How to Sc2tog: insert hook into stitch, and pull up the loop, insert your hook into next stitch and pull up the loop, yarn over and pull through all three loops
Pattern notes:
<…> repeat what is written between the brackets x times
( ) at the end of each round, is the number of stitches you should have at the end of the round.
Work in continuous rounds (do not join, turn, slip stitch, unless otherwise instructed).
Koala pillow pattern:
Grey yarn. Make a magic circle and chain 1.
Round 1: Make 6 sc inside the magic circle. Close it (6)
Round 2: Make 2 sc into each stitch. Place the marker onto the first or last stitch made. (12)
Round 3: < make 1 sc in next stitch, make 2 sc in the next stitch> repeat around. Replace marker (18)
Round 4: < make 1sc in next 2 stitches, make 2 sc in the next stitch> repeat around. Replace marker (24)
Round 5: <make 1 sc in next 3 stitches, make 2 sc in the next stitch> repeat around. Replace marker (30)
Round 6: Make 1 sc in next two stitches, make 2 sc in the next stitch, < make 1 sc in next 4 stitches, make 2 sc in the next stitch> repeat around. Make 1 sc in the last 2 stitches. Replace marker (36)
Round 7: < make 1 sc in next 5 stitches, make 2 sc in the next stitch> repeat around. Replace marker (42)
Round 8: Make 1 sc in next 2 stitches , make 2 sc in the next stitch, < make 1 sc in next 6 stitches, make 2 sc in the next stitch> repeat around. Make 1 sc in the last 4 stitches. Replace marker ( 48)
Round 9: < make 1 sc in next 7 stitches, make 2 sc in the next stitch> repeat around. Replace marker (54)
Round 10: Make 1 sc in next 2 stitches, make 2 sc in the next stitch, < make 1 sc in next 8 stitches, make 2 sc in the next stitch> repeat around. Make 1 sc in the last 6 stitches. Replace marker (60)
Round 11: < make 1 sc in next 9 stitches, make 2 sc in the next stitch > repeat around. Replace marker (66)
Round 12: Make 1 sc in next 2 stitches, make 2 sc in the next stitch< make.1 sc in next 10 stitches, make 2 sc in the next stitch> repeat around. Make 1 sc in the last 8 stitches. Replace marker (72).
Round 13: < make 1 sc in next 11 stitches, make 2 sc in the next stitch> repeat around. Replace marker (78).
Round 14: Make 1 sc in next 2 stitches, make 2 sc in the next stitch< make.1 sc in the next 12 stitches, make 2 sc in the next stitch> repeat around. Make 1 sc in the last 10 stitches. Replace marker (84)
Round 15: < make 1 sc in next 13 stitches , make 2 sc in the next stitch > repeat around. Replace marker (90)
Round 16: Make 1 sc in next 2 stitches, make 2 sc in the next stitch < make 1 sc in next 14 stitches, make 2 sc in the next stitch> repeat around. Make 1 sc in the last 12 stitches. Replace marker (96)
Round 17: < make 1 sc in next 15 stitches, make 2 sc in the next stitch > repeat around. Replace marker (102)
Round 18: Make 1 sc in the next 2 stitches,.make 2 sc in the next stitch< make 1 sc in next 16 stitches, make.2 sc in the next stitch> repeat around. Make 1 sc in the last 14 stitches. Replace marker (108)
Round 19: Make 1 sc into each stitch. Replace marker (108)
Round 20: Make 1 sc in next 2 stitches, sc2tog, < make 1 sc in next 16 stitches, sc2tog> repeat around, make 1 sc into last 14 stitches. Replace marker (102)
Round 21: < make 1 sc in next 15 stitches, make sc2tog> repeat around. Replace marker (96)
Round 22: Make 1 sc in next 2 stitches, sc2tog < make 1 sc in the next 14 stitches, sc2tog> repeat around, make 1 sc in the last 12 stitches. Replace marker (90) Turn your work inside out (flip the bowl, the right side should be out)
Round 23: < make.1 sc in next 13 stitches, make sc2tog> repeat around. Replace marker (84)
Round 24: Make 1 sc in next 2 st, sc2tog < make 1 sc in next 12 stitches, sc2tog> repeat around. Make 1 sc in the last 10 stitches. Replace marker (78)
Round 25: < make 1 sc in next 11 stitches, sc2tog> repeat around. Replace marker (72)
Round 26: Make 1 sc in next 2 stitches, sc2tog, < make 1 sc in next 10 stitches, sc2tog> repeat around. Make 1 sc in the last 8 stitches. Replace marker (66)
Round 27: < make 1 sc in next 9 stitches, sc2tog> repeat around. Replace marker (60)
Round 28: Make 1 sc in next 2 stitches, sc2tog < make 1 sc in next 8 stitches, sc2tog> repeat around. Make 1 sc in the last 6 stitches. Replace marker (54)
Round 29: < make 1 sc in next 7 stitches, sc2tog> repeat around. Replace marker (48)
Round 30: Make.1 sc in next 2 stitches, sc2tog < make 1 sc in next 6 stitches, sc2tog> repeat around. Make 1 sc in the last 4 stitches. Replace marker (42)
Round 31: < make 1 sc in next 5 stitches, sc2tog> repeat around. Replace marker (36)
Round 32: < make 1 sc in next 4 stitches, sc2tog> repeat around. Replace marker (30) Stuff the pillow. Do not overfill orunder fill it. The pillow should have a smooth shape.
Round 33: < make.1 sc in next 3 stitches, sc2tog> repeat around. Replace marker (24)
Round 34: < make 1 sc in next 2 stitches, sc2tog> repeat around. Replace marker (18)
Round 35: < make 1 sc in the next stitch, sc2tog> repeat around. Replace marker (12) add nore stuff if needed.
Round 36: <sc2tog> x 6 times.
Cut the yarn, leave long tail ( around 10 cm /2,5 inch is enough).
Weave in the yarn tail through 6 stitches (through front loops only) pull and close, then finish weaving in.
Inner Ears – Make 2 with Black Yarn:
Magic circle and chain 1
Round 1: make 6 sc inside the circle
Round 2: Make 2 sc into each stitch. (12)
Round 3: < make 1 sc in next stitch, make 2 sc in next stitch > repeat around. Place the marker (18)
Round 4: < make 1 sc in next 2 stitches, make 2 sc in next stitch > repeat around. Replace marker (24)
Round 5: < make 1 sc in next 3 stitches, make 2 sc in the next stitch > repeat around. Replace marker (30)
Round 6: < make 1 sc in next 4 stitches, make 2 sc in next stitch > repeat around. Replace marker (36)
Round 7: < make 1 sc in next 4 stitches, sc2tog> repeat around. Replace marker (30)
Round 8: < make 1 sc in next 3 stitches, sc2tog> repeat around. Replace marker (24)
Round 9: < make 1 sc in next 2 stitches, sc2tog> repeat around. Replace marker (18)
Round 10: < make 1 sc in next stitch , sc2tog> repeat around. Replace marker (12)
Round 11: Make < sc2tog> x 6 times. Weave the yarn tail through 6 stitches (through front loops only) pull and close, then finish weaving in the end.
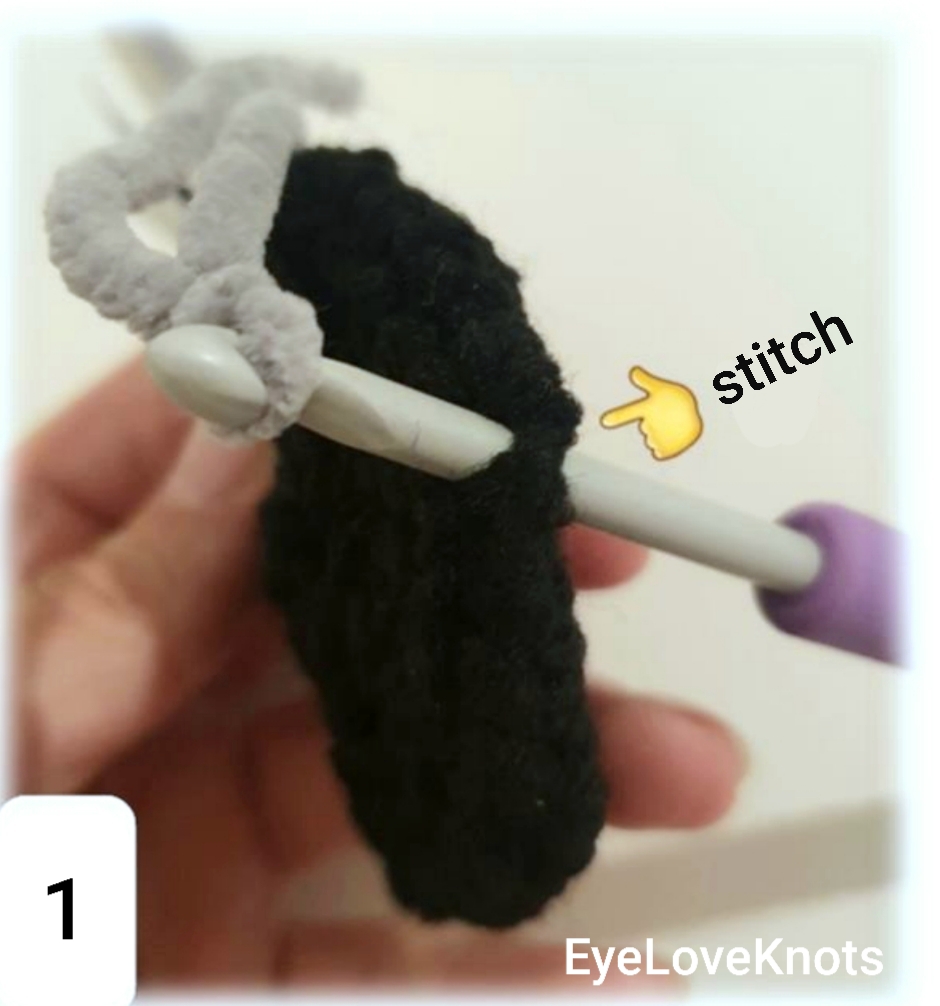
With Grey yarn, insert your hook into any stitch located on the edge (you will need to insert your hook into two holes and the stitch will be in between, see picture 1) and chain 2.
Row 1: Make 2 double crochets into the same stitch, 1 hdc in next stitch, 1 sc in next 18 stitches, 1 hdc in next stitch and 2 double crochet in next stitch. Chain 2 and slip stitch to the next stitch. Cut the yarn, leave long tail for sewing.
Nose – with Black Yarn:
Make a magic circle and chain 1
Round 1: Make 6 sc inside the magic circle. Close it. (6)
Round 2: Make 2 sc into each stitch. Place the marker (12)
Round 3: Make 2 hdc into first stitch. Make 1 sc in next 4 stitches, make 2 hdc in next 2 stitches, make 1 sc in next 4 stitches, make 2 hdc in the last stitch. Replace marker (16)
Round 4: Make 2 hdc in first 2 stitch, make 1 sc in next 4 stitchse, make
2 hdc in next 4 stitches, make 1 sc in next 4 stitches, make 2 hdc in the last 2 stitches. Replace marker (24)
Round 5: Make 1 sc in next 2 stitches, make 2 sc in next 2 stitches, make 1sc in next 7 stitches, make 2 sc in next stitch, make 1 sc in next 9 stitches, make 2 sc in next stitch. Make 2 slip stitches. (28)
Slip stitch into next 5 stitches, then cut the yarn, leaving a long tail for sewing.
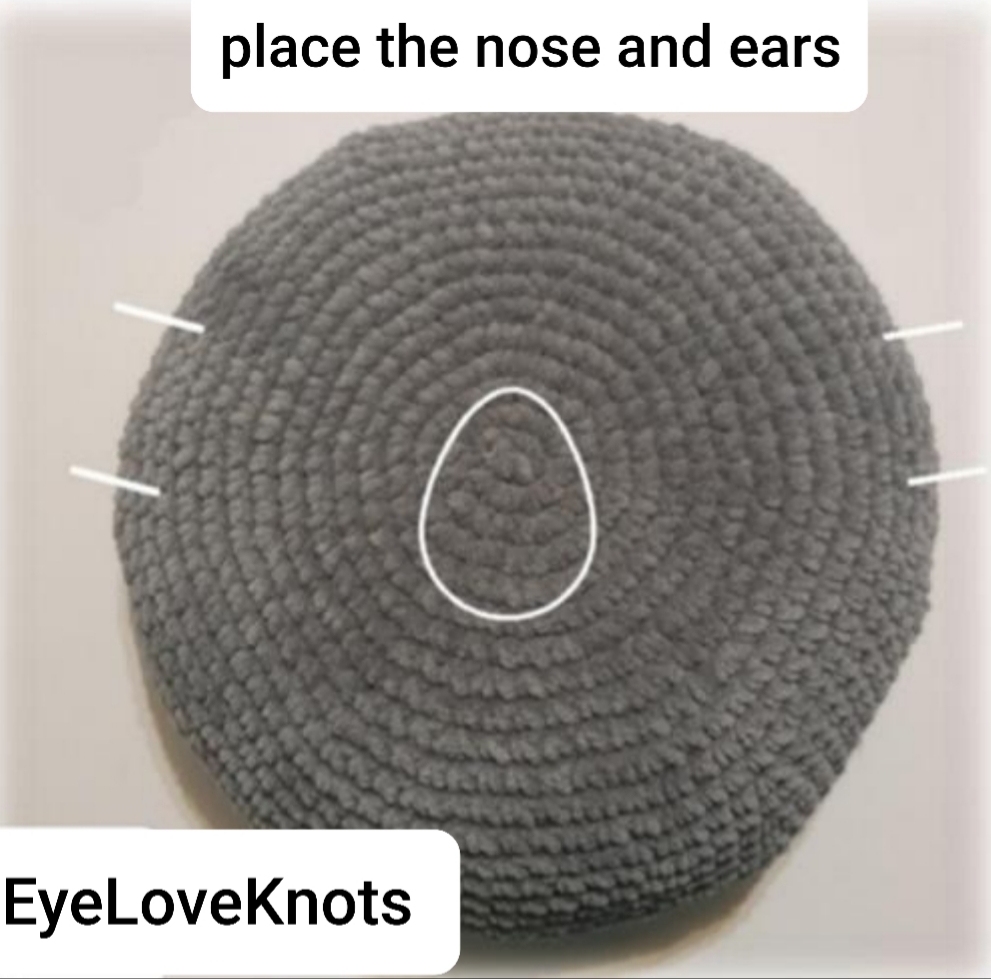
Pillow Assembly:
Look at picture below to see where to place the nose and ears.
For the eyes, take a black yarn and thread it through the needle. Insert the needle approximately 6-7 stitches away from the point where you will start your eye (point 0, see picture 1 and 2) and bring it out in point A (picture 2 –
10 Rounds to the right and 3 stiches up from the nose). Leave approximately 4 cm / 1 inch long tail hanging
loosely. Insert your needle in point B (9 Rounds to the left, 2 stitches down, picture 3) and bring it out in point C (picture 4, 7 Rounds to the right, 1 stitch up). Insert your needle in point D (2 Rounds to the right, 1 stitch down) and bring it out in point A (picture 5).
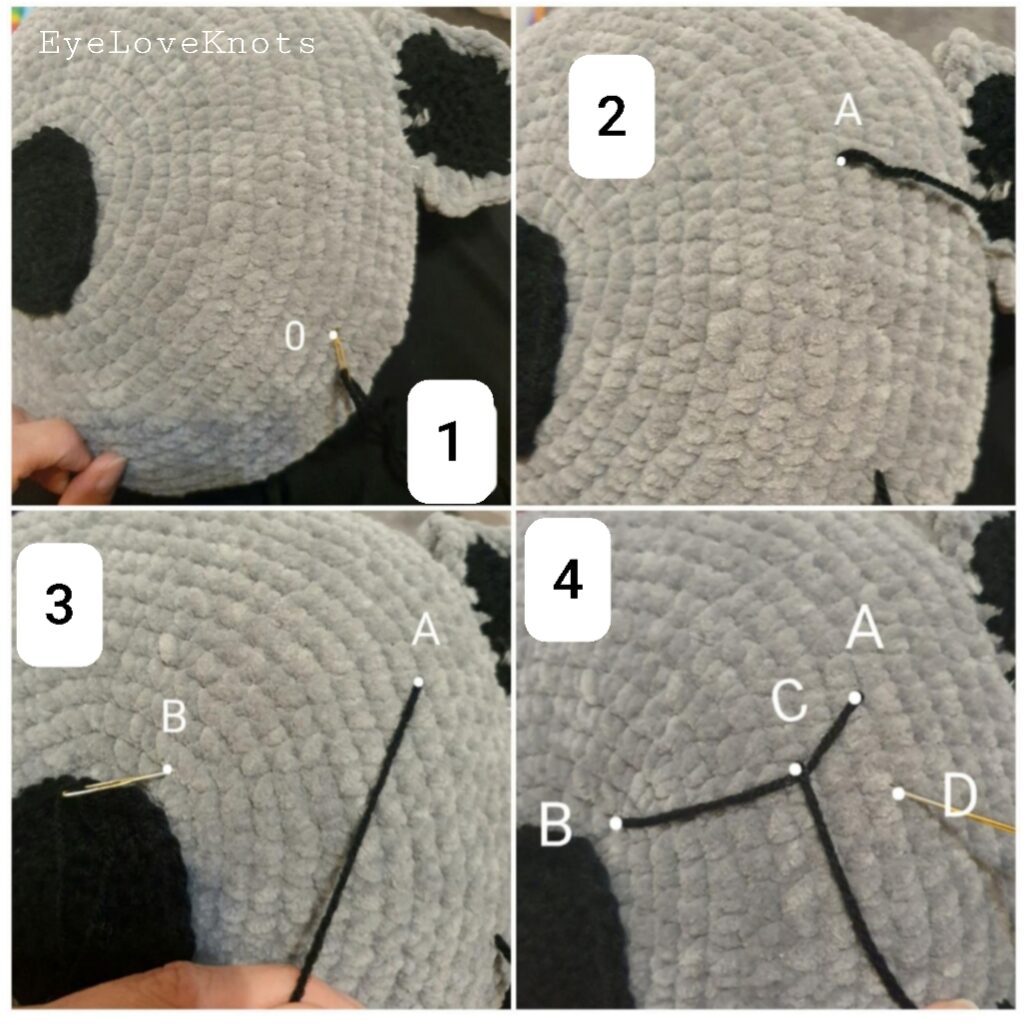
Insert your needle in point E (2 Rounds to the right, 1 stitch down, picture 6) and bring it out the same point where you started (point 0). Gently tighten the yarn (do not overtighten) and tie a knot (picture 7) . Cut the thread close to the knot. Using the pointed end of the needle, or smaller crochet hook if you have any, tuck the knot inside the pillow, until it become invisible. Make the second eye in the same way, starting from the left side (mirror image).

Please feel free to make and sell your own items made using this pattern, but keep in mind, this written pattern and my photos are protected by copyright. Please DO NOT claim this pattern as your own nor should you sell my pattern. DO NOT re-publish my photos as your own. DO NOT copy and paste my pattern anywhere, link to it instead so other’s can visit. Making videos providing instructions how to make my projects on any social media platform is also not permitted
Join one of our awesome Facebook groups to share your creations, and see what others are up to!
– Yarn Crafts & Coffee Community
– DIY Home On Rockwood Lane
– Alexandra Lane Lifestyle
Leave a Reply