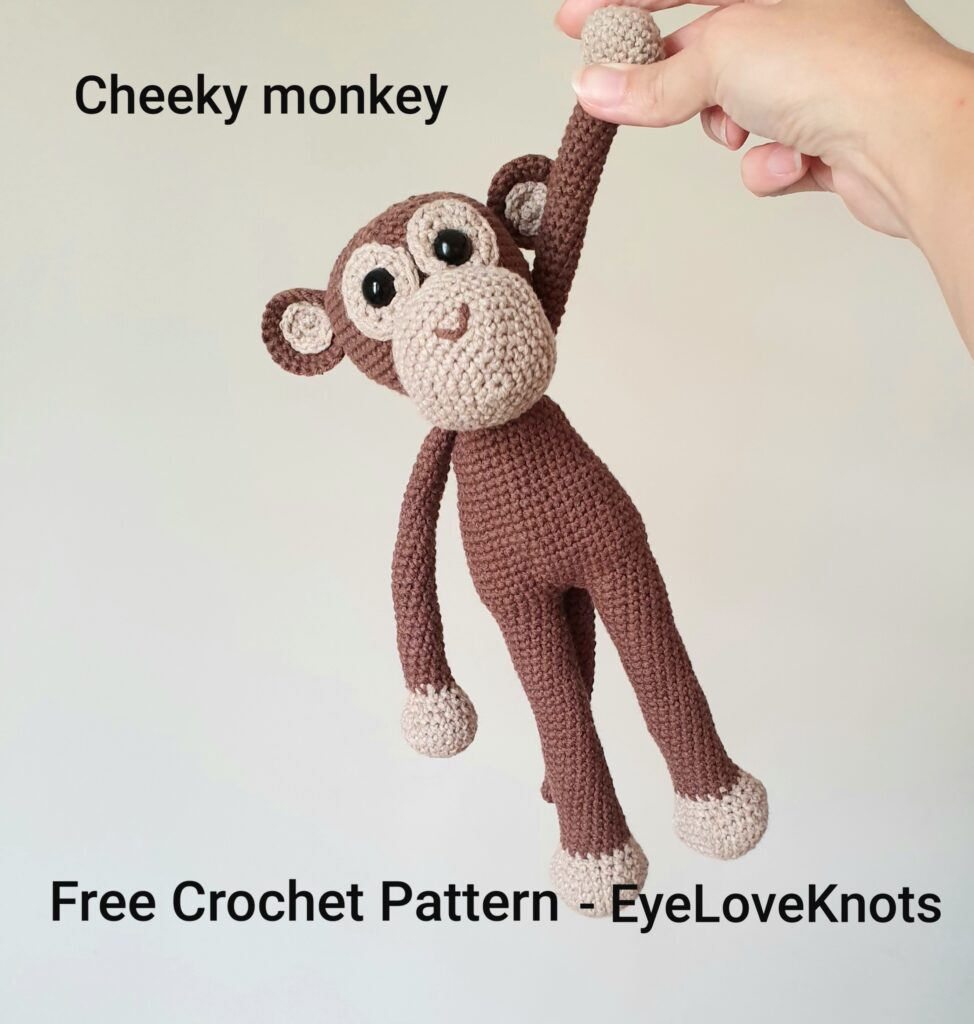
This is a free crochet pattern and video tutorial showing how to crochet the Cheeky Monkey – a fun amigurumi monkey toy that uses simple single crochets.
This post contains affiliate links for Etsy, WeCrochet and Amazon. If you make a purchase by clicking on them, I make a small commission at no extra cost to you. Thanks for your support!
Find the free crochet pattern instructions below, or purchase a printer-friendly, ad-free PDF on Etsy by clicking here.
In a hurry? Pin this for later when you have more time.

The idea for crocheting this monkey came to my mind when I decided to surprise my daughter with a one-of-a-kind gift. This adorable toy, lovingly handmade, has found a special place in my heart as it now becomes an inseparable companion to my child. Even her cousin thought it was awesome, so I ended up making another one. If you’re into crochet or just curious about how to make your own adorable creations, stick around. We’ll dive into the step-by-step process and maybe even inspire you to start your own crocheting adventure. Let’s get hooking.
Ad-Free Printer Friendly PDF:

If you would like a PDF version of this post, you may get one through the AnnaDcrochet Etsy Shop for a small fee. This fee is to compensate for the views lost when you no longer need to return to the blog to for the information, as you will have your own copy. In a hurry? Pin this for later when you have more time!
What Supplies Do I Need to Crochet a Monkey?
• DK/Lightweight #3 Yarn – I used Alizee Cotton Gold Yarn, 30g/120yds of 493 Brown & 20g/95 yards of 262 Beige
• 2 8mm Safety Eyes
• Fiberfill Stuffing
• C2/2.5mm Crochet Hook
• Stitch marker
• Crochet needle
• Pins (optional)
• Scissors
Material notes:
Alizee Cotton Gold yarn is 50% synthetic and 50 percent cotton, and has 361 yards per ball. I used about 1/3 of beige yarn and 1/4 of brown yarn. You can use other DK yarn, such as Durable Cosy Extra Fine, WeCrochet Cotlin, Hobbii Friends Wheel, Papatya Cotton Touch or Yarnart Jeans.
Use stitch marker or small piece of yarn at begin or end of the rounds.
You can use sewing pins to secure pieces together, so u can see how your monkey looks before you sew the separate pieces down.
How long does it take to crochet a monkey?
It took me about 4 hours to crochet this cheeky monkey.
Measurements:
Finished monkey is about 29 cm / 11.5 inches tall.
Gauge (not essential):
26 sc = 4″ / 4 cm
Abbreviations (US Terms):
- sc – Single Crochet (Photo Tutorial)
- sc2tog – Single Crochet Two Stitches Together aka Decrease
- How to sc2tog: insert hook into stitch, and pull up the loop, insert your hook into next st and pull up the loop, yarn over and pull through all three loops
Pattern Notes:
<…> – repeat what is written between the brackets x times
( .) at the end of each round, is the number of stitches you should have at the end of the round.
Work in continuous rounds( do not join, turn, slip stitch) unless otherwise instructed.
Stuff legs, arms and body as you go. Use your fingers, pens or wooden stick to stuff. When changing colours, do so in the last yarn over of the previous stitch.
Instead of single crochet, you can use the cross single crochet technique. In the video, I showed what the difference is between cross sc and regular sc.
Cheeky Monkey, Video Tutorial:
Cheeky Monkey, Written Crochet Pattern:
Cheeky Monkey Legs:
Beige yarn: make Magic circle and chain 1
Round 1: Make 6 sc inside the Magic circle. (6)
Round 2: Make 2 sc into each stitch. Replace marker (12)
Round 3: < make 1 sc in next stitch, make 2 sc in next stitch> repeat around. Replace marker (18)
Round 4: < make 1 sc in next 2 stitches, make 2 sc in next stitch> repeat around. Replace marker (24)
Round 5: < make 1 sc in next 3 stitches, make 2 sc in next stitch> repeat around. Replace marker (30)
Round 6: < make 1 sc in next 4 stitches, make 2 sc in next stitch> repeat around. Replace marker (36)
Round 7: Make 1 sc into each stitch. Replace marker (36)
Round 8: < make 1sc in next 4 stitches, make sc2tog> repeat around. Replace marker (30)
Turn inside out.
Round 9: < make 1 sc in next 3 stitches, make sc2tog> repeat around. Replace marker (24)
Stuff with fiberfill.
Round 10: <make 1 sc in next 2 stitches, make sc2tog> repeat around. Replace marker (18)
Round 11: Make 1 sc in next 3 stitches, make sc2tog, make 1 sc in next 10 stitches, make sc2tog , make 1 sc in the last stitch. Replace marker ( 16)
Change colour to brown
Round 12 – Round 41: Make 1 sc into each stitch. Replace marker (16).
Cut the yarn on the first leg.
Make another leg, but do not cut the yarn. Stuff with fiberfill. To keep colour changes at the back of your monkey, add a few extra sc onto the second leg. Then chain 2 and join the legs with sc in the next stitch of the first leg.
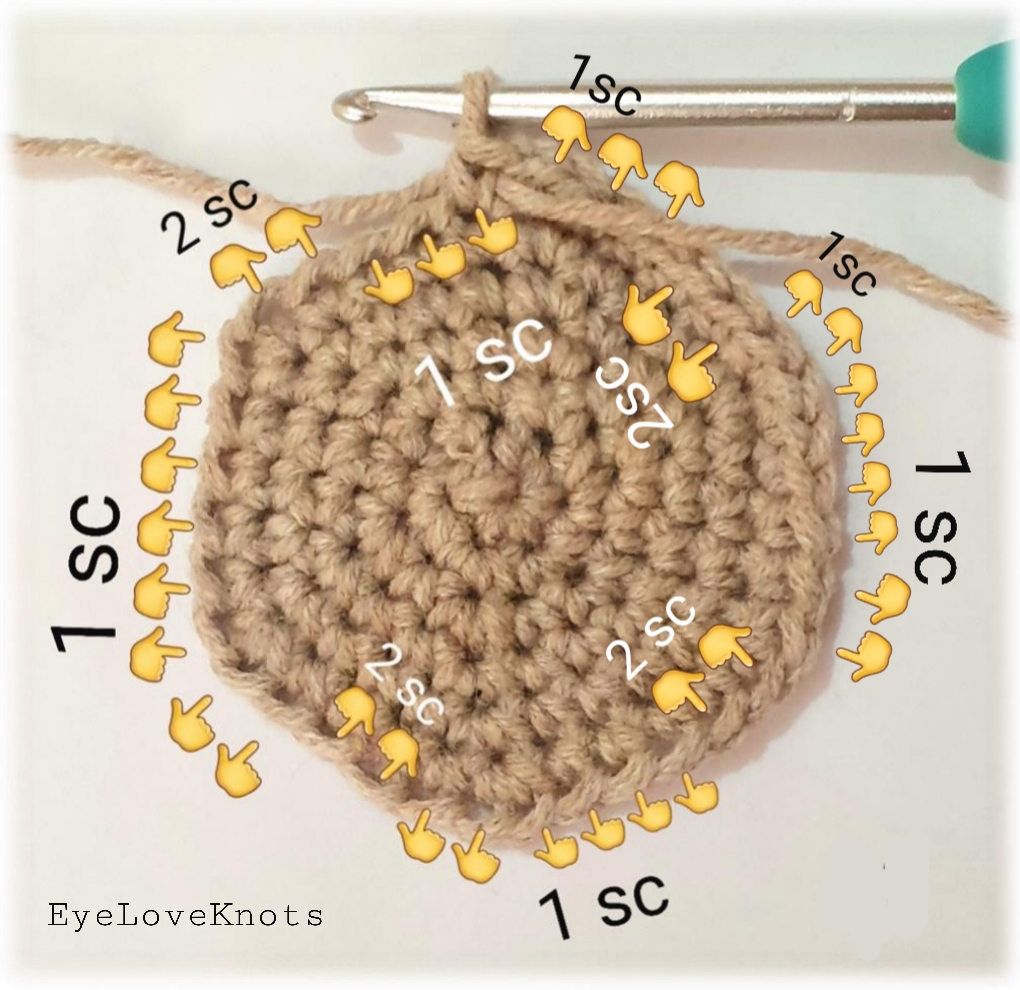
Round 42: Make 1 sc into each stitches and chains. Sc all around first leg (1 sc into next16 stitches) then make 1 sc into 2 chains, then continue sc around second leg (1 sc in next 16 stitches) and sc into last 2 chains Place the marker (36) (see diagram⬇️)

Round 43: < make 1 sc in next 5 stitches, make 2 sc in next stitch>repeat around. Replace marker (42)
Round 44: < make 1 sc in next 6 stitches, make 2 sc in next stitch> repeat around. Replace marker (48)
Round 45 – Round 48: Make 1 sc into each stitch. Replace marker (48)
Round 49: < make 1 sc in next 6 stitches, make sc2tog> repeat around. Replace marker (42)
Round 50 – Round 53: Make 1 sc into each stitch. Replace marker. (42)
Round 54: < make 1 sc in next 5 stitches, sc2tog> repeat around. Replace marker (36)
Round 55 – Round 60: Make 1 sc into each stitch. Replace marker (36)
Round 61: < make 1 sc in next 4 stitches, sc2tog> repeat around. Replace marker (30)
Round 62 – Round 66: Make 1 sc into each stitch. Replace marker (30)
Round 67: < make 1 sc in next 3 stitches, sc2tog> repeat around. Replace marker (24)
Round 68: < make 1 sc in next 2 stitches, sc2tog> repeat around. Replace marker (18)
Head:
Round 69: < make 1 sc in next 2 stitches make 2 sc in next stitch> repeat around. Replace marker (24)
Round 70: < make 1 sc in next 3 stitches, make 2 sc in next stitch> repeat around. Replace marker (30)
Round 71: < make 1 sc in next 4 stitches, make 2 sc in next stitch> repeat around. Replace marker (36)
Round 72: < make 1 sc in next 5 stitches, make 2 sc in next stitch> repeat around. Replace marker (42)
Round 73: < make 1 sc in next 6 stitches, make 2 sc in next stitch> repeat around. Replace marker (48)
Round 74: <make 1 sc in next 7 stitches, make 2 sc in next stitch > repeat around. Replace marker (54)
Round 75: < make 1 sc in next 8 stitches, make 2 sc in next stitch> repeat around. Replace marker (60)
Round 76 – Round 83: Make 1 sc into each stitch. Replace marker (60)
Round 84: < make 1 sc in next 8 stitches, sc2tog> repeat around. Replace marker (54)
Round 85: < make 1 sc in next 7 stitches, sc2tog> repeat around. Replace marker (48)
Round 86: < make 1 sc in next 6 stitches, make sc2tog> repeat around. Replace marker ( 42) Do not cut the yarn. We will continue the head later.
Eyes – Make 2 with Beige Yarn:
Round 1: Magic circle and chain 1
Round 2: Make 10 sc inside the Magic circle (10)
Round 3: Make 2sc into each stitch.(20). Cut the yarn, leave long tail for sewing.
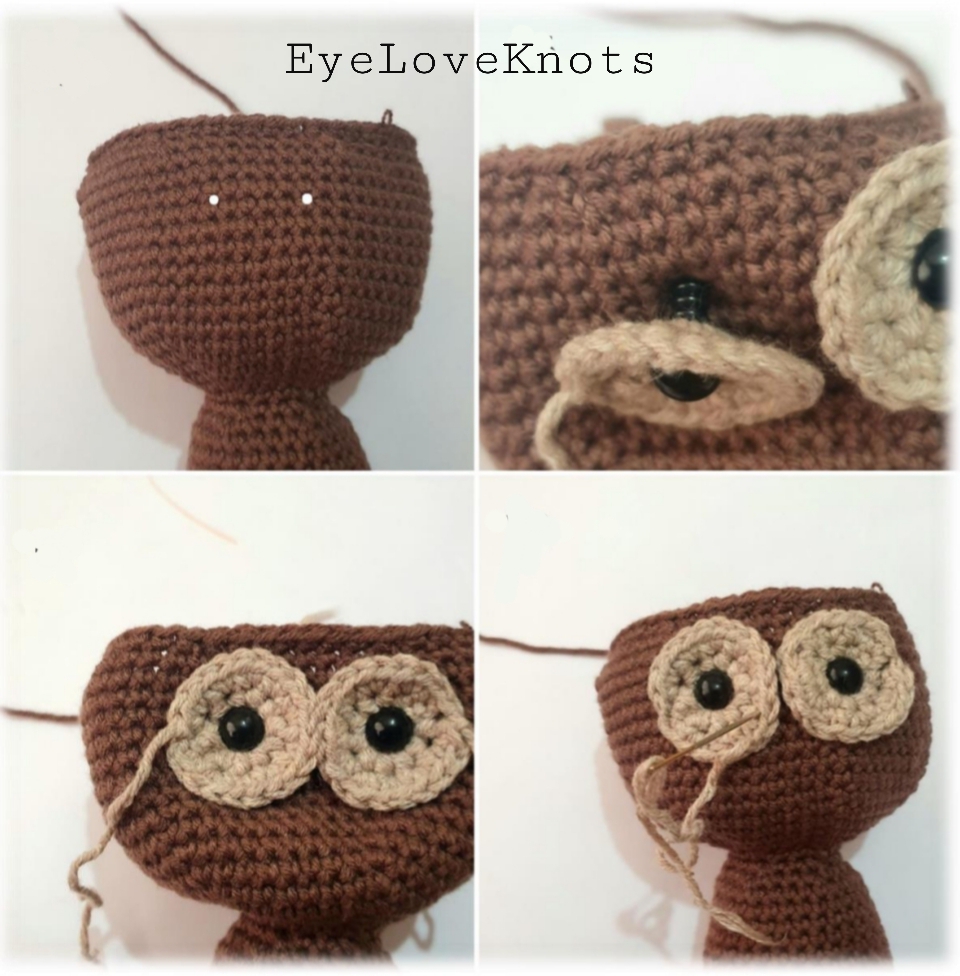
Insert 2 safety eyes inside the magic circle space, then insert safety eyes to the head between rounds 81 and 82 (at distance of 4 stitches from each others – see picture below, then sew the eyes by the needle.

Continue working on head
Round 87: < make 1 sc in next 5 stitches, make sc2tog> repeat around. Replace marker (36) Remember to stuff with fiberfill as you go)
Round 88: < make 1 sc in next 4 stitches, make sc2tog> repeat around. Replace marker (30)
Round 89: < make 1 sc in next 3 stitches, make sc2tog> repeat around. Replace marker (24)
Round 90: < make 1 sc in next 2 stitches, make sc2tog> repeat around. Replace marker (18)
Round 91: < make 1 sc in next stitch, make sc2tog> repeat around. Replace marker (12)
Round 92: <Make sc2 tog > x 6 (6)
Cut yarn, leave long tail. By the needle wave yarn tail through 6 stitches ( front loops only) , pull and close. Cut the yarn, wave end in.
Muzzle – In Beige Yarn:
Magic circle and chain 1
Round 1: Make 6 sc inside the Magic circle (6)
Round 2: Make 2 sc into each stitch. Replace marker (12)
Round 3: < make 1 sc in next stitch, make 2 sc in next stitch> repeat around. Replace marker (18)
Round 4: < make 1 sc in next 2 stitches, make 2 sc in next stitch> repeat around. Replace marker (24)
Round 5: < make 1 sc in next 3 stitches, make 2 sc in next stitch> repeat around. Replace marker (30)
Round 6: < make 1 sc in next 4 stitches, make 2 sc in next stitch> repeat around. Replace marker (36)
Round 7: Make 1 sc in next 3 stitches, make 2 sc in next 2 stitches, make 1 sc in next 8 stitches, make 2 sc in next 2 stitches, make 1 sc in next 6 stitches, make 2 sc in next 2 st 6, make 1 sc in next 8 stitches, make 2 sc in next 2 stitches, make 1 sc in the last 3 stitches. Replace marker (44)

Round 8 – Round 10: Make 1 sc into each stitch. Replace marker (44)
Round 11: Make 1 sc in first 3 stitches, make < sc2tog> x 2 , make 1 sc in next 8 stitches, <make sc2tog> x 2 , make 1 sc in next 6 stitches, < make sc2dec> x 2, make 1 sc in next 8 stitches, <make sc2tog> x 2 , make 1 sc in last 3 stitches. Replace marker (36)
Round 12: Make 1 sc into each stitch (36)
Round 13: < make 1 sc in next 4 stitches, sc2tog> repeat around. Replace marker (30)
Round 14: < make 1 sc in next 3 stitches, sc2tog> repeat around (24)
Cut the yarn. Leave long tail for sewing.
Embroider the nose:
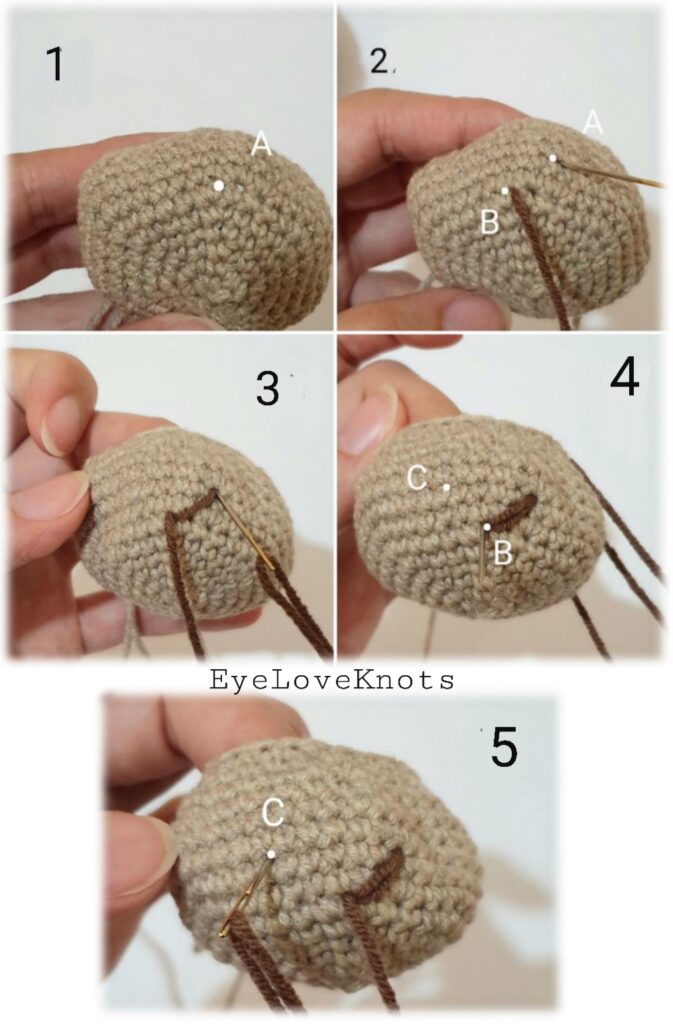
Thread the brown yarn on the needle and make a knot. Insert the needle between rounds 6 and 7( point A, pic 1) and bring it out. Then insert your needle 2 stitches down, 2 stitches left ( point B) and again into point A ( pic 2) and pull.
Then put your needle into point A ( pic 3) and then again in point B ( pic 4) and bring it out.
Then insert the needle 2 stitches up, 2 stitches left ( point c) ( pic 5) and pull. Then insert your needle in point B and C and pull. Make a knot, cut the yarn.

Stuff the muzze and sew it just under the eyes .
Outer Ear Pieces – Make 2 with Brown:
Magic circle and chain 1
Round 1: Make 6 sc inside the magic circle (6)
Round 2: Make 2 sc into each stitch. Repeat around. Replace marker (12)
Round 3: < make 1 sc in next stitch, make 2 sc in next stitch> repeat around. Replace marker (18)
Round 4: < make 1 sc in next 2 stitches, make 2 sc in next stitch> repeat around. Replace marker (24)
Round 5: Make 1 sc into each stitch. Cut the yarn, leave long tail for sewing.
Inner Ear Pieces – Make 2 with Beige:
Magic circle and chain 1
Round 1: Make 6 sc inside the loop (6)
Round 2: Make 2 sc into each stitch. Cut the yarn, leave long tail for sewing (12)
Assemble Ears:
Sew beige circle onto the brown circle. Insert your needle under the front loops only, beige yarn should not be visible from the outside.
Now sew the ears at the same round as the eyes or 1 round above, secure.
Hands – Make 2 with Beige Yarn:
Magic circle and chain 1
Round 1: Make 6 sc inside the magic circle (6)
Round 2: Make 2 sc into each stitch. Replace marker (12)
Round 3: < make 1 sc in next stitch, make 2 sc in next stitch> repeat around. Replace marker (18)
Round 4: < make 1sc in next 2 stitches make 2 sc in next stitch> repeat around. Replace marker (24)
Round 5 – 6: Make 1 sc into each stitch. Replace marker (24). Turn inside out.
Round 7: < make 1 sc in next 2 stitches, make sc2tog> repeat around. Replace marker (18)
Round 8: < make 1 sc in next stitch, sc2tog> repeat around. Replace marker (12)
Stuff with fiberfill .
Round 9: <Make sc2tog > x 2, make 1 sc into each stitch until end of the round. Replace marker (10)
Change colour to brown
Round 10 – Round 38: Make 1 sc into each stitch. Replace marker. (10)
Stuff with fiberfill until round 34. Fold top of arm flat and make 5 sc through both sides across. Cut the yarn, leave long tail.
Sew the arms on either side of the body on the round 67- 68. Remember to secure last stitch with a knot.
Tail – In Brown Yarn:
Magic circle and chain 1.
Round 1: Make 3 sc inside the magic circle (3)
Round 2: Make 2 sc in first stitch, make 1 sc in next 2 stitches. (4). Turn inside out.
Round 3: Make 2 sc in first stitch, make 1 sc in next 3 stitches. Replace marker (5)
Round 4: Make 2 sc in first stitch, make 1 sc in next 4 stitches. Replace marker (6)
*Fill with fiberfill as you go.
Round 5: Make 2 sc in first stitch, make 1 sc in next 5 stitches. Replace marker (7)
Round 6: Make 2 sc in first stitch , make 1 sc in next 6 stitches. Replace marker (8)
Round 7: Make 2 sc in first stitch, make 1 sc in next 7 stitches. Replace marker (9)
Round 8 – Round 39: Make 1 sc into each stitch. Replace marker (9)
Cut the yarn, leave long tail.
Sew the tail to the body to the round 54.

Please feel free to make and sell your own items made using this pattern, but keep in mind, this written pattern and my photos are protected by copyright. Please DO NOT claim this pattern as your own nor should you sell my pattern. DO NOT re-publish my photos as your own. DO NOT copy and paste my pattern anywhere, link to it instead so other’s can visit. Making videos providing instructions how to make my projects on any social media platform is also not permitted.
Join one of our awesome Facebook groups to share your creations, and see what others are up to!
– Yarn Crafts & Coffee Community
– DIY Home On Rockwood Lane
– Alexandra Lane Lifestyle
Linked Up To…


Leave a Reply