This post contains affiliate links for LoveCrochet. If you make a purchase by clicking on them, I make a small commission at no extra cost to you. Thanks for your support!
This year I am participating in the 2018 Christmas in July Crochet Along, hosted by Marie of Underground Crafter and Pia of Stitches n Scraps.
When I saw the opening to join this crochet along, I got really excited and popped over to sign up. Most spots were already filled, but this month happened to be open, which is inspired by the men in our lives. My challenge was to design something that could be worked up quickly for gift giving, and something a guy would like to receive – the first part not bad, but the second part not such an easy task!
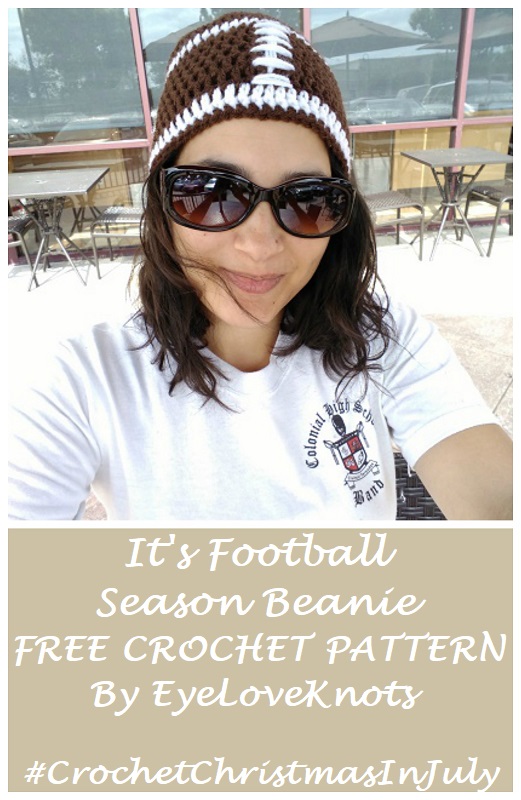
Time went on, and I was getting nervous that I wouldn’t have anything ready when I remembered this hat. I made this hat two Super Bowls ago, and wore it to my nieces flag football games, but never published the pattern. Football + Men = Success! Hehe. AND! This pattern is sized from newborn to adult large, so you can make the whole family matching hats 🙂
I hope you enjoy this pattern! And that you’ll check out what the other designers have put together as part of the Christmas in July Crochet Along. You can find out more about joining and entering the giveaways HERE, which will take you to the Underground Crafter’s blog.
If you would like a PDF version of this post, you may get one through either my EyeLoveKnots Etsy Shop or EyeLoveKnots Craftsy Shop for a small fee. This fee is to compensate for the views lost when you no longer need to return to the blog to for the information, as you will have your own copy. Plus! It helps fund supplies for new projects to share with you!
Shop EyeLoveKnots Etsy: It’s Football Season Beanie.
Shop EyeLoveKnots Craftsy: It’s Football Season Beanie.
Shop EyeLoveKnots LoveCrochet: It’s Football Season Beanie.
Are you a Raveler? Share your version of this project on Ravelry – It’s Football Season Beanie.
Materials:
- 100 – 225 Yards of Worsted Weight Yarn – I used Red Heart’s With Love in the Chocolate and White colorways
- I9/5.5mm Crochet Hook
- Tapestry Needle for Weaving in Ends & Stitching Football Laces
Material Notes:
Yarn Alternatives: Hobby Lobby’s I Love This Yarn, Berroco’s Vintage Yarn.
Time Spent:
Times range from 45 minutes to two and a half hours, depending on desired size.
Measurements:
The Newborn Size has a crown of 4.25″ in diameter, a circumference of nearly 13.5″ to fit a head size of 13 – 14″, and is 5″ in length.
The 3 – 6 Month Size has a crown of 4.75″ in diameter, a circumference of nearly 15″ to fit a head size of 15 – 16″, and is 5.25″ in length.
The 6 – 12 Month Size has a crown of 5.5″ in diameter, a circumference of nearly 17.5″ to fit a head size of 17 – 19″, and is 5.75″ in length.
The Toddler Size has a crown of 5.75″ in diameter, a circumference of 18″ to fit a head size of 18 – 20″, and is 6.5″ in length.
The Child Size – Teen/Adult Small Size has a crown of 6.25″ in diameter, a circumference of nearly 19.75″ to fit a head size of 20 – 22″, and is 7 – 8.5″ in length, respectively.
The Adult Large Size has a crown of 6.75″ in diameter, a circumference of nearly 21.25″ to fit a head size of 22 – 23″, and is about 8.5 – 9.5″ in length.
*The best way to ensure sizing is to take head measurement. To do so, take a soft tape measure, and measure around the head, just above eyebrows. The distance around is the circumference. If it does NOT fall in the given circumference ranges, you will need to use this equation to figure out what size diameter you will need: Circumference / 3.14 (pi) = crown diameter, keeping yarn stretch in mind. For these beanies, there is about an inch or so of stretch, but most yarns will stretch at least 2″.
Gauge:
14 DC by 8 Rows = 4″ Square
Abbreviations:
- SC – Single Crochet
- HDC – Half Double Crochet
- DC – Double Crochet
Pattern Notes:
I work my crown and body differently than most to help keep my seam straight, and it will be written as such.
In the crown, the beginning chain 2 does not count as a stitch, but in the body, the chain 2 does count.
Join to the first stitch, not the beginning chain 2.
If you need help working up the basic beanie, I have a step by step photo tutorial in my Women’s Basic Beanie post, and I even explain how to make a fun pom pom to top the beanie with!
Patterns:
NEWBORN:
In Brown, chain 4. Join to form a ring. Chain 1. 9 HDC into the ring. Join. (9 HDC)
R2: Chain 2. DC into the 1st stitch, 2 DC into each of the next 8 DCs, and DC into the last stitch. Join. (18 DC)
R3: Chain 2. DC into the first 2 stitches, (2 DC into the next stitch, DC into the next stitch) 8x, DC into the last stitch. Join. (27 DC)
R4: Chain 2. DC into the 1st 3 stitches, (2 DC into the next stitch, DC into each of the next 2 stitches) 8x, DC into the last stitch. Join with White. (36 DC)
R5: In White, chain 2. DC into the 2nd DC, and each DC around. Join with Brown. (36 DC)
R6: In Brown, chain 2. DC into the 1st DC, and each DC around. Join. (36 DC)
R7: Chain 2. DC into the 2nd DC, and each DC around. Join. (36 DC)
R8 – 9: Repeat Rounds 6 and 7. At the end of Round 9, join with White.
R10: In White, chain 2. DC into the 1st DC, and each DC around. Join with Brown.
R11: In Brown, chain 1. SC into the 1st stitch, and each stitch around. Join, and Fasten Off. (36 SC)
3 – 6 MONTH:
In Brown, chain 5. Join to form a ring. Chain 2. 11 DC into the ring. Join. (11 DC)
R2: Chain 2. DC into the 1st stitch, 2 DC into each of the next 10 DCs, DC into the last stitch. Join. (22 DC)
R3: Chain 2. DC into the 1st 2 stitches, (2 DC into the next stitch, DC into the next stitch) 10x, DC into the last stitch. Join. (33 DC)
R4: Chain 2. DC into the 1st 3 stitches, (2 DC into the next stitch, DC into each of the next 2 stitches) 10x, DC into the last stitch. Join with White. (44 DC)
R5: In White, chain 2. DC into the 2nd DC, and into each DC around. Join with Brown. (44 DC)
R6: In Brown, chain 2. DC into the 1st DC, and each DC around. Join. (44 DC)
R7: Chain 2. DC into the 2nd DC, and each DC around. Join. (44 DC)
R8 – 9: Repeat Rounds 6 and 7. At the end of Round 9, join with White.
R10: In White, chain 2. DC into the 1st DC, and each DC around. Join with Brown.
R11: In Brown, chain 1. SC into the 1st stitch, and each stitch around. Join, and Fasten Off. (44 SC)
6 – 12 MONTHS:
In Brown, chain 4. Join to form a ring. Chain 2. 10 DC into the ring. Join. (10 DC)
R2: Chain 2. DC into the 1st stitch, 2 DC into each of the next 9 DC, DC into the last stitch. Join. (20 DC)
R3: Chain 2. DC into the 1st 2 stitches, (2 DC into the next stitch, DC into the next stitch) 9x, DC into the last stitch. Join. (30 DC)
R4: Chain 2. DC into the 1st 3 stitches, (2 DC into the next stitch, DC into each of the next 2 stitches) 9x, DC into the last stitch. Join. (40 DC)
R5: Chain 2. DC into the 1st 4 stitches, (2 DC into the next stitch, DC into each of the next 3 stitches) 9x, DC into the last stitch. Join with White. (50 DC)
R6: In White, chain 2. DC into the 2nd DC, and into each DC around. Join with Brown. (50 DC)
R7: In Brown, chain 2. DC into the 1st DC, and into each DC around. Join. (50 DC)
R8: Chain 2. DC into the 2nd DC, and into each DC around. Join. (50 DC)
R9 – 10: Repeat Rounds 7 and 8. At the end of Round 8, join with White.
R11: In White, chain 2. DC into the 1st DC, and into each DC around. Join with Brown. (50 DC)
R12: In Brown, chain 1. SC into the 1st DC, and into each DC around. Join, and Fasten Off. (50 SC)
TODDLER, 1 – 3 YEARS:
In Brown, chain 5. Join to form a ring. Chain 2. 11 DC into the ring. Join. (11 DC)
R2: Chain 2. DC into the 1st stitch, 2 DC into each of the next 10 DC, DC into the last stitch. Join. (22 DC)
R3: Chain 2. DC into the 1st 2 stitches, (2 DC into the next stitch, DC into the next stitch) 10x, DC into the last stitch. Join. (33 DC)
R4: Chain 2. DC into the 1st 3 stitches, (2 DC into the next stitch, DC into each of the next 2 stitches) 10x, DC into the last stitch. Join. (44 DC)
R5: Chain 2. DC into the 1st 4 stitches, (2 DC into the next stitch, DC into each of the next 3 stitches) 10x, DC into the last stitch. Join. (55 DC)
R6: Chain 2. DC into the 2nd DC, and into each DC around. Join with White. (55 DC)
R7: In White, chain 2. DC into the 1st DC, and into each DC around. Join with Brown. (55 DC)
R8: In Brown, chain 2. DC into the 2nd DC, and into each DC around. Join. (55 DC)
R9 – 11: Repeat Rounds 7 and 8, ending after a Round 7 repeat. At the end of Round 11, join with White.
R12: In White, chain 2. DC into the 2nd DC, and into each DC around. Join. (55 DC)
R13: Chain 1. SC into the 1st DC, and into each DC around. Join with Brown. (55 SC)
R14: In Brown, chain 1. SC into the 1st SC, and into each SC around. Join, and Fasten Off. (55 SC)
CHILD, 4 – 12 YEARS:
In Brown, chain 4. Join to form a ring. Chain 2. 9 HDC into the ring. Join. (9 HDC)
R2: Chain 2. DC into the 1st stitch, 2 DC into each of the next 8 DC, DC into the last stitch. Join. (18 DC)
R3: Chain 2. DC into the 1st 2 stitches, (2 DC into the next stitch, DC into the next stitch) 8x, DC into the last stitch. Join. (27 DC)
R4: Chain 2. DC into the 1st 3 stitches, (2 DC into the next stitch, DC into each of the next 2 stitches) 8x, DC into the last stitch. Join. (36 DC)
R5: Chain 2. DC into the 1st 4 stitches, (2 DC into the next stitch, DC into each of the next 3 stitches) 8x, DC into the last stitch. Join. (45 DC)
R6: Chain 2. DC into the 1st 5 stitches, (2 DC into the next stitch, DC into each of the next 4 stitches) 8x, DC into the last stitch. Join with White. (54 DC)
R7: In White, chain 2. DC into the 2nd DC, and into each DC around. Join with Brown. (54 DC)
R8: In Brown, chain 2. DC into the 1st DC, and into each DC around. Join. (54 DC)
R9: Chain 2. DC into the 2nd DC, and into each DC around. Join. (54 DC)
R10 – 12: Repeat Rounds 8 and 9, ending after a Round 8. At the end of Round 12, join with White.
R13: In White, chain 2. DC into the 1st DC, and into each DC around. Join. (54 DC)
R14: Chain 1. SC into the 1st stitch, and into each stitch around. Join with Brown. (54 SC)
R15: In Brown, chain 1. SC into the 1st stitch, and into each stitch around. Join, and Fasten Off. (54 SC)
TEEN/ADULT SMALL:
In Brown, chain 4. Join to form a ring. Chain 2. 9 HDC into the ring. Join. (9 HDC)
R2: Chain 2. DC into the 1st stitch, 2 DC into each of the next 8 DC, DC into the last stitch. Join. (18 DC)
R3: Chain 2. DC into the 1st 2 stitches, (2 DC into the next stitch, DC into the next stitch) 8x, DC into the last stitch. Join. (27 DC)
R4: Chain 2. DC into the 1st 3 stitches, (2 DC into the next stitch, DC into each of the next 2 stitches) 8x, DC into the last stitch. Join. (36 DC)
R5: Chain 2. DC into the 1st 4 stitches, (2 DC into the next stitch, DC into each of the next 3 stitches) 8x, DC into the last stitch. Join. (45 DC0
R6: Chain 2. DC into the 1st 5 stitches, (2 DC into the next stitch, DC into each of the next 4 stitches) 8x, DC into the last stitch. Join. (54 DC)
R7: Chain 2. DC into the 2nd DC, and into each DC around. Join with White. (54 DC)
R8: In White, chain 2. DC into the 1st DC, and into each DC around. Join with Brown. (54 DC)
R9: In Brown, chain 2. DC into the 2nd DC, and into each DC around. Join. (54 DC)
R10 – 15: Repeat Rounds 8 and 9. At the end of Round 15, join with White.
R16: In White, chain 2. DC into the 1st DC, and into each DC around. Join. (54 DC)
R17: Chain 1. SC into the 1st stitch, and into each stitch around. Join with Brown. (54 SC)
R18: In Brown, chain 1. SC into the 1st stitch, and into each stitch around. Join, and Fasten Off. (54 SC)
ADULT LARGE:
In Brown, chain 5. Join to form a ring. Chain 2. 11 DC into the ring. Join. (11 DC)
R2: Chain 2. DC into the 1st stitch, 2 DC into each of the next 10 DC, DC into the last stitch. Join. (22 DC)
R3: Chain 2. DC into the 1st 2 stitches, (2 DC into the next stitch, DC into the next stitch) 10x, DC into the last stitch. Join. (33 DC)
R4: Chain 2. DC into the 1st 3 stitches, (2 DC into the next stitch, DC into each of the next 2 stitches) 10x, DC into the last stitch. Join. (44 DC)
R5: Chain 2. DC into the 1st 4 stitches, (2 DC into the next stitch, DC into each of the next 3 stitches) 10x, DC into the last stitch. Join. (55 DC)
R6: Chain 2. DC into the 1st 5 stitches, (2 DC into the next stitch, DC into each of the next 4 stitches) 10x, DC into the last stitch. Join. (66 DC)
R7: Chain 2. DC into the 2nd DC, and into each DC around. Join. (66 DC)
R8: Chain 2. DC into the 1st DC, and into each DC around. Join with White. (66 DC)
R9: In White, chain 2. DC into the 2nd DC, and into each DC around. Join with Brown. (66 DC)
R10 – 17: In Brown, repeat Rounds 8 and 9. At the end of Round 17, join with White.
R18: In White, chain 2. DC into the 1st DC, and into each DC around. Join. (66 DC)
R19: Chain 1. SC into the 1st stitch, and into each stitch around. Join with Brown. (66 SC)
R20: In Brown, chain 1. SC into the 1st stitch, and into each stitch around. Join, and Fasten Off. (66 SC)
Football Lacings:
Cut a long piece of white yarn, and thread tapestry needle. The lacings will be in the brown space between white rounds.
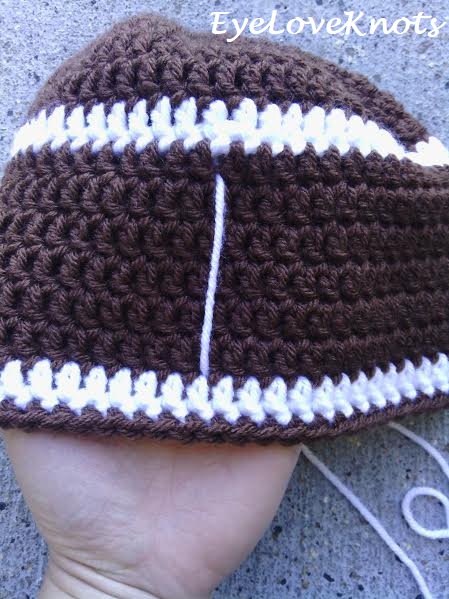
Weave tail in on the wrong side a few times – I recommend 3, and then insert needle from wrong side just under top white round, and bring down and back into the hat from the right side just above bottom white round. Repeat two more times to make this line thicker.
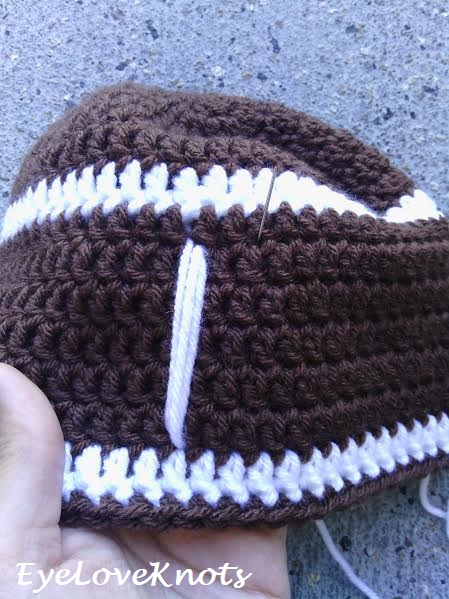
Now time to work the horizontal stripes. Bring needle up from the wrong side, about two stitches over from where you first took the needle out at the top, and work over to the left, bringing the needle down about two stitches from that center line. Repeat two more times to thicken.
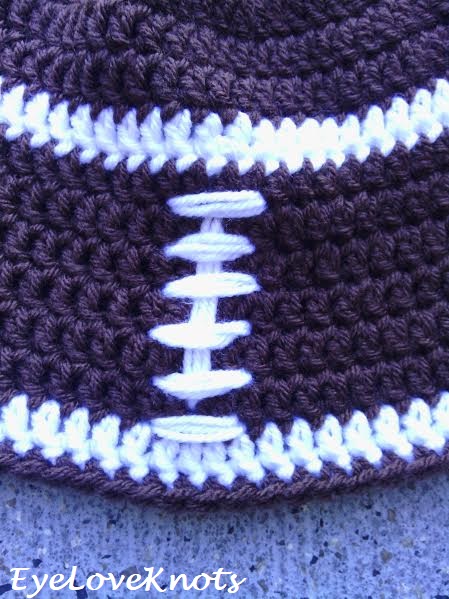
Evenly work in this manner down the center line, making sure to match up the start and finish of the center line with your horizontal stripes, as I did with my first stripe, but missed with my second stripe (why you can see the gap). What I should have done was work the second to last horizontal stripe a little lower, and omit the last stripe. Also make sure not to pull too tight, as you don’t want the part of the hat to bunch. Weave the final end in.
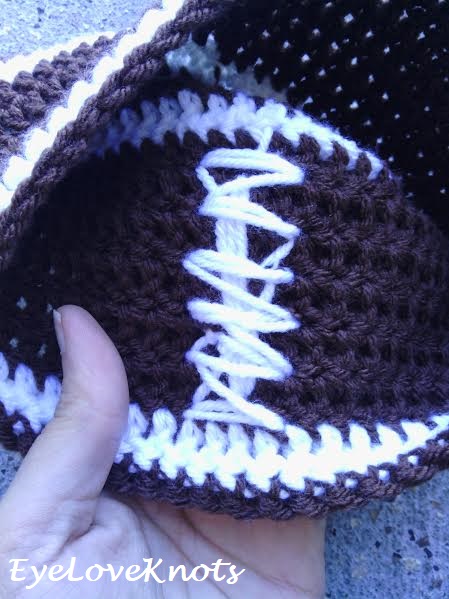
This is what the inside of my hat looks like… A little messy, but not noticeable from the right side, and not in the way. You could always line your hat if you don’t like it, or stitch up the lacings part, and sew on, like an applique.

And there you have a football beanie ready to wear, or gift to a lucky guy in your life!
Please feel free to make and sell your own It’s Football Season Beanies using this pattern, but please DO NOT claim this pattern as your own nor should you sell my pattern, and DO NOT re-publish my photos as your own. DO NOT copy and paste my pattern anywhere, link to it instead.
Join the EyeLoveKnots Crafting Community on Facebook to share your creations, and see what others are up to!
Linked Up To…
Sundays at Home #216 – Celebrating Everyday Life
Nifty Thrifty Sunday #345 – Meet Our Life
In Stitches Party #15 – Nicki’s Homemade Crafts
Creative Mondays – Claire Justine
Handmade Monday #86 – Sum of their Stories
Inspiration Monday – Scattered Thoughts of a Crafty Mom
Craftastic Monday Link Party – Sew Can Do
The Really Crafty Link Party #130 – Keeping it Real
Merry Monday #215 – A Wonderful Thought
Tutorials & Tips Link Party {361} – Home Stories A to Z
The Scoop Link Party #337 – Worthing Court Blog
433rd Inspire Me Tuesday – A Stroll Thru Life
Fabulous Party #226 – Lou Lou Girls
Sew It Cook It Craft It Link Party #65 – Sew Historically
Turning Heads Tuesday – Elegantly Dressed and Stylish
Confident Twosday Linkup – I Do DeClaire
The Linky Ladies Party #138 – The Purple Poncho
{wow me} wednesday #360 – Ginger Snap Crafts
Your Whims Wednesday #366 – My Girlish Whims
The Wednesday Link Party 256 – The Stitchin’ Mommy
Hookin’ on Hump Day #171 – Petals to Picots
The Blended Blog Freestyle Link Up – Living on Cloud Nine
Pin Party #276 – Pin Junkie
Crafty Love Link Party #36 – Jessie at Home
Friday Frenzy Link Party – 8/3/18 – Kelly Lynn’s Sweets and Treats
Funtastic Friday 190 – Olives & Okra
Sweet Inspiration Link Party #118 – Purple Hues and Me
Thursday Fashion Files Link Up #172 – Curly Crafty Mom
Weekend Wear Linkup – Mom with Style
Lizzie in Lace Link Up – Lizzie in Lace
Snickerdoodle Create Bake Make Party #243 – Across the Boulevard
Sundays at Home #217 – Celebrating Everyday Life
Pretty Pintastic Party #220 – Sparkle Living
That’s so clever, it’s a simple hat but the details make it look so much fun. Brilliant!
Yes! Simple is always a plus. I would like to try another version of this in tapestry too.
First, this football beanie look adorable on you Alexandra! i say you wear it for some of the games! What a clever idea for a guy’s gift! You did a great job!
thanks for linking!
jess xx
http://www.elegantlydressedandstylish.com
Thank you, thank you! I would like to work another up in a lighter cotton yarn so it’s more tolerable in our Florida heat. I have a cousin started high school this year, already started his football practices, and I am looking forward to wearing it some of his games.
This is a such a unique idea! Very cute! I love at how you came up with it as well as having it available from NB to adults!
Maureen | http://www.littlemisscasual.com
Thanks so much, Maureen!
Cute! My son would love one of these.
Thank you for sharing at The Really Crafty link Party. Pinned.
Love your hat! In pic looks like 2 white rows together but when i make it following pattern there is brown row in between white row on all the pattern sizes. Just wondering why. Thanks!
In my original hat, which is what the pictures are from, I worked a row of double crochet followed by single crochet both in white. In this design, I did not have time to figure out measurements by working this way, but I have done several hats for clients as written in this pattern.
Love this! This will be one of my features this week on the Snickerdoodle Create Bake Make Party! Stop by to check it out! Roseann from This Autoimmune Life
Thanks so much, Roseann! Just popped by the party 🙂
Such a cute football hat! Thanks for sharing the pattern! I’m pinning this!
Thanks so much, Tonna!
What a great idea! Christmas gifts for all the footballers here! Thank you for the idea and pattern.
Yes, excellent gift idea. Enjoy!
My sis says it’s cute, as I shared pattern w/ her.
Just finished mine. Hardest part was even laced. Go Rams!
So kind of you to share! Thank you! I will admit, I had quite a tough time myself with getting that lacing even – you can tell that mine isn’t in the one in the photo. I thought about cutting some out of felt, and hot gluing on to see how it would turn out. Maybe in the fall… Glad you enjoyed the pattern!