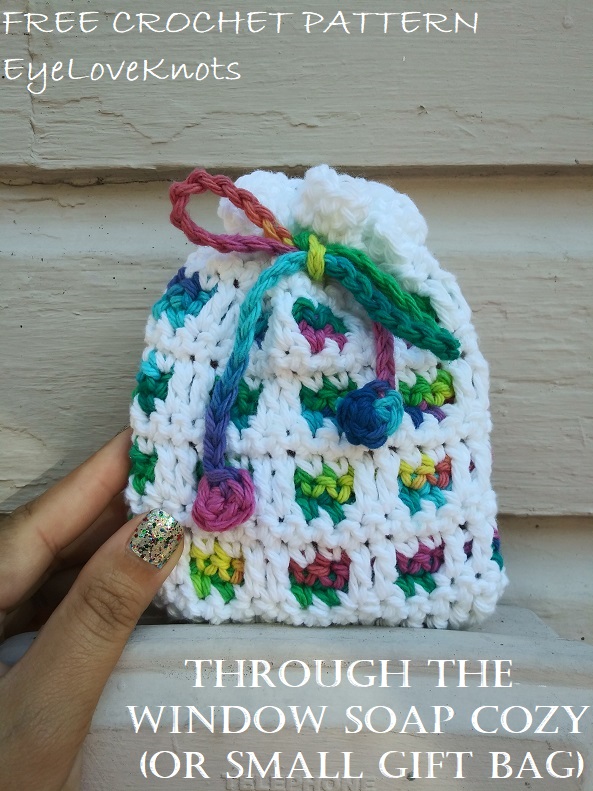
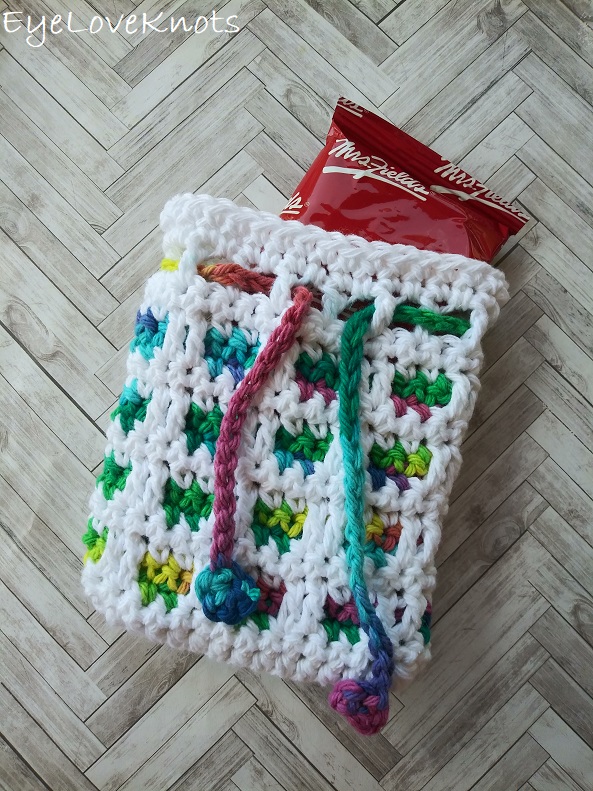
This is a free crochet pattern for how to crochet my Through the Window Gift Bag, a fun mini gift bag crocheted with inset mosaic crochet. Don’t let it scare you! It’s comprised of simple single crochet stitches, chains and easy double crochets.
This post contains affiliate links. If you make a purchase by clicking on them, I make a small commission at no extra cost to you. I only recommend products I love and hope you’ll love them too! Click here to find out about the different affiliate programs I am apart of. This post also contains shop links to my yarn shop and craft store, Yarn Crafts & Coffee. You can shop online or in person in Melbourne, Florida.
Find the free crochet pattern instructions below, or purchase a printer-friendly, ad-free PDF on Ravelry by clicking here.
In a hurry? Pin this for later when you have more time.
Crochet mini bags are one of my favorite things to make. They are quick to work up and so versatile!
Originally, this mini crochet bag was designed as a soap cozy, where you place a bar of soap in it and use it in the shower to exfoliate with and make your bar of soap go further, but these mini crochet bags are also perfect as candy pouches for parties, as small gift bags and even as a coin purse, so in remixing this design as part of my Spooktacular Halloween Crafting Event 2025, I decided to rename this bag as a Mini Gift Bag.
My favorite way to work this stitch pattern is by using a variegated yarn as the background color and a coordinating color over top of it as the main color, but over the years, I’ve enjoyed working many samples in a single solid color as the background color, or two solid colors to resemble stripes. The possibilities are endless!
Soap Cozy Note:
The feedback I’ve received for this bag as a soap cozy is that with it’s solid fabric and thicker yarn, it does take a while to dry so keep this in mind if you intend to use it this way. Perhaps, consider using a lighter weight yarn, or a cotton blend with a fast drying fiber, like bamboo.
In Spring colors, this is a great bag for Easter treats or a Mother’s Day Gift.

In cute, spookier colors, this is a great bag for Halloween treats.
October 2, 2025 Pattern Update:
As mentioned above, I wanted to include this design in the Spooktacular Halloween Crafting Event for 2025, but I also wanted to add a video tutorial. Right now, the video filming is still in progress so I will be updating this post again when the video is ready. In the update, I used a different worsted weight cotton yarn that is thicker than the others I used prior, which lead to a stitch count adjustment to accommodate the thicker yarn but get closer to the original size. I did not want to remove the original instructions because they are still great for lighter worsted weight cotton yarns, like WeCrochet Dishie and Queensland Coastal Cotton, without having to go up a crochet hook size (H8/5mm is my favorite for all worsted weight yarn!). The new instructions are great for thicker worsted weight cotton yarns, like the Circulo Natural Cotton Maxcolor 4/6 that I used, and may be appropriate for acrylic and wool yarns as well, though I haven’t tested the sizing on these.
So, this is a two-in-one pattern. Make sure to find the heading appropriate to your choice of yarn to follow those instructions. The video tutorial and PDF will reflect both versions the same as this post.
Mosaic Crochet Patterns:
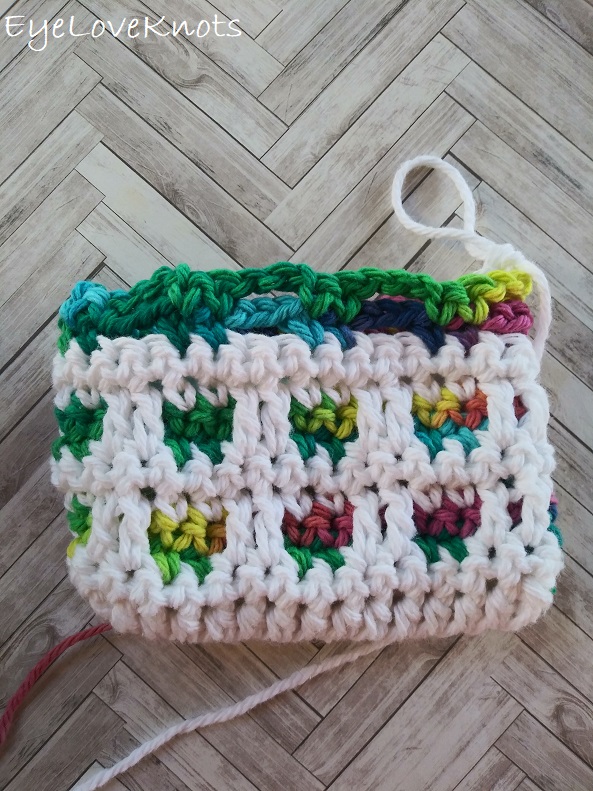
Through the Window is a fun crochet line that features inset mosaic crochet, a technique combining chains and single crochets with double crochets worked over the chains. With the main color worked on top of the fun, colored background boxes, it reminds me a window pane – the inspiration behind the name.
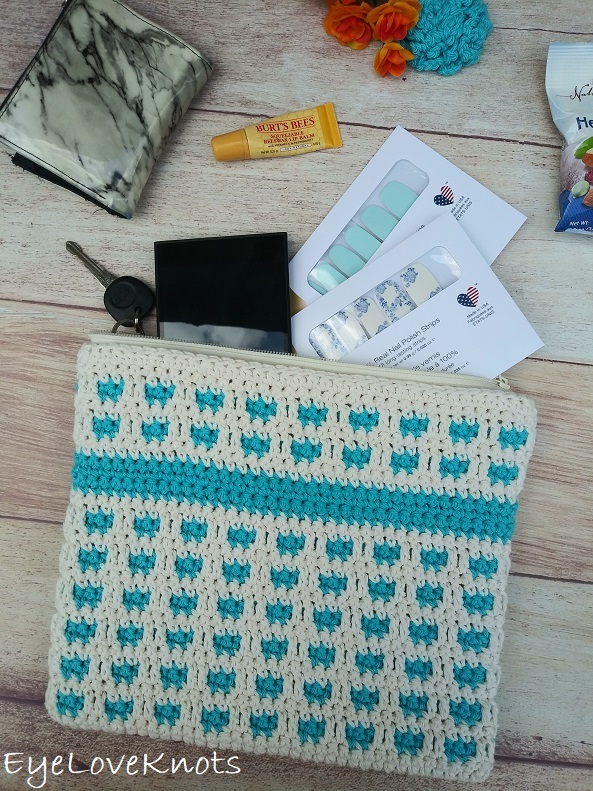
You’ll Love These Matching Pieces:
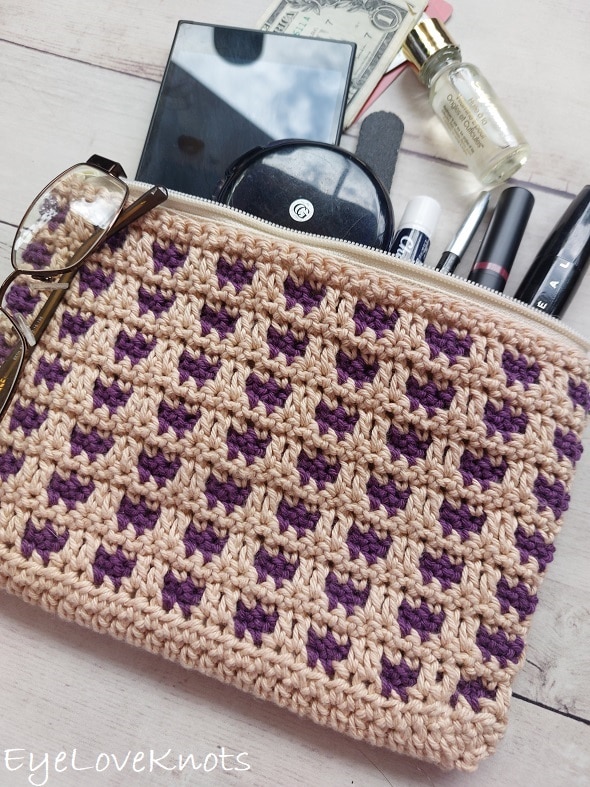
Through the Window Cosmetic Bag or Hook Pouch
Through the Window Mini Stocking
Find more Through the Window accessory and home decor crochet patterns here on EyeLoveKnots, and Through the Window accessory and wearables crochet patterns on Cre8tion Crochet.
Ad-Free, Printer Friendly PDF:

EyeLoveKnots newsletter subscribers get access to Exclusive Subscriber Content, like the free PDF of this pattern via the Free File Library – you’ll find the tab on the top menu. The library is password protected so sign up for my newsletter and you’ll receive a Welcome email containing this month’s password, or if you are already a blog subscriber, reference your latest newsletter for this month’s password. From the library, you’ll be able to access the PDFs via Google Drive – you do not need to have a Google Drive account to view and download the PDF.
For a Limited Time…

Through 10/03/25 at 2:00pm EST, you can grab a free copy of the PDF for the Through the Window Mini Gift Bag on Ravelry using code SPOOKY25. I earn my income from the number of pageviews my blog sees, so please do not share the code, but instead share the link to this post so others can find it. Thank you!
After 10/03/25 or for non-subscribers, if you would like a PDF version of this post, you may get one through either my Etsy Shop, Ravelry Shop or LoveCrafts Shop for a small fee. This fee is to compensate for the views lost when you no longer need to return to the blog to for the information, as you will have your own copy. In a hurry? Pin this for later when you have more time!


Save this to Your Favorites On: AllFreeCrochet, FaveCrafts, Crochet Pattern Bonanza, Cheap Thrifty Living, DIYideaCenter, AllFreeHolidayCrafts, Free Crochet Tutorials
Materials:
- 70 Yards of Worsted Weight Yarn
- H8/5mm Crochet Hook
- Tapestry Needle
- Optional, Jewelry Pliers
Material Notes:

My original bag, worked in the white and Spring-y variegated yarn, was worked in Lily Sugar n Cream in the White and Psychedelic colorways.
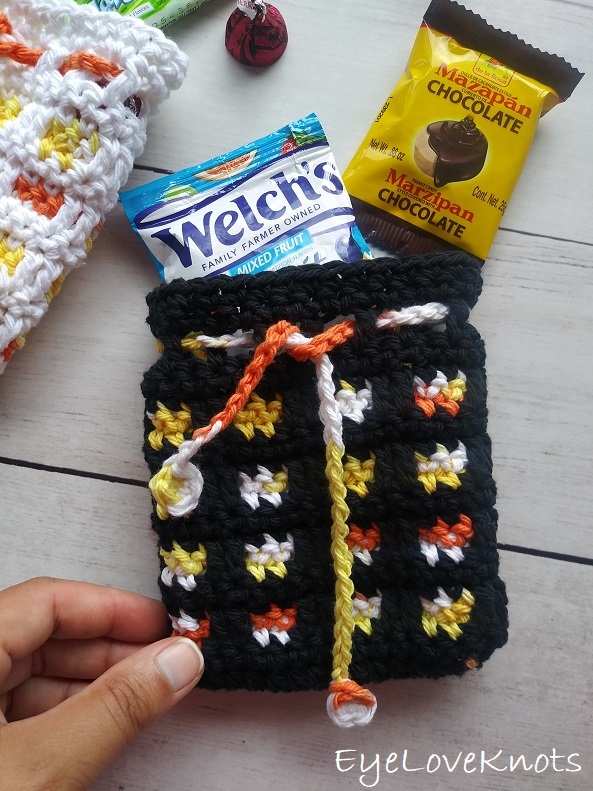
In 2020, I remade this little bag in candy corn inspired colors using Lily Sugar n Cream in the Creamsicle, White and Black colorways.
In 2025, I revisited this pattern again for the Spooktacular Halloween Crafting Event, and I wanted to use a yarn I’ve really been enjoying lately and that I also carried in my Yarn Crafts & Coffee Shop so I turned to Circulo Cotton Natural Maxcolor 4/6 in the Black and Pumpkin colorways.
With Black being such a dark color and near impossible to see on camera, I also made another sample for the video tutorial using WeCrochet Dishie in the White, Crème Brulee and Clementine colorways.
Now, do you need to use a cotton yarn? Not at all! I love the durability and versatility of cotton yarn, but you can use your favorite worsted weight yarn from your stash. Keep in mind, cotton creates a more relaxed fabric, so if you opt for something like acrylic or wool, you’ll want to size up on your crochet hook.
We have lots of great crochet hooks in our Yarn Crafts and Coffee Yarn Shop. The most popular, and preferred by Candace and Emily, are the Clover Amour Crochet Hooks with the soft handles and smooth metal hook. Alexandra prefers metal crochet hooks with large, ergonomic clay handles and just loves the fun designs from SiennasBowtique and BronzeShepherdStudio! If your preference is wood, the LYKKE brand are lovely, smooth and sturdy.
Jewelry Pliers are an excellent tool to use to help weave in the ends of tough yarns, such as cotton yarns and chunkier yarns, that can be quite tough on the fingers when weaving in with just fingers and a tapestry needle. Sore thumbs and frustration can be a thing of the past by simply using jewelry pliers to help pull the tapestry needle through the work. Make sure the eye of the needle is facing up so you can see directly down it and carefully pull, wiggling as needed. If it gets caught and you tug too hard, it will break the eye of your needle.
Time Spent:
This cozy took me just under 45 minutes to work up.
Measurements:
- Lily Sugar n Cream: 4 1/4″ Wide by 5 3/4″ Tall
- Circulo Natural Cotton Maxcolor 4/6: 4 1/4″ by 5 1/2″ Tall
Gauge – Not Essential:
In Pattern, Round 1:
- Queensland Coastal Cotton: 3 7/8″ Wide by 1 1/8″ Tall
- WeCrochet Dishie: 4″ Wide by 1 1/8″ Tall
- Circulo Natural Cotton Maxcolor 4/6: 3 7/8″ Wide by 1 1/4″ Tall
Measured Flat Across a Row 3 Repeat:
- WeCrochet Dishie: 17 Stitches by 11 Rows = 4” Wide by 4 1/8” Tall
Abbreviations (US Terms):
- HDC – Half Double Crochet (Photo Tutorial | Video Tutorial)
- SC – Single Crochet (Photo Tutorial)
- DC – Double Crochet (Photo Tutorial)
Pattern Notes:
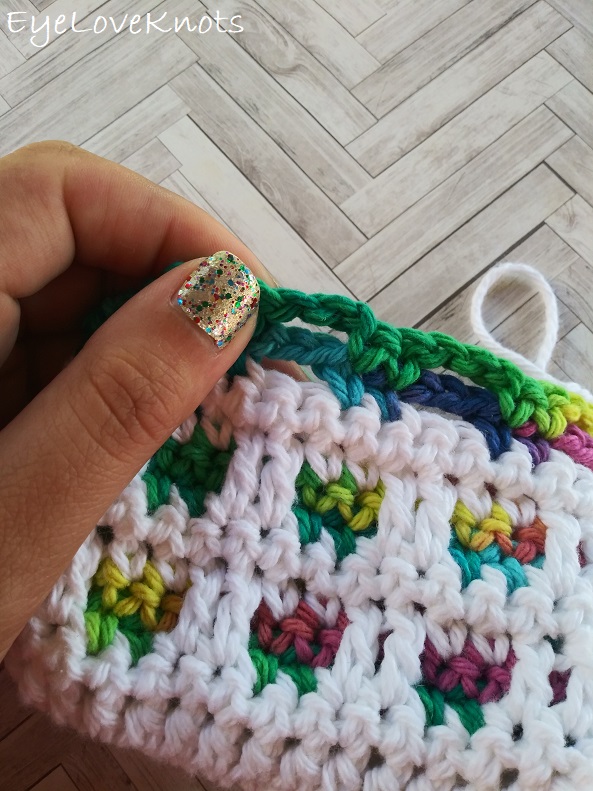
In the pattern, I will instruct to example, in Round 5 “DC into R3”. In the photo above, you can see how there is a skipped stitch in white, and two rows of chains above it. You will push those chains to the back, and work the double crochet just into that skipped stitch in white.
The stitch multiple is 4. If you want to adjust the stitch number for this project, however many chains you start with, you will have double the amount of half double crochet stitches at the end of Round 1 – you’ll just want to make sure this final stitch count is a multiple of 4.
Join to the first stitch of the round, making sure to move the previous color/s to the inside of the bag first so it won’t be visible from the right side (or front side) of the bag). When joining from the right side of the bag, pull the other color/s up along the inside of the bag to carry it/them and place over your crochet hook before joining. The chain 1 from the next round will secure it in place.
For the most seamless color change, after joining with the current color, turn to the new working side. Pull the new color through the loop on your hook, then pull the tail end of the original color tight – it will disappear. Continue working with the new color. If the original loop pops up at any time while you’re working, simply hold onto the fabric and give the tail end a tug, and it will disappear again. If you prefer the more common way of changing colors in the last yarn over of the previous stitch, feel free to substitute this method.
Mosaic Crochet Mini Bag Video Tutorial:
Filming for the video is in progress, but in the meantime, you can follow the written instructions and reference the video tutorial for the Through the Window Cosmetic Bag or Hook Pouch to review the stitch pattern.
Mosaic Crochet Mini Bag Pattern in Lily Sugar n Cream or WeCrochet Dishie:
In Main Color, chain 16. 2 HDC into the 2nd chain, HDC into the next 13, 3 HDC into the last chain, HDC into the next 13 along the opposite side of the foundation chain, HDC into the 1st stitch. Join. (32 HDC)
R2: Chain 1, turn. SC into the 1st HDC, and into each HDC around. Join with Background Color. (32 SC)
R3: In Background Color, chain 1, and turn. SC into the 1st SC, chain 3, skip the next 2 SC, (SC into each of the next 2 SC, chain 3, skip the next 2 SC) 7x, SC into the next stitch. Join.
R4: Chain 1, turn. SC into the 1st SC, chain 3, (SC into each of the next 2 SC, chain 3) 7x, SC into the next SC. Join with Main Color.
*I recommend weaving in the initial end/s now, as it’s easy to get to.
R5: In Main Color, chain 1, and turn. SC into the 1st SC, DC into each of the 2 open stitches from R3, (SC into each of the next 2 SC, DC into each of the next 2 stitches of R3) 7x, SC into the next SC. Join.
R6: Chain 1, turn. SC into the 1st SC, and each stitch around. Join with Background Color.
R7 – 16: Repeat Rounds 3 – 6; Fasten off Background Color at the end.
R17: In Main Color, chain 3 (counts as a DC + chain 1 space), and turn. Chain 1, skip the next SC, (DC into the next SC, chain 1, skip the next SC) 15x. Join to the 2nd chain of the beginning chain 3. (16 DC)
Option 1, (Original Design) R18 – 19: Chain 1, turn. SC into the 1st SC, and each stitch around. Join to the first SC. (32 SC)
Option 2 (New, Recommended), R18: Chain 2 (counts as a DC), but do not turn. DC into each chain space and each DC around. Join to the top of the beginning chain 2. (32 DC)
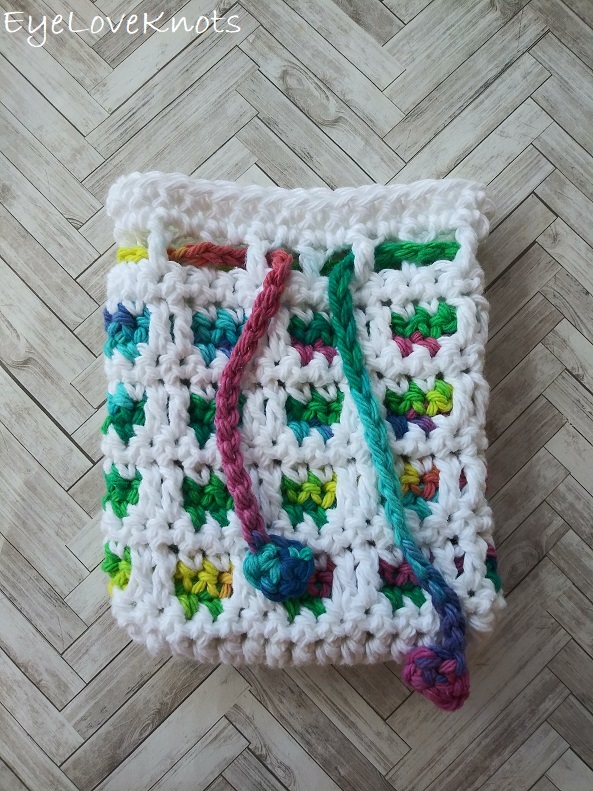
Crochet Drawstring Tie Pattern:
In Background Color, chain 2. Work 4 SC into the 1st chain, slip stitch to the 1st SC. Chain 62. Work 3 SC into the 2nd to last chain. Slip stitch join, & fasten off.
Weave in ends, then weave tie in and out of Round 17.
Mosaic Crochet Gift Bag with Circulo Natural Cotton Maxcolor 4/6:
In Main Color, chain 14. 2 HDC into the 2nd chain, HDC into the next 11, 3 HDC into the last chain, HDC into the next 11 along the opposite side of the foundation chain, HDC into the 1st stitch. Join. (28 HDC)
R2: Chain 1, turn. SC into the 1st HDC, and into each HDC around. Join with Background Color. (28 SC)
R3: In Background Color, chain 1, and turn. SC into the 1st SC, chain 3, skip the next 2 SC, (SC into each of the next 2 SC, chain 3, skip the next 2 SC) 6x, SC into the next stitch. Join.
R4: Chain 1, turn. SC into the 1st SC, chain 3, (SC into each of the next 2 SC, chain 3) 6x, SC into the next SC. Join with Main Color.
*I recommend weaving in the initial end/s now, as it’s easy to get to.
R5: In Main Color, chain 1, and turn. SC into the 1st SC, DC into each of the 2 open stitches from R3, (SC into each of the next 2 SC, DC into each of the next 2 stitches of R3) 6x, SC into the next SC. Join.
R6: Chain 1, turn. SC into the 1st SC, and each stitch around. Join with Background Color.
R7 – 16: Repeat Rounds 3 – 6; Fasten off Background Color at the end.
R17: In Main Color, chain 3 (counts as a DC + chain 1 space), and turn. Chain 1, skip the next SC, (DC into the next SC, chain 1, skip the next SC) 13x. Join to the 2nd chain of the beginning chain 3. (14 DC)
Option 1, (Original Design) R18 – 19: Chain 1, turn. SC into the 1st SC, and each stitch around. Join to the first SC. (28 SC)
Option 2 (New, Recommended), R18: Chain 2 (counts as a DC), but do not turn. DC into each chain space and each DC around. Join to the top of the beginning chain 2. (28 DC)
Crochet Drawstring Tie Pattern:
In Background Color, chain 2. Work 4 SC into the 1st chain, slip stitch to the 1st SC. Chain 62. Work 3 SC into the 2nd to last chain. Slip stitch join, & fasten off.
Weave in ends, then weave tie in and out of Round 17.
Please feel free to make and sell your own items made using this pattern, but keep in mind, this written pattern and my photos are protected by copyright. Please DO NOT claim this pattern as your own nor should you sell my pattern. DO NOT re-publish my photos as your own. DO NOT copy and paste my pattern anywhere, link to it instead so other’s can visit. Making videos providing instructions how to make my projects on any social media platform is also not permitted.
Join one of our awesome Facebook groups to share your creations, and see what others are up to!
– Yarn Crafts & Coffee Community
– DIY Home On Rockwood Lane
– Alexandra Lane Lifestyle
Linked Up To…
Craft Schooling Sunday – Creative Jewish Mom
Happiness is Homemade – Create with Cynthia
Handmade Monday #173 – Sum of their Stories
The Really Crafty Link Party #215 – Keeping it Real
Little Cottage Link Party #49 – Love my Little Cottage
Craftastic Monday Link Party – Sew Can Do
Ginx Woolly Linx Party April – Ginx Craft
Linky Ladies Party #183 – The Purple Poncho
545th Inspire Me Tuesday – A Stroll Thru Life
All About Home #37 – Common Ground
Hookin on Hump Day #213 – Moogly
{Wow Me} Wednesday #452 – Ginger Snap Crafts
The Wednesday Link Party #345 – The Stitchin’ Mommy
Waste Not Wednesday 203 – Faeries and Fauna
Your Whims Wednesday #457 – My Girlish Whims
To Grandma’s House We Go Link Party 190 – Chas’ Crazy Creations
Tuesday Turn About #46 – My Wee Abode
Thursday Favorite Things #437 – An Artful Mom
Creatively Crafty Link Party #221 – Life Beyond the Kitchen
Creative Compulsions Linky Party #57 – My Bijou Life
Scrappy Stitchers Link Party #62 – Stitches n Scraps
Traffic Jam Linky Party #231 – My Bijou Life
May 2020 Best of the Month – Calypso in the Country
Home Matters Linky Party #280 – Modern on Monticello
Handmade & Otherwise Weekly Link Up Week 47 – Petals, Pies and Otherwise
Pin Party #366 – The Pin Junkie
Create, Bake, Grow & Gather Party #417 – Shabby Art Boutique
Link Your Stuff – Annemarie’s Haakblog
Snickerdoodle Create Bake Make Link Party 333 – EyeLoveKnots
Unlimited Monthly Link Party 12 – Grammy’s Grid
One More Row Free Pattern Link Party #19 – Loops and Love Crochet
I have a few things I need to make but I really want to make this bag. I love the variegated yarn with the white.
Yes! The variegated yarn is gorgeous for the background of projects using this stitch pattern. I want to order some more now.
Love the kaleidoscopic feel it has!
Yes! Couldn’t have come out more perfect.
This is so cute! Pinning!
Michelle
https://mybijoulifeonline.com
Thank you for sharing!
LOVE this one, just as sweet as can be! thanks for sharing on craft schooling Sunday!
Thanks so much! I had fun working it up.
I am extremely confused on the very first part. Ok, so you say to put 2 hdc in 2nd ch, and in next 13 ch, 3 hdc in last ch….
So what is unclear, do I put 2 hdc in all 13? Or just one hdc in each ch?
Thanks for catching this! I will fix it. It’s 2 HDC into the 2nd chain, 1 HDC into the next 13…
Oh awesome! I do have a couple other questions.
At the end of the rounds, you say sc in last sc. Join. What am I supposed to do when joining? A sl st, or? I’ve been doing the last sc then just ch 1 and turning. I’m not changing colors.
Also, when I get to round 6 is the project supposed to be cupping at one end?
Join always means slip stitch unless otherwise stated.
I’m not sure why your work is cupping there? Round 2 is where it should start cupping upwards to make the bag shape. If you want, you can email a picture to me.
Love these soap cosies, and this one is really great colours.
This is such a great pattern. I love the colors you used. Very pretty!
Thanks so much, Michelle!
This is gorgeous. I will definitely be having a go at this!
Hope you’ll share if you do 🙂 Enjoy!
Love it! Thanks so much for linking up with me at my #UnlimitedMonthlyLinkParty 12, open May 1 to 26. All entries shared if social media buttons are installed.
CONGRATS! Your post is FEATURED at my #UnlimitedMonthlyLinkParty 13, open June 1 to 26. All entries shared if social media buttons are installed.
So awesome – thanks, Dee!
This is gorgeous! Is there a video tutorial available for it?
Thanks, Delia! I am working on my first YouTube video, but it’s not for this bag pattern. It’s quite a process, but slowly will get more videos going. I will add this one to my list.
It’s super cute! I am a little confused though. Do I need to double the first white section so it’s big enough? If I SC into each HDC, I’d only have like 16, not 32.
So glad you like it 😊 At the end of Round 1, you’ll finish with 32 stitches after you work all the way around, and then continue in rounds all the way up.
I see now! I feel like an idiot lol thanks!