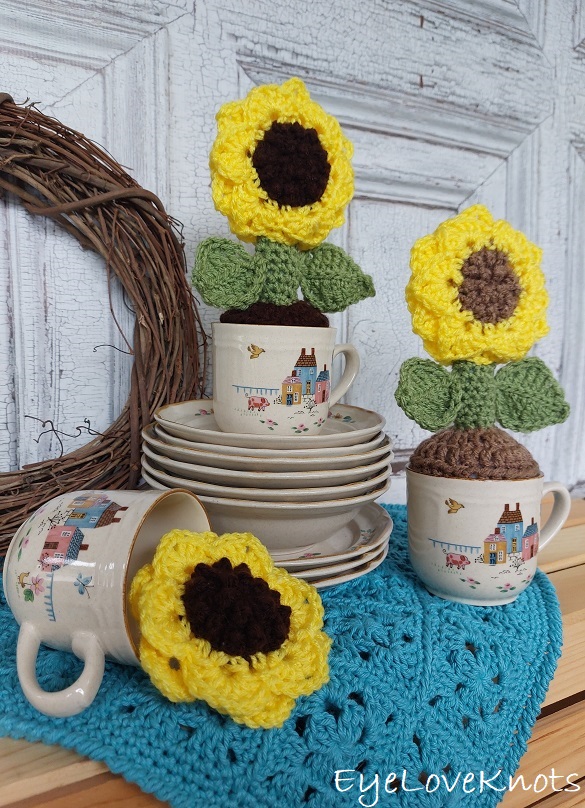
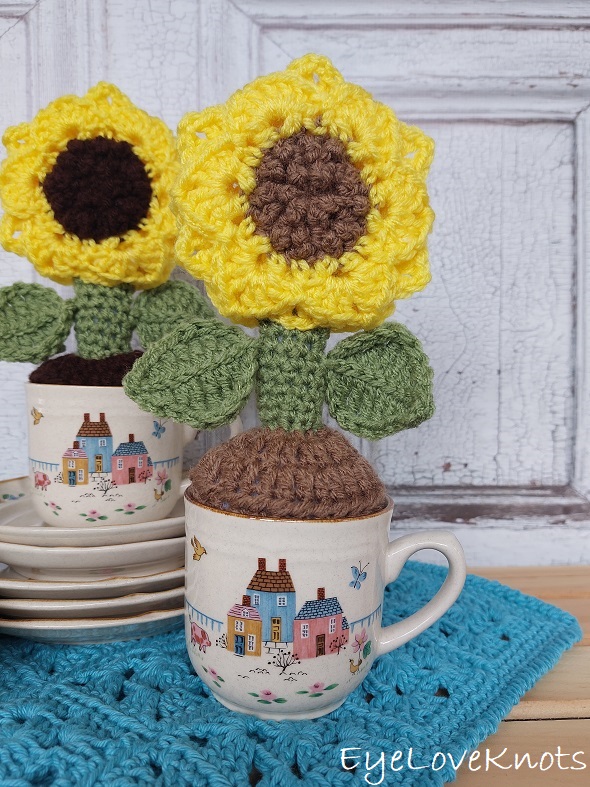
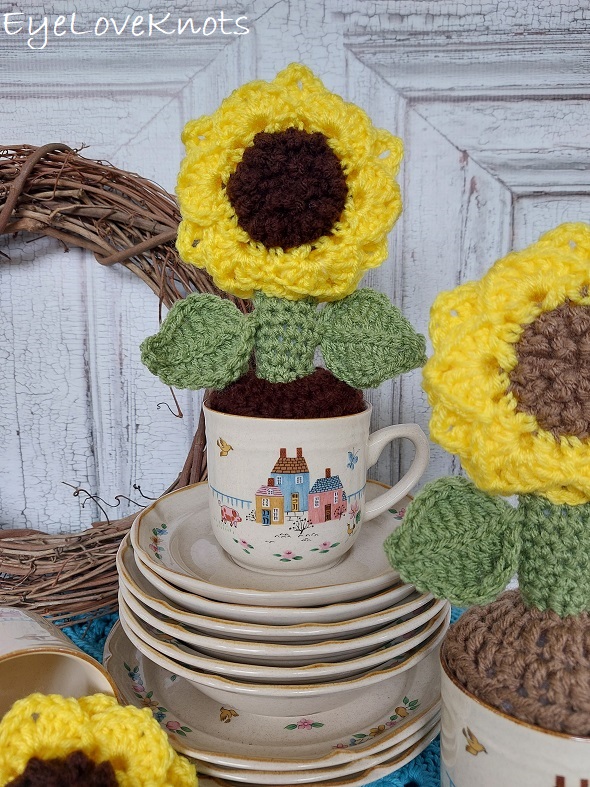
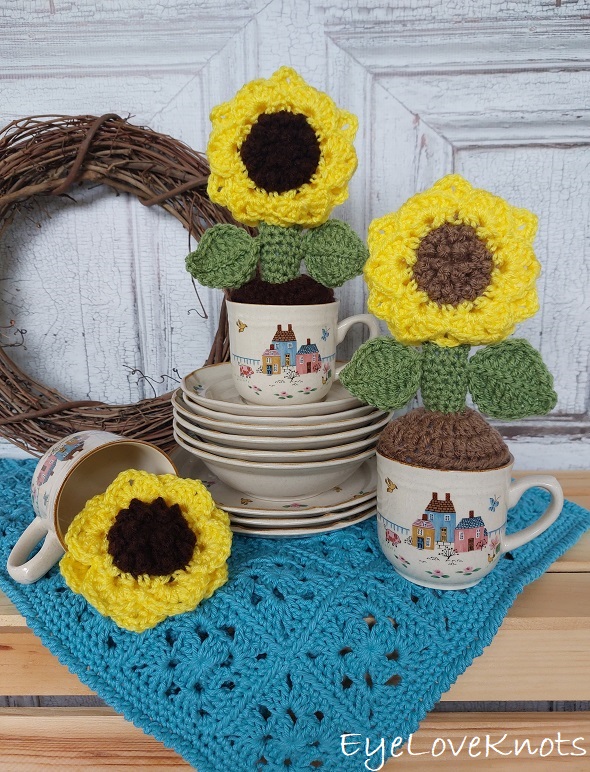
This is a free crochet pattern and video tutorial showing how to crochet a cute, potted sunflower using any size pot or upcycled coffee mug.
This post contains affiliate links for Etsy and Amazon. If you make a purchase by clicking on them, I make a small commission at no extra cost to you. Thanks for your support!
Find the free crochet pattern instructions below, or purchase a printer-friendly, ad-free PDF on Ravelry by clicking here.
Short on time? Pin it for later.
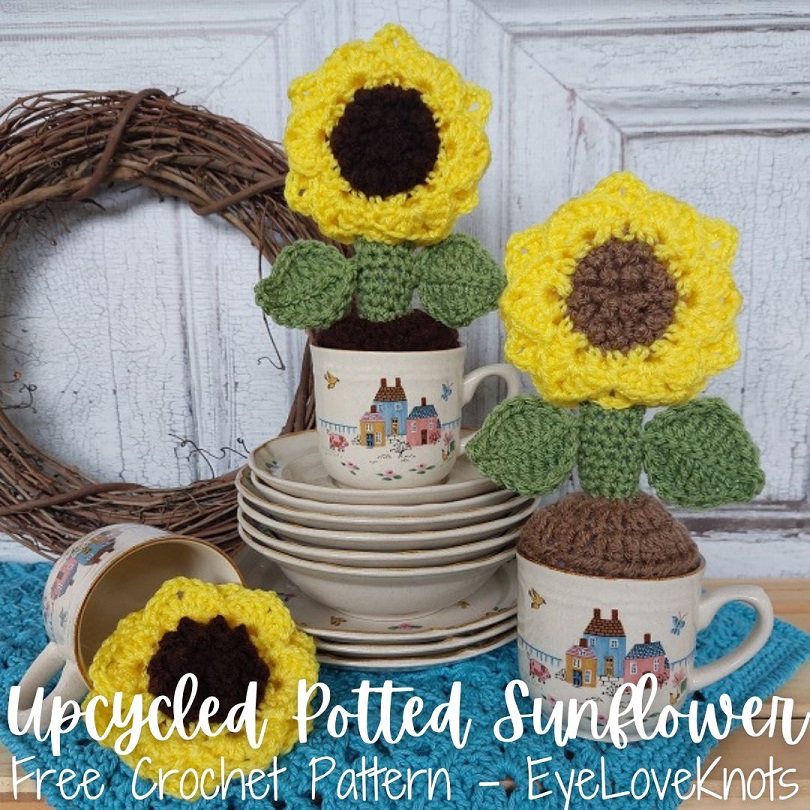
I picked up this vintage set in May of last year at a garage sale. You may not know this, but I have a booth at America’s Antique Mall in Melbourne, Florida (seller ELK). I also sell on eBay and on Etsy as OnRockwoodLane, and Instagram as OnRockwoodLaneShop. I bought the box of all the pieces. They were all wrapped up, and I didn’t even look through much, but I was so in love with the image. These are of the Vintage International Heartland 7774 Pattern. These are tea cups, though they look more like smaller coffee cups, and these three happened to have some chips and cracked that I did not feel comfortable selling for drinking purposes. They’ve been sitting on my repurpose shelf until this project came to mind.
I signed up for a Fall Festival & Artisan Market on October 22nd at the antique mall, and I wanted to take these mugs with me. The colors and images give me a Fall vibe so I thought they’d do well. At first, I thought of making candles with them, but then I glanced over, and saw my Saguaro Cactus up on my shelf, and these Sunflowers came to mind!
How Can I Make This Potted Sunflower for Any Size Pot or Mug?
I will be sharing instructions for my size mug, but here is how you can easily adjust the dirt pattern to fit any mug or pot you have on hand.
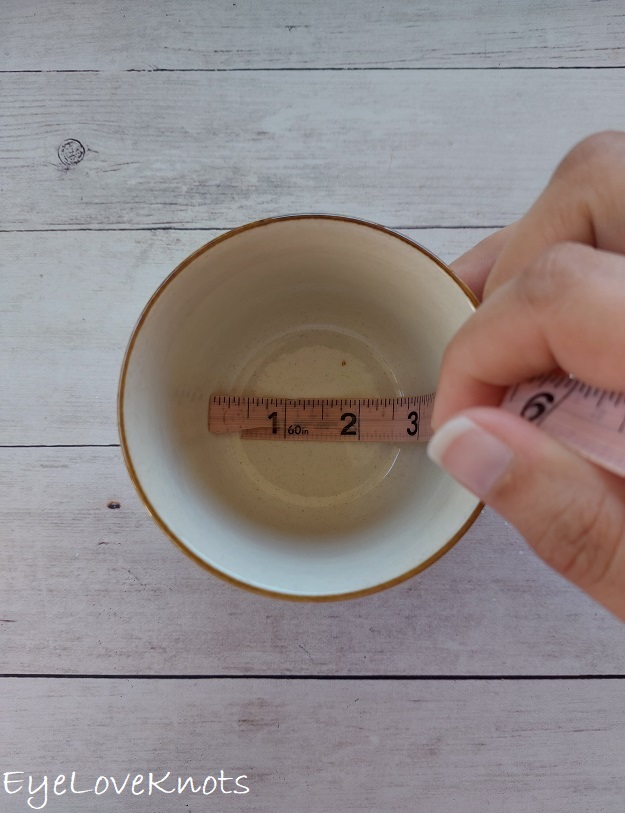
Step 1: Place your soft tape measure down into your mug, and measure the diameter across the bottom. This is going to be the size you want your crocheted circle’s diameter to be. Mine is 2.5″.
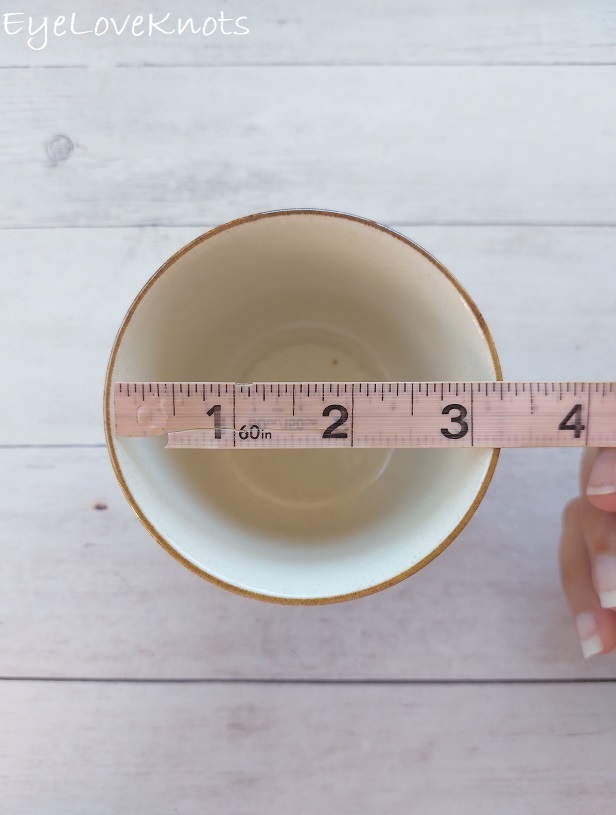
Step 2: Measure the diameter across the inside opening at the top of your mug. This is going to be the size you want to increase your crocheted circle to in the end. Mine is about 3.13″ (3 1/8″).
Step 3: Does you mug taper, or is it about the same size all the way up? If it tapers, you may need to increase one round, then work the next (or two) in the round with no increase, then repeat again so it gradually gets wider. If it’s about the same size, then you can follow along with me – I went from increasing to 20, to one round of 20 around, and then just one more round of increasing to get 30, and I was at my 3″ diameter already.
Step 4: Does your diameter need to be smaller or larger to fit your mug? You can subtract or add one or two stitches to the beginning ring to adjust the diameter. I like to keep a log when I’m experimenting. Start with 10 DC in the ring. Measure. Increase to 20 DC. Measure. Increase to 30 DC. Measure. You will be able to see the trend this way, and this will help you determine whether to go down or up stitches. You can also switch to a smaller or larger crochet hook.
AD-FREE, PRINTER FRIENDLY PDF:
If you would like a PDF version of this post, you may get one through either my EyeLoveKnots Etsy Shop, Ravelry or LoveCrochet Shop for a small fee. This fee is to compensate for the views lost when you no longer need to return to the blog to for the information, as you will have your own copy. Plus! It helps fund supplies for new projects to share with you!
Shop EyeLoveKnots Etsy: Upcycled Potted Sunflower.
Shop EyeLoveKnots LoveCrochet: Upcycled Potted Sunflower.
Share your version of this project on Ravelry – Upcycled Potted Sunflower.
Short on Time? Pin it for Later.
Save this to Your Favorites on: AllFreeCrochet, FaveCrafts, Cheap Thrifty Living, DIYideaCenter, Crochet Pattern Bonanza, AllFreeHolidayCrafts, Free Crochet Tutorials, The Free Crochet Family
What Supplies Do I Need to Crochet a Potted Sunflower?
- Worsted Weight Yarn – I used Red Heart Super Saver in the Coffee/Cafe Latte (42 Yards), Tea Leaf (10 Yards) and Bright Yellow (25 Yards) colorways
- H8/5mm Crochet Hook
- Tapestry Needle
- Soft Tape Measure
- Pot or Mug – mine is a vintage mug with a base diameter of 2.5″, and a top diameter of 3″; If you want the same ones as I have, I’ve found some on Etsy.
- Poly-fil Stuffing
- Optional, Pipe Cleaners
Material Notes:
Similar Yarns: Caron’s One Pound, Bernat’s Super Value.
I like Red Heart’s Super Saver for my home projects because it’s affordable, and durable, and for this project, it’s stiff. If you have washed your Red Heart Super Saver, or working with a softer yarn, you may just want to add pipe cleaners to your stem before you stuff to add more stability so the flower doesn’t fall over.
How Long Does it Take to Crochet a Potted Sunflower?
I had mine ready in just under one hour, 15 minutes.
Measurements:
Without the mug, my sunflower measures 9″ tall. Across the sunflower, it measures 4.38″ (or 4 3/8″), and from one point of one leaf to the other point of the other, it measures 6″.
Gauge:
In Dirt Top Pattern, 30 HDC in the round = 3″ in diameter
Abbreviations (US Terms):
- DC – Double Crochet (Photo Tutorial)
- HDC – Half Double Crochet (Photo Tutorial)
- PLT – Pull Loop Through Join As You Go Method
- FPSC – Front Post Single Crochet
- SC – Single Crochet (Photo Tutorial)
- TR – Treble Crochet (sometimes called a Triple Crochet; to start, yarn over 2x to have 3 loops on your hook, then [yarn over and pull through 2 until back to just one loop on hook])
- DTR – Double Treble Crochet (to start, yarn over 3x to have 4 loops on your hook, then [yarn over and pull through 2 until back to just one loop on hook])
- FLO – Front Loop Only
- BLO – Back Loop Only
Pattern Notes:
Beginning chain does not count as a stitch.
Join to the first stitch of the round, not the beginning chain, unless otherwise stated.
Upcycled Potted Sunflower, Part 1, Video Tutorial:
Upcycled Potted Sunflower, Part 2, Video Tutorial:
Upcycled Potted Sunflower, Written Tutorial Starting with the Base of the Dirt and Brown:
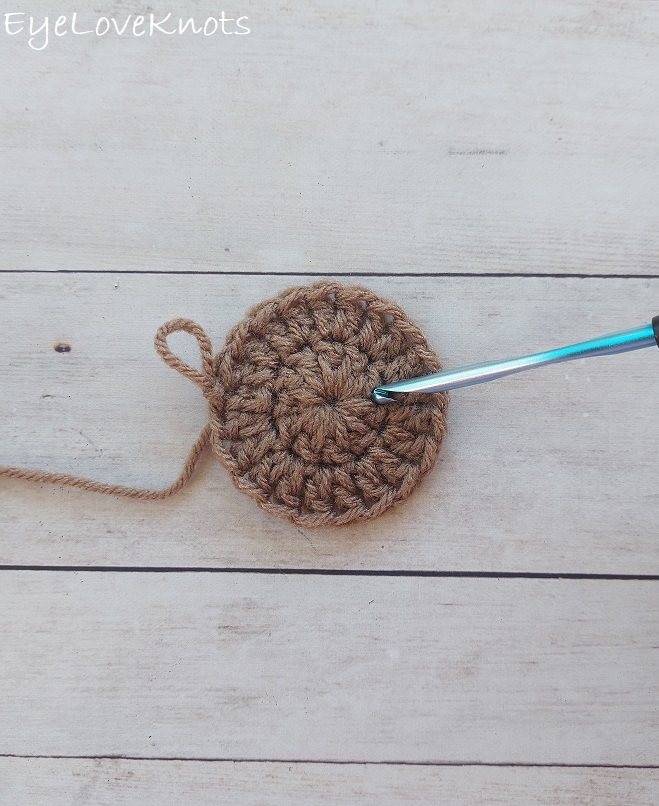
Chain 4. Slip stitch join to the first chain to form a ring. Chain 2. Work 10 DC into the center ring. (10 DC)
R2: Chain 2. Work 2 DC into the first stitch, and each stitch around. Join. (20 DC)
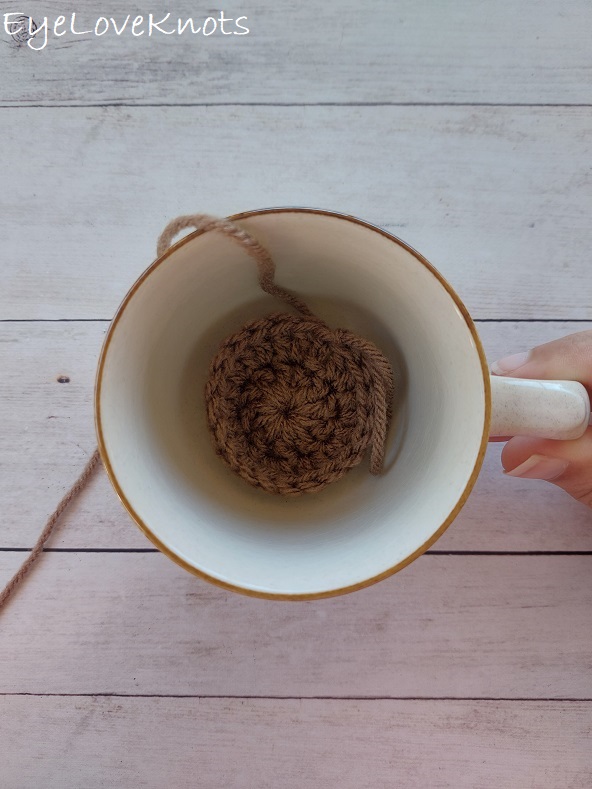
Checkpoint: Right now, the diameter of this piece measures 2.5″, and fits inside the bottom of my cup. It’s actually a tiny bit smaller then the bottom of my cup, and that’s okay. Adjust here if necessary to fit your cup.
R3: Chain 2. Work 1 DC into the first stitch, and each stitch around. Join. (20 DC)
R4: Chain 2. Work 2 DC into the first stitch, DC into the next stitch, (2 DC into the next stitch, DC into the next stitch) 9x. Join. (30 DC)
Checkpoint: Right now, the diameter of this piece measures 3″, and creates a piece that is snug inside my cup.
R5 – 6: Chain 2. Work 1 DC into the first stitch, and each stitch around. Join. (30 DC)
Checkpoint: Right now, this is a little shy of the top of my cup. The stuffing will make the top puff out a little bit to add height. It’s easy here to add or subtract rounds if needed.
Fasten off, and set aside.
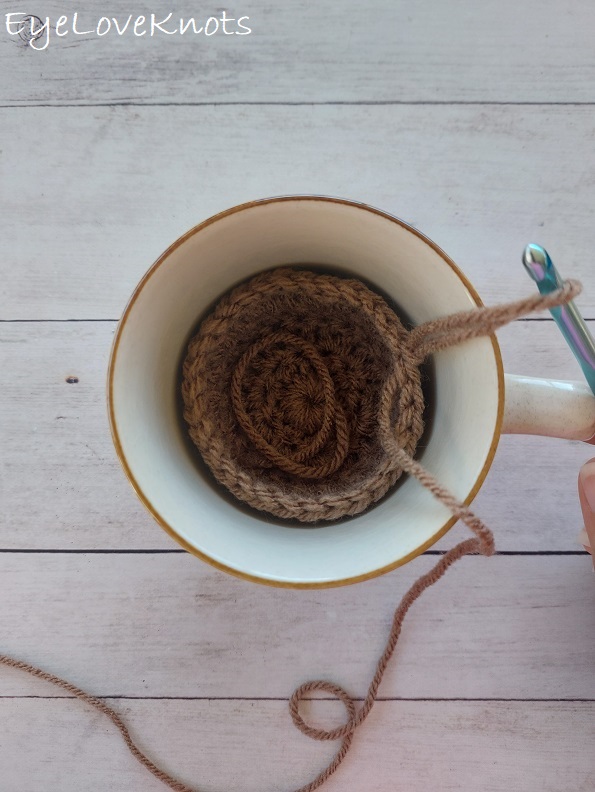
Dirt Top Piece Worked in the Same Brown Color:
I will split the beginning increase to help keep my seam straight, and less noticeable. You can increase as you’re comfortable.
I am working in half double crochet, but you can also work in double crochet for a more puffy piece.
If you’ve made any adjustments to the bottom piece of the dirt, make the same adjustments here to match.
Round 3 is worked using a join as you go method because I don’t really like hand stitching. You may increase up to 30, and then whipstitch piece on later. That is up to you. I will provide instructions for both, so follow whichever method you prefer.
If you’re not working the PLT option, you will want to weave in all your ends prior to whipstitch closed. Check the fit before weaving in the ends as you can still pull the whipstitches out if adjustment is needed. If you are working the PLT option, you will want to weave in all ends prior to working Round 3. If you are unsure of how your dirt will fit into your cup, and want to check before weaving in ends (in case you need to adjust), then leave them out, work Round 3, check the fit, then frog Round 3, weave in ends, rework Round 3, and fasten off.
Place the dirt into your cup while stuffing to get the proper fit.
Chain 4. Slip stitch join to the first chain to form a ring. Chain 1. Work 10 HDC into the center ring. (10 HDC)
R2: Chain 1. Work 1 HDC into the first stitch (this stitch falls just to the left of the beginning chain), 2 HDC into each of the next 9 stitches, HDC into the first stitch (this stitch falls just to the right of the beginning chain). Join. (20 HDC)
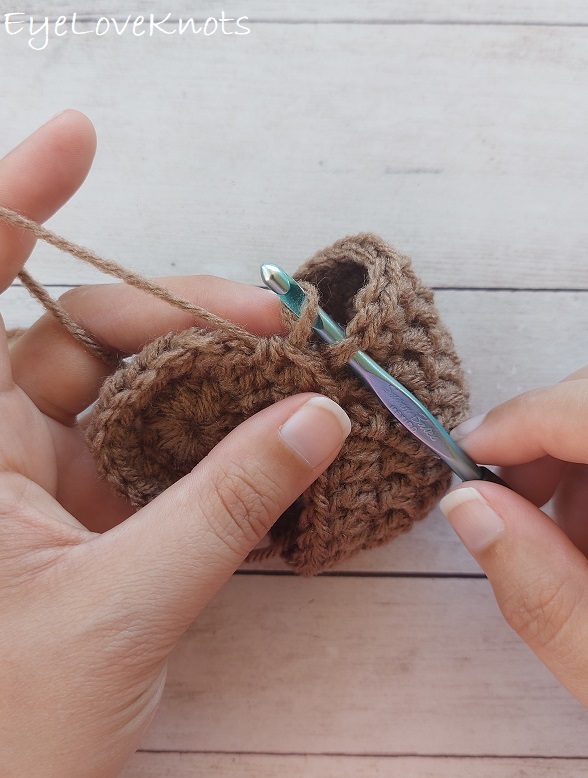
R3, No PLT: Chain 1. Work 1 HDC into the first stitch (this stitch falls just to the left of the beginning chain), HDC into the next stitch, (2 HDC into the next stitch, HDC into the next stitch) 9x, HDC into the first stitch (this stitch falls just to the right of the beginning chain). Join, and fasten off with long tail for sewing. (30 HDC) Weave in ends. Thread tapestry needle, and begin to whipstitch top to bottom with the wrong sides facing inward. Leave room to stuff before seaming closed.
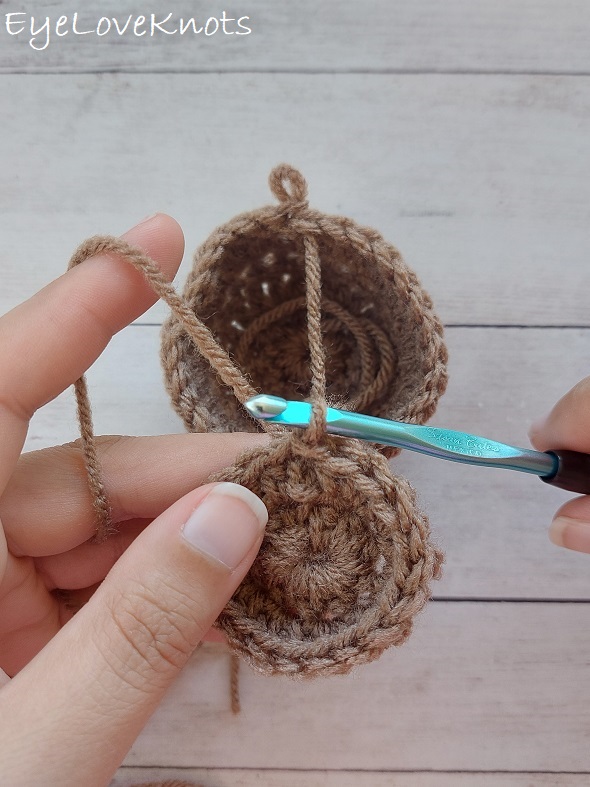
R3, with PLT: Sit the bottom piece of the dirt upright in it’s bowl shape with the beginning chain 2 positioned at 12 o’clock. The first stitch worked with PLT will be done to the stitch just to the right of the bottom piece’s beginning chain 2 – you’re working in a counter clockwise manner. Chain 1. Work 1 HDC into the first stitch (this stitch falls just to the left of the beginning chain), PLT, HDC into the next stitch, PLT (HDC into the next stitch, PLT, HDC into the same stitch, PLT, HDC into the next stitch, PLT) 8x. Begin stuffing. (HDC into the next stitch, PLT, HDC into the same stitch, PLT, HDC into the next stitch, PLT). Add any more stuffing needed. HDC into the first stitch (this stitch falls just to the right of the beginning chain), PLT. Slip stitch join by inserting your hook into the beginning chain of your top piece, then directly across into the corresponding stitch of the bottom piece, then yarn over and pull through. (30 HDC)
Fasten off, and weave in end/s.
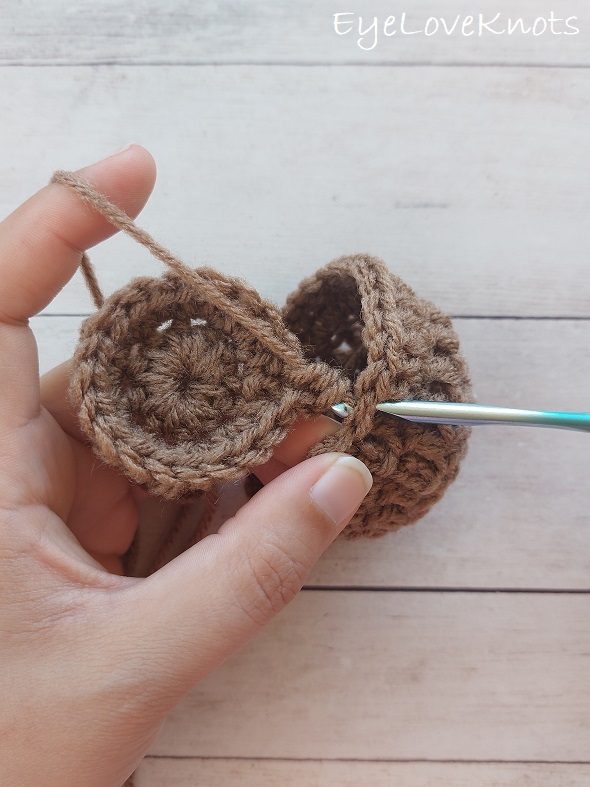
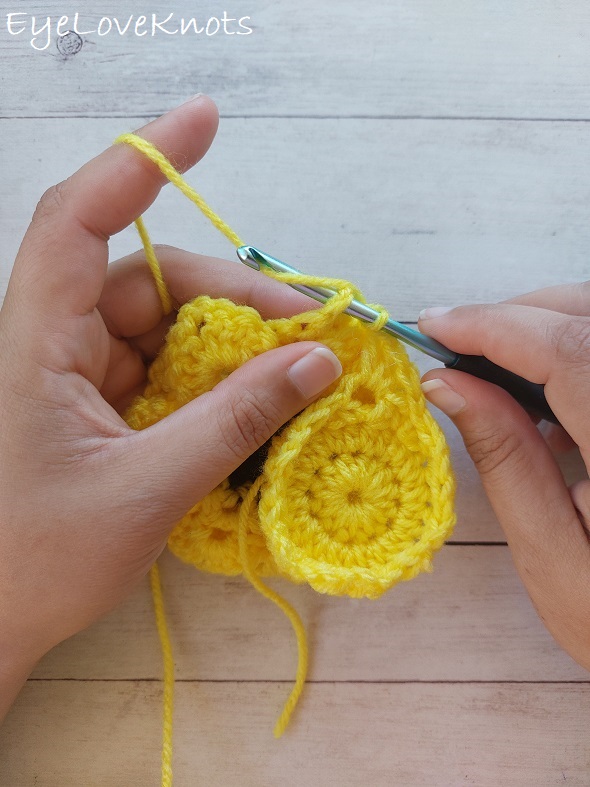
Photo Tutorial for R3 with PLT:
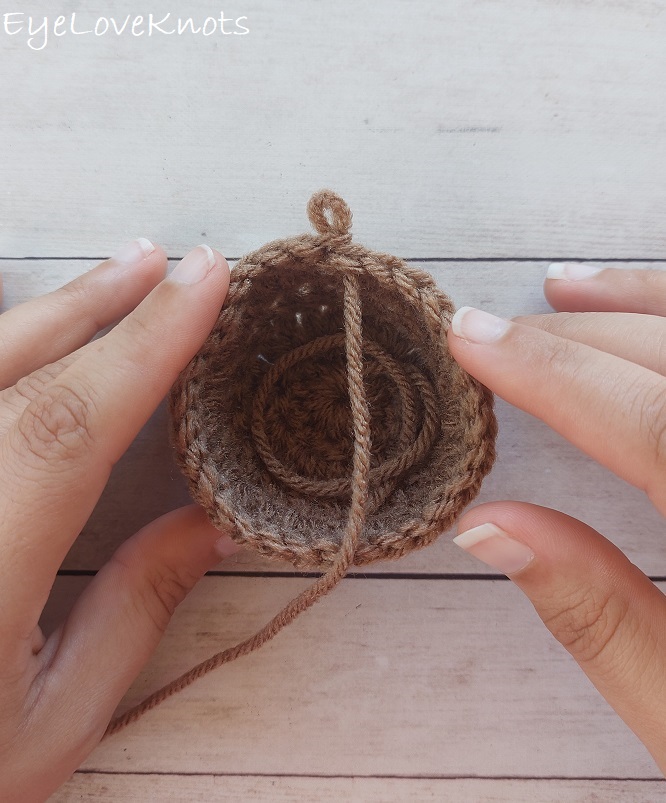
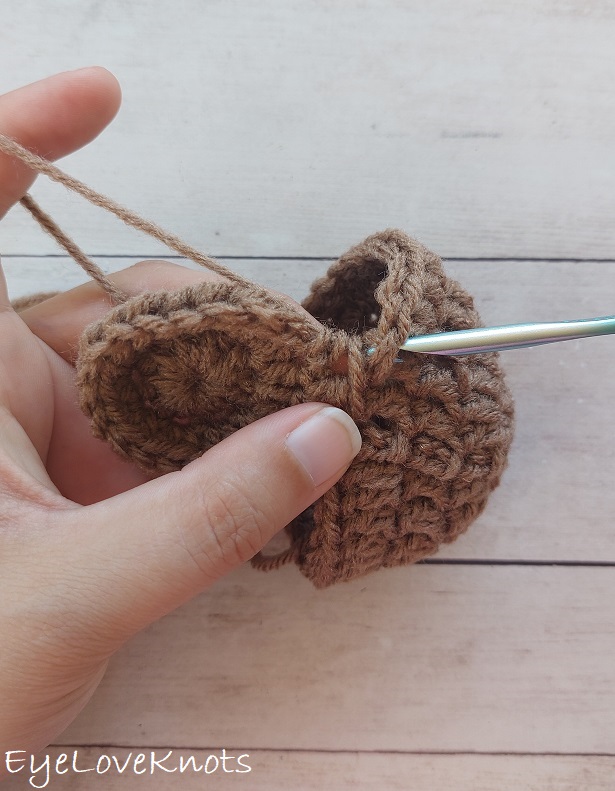
Here is the base with the seam/beginning chain at 12 o’clock.
You want the seam from your top piece to line up with the seam from the bottom piece.
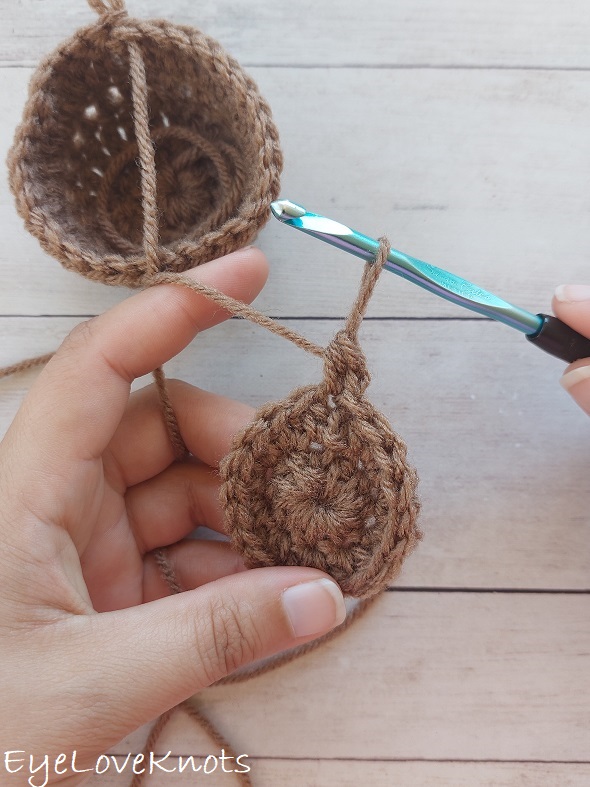
Work the first half double crochet as normal on your top piece, then pull up on the loop so you don’t lose it.
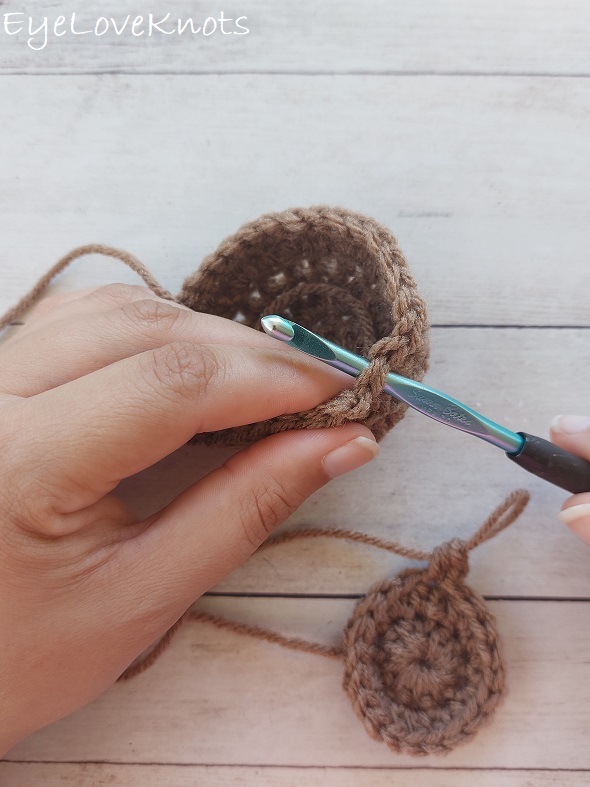
Remove your hook, and set the top piece aside for a moment. Insert your crochet hook from the right side to the wrong side into the stitch that is just to the right of the seam/beginning chain of the bottom piece. You are working in a counter-clockwise direction.
Replace the loop from the top piece onto your crochet hook.
Tighten the loop back down to normal tension.
Pull through the stitch on your hook.
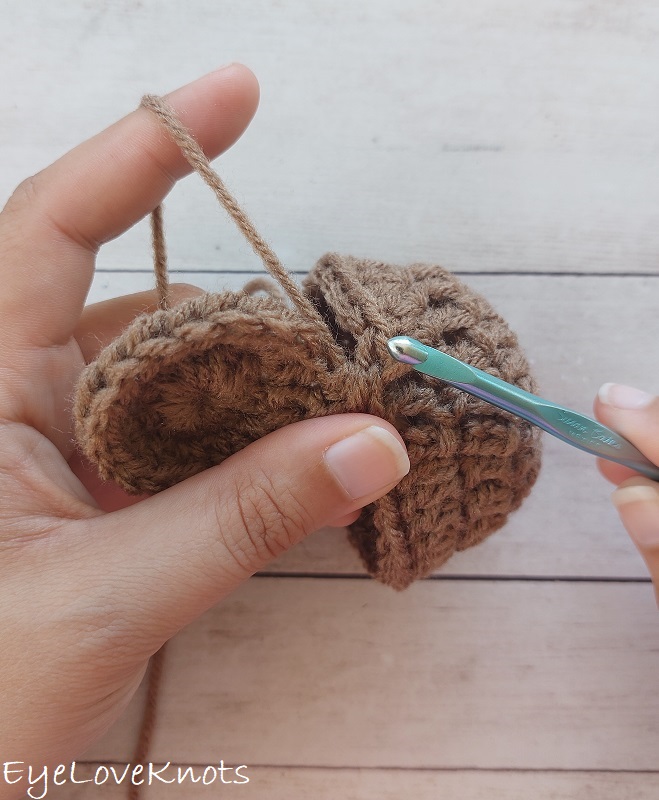
Now your two layers are connected.
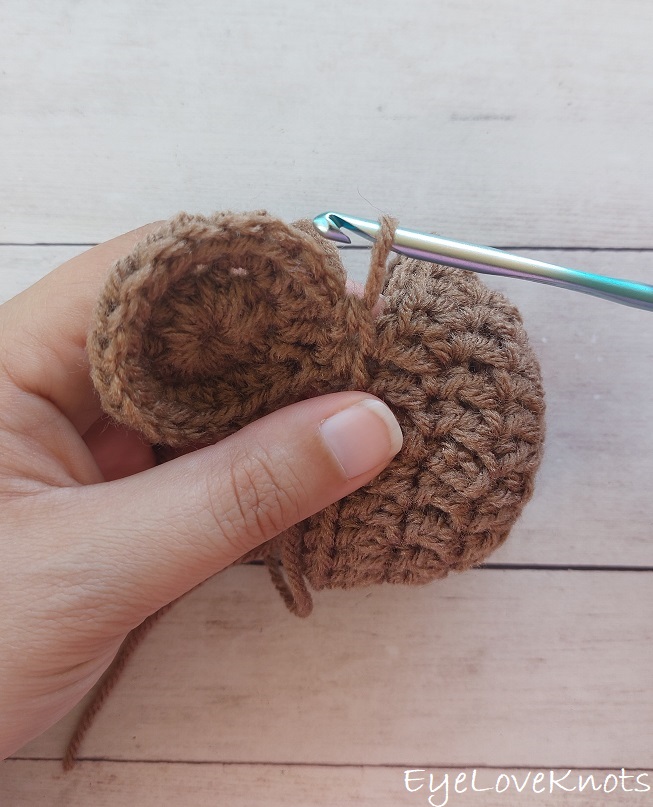
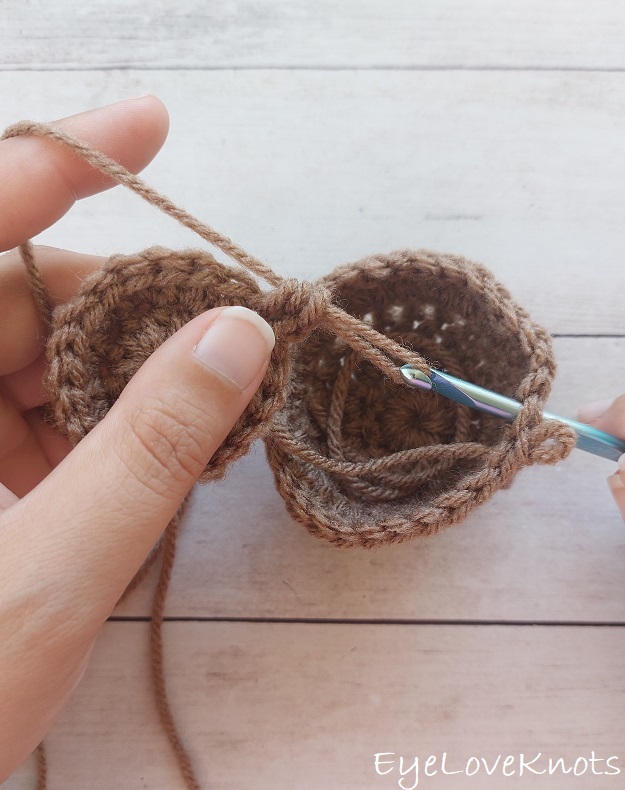
Begin again – half double crochet into the top piece as normal.
Pull up on the loop so you don’t lose it. Remove your hook. Hold the loop in your left hand. Reinsert the hook into the next stitch on the bottom piece.
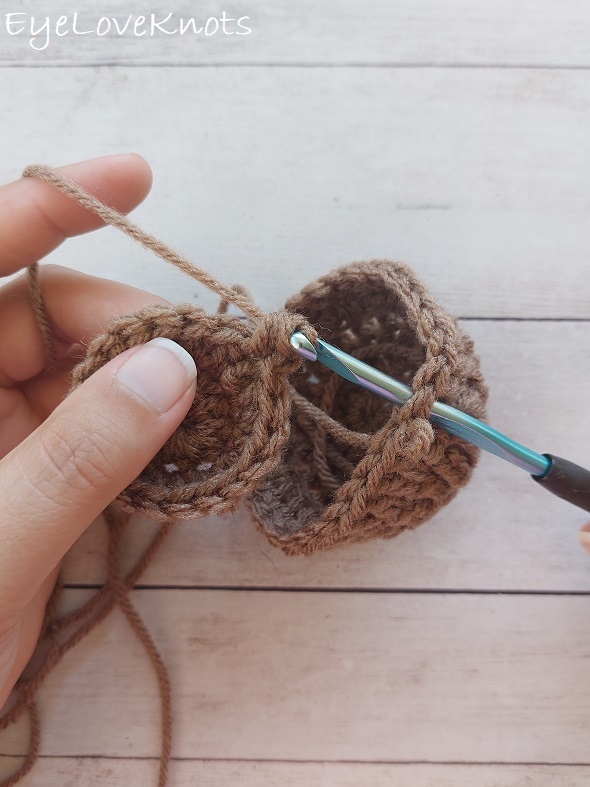
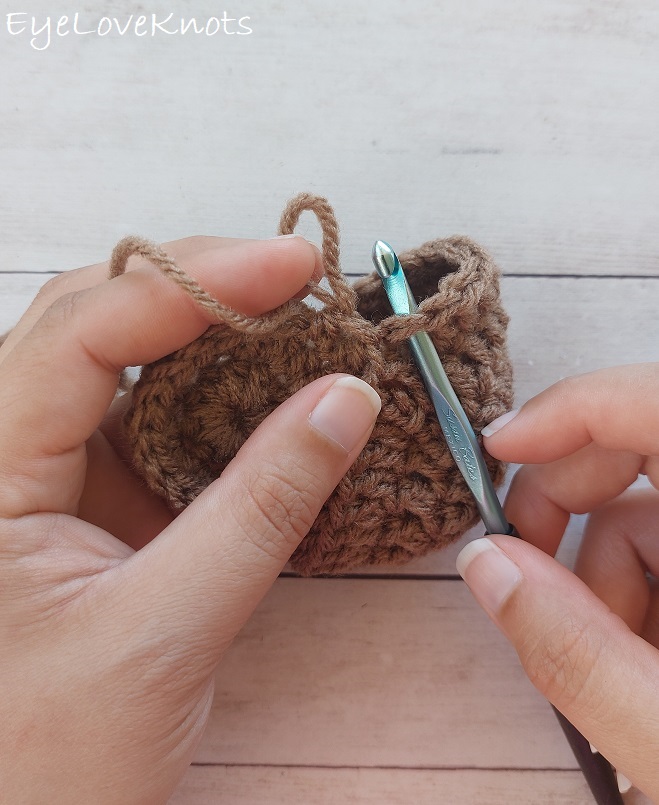
Replace the loop from the top piece onto your crochet hook. Tighten the loop back down to normal tension.
Pull the loop through the stitch on your hook.
Stem Worked in Green:
Again, I don’t care for hand sewing so I’m attaching my yarn to my dirt, and working the stem right onto it (using the post stitches). Alternatively, you can start with a chain 10, then slip stitch to the first stitch to form a ring, and work in pattern, then go back later, and sew the stem to the dirt.
To surface slip stitch, insert your hook into the next stitch working from the right side down through to the wrong side, yarn over, and pull the yarn through. Repeat as necessary.
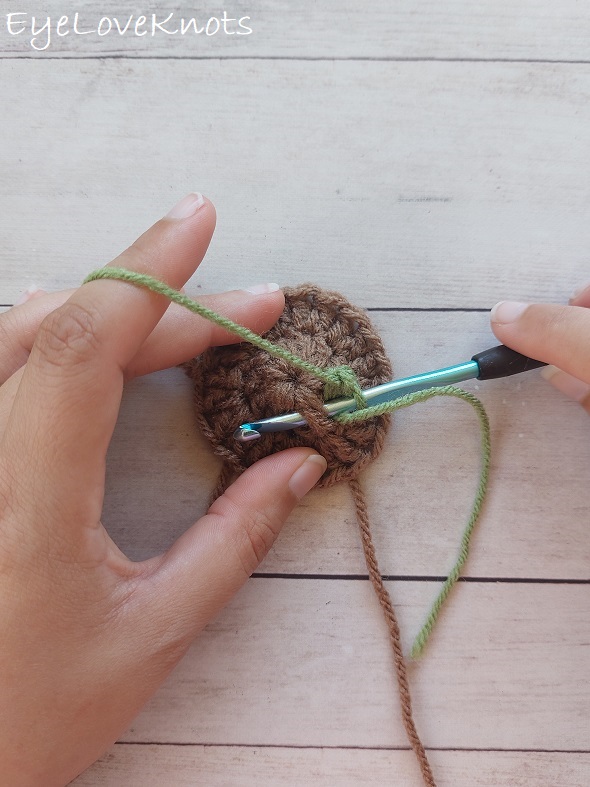
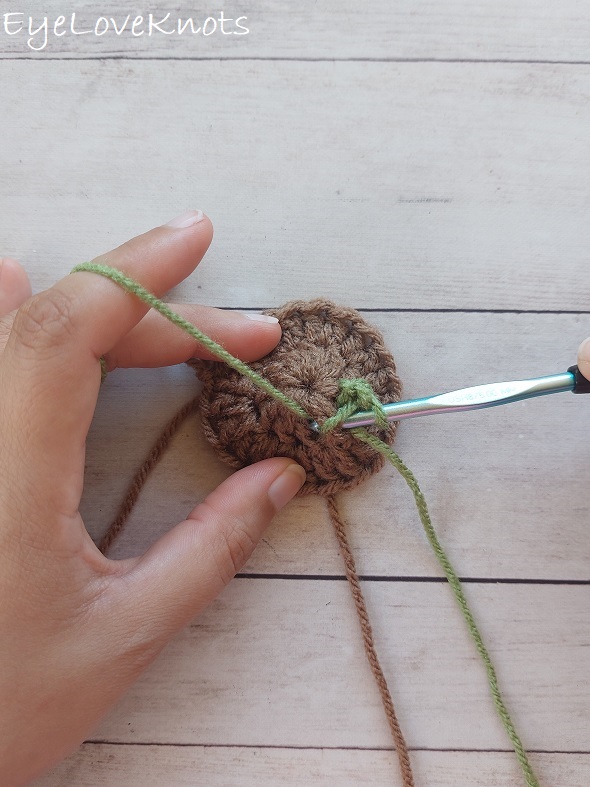
Attach the green to any post of Round 1 of the top piece of the dirt. Chain 1. FPSC around this stitch, and then FPSC around each of the next 9 stitches. It will look like we’re missing a stitch (because we have to account for the beginning chain of that round), but just ignore it. When you have 10 FPSC worked, then join.
Beginning working in a continuous join for the remainder of the stem to avoid a visible seam – this means no more joining, and no beginning chain 1 after Round 2.
R2: Chain 1. SC into the first SC, and each SC around. (10 SC)
R3 – 4: SC into the first SC, and each SC around. (10 SC)

R5, Leaf Round: [chain 10, slip stitch into the second chain, SC into the next chain, HDC into the next chain, DC into the next chain, TR into the next chain, DTR into each of the next 2 chains, TR into the next chain, DC into the last chain, chain 1, slip stitch into the same stitch as the last, then rotate the leaf to work on the opposite side of the foundation chain, DC into the same chain, TR into the next chain, DTR into each of the next 2 chains, TR into the next chain, DC into the next chain, HDC into the next chain, SC into the next chain, chain 2, slip stitch join to the first slip stitch, then rotate and surface slip stitch right up the center of the chains], SC into each of the next 6 stitches on the stem, then work the second leaf by repeating […]. From the right side, insert hook into the same stitch on the stem as the last leaf worked, yarn over and pull through (so the leaf faces forward), then push the leaf forward so you can work a SC into each of the next 4 stitches of the stem behind it.
R6: (Skip the next leaf, SC into each of the next 4 stitches) 2x. (8 SC)
R7 – 10: SC into each stitch around. (8 SC)
Stuff the stem. For extra support, place in pipe cleaners before stuffing.
R11: SC into the first two stitches, then hold both layers together, and slip stitch across through both layers to close up the opening. Fasten off.
If you want to make sure your flower fits well on the stem, then hold off on weaving in your ends. You can always remove the slip stitches, and add more rounds if a taller stem is needed for more support of the flower. Otherwise, weave in ends.
Photo Tutorial for Post Stitches:
In the very center is the center ring we worked into. At the edge of Round 1 you’ll see a dotted stitching around – this is where Round 2 is worked into the v-shape stitches of Round 1. In between both of these are the posts from each stitch. To FPSC around one, insert your hook into the space in between stitches…
…wrap the hook around the back, and come out the space in between the that same stitch and the next.

Yarn over…
… pull through.

There are two loops on your hook. Yarn over, and pull through both loops to complete a single crochet.
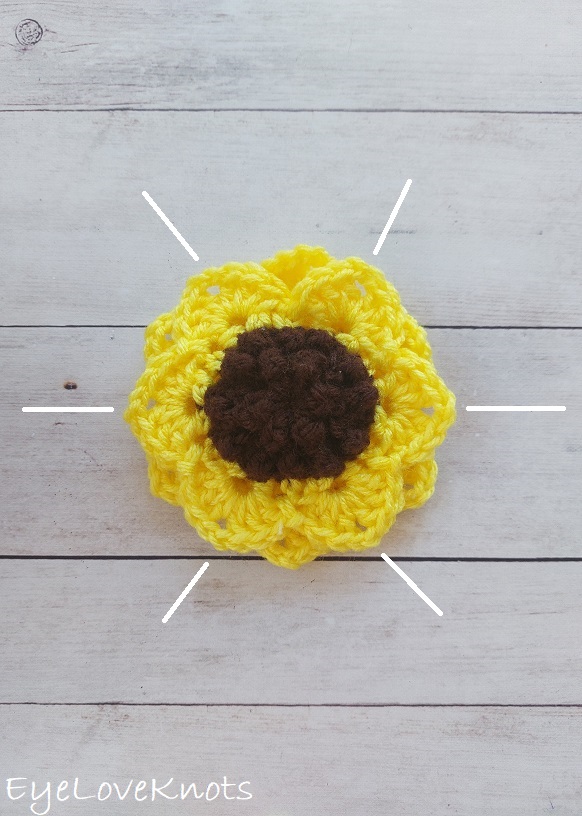
Front of Sunflower Worked in Brown for the First Two Rounds, then Yellow:
In the first round, after joining the ring, instructions state to turn. This is intentional. When the treble crochet’s are worked, they produce a bump on the opposite side of which you are working. I wanted the bumps to come through on the right side, so the turn is there for this to happen. In this case, you will need to hold the tail on top of the ring as you work, as opposed to behind it, so it is not visible from the right side when finished.
With Brown, chain 5. Join to form a ring. Chain 1, and turn. (SC into the ring, TR into the ring) 6x. Join. (12 stitches)
R2: Chain 1. (SC, TR) into the 1st stitch, and into each of the next 11 stitches. Join. (24 stitches)
Fasten off with Brown. With the right side facing, join Yellow into the front loop only of any treble crochet.
R3, Begin Petals: In Yellow and working into the FLO, chain 1. SC into the 1st stitch, skip the next stitch, (HDC, chain 2, HDC) into the next stitch, skip the next stitch, [SC into the next stitch, skip the next stitch, (HDC, chain 2, HDC) into the next stitch, skip the next stitch] 5x. Join. (6 Petals)
R4: Chain 1. (3 DC, chain 2, 3 DC) into the next chain 2 space, [slip stitch into the next SC, (3 DC, chain 2, 3 DC) into the next chain 2 space] 5x. Join to the same spot as the join of Round 3. (6 Petals)
Fasten off, and weave in ends.
R5, Back Layer Begin Petals; All in BLO: Attach Yellow into the BLO of the stitch behind where you worked a (HDC, chain 2, HDC) from the front. Chain 1. SC into this stitch, skip the next stitch, (HDC, chain 2, HDC) into the next stitch, skip the next stitch, [SC into the next stitch, skip the next stitch, (HDC, chain 2, HDC) into the next stitch, skip the next stitch] 5x. Join. (6 Petals)
R6: Chain 1. (3 DC, chain 2, 3 DC) into the next chain 2 space, [2 SC into the next SC, (3 DC, chain 2, 3 DC) into the next chain 2 space] 5x. Join to the same spot as the join of Round 5. (6 Petals)
Fasten off, and weave in ends.
Back of Sunflower Worked in Yellow:

I work this piece to add a clean, finished back side, and to prevent the Sunflower petals from curling on the front size. You could always leave this part off, and block your petals, and then just have an unfinished back of the flower.
Chain 4. Slip stitch join to the first chain to form a ring. Chain 1. Work 10 HDC into the center ring. (10 HDC)
R2: Chain 1. Work 2 HDC into the first stitch, and each stitch around. Join. (20 HDC)
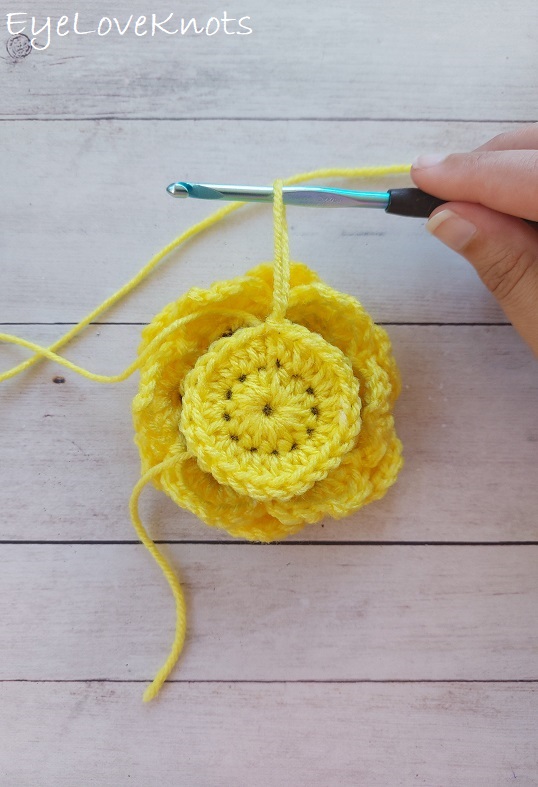
Before moving forward, check the size of this circle against the size of the brown circle from the front of the Sunflower. You want a piece that is the same size, or a little bit larger, otherwise, it will not connect to the petals in the front correctly (it will pull them in a weird way).
If you are unsure, and want to check out the flower will fit on the stem, then hold off on weaving in your initial tail end, work the next couple rounds including the joins of Round 4. There will be a small gap left unworked that you can use to turn your work to the wrong side after checking fit, and then you can weave in the ends. Otherwise, weave in ends.
R3: Chain 1. SC into the 1st stitch, skip the next stitch, (HDC, chain 2, HDC) into the next stitch, skip the next stitch, [SC into the next stitch, skip the next stitch, (HDC, chain 2, HDC) into the next stitch, skip the next stitch] 5x. Join. (6 Petals)
In the next round, we are working the join into the corresponding chain 2 from the petals of the front side of the flower, leaving the petals from the second layer unworked, and sandwiched in between the two outside layers. Work so the wrong sides are facing each other. All the stitches but the SC in between the 3 DCs of the petals is worked into the back piece aka where we insert into the front layer is the only stitch worked outside of the back piece.
R4: Chain 1. (3 DC, chain 1, insert hook into the corresponding chain 2 from the front layer, and complete a SC, 3 DC) into the next chain 2 space, [slip stitch into the next SC, (3 DC, chain 1, insert hook into the corresponding chain 2 from the front layer, and complete a SC, 3 DC) into the next chain 2 space] 5x. Join to the same spot as the join of Round 3, and fasten off with a longer tail end for sewing. (6 Petals)
Checkpoint: Use the openings in between the joined petals to try your flower onto the stem. If you’re happy with how it sits, and haven’t woven in the ends yet, then turn the flower to the wrong side facing, and weave the ends in, then turn to the right side facing, and reposition on stem. If you need more support for your flower, this is where you can take the slip stitches out of the final round of the stem, and either add pipe cleaners, add more stuffing and/or add additional rounds to the stem before slip stitching closed again.
Using the Yellow tail end, sew the flower in place onto the stem. I worked across to the left side, then put my flower into my cup to make sure it all was still good, then removed it, worked back across to the right side, and then weaved in my final end. Prior to weaving in the end you can easily remove the stitches if needed.
Ta-dah!
Feel free to use this information to make and sell your own items. When sharing, designer credit is appreciated, but not required. All EyeLoveKnots Patterns, Photos and PDF’s are protected under copyright. They are not to be copied, distributed or sold – doing so is copyright infringement and stealing! DO NOT copy and paste my pattern anywhere, and DO NOT share the written pattern with others, share the link to the pattern instead so others can find it themselves.
Join one of our awesome Facebook groups to share your creations, and see what others are up to!
– Yarn Crafts & Coffee Community
– DIY Home On Rockwood Lane
– Alexandra Lane Lifestyle
Linked Up To…
Beautifully Made Home Decor Link Party 234 – Across the Blvd
All About Home #164 – Common Gound
One More Row Free Crochet Link Party #47 – Loops and Love Crochet
Tuesday Turn About #171 – My Wee Abode
Farmhouse Friday #273 – County Road 407
Home Matters Linky Party #400 – Modern on Monticello
New Upcycle Ideas 648 Linkup – Funky Junk Interiors
Handmade Monday #296 – Sum of their Stories
The Really Crafty Link Party #333 – Keeping it Real
Craftastic Monday Link Party – Sew Can Do
Happiness is Homemade Link Party – Decor Craft Design
Hello Monday – Pink Lady
Anything Goes Linky 348 – My Random Musings
Sundays on Silverado #113 – The House on Silverado
Craft Schooling Sunday – Creative Jewish Mom
Share the Wealth Link Up #28 – Big Fat Menopausal Life
656th Inspire Me Tuesday – A Stroll Thru Life
Fabulous Party 444 – Lou Lou Girls
Talent Sharing Link Up – Scribbling Boomer
The Happy Now Blog Link Up #341 – JENerally Informed
Linky Ladies Party #229 – The Purple Poncho
The Wednesday Link Party 471 – Oombawka Design
Team Creative Crafts Link Party #114 – Artsy-Fartsy Mama
Wonderful Wednesday – Oh My Heartsie Girl
Wonderful Wednesday Blog Hop – My Life Abundant
Wednesday Link Party #316 – To Grandma’s House We Go
The Loop Scoop 47 – Moogly Blog
Thursday Favorite Things #561 – An Artful Mom
Creatively Crafty Link Party #348 – Try It – Like It – Create It
Encouraging Hearts and Home Blog Hop – My Slices of Life
Grace at Home No. 484 – Imparting Grace
Linky Party – Karins Kottage
Crafty Creators Link Party #38 – Life as a LEO Wife
Create, Bake, Grow & Gather Party #540 – Shabby Art Boutique
Funtastic Friday Link Party #405 – Simply Beautiful by Angela
A Morning Cup of Joe – The Cottage Market
Saturday Sparks Link Party 534 – Pieced Pastimes
Pink Saturday – How Sweet the Sound
Your crochet potted sunflowers are ADORABLE Alexandra! I think my daughter would love making these, so thanks for the pattern!
Thanks so much, Marie! I think she will enjoy it 🙂
Oh my gosh!! THESE ARE ADORABLE! I don’t think I have the skills, patience or talent to make them but I am SO IMPRESSED that you were able to create these little flowers. And – I love that you put them in a tea cup. Perfect.
Thank you so much, Anna! I had a lot of fun working these sunflowers up, and so glad I could bring new life to these tea cups too. Popping over to check out your blog!
These sunflowers are adorable!
Thank you!
These sunflowers are so bright and cheerful! They would be great gifts for friends.
Thank you for sharing this post at Talent-Sharing Tuesdays Link-Up 36.
Carol
http://www.scribblingboomer.com
They definitely would!
Wow Adorable and so perfect for fall! thanks for sharing on craft schooling Sunday!
Thank YOU!
I love sunflowers and your potted ones turned out so cute! I’m featuring you this week at the Home Matters Party. Hope to see you drop by!
I sadly don’t now how to knit or crochet but I had to pin this as they are so cute and cheerful! Maybe someday I’ll be able to make them.
I appreciate the pin! I have included video tutorials if you want to take a look. I’m happy to help with any questions if you wanted to learn to crochet 🙂 I’ll be adding a couple to my OnRockwoodLane Etsy shop this week if you would like to buy one – I have 3 available.
First of all I had to laugh. Your vintage dishes were all the rage when I got married. In fact, they’re the set my sister-in-law chose when she married in 1984 and she still uses them! I love sunflowers and can’t wait to make a few. They’re perfect gifts, but I will be making myself one, too. Thank you for the pattern.
Love to hear this! I think it’s a gorgeous set! And I am so lucky to have found so many pieces in great shape. So glad you like the design! Happy hooking 🙂
This is absolutely darling! I love this sunny project!
Thanks so much! I had so much fun putting them together. I have a bunch of other chipped cups that have different prints so now I’m thinking of what other flowers I can work for those cups. Going to wait until after the holidays, but can’t wait to start!
Very nice sunflower. Great idea in cup instead of crocheted pot
Thanks for sharing and your video is super excellent no music in background and nice and slow like idea using cup instead of crocheted pot hope you do other flowers I crochet and hope to attempt this thanks
I am so very happy that you enjoyed this pattern and video tutorial! Thank you for your feedback! After I made this sunflower in a cup, I have been dreaming up other flowers to make for other cups that I have in similar conditions (chipped or cracked – otherwise not drinkable), I just haven’t gotten to designing any others yet. Hope to do some in the Spring. Happy crocheting! Please reach out if you have any questions along the way.