Photo tutorial & video tutorial showing how to crochet evenly around a crochet project.
This post contains affiliate links for Etsy. If you make a purchase by clicking on them, I make a small commission at no extra cost to you. Thanks for your support!
Find the free photo tutorial instructions below, or purchase a printer-friendly, ad-free PDF on Etsy by clicking here.
In a hurry? Pin this for later when you have more time.
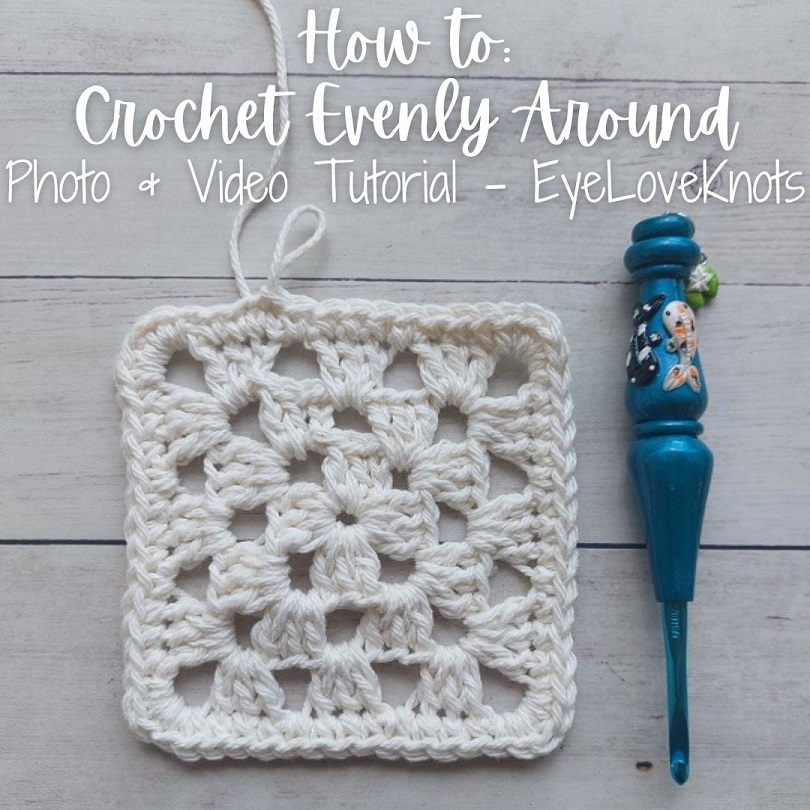
You just finished working a new project, and now you want to evenly crochet around it to add a finishing touch, or a border, but you’re not quite sure how to work evenly, let me show you!
In the case of granny squares, they can be finished without a border. Evenly crocheting around will add a nice finishing touch, or serve as the foundation of additional rounds of a border. Tutorial is shown with (US) single crochets and (US) half double crochets, but the same concept applies no matter which stitch pattern you use so feel free to change it.
You’ll find a FAQ section first, and then I’ll show photo and video tutorials for crocheting evenly around, and multiple ways depending on the stitch pattern. I’m starting out with crocheting around a granny square, but as I do different projects, I’ll update this post with photo & video tutorials. Feel free to drop me a line with your request. All tutorials are given in US terms.
I am not creating anything new here, but I did take the time to take the photos, edit them, and put this tutorial together, so please respect my work. Do not pin or share any of the tutorial images – just the main photo. Provide the link for others to find my page (help out me and my blog with the traffic). Do not copy and paste my work anywhere. Thank you!
What Does it Mean to Crochet Evenly Around?
To crochet evenly around means to work an even number of stitches into each stitch on the top, down the side, across the bottom and up the other side back to the beginning of the round. This results in an equal number of stitches on the top and bottom, and an equal number on both sides plus an increase of stitches in each of the corners so the fabric will lay flat.
Do I Have to Crochet Evenly Around My Project?
Not at all. Whether to crochet evenly around a project or not is completely up to you, but I do think that it gives a finished look to the edge/s of a crocheted project, and will balance out any unevenness.
Should I Weave In My Ends Before Crocheting Evenly Around?
Weaving in your ends before crocheting evenly around is completely up to you. I do try my best to weave in as I go so that I don’t have a lot of ends left at the end of the project, but keep in mind that weaving in prior along the sides can make the stitches a little tighter to work into when crocheting around, but does not prevent.
Should I Crochet Evenly Around Before Blocking?
Whether or not to crochet evenly around your project before blocking is completely up to you, and would also depend on the type of project that you’re working. For example, individual granny squares may be blocked prior to assembling together where you would then crochet evenly around, though individual granny squares may also be assembled, then a border crocheted evenly around, and then blocking of the final piece. Garments pieces are often blocked prior to assembly, then a final edging crocheted evenly around the neck, sleeves and bottom is typically worked.
Where Should I Insert my Crochet Hook When Crocheting Evenly on the Sides?
When crocheting evenly down or up the sides, you should insert your crochet hook directly into the center of the stitch on the edge picking up two loops on your hook resulting in even stitches along the side. You should not insert your hook into the space in between the two stitches on the end as this can create gaps in the fabric along the sides as well as create an uneven appearance within your stitches.
How Do I Prevent Gaps on the Sides When I Crochet Evenly Around?
To prevent gaps on the sides of your project when crocheting evenly around, you should insert your crochet hook directly into the center of the stitch on the edge, and not into the space in between the two stitches on the end.
Why Are the Sides of my Crochet Project Ruffling When I Crochet Evenly Around, and How Do I Fix It?
When you’re crocheting evenly around, you may notice the sides of your crochet project start to ruffle even though you’re working the correct number of stitches. This ruffle is caused from a change in the tension that’s used on the project versus on the edging/border. To fix the ruffling along the sides of your project, my go to is simply going down one hook size when working the edging/border. For example, a project worked with an H8/5mm crochet hook hook, I would go down to a G6/4.25mm or 4.5mm crochet hook. Alternatively, you can block your finished piece to correct the ruffling.
Why Are My Corners Not Laying Flat When I Crochet Evenly Around?
When crocheting evenly around, you’ll want to increase, or work multiple stitches, into the corner stitches so they will lay flat. If your corners are taking a bowl shape, or puckering, it most likely means that you need to add more stitches to your corner, or work with a looser tension.
I typically stick to this format: (single crochet, chain 2, single crochet), changing the stitch out as needed. I like a chain 2 in the center for a more square corner (chain 1 for a more rounded corner), and a chain in general so I have space to work the corner increases of the next round comfortably. If I do not plan on adding an additional round, I may work 5 stitches in each corner instead, such as: (2 single crochet, 1 half double crochet, 2 single crochet), keeping the center stitch one stitch above the rest for a more square corner (all the same stitch for a more rounded corner). These are just two examples of how you can increase in the corners.
How to Crochet Evenly Around Different Stitch Patterns?
As I mentioned, as I do different projects, I’ll update this post with photo & video tutorials of crocheting evenly around different stitch patterns, but many of the same concepts apply when working a variety of stitch patterns. If you have any requests, please drop me a comment to let me know, but here are some answers to help get you started.
How Many Stitches Do I Crochet into the Side of a Row?
Regardless of your stitch pattern chosen for the edging/border (ie single crochet, half double crochet, etc), the general rule for crocheting evenly into the side of a row is:
- 1 stitch per row of single crochet
- 3 stitches per 2 rows of half double crochet
- 2 stitches per row of double crochet
- 3 stitches per row of treble crochet
How Do I Crochet Evenly into a Beginning Chain?
When crocheting evenly into the beginning chain, I would follow the same general rule of working into the side of a row depending on the stitch pattern. For example, some makers work a chain 2 when working in double crochet, and some work a chain 3 for the same stitch pattern, however, I would follow 2 stitches per row of double crochet.
How Do I Crochet Evenly Around Corner to Corner in Half Double Crochet or Double Crochet Boxes?
When crocheting evenly around a corner to corner box project, like a washcloth or afghan, work a stitch (I usually pick a single crochet for the first round as it keeps the first round close to the fabric so the chains keep their shape after the remaining rounds are added, otherwise it creates little gaps) into the space in between boxes, then loosely chain 1 for half double crochet boxes, or chain 2 for double crochet patterns. Then repeat working a stitch in between the next two boxes, and then a chain over the box. In each corner following my given stitch pattern of single crochet, I would work a (single crochet, chain 2, single crochet) into the corner stitch.
For remaining rounds following my given stitch pattern of single crochet (you could change it up), I would work 1 single crochet per stitch that’s in between the boxes, and 1 single crochet per chain 1 or 2 single crochets per chain 2, then work a single crochet into the first stitch of the corner, (work a single crochet into the corner chain space, chain 2, single crochet into the same chain space), single crochet into the next stitch of the corner, and continue in the same manner all the way around.
Ad-Free Printer Friendly PDF:

If you would like a PDF version of this post, you may get one through my Etsy Shop for a small fee. This fee is to compensate for the views lost when you no longer need to return to the blog to for the information, as you will have your own copy. In a hurry? Pin this for later when you have more time!


Save this to your Favorites on: AllFreeCrochet, FaveCrafts, Crochet Pattern Bonanza, DIYideaCenter, Cheap Thrifty Living, Free Crochet Tutorials
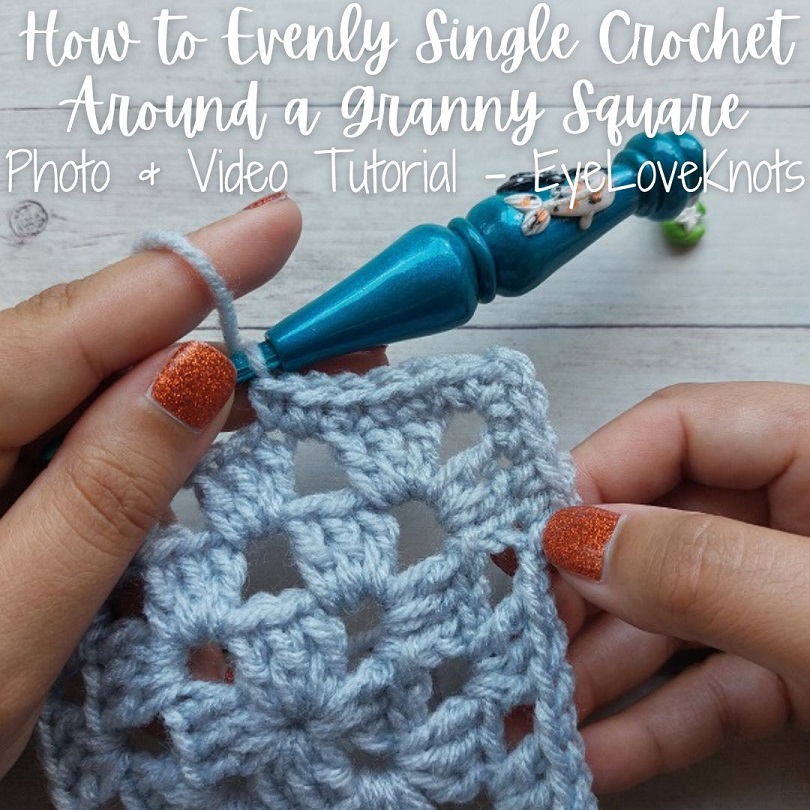
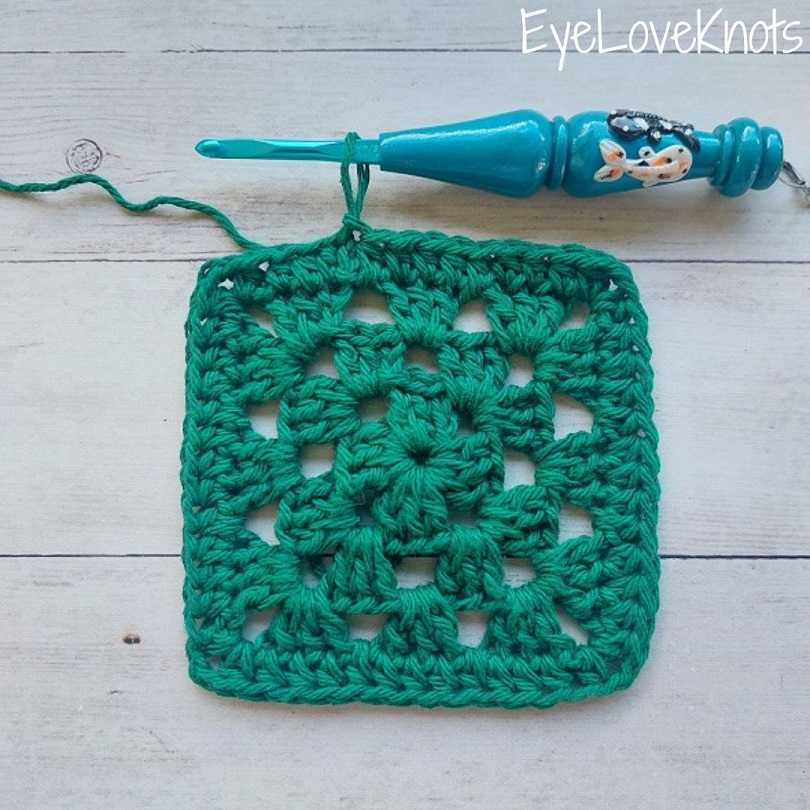
Video Tutorial Showing How to Evenly Single Crochet Around a Granny Square:
Photo Tutorial Showing How to Evenly Single Crochet Around a Granny Square:
Yarn is Red Heart Super Saver in the Light Gray colorway (above) and Lily Sugar n Cream in the Ecru colorway (below), and I’m using an H8/5mm crochet hook – I love this Koi Fish Ergonomic Clay I bought on Etsy. My polish is from Lily and Fox in the Burlesque colorway.
This tutorial begins right after the slip stitch join of the previous round. If you prefer to begin in the corner chain space, then use your preferred method to tie on, begin with a chain 1, and work evenly in pattern.
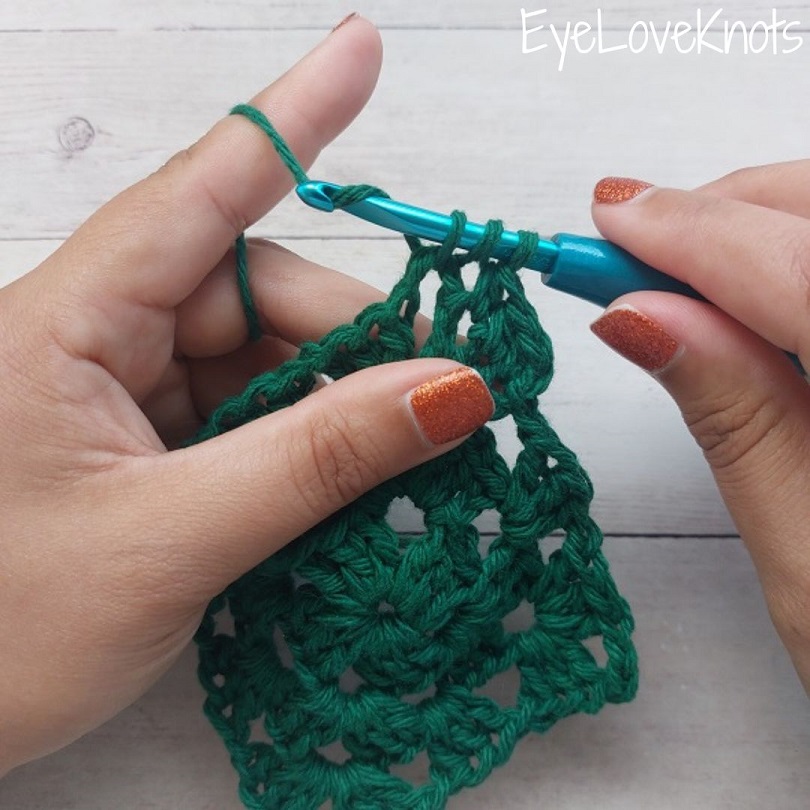
When working with single crochets, we start with a chain 1, and this does not count as a stitch.
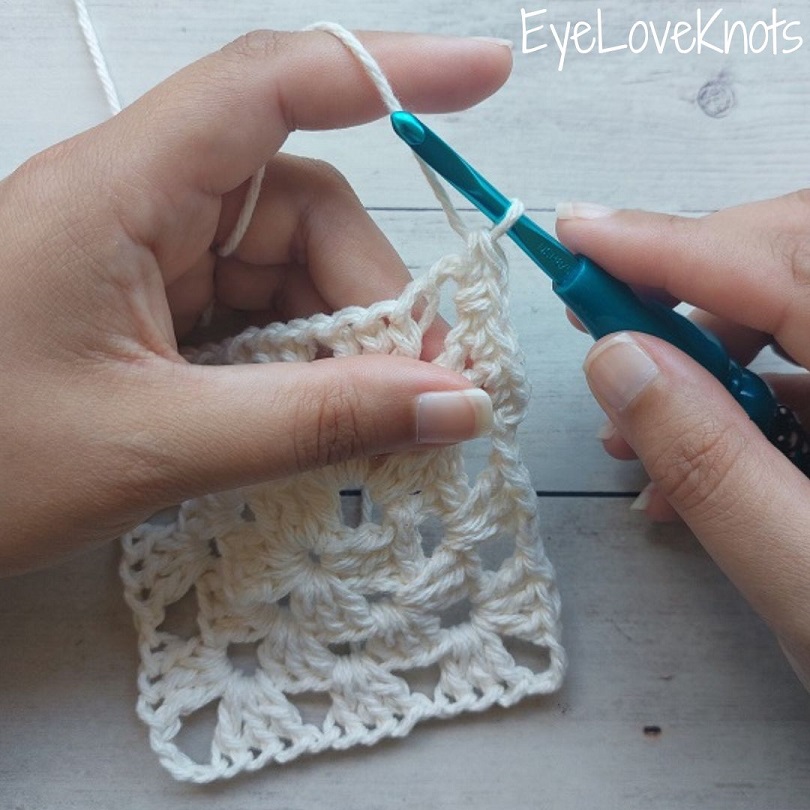
Insert your hook into the very first stitch, which is the same stitch you joined to previously.

Yarn over, and pull through.
You will have 2 loops on your hook.
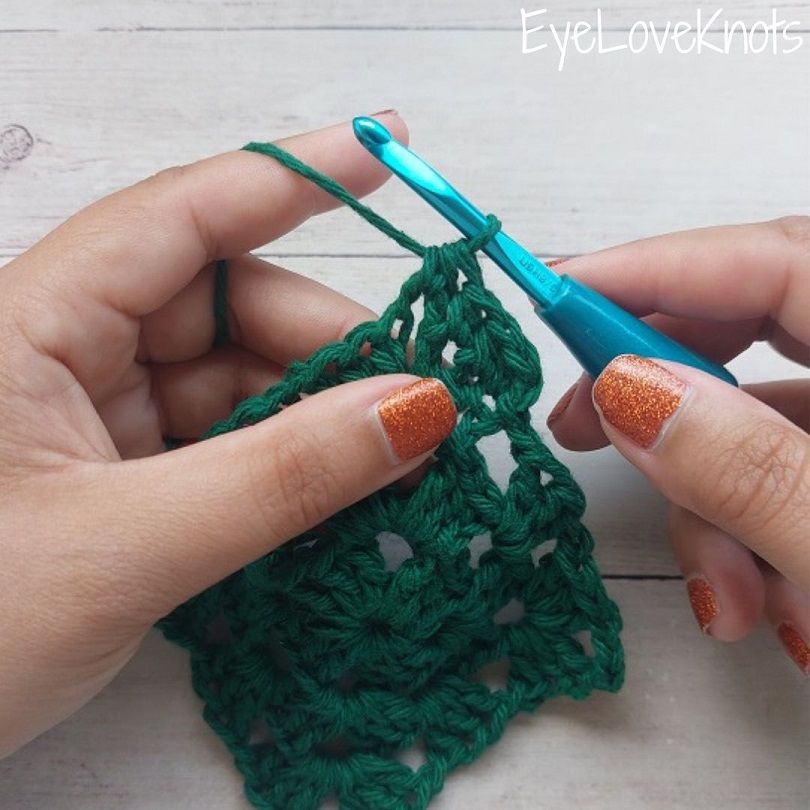
Yarn over…
… and pull through…

… to complete the first single crochet.

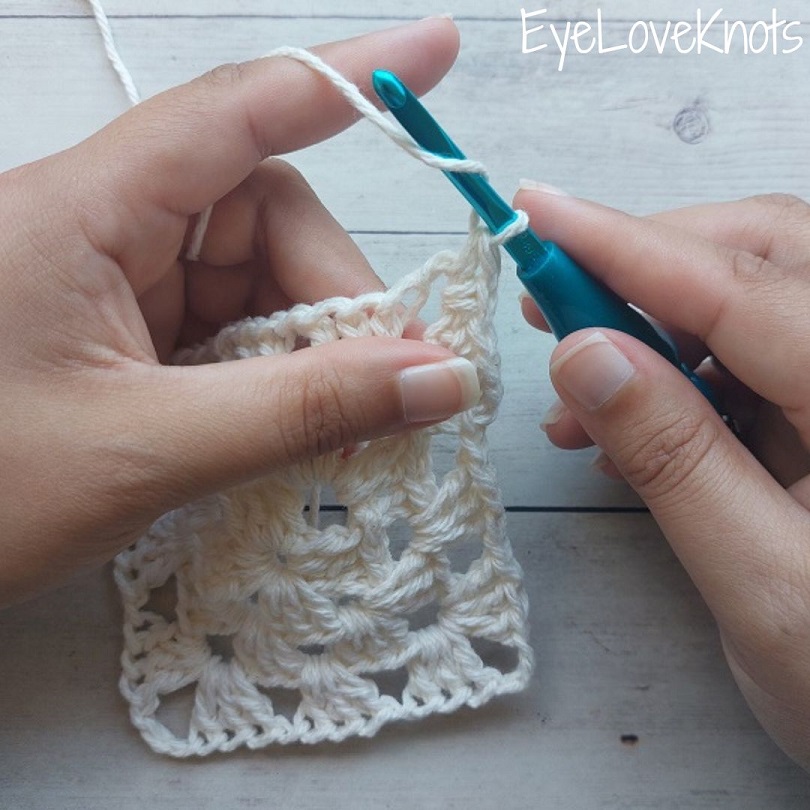
The next single crochet will be worked into the very next stitch, which is the second double crochet.
Insert your hook into this stitch picking up both loops from the v-shape.
Yarn over, and pull through (2 loops on your hook), then yarn over and pull through both loops to complete the second single crochet crochet.
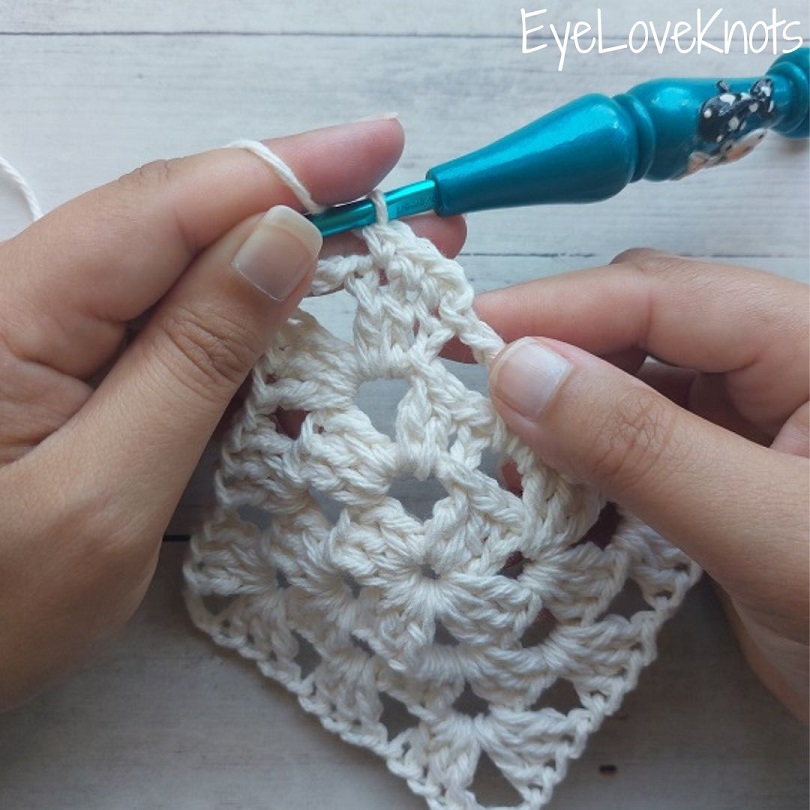
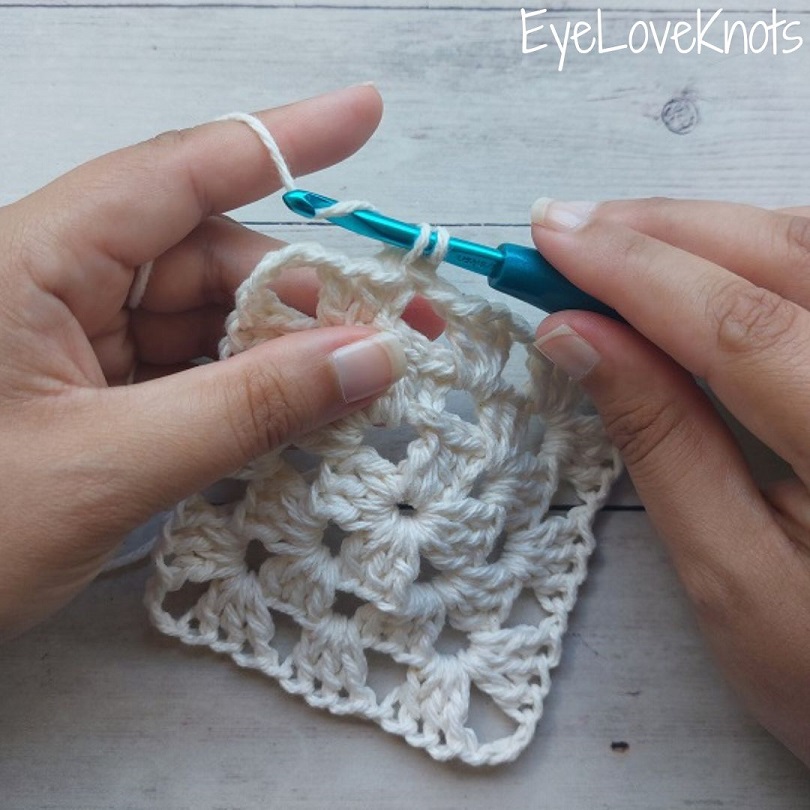
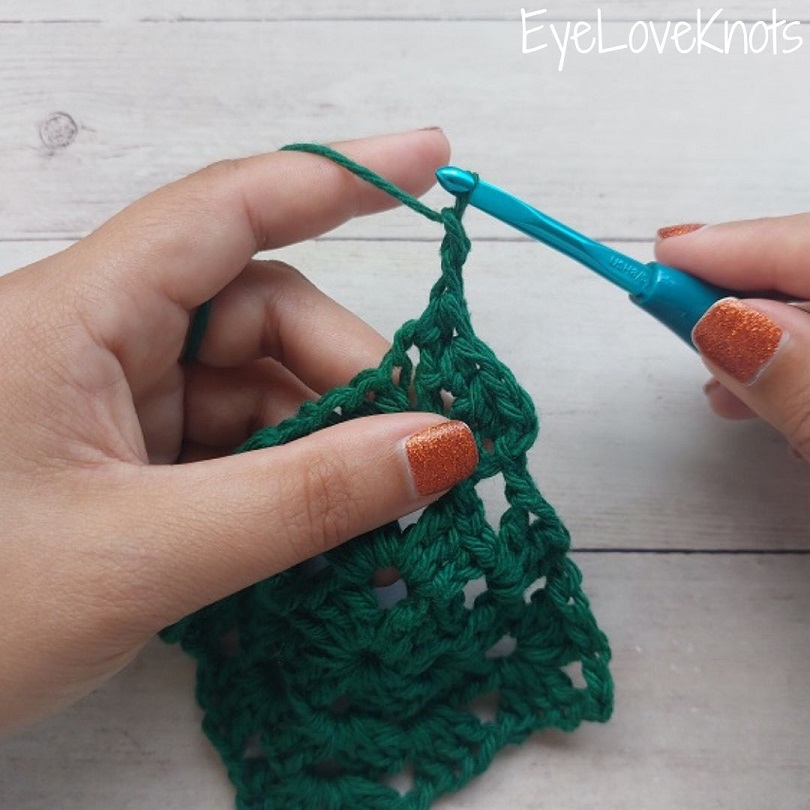
Single crochet once more into the next double crochet.
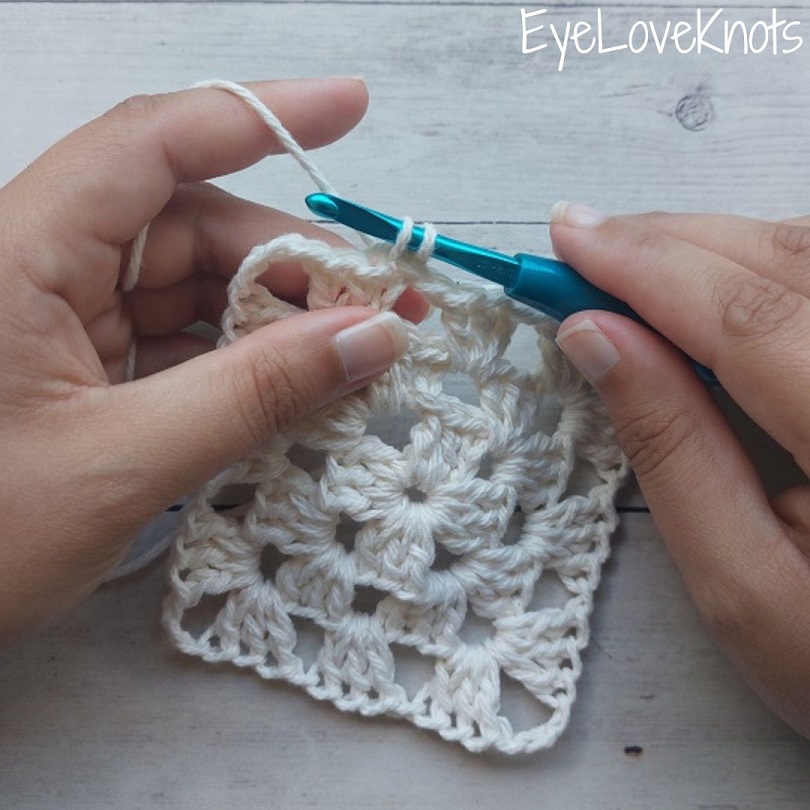
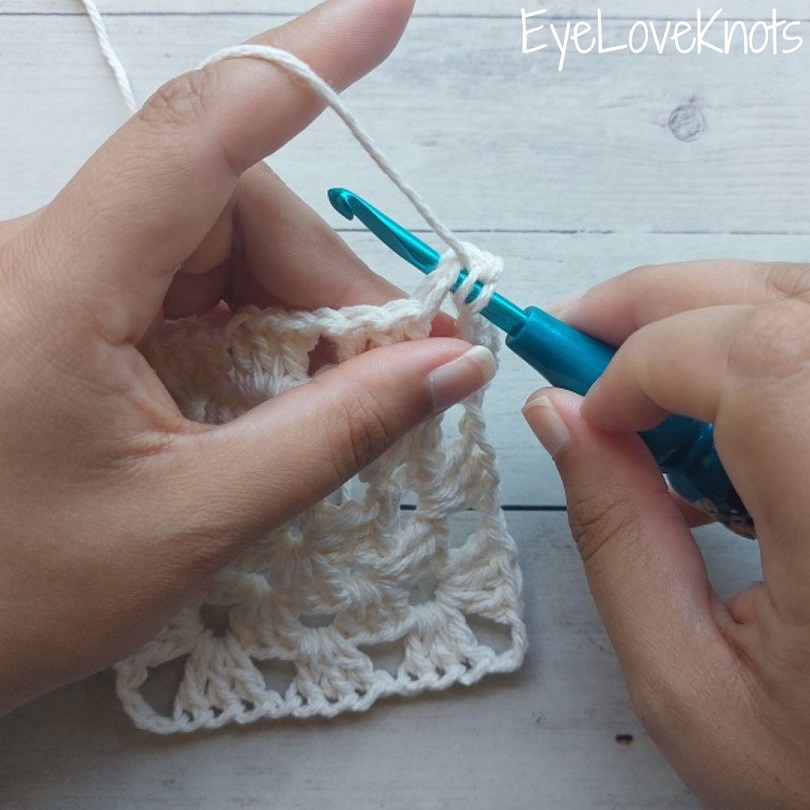
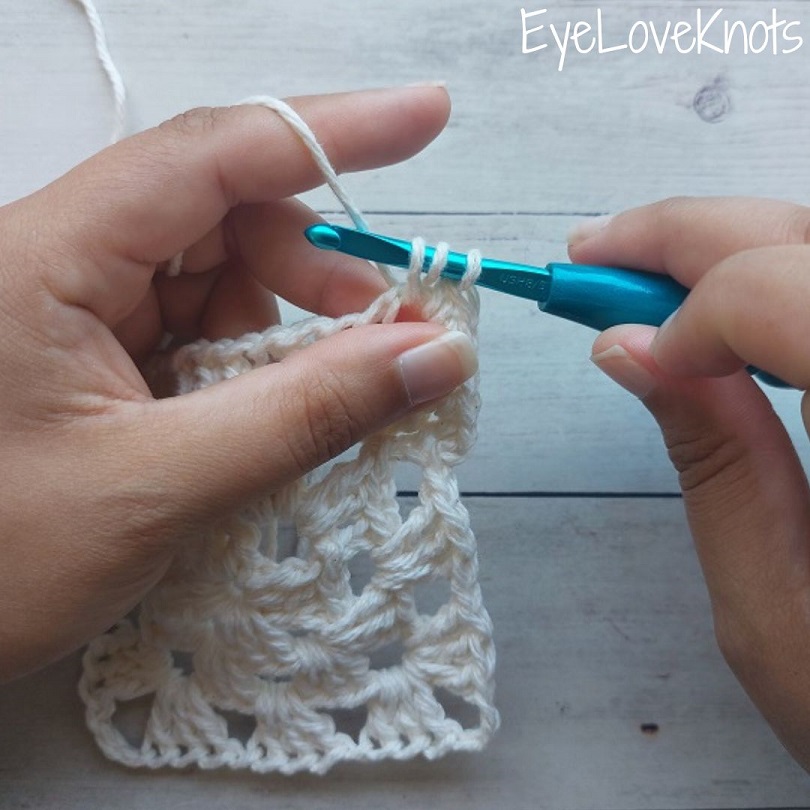
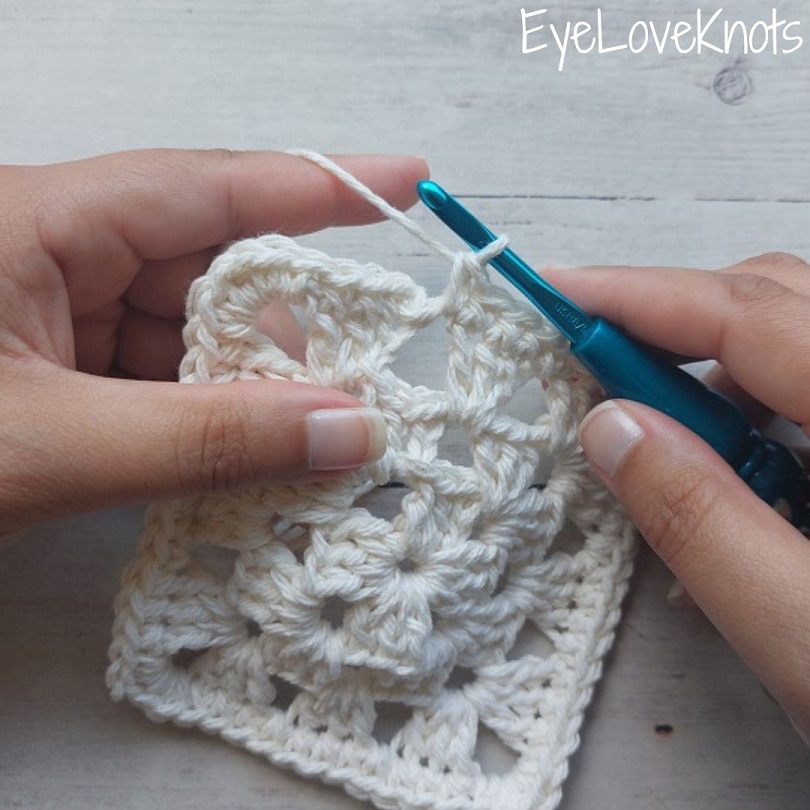
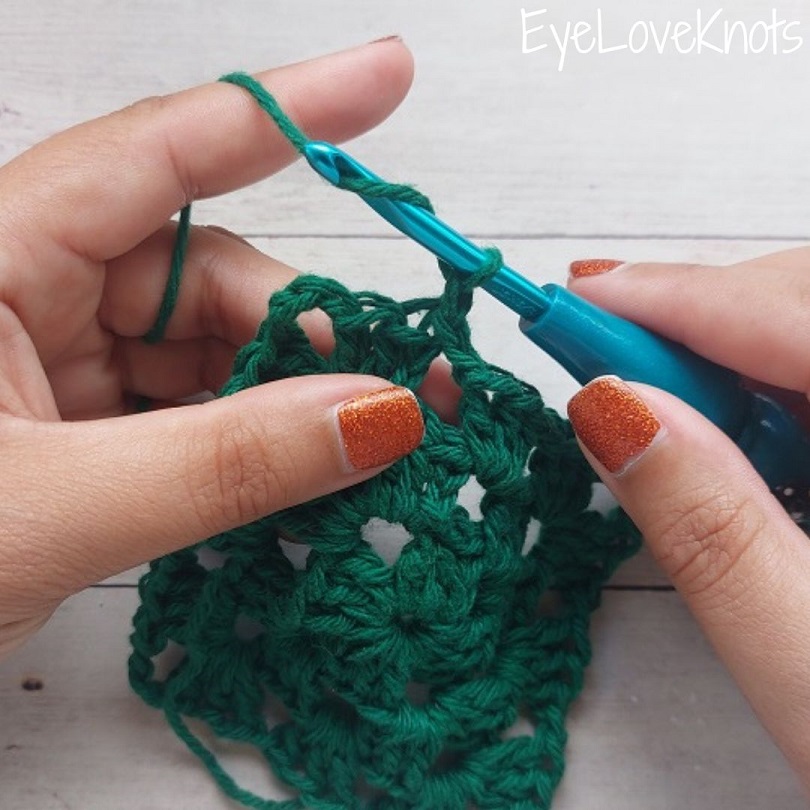
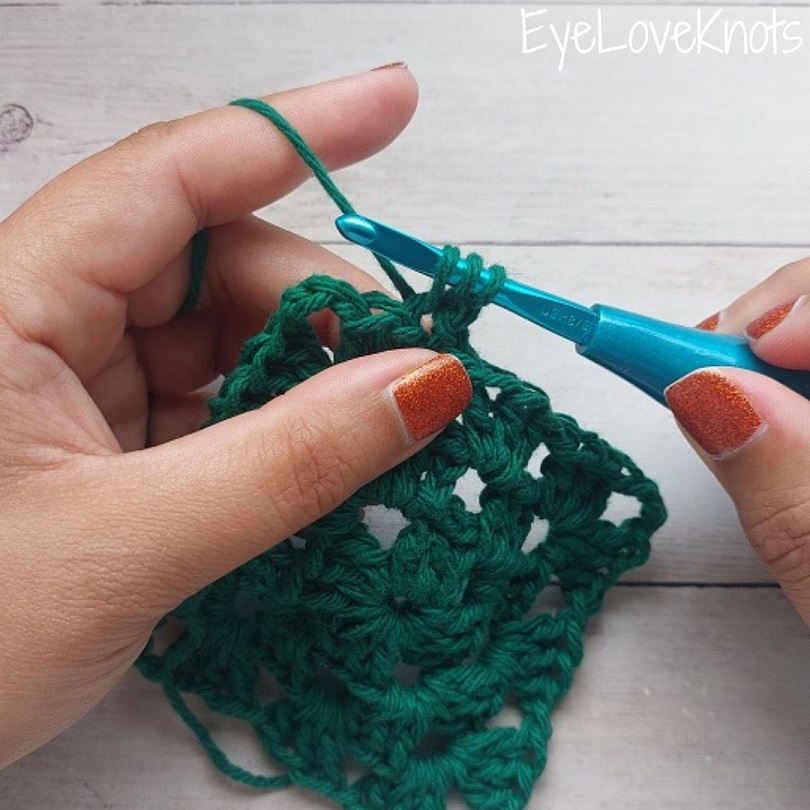
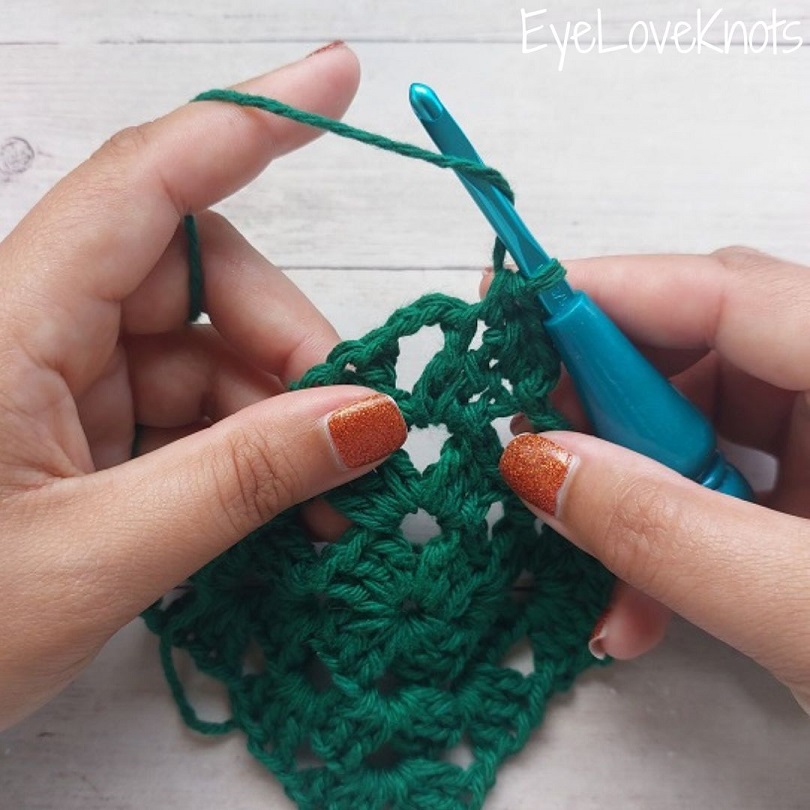
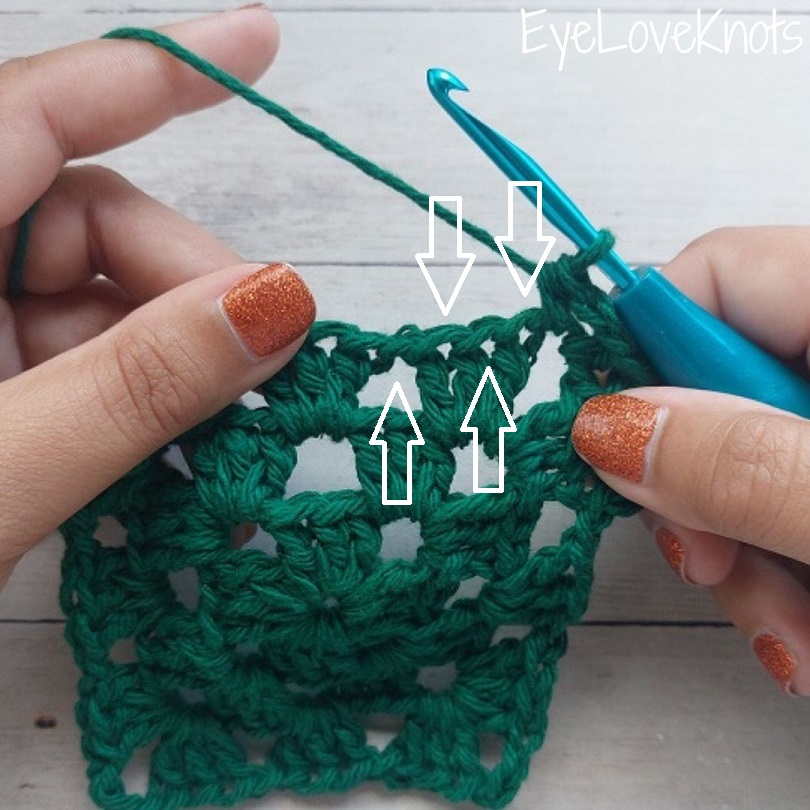
Now we’ve reached the chain space of the corner, and in this corner (and each remaining corner), we need to increase, which means add more stitches to, so the corner will lay flat.

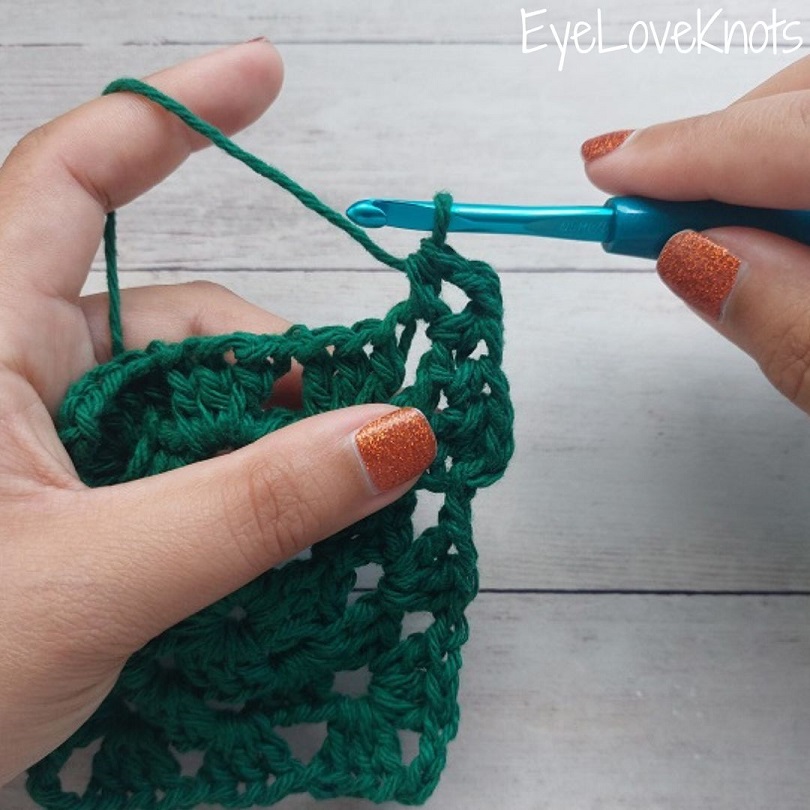
Insert your hook directly into the chain space, picking up the chains on your hook so you can crochet over it, yarn over and pull through (2 loops on your hook). Yarn over, and pull through both loops to complete the first single crochet.
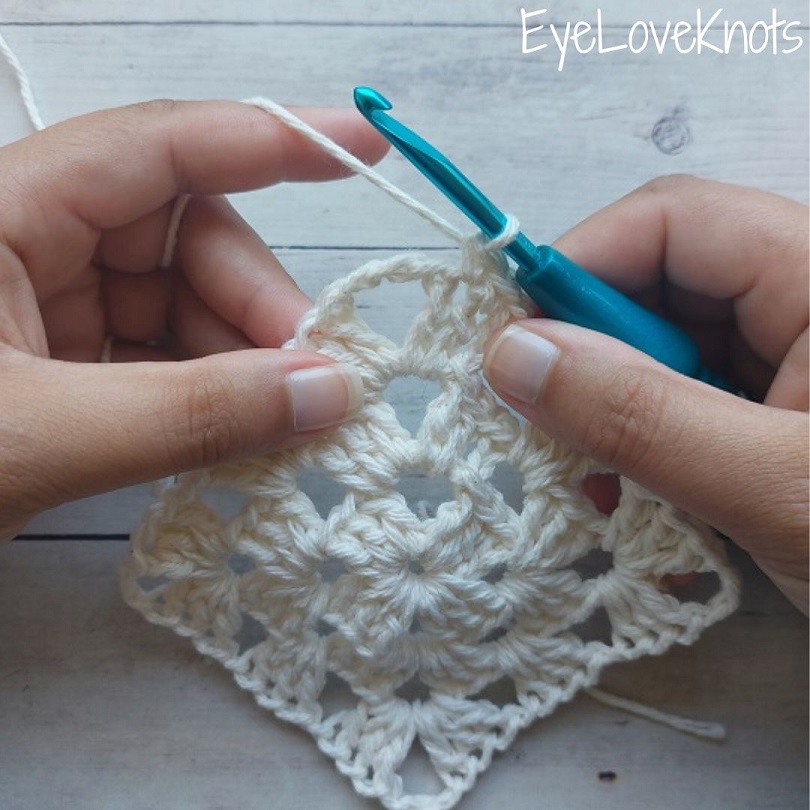
Chain 2 for the corner. [For a more rounded corner, chain 1 instead]
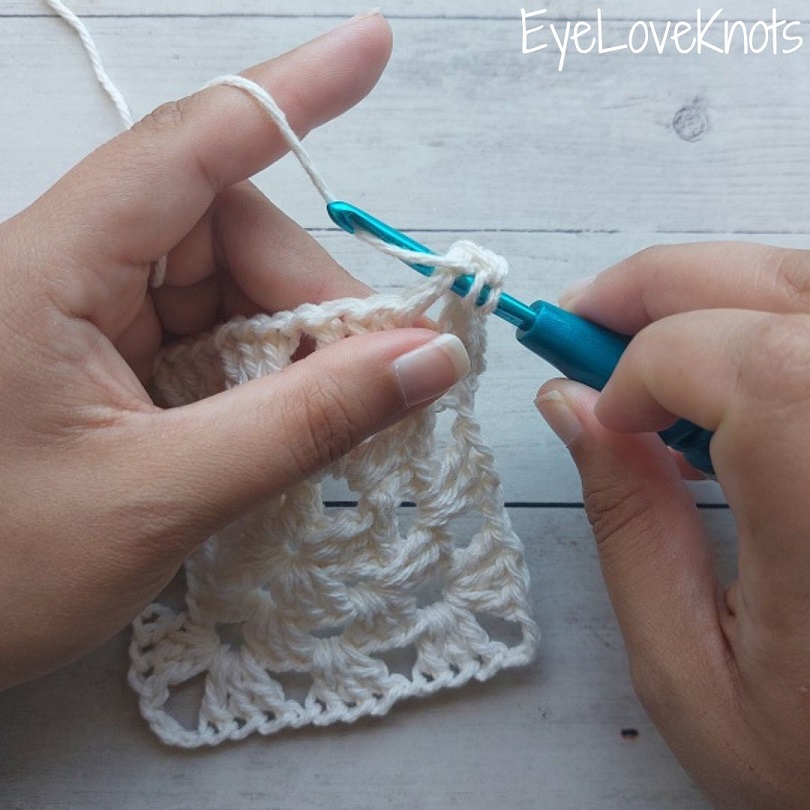
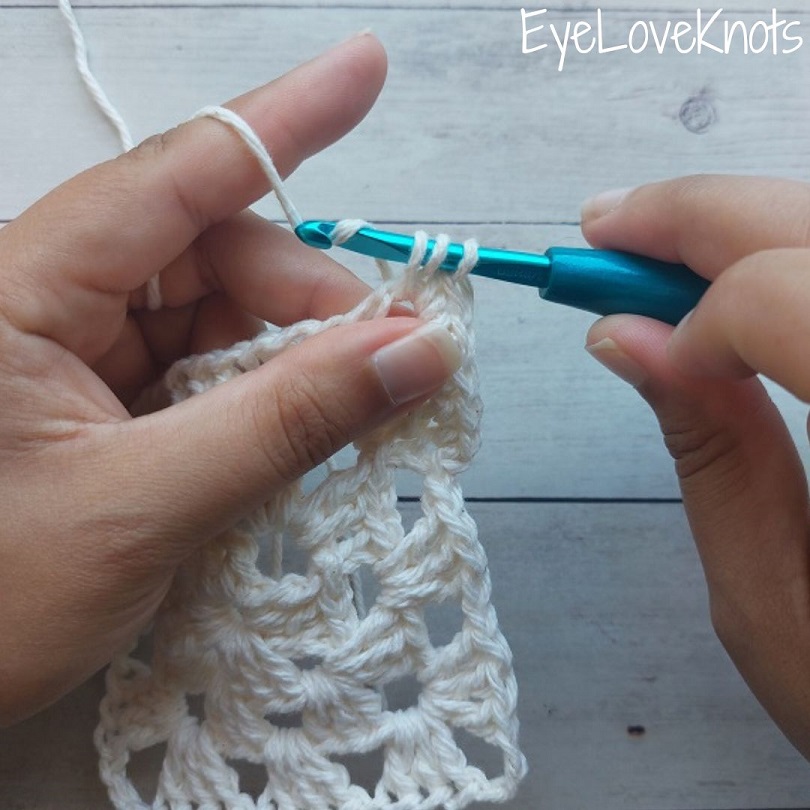
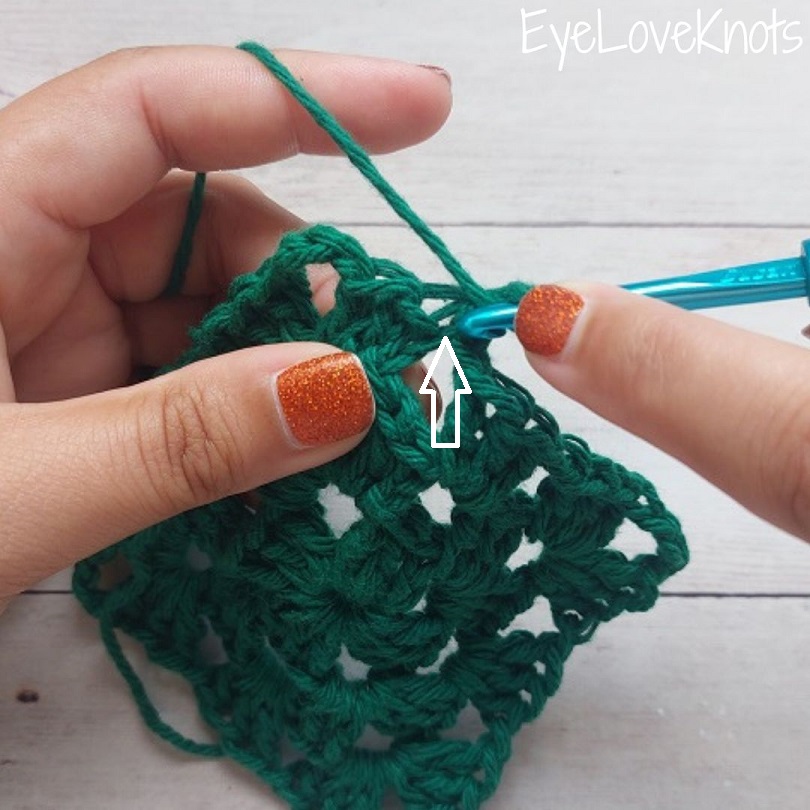
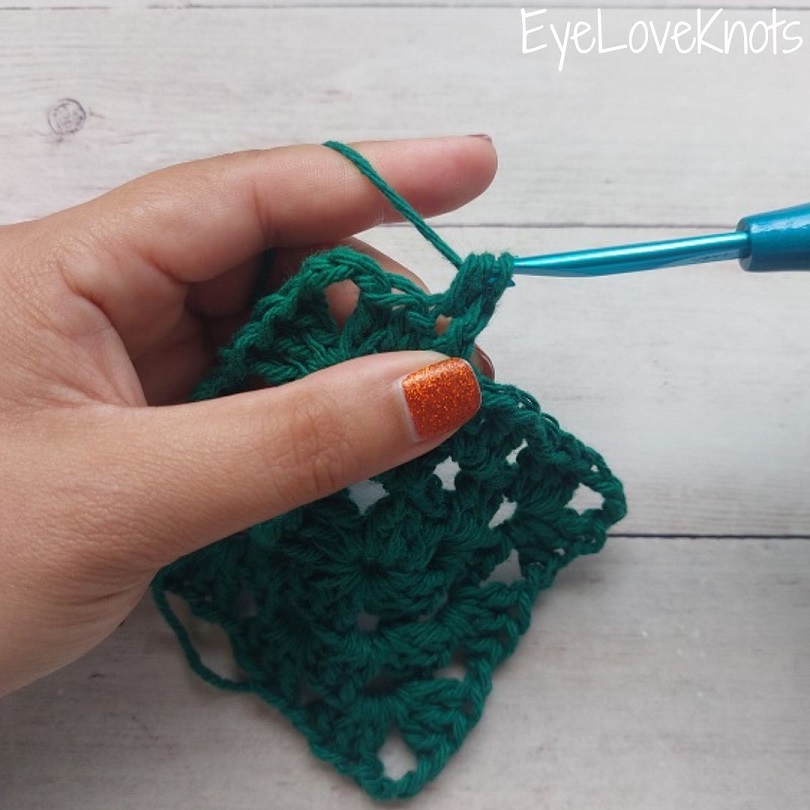
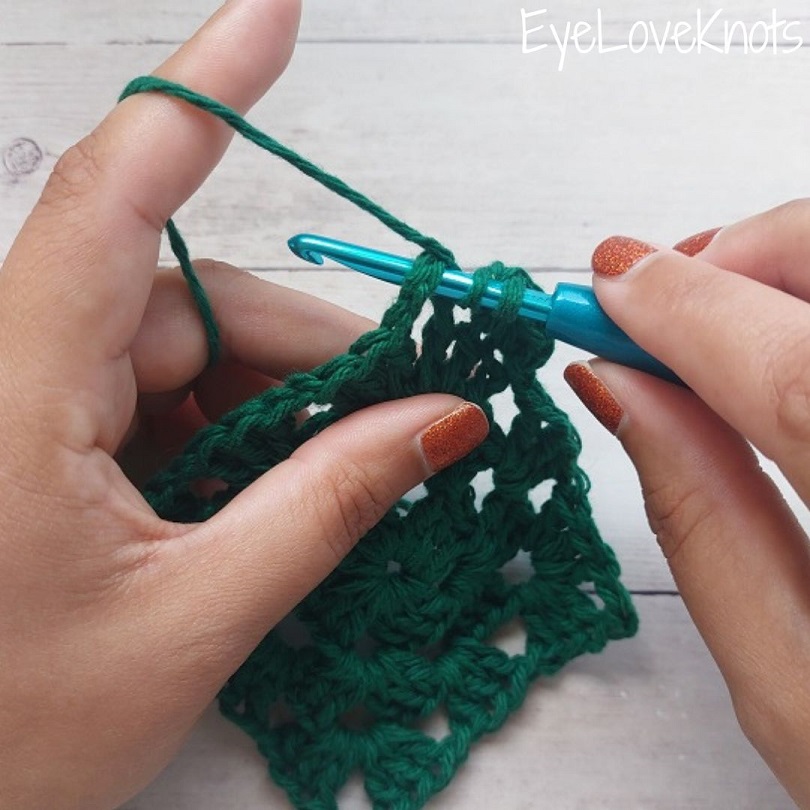
Work one more single crochet into the same corner chain space. This completes our corner.
The chain space that we created there gives us a place to comfortably work the next round’s corner into.
Alternatively, if you want a solid corner without a chain space, into the chain space, work 5 single crochets for a rounded corner, or (2 single crochets, 1 half double crochet, 2 single crochets) for a more square edge (as shown).
To half double crochet, yarn over.
Insert crochet hook into the chain space.
Yarn over and pull through.
You will have 3 loops on your crochet hook.
Yarn over…
… and pull through all 3 loops…
… to complete the half double crochet.

Here is the finished solid corner after adding the remaining two single crochets.

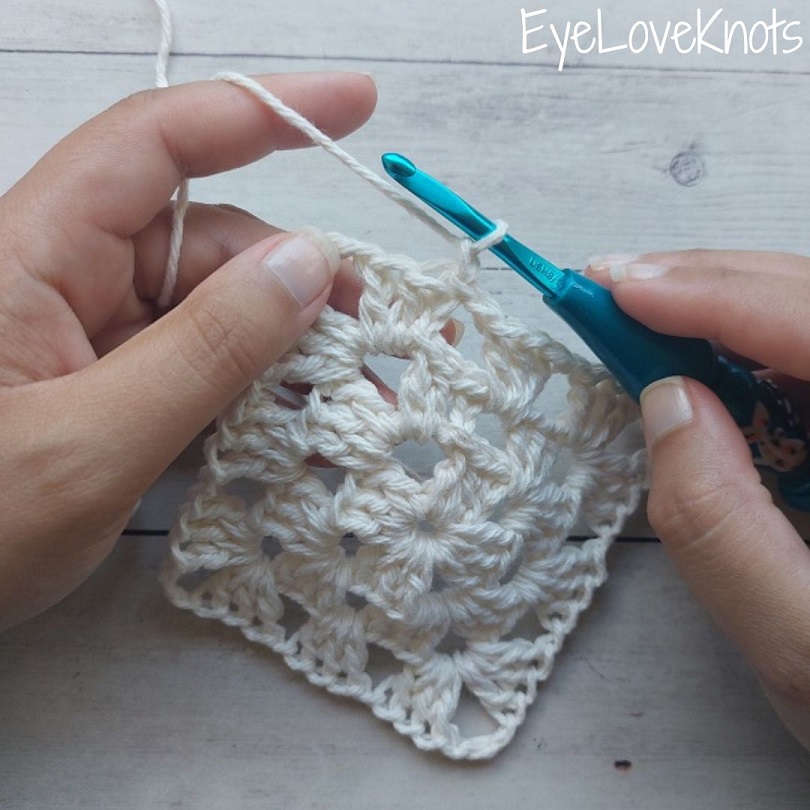
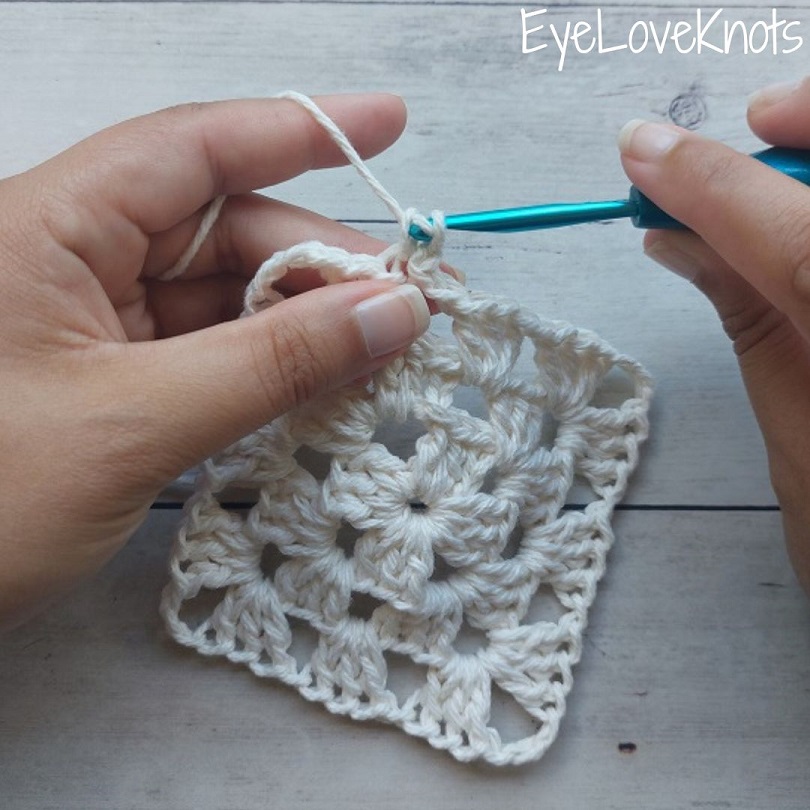
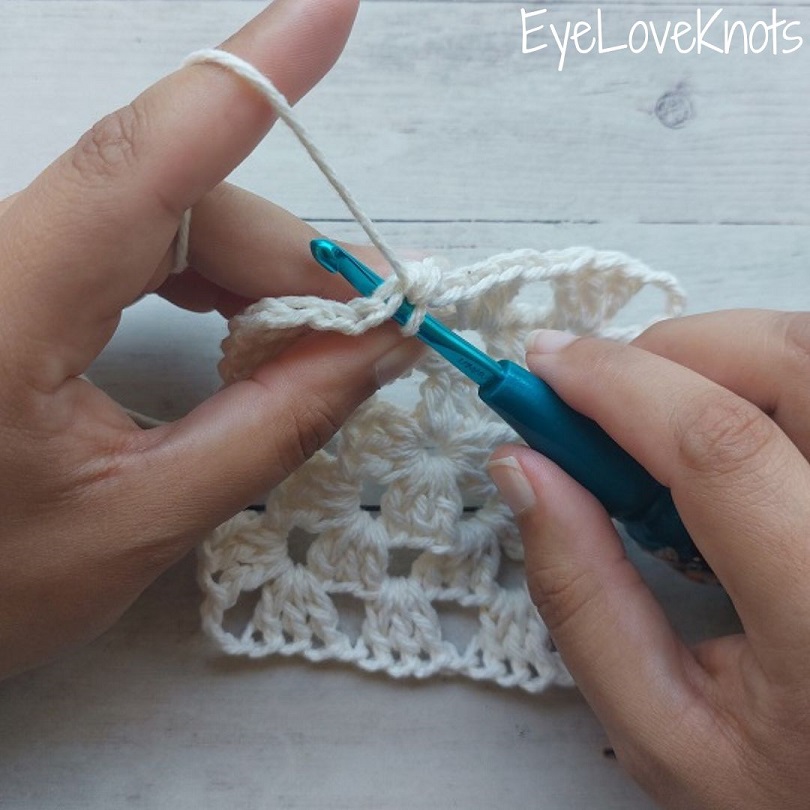
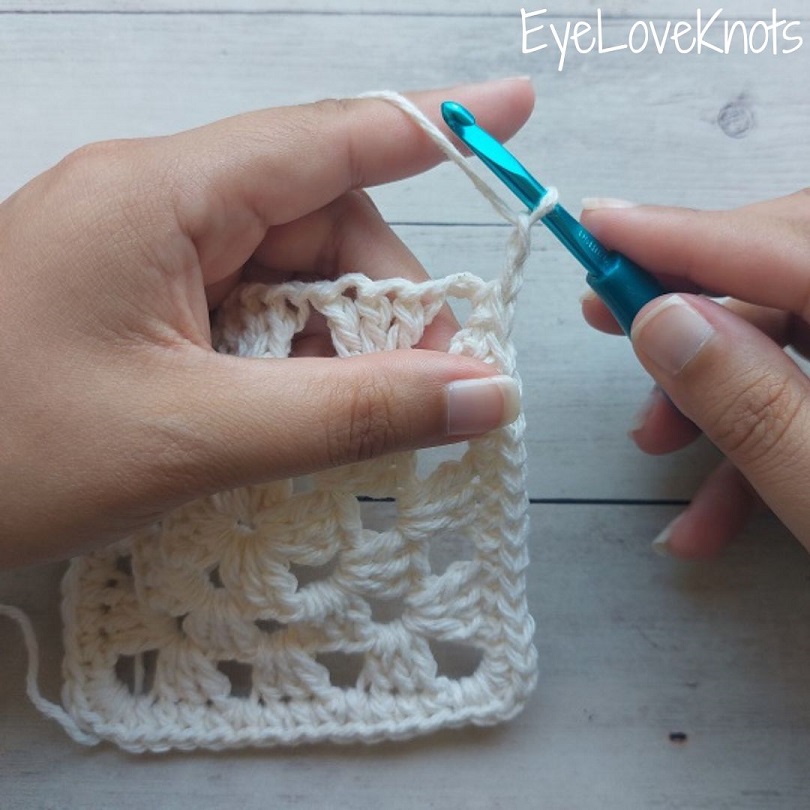
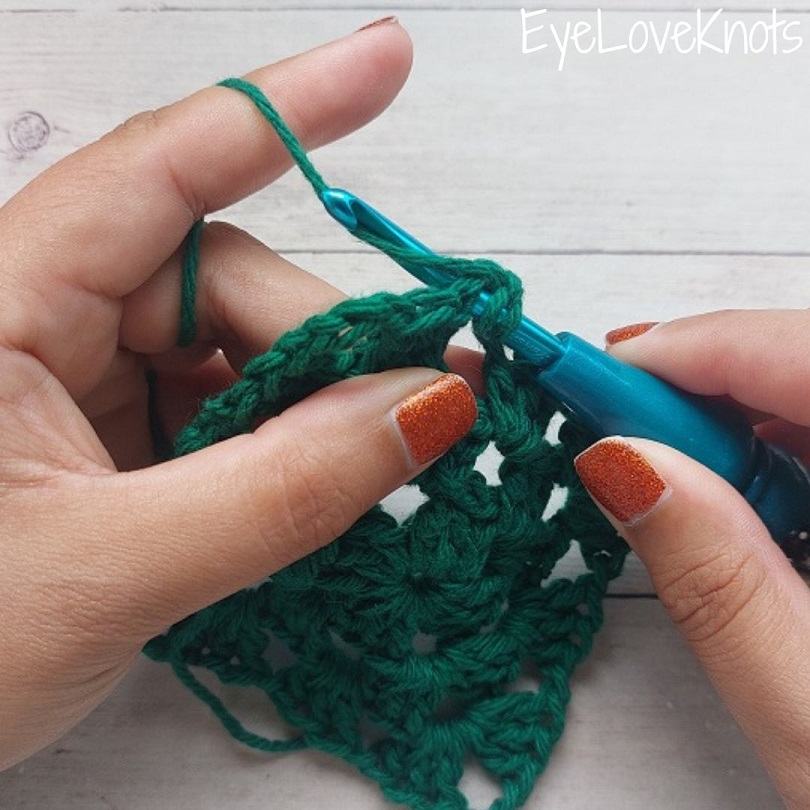
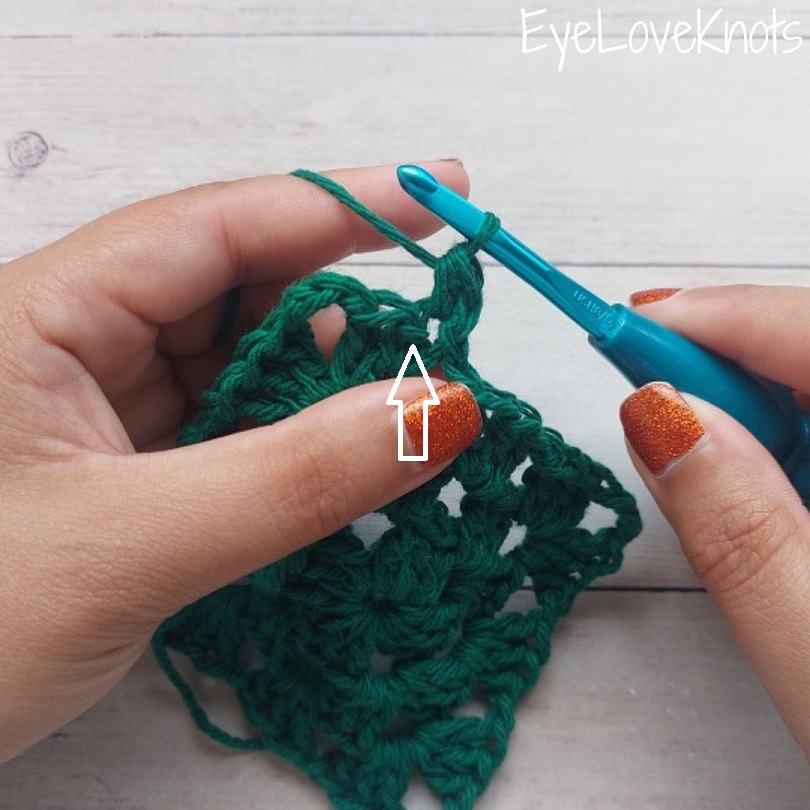
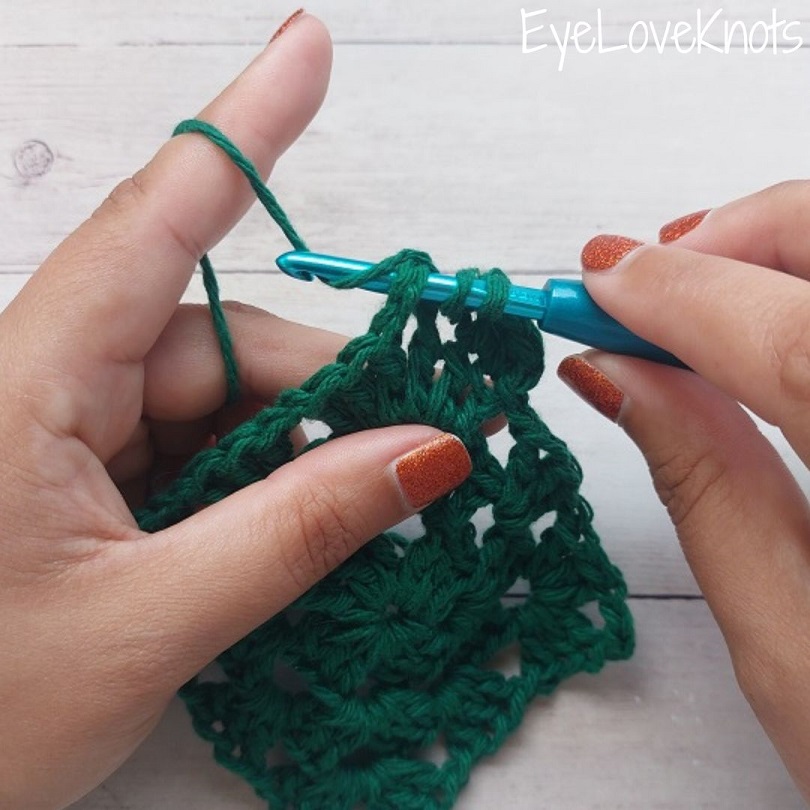
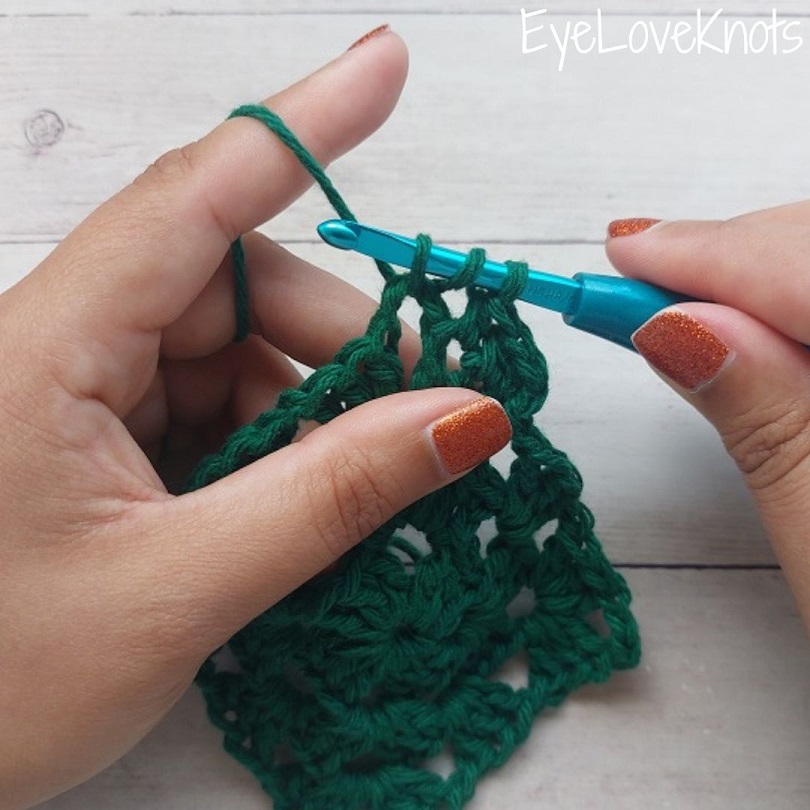
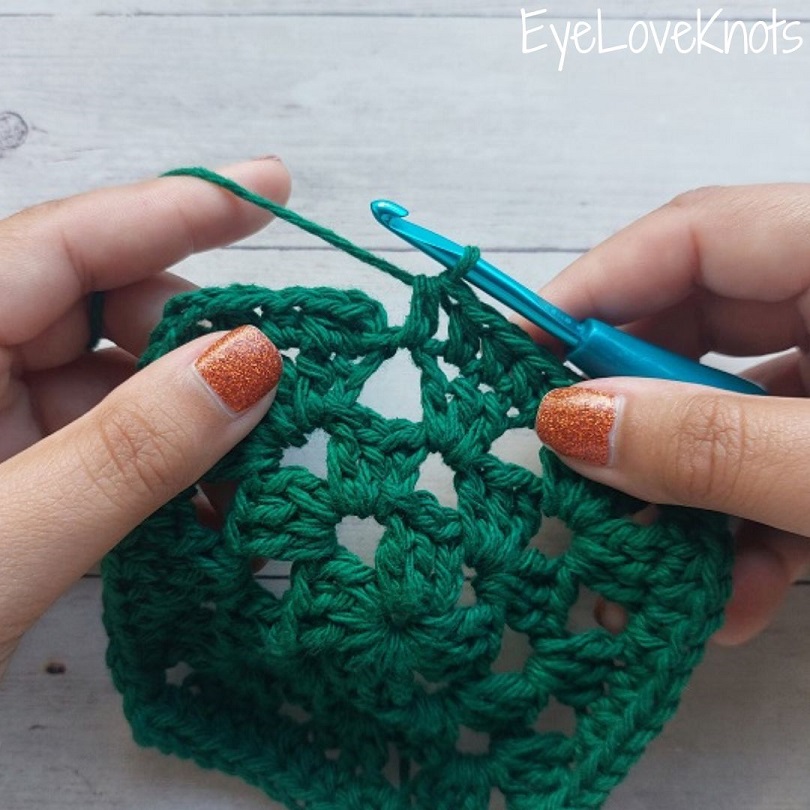
Continue working one single crochet all the way around the granny square into each double crochet and each chain space, and increasing in the corner using your desired method.
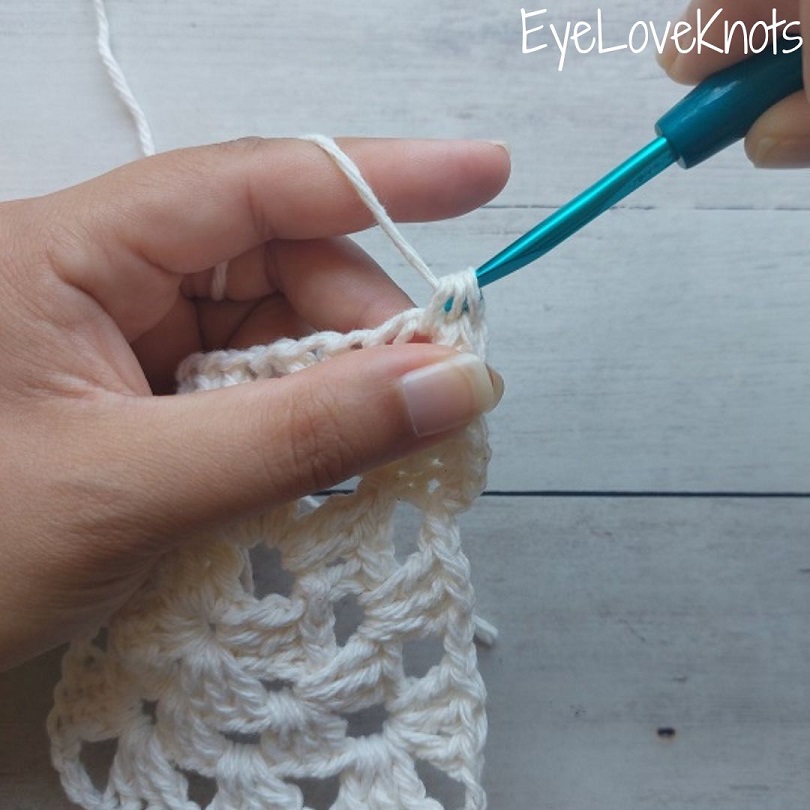
The last stitch of the round will be a single crochet into the last chain space.
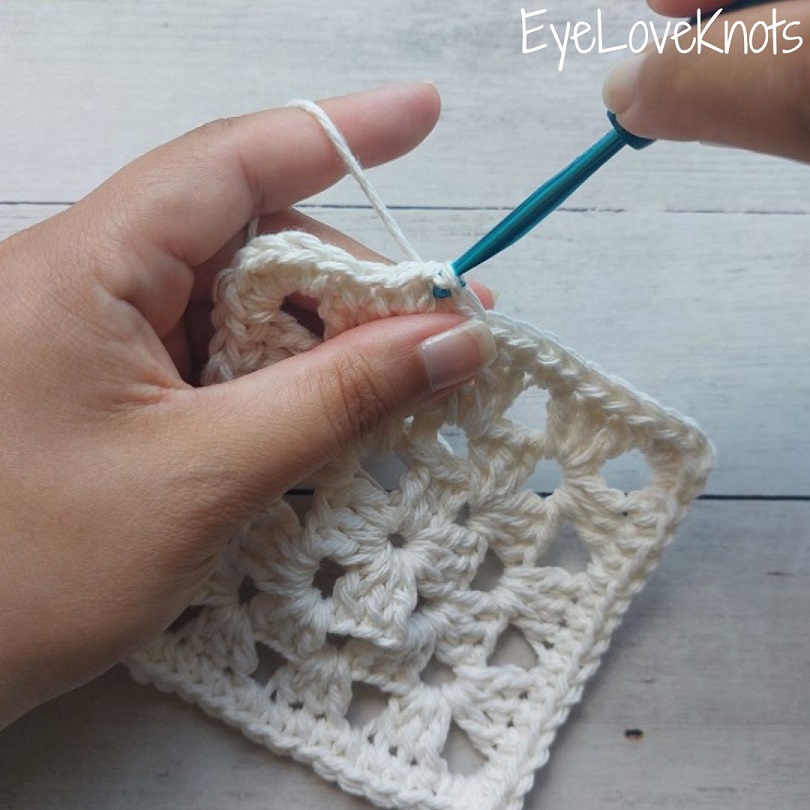
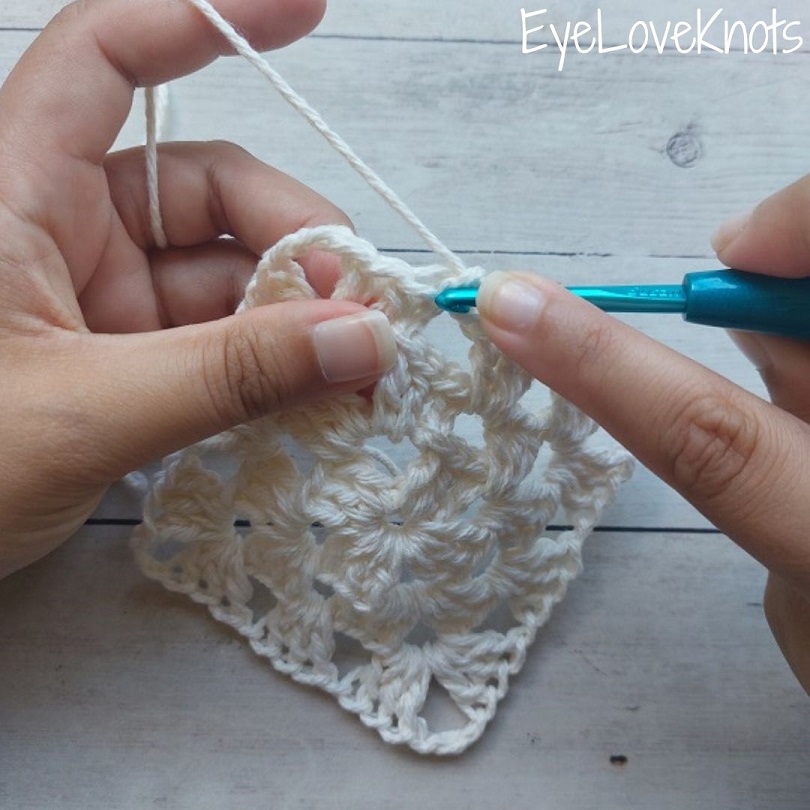
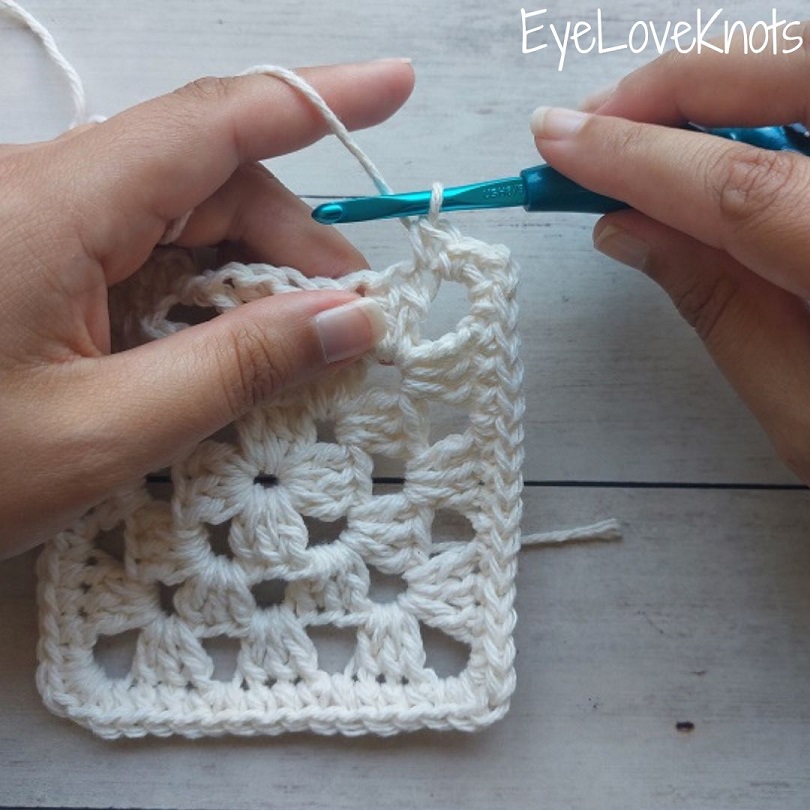
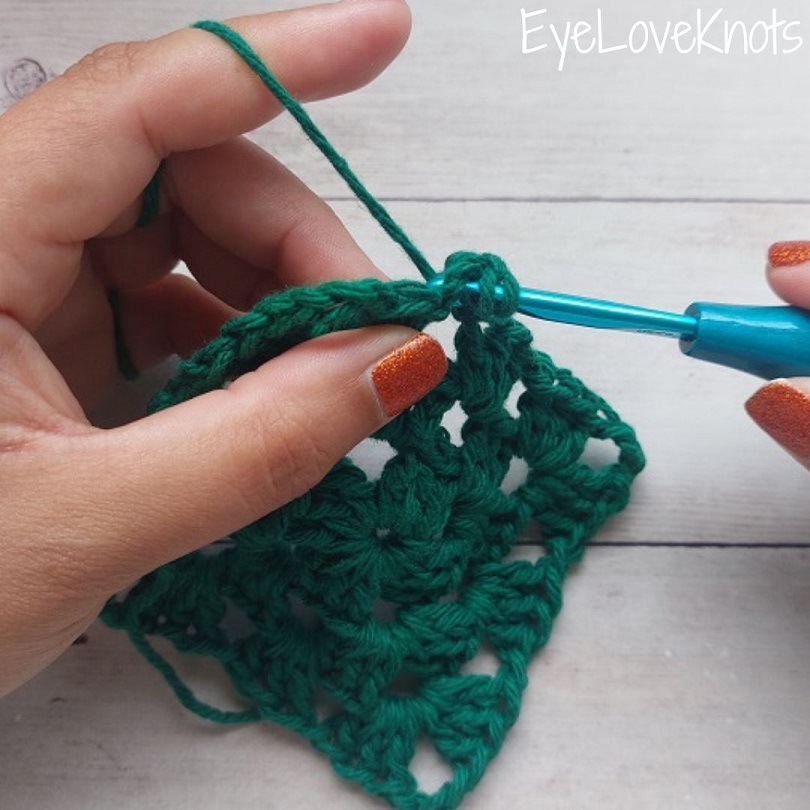
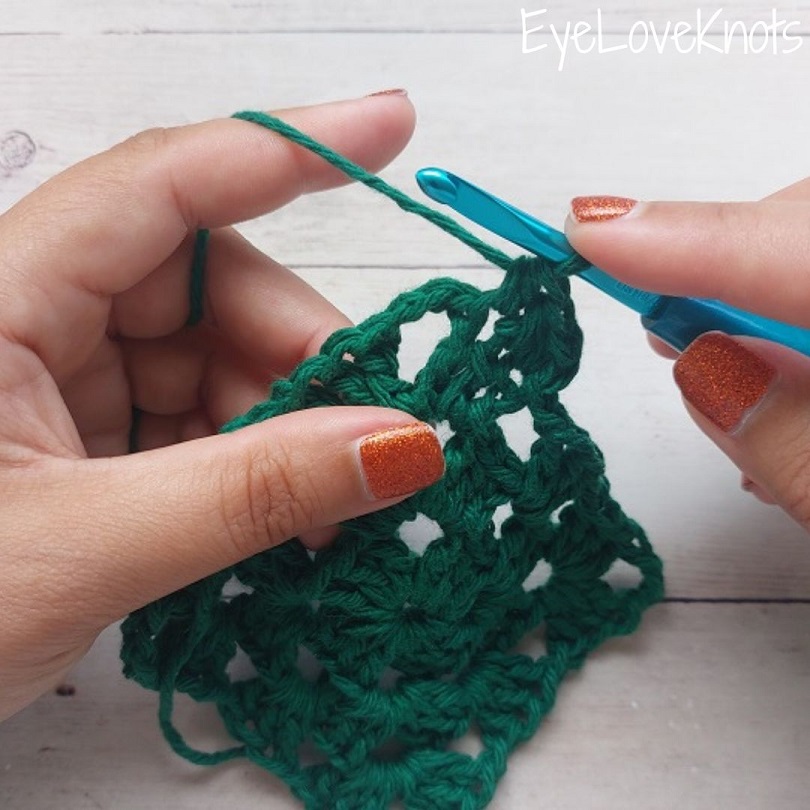
Slip stitch join to the first single crochet of the round.

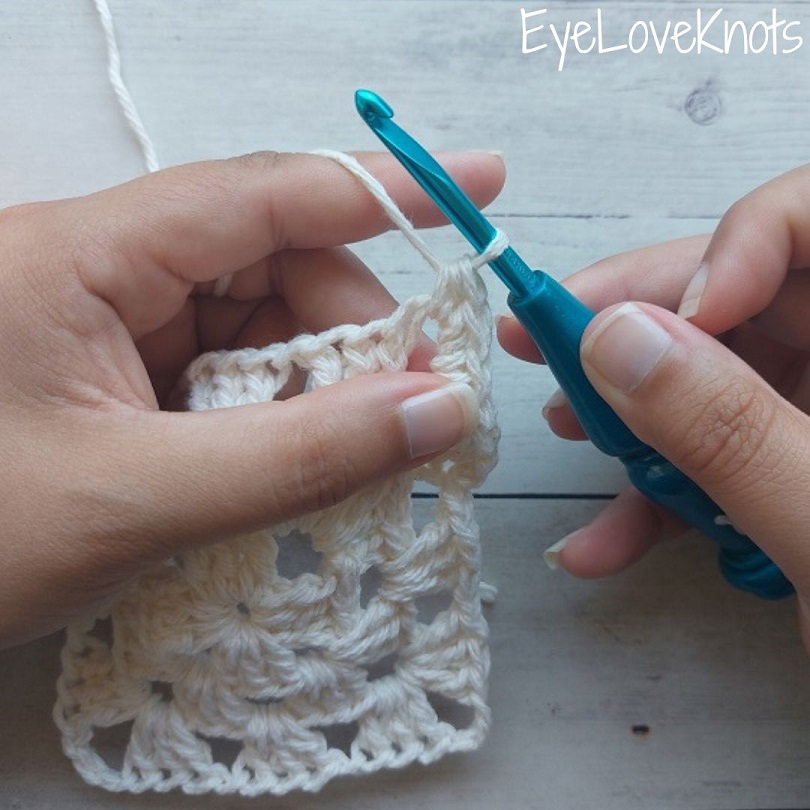
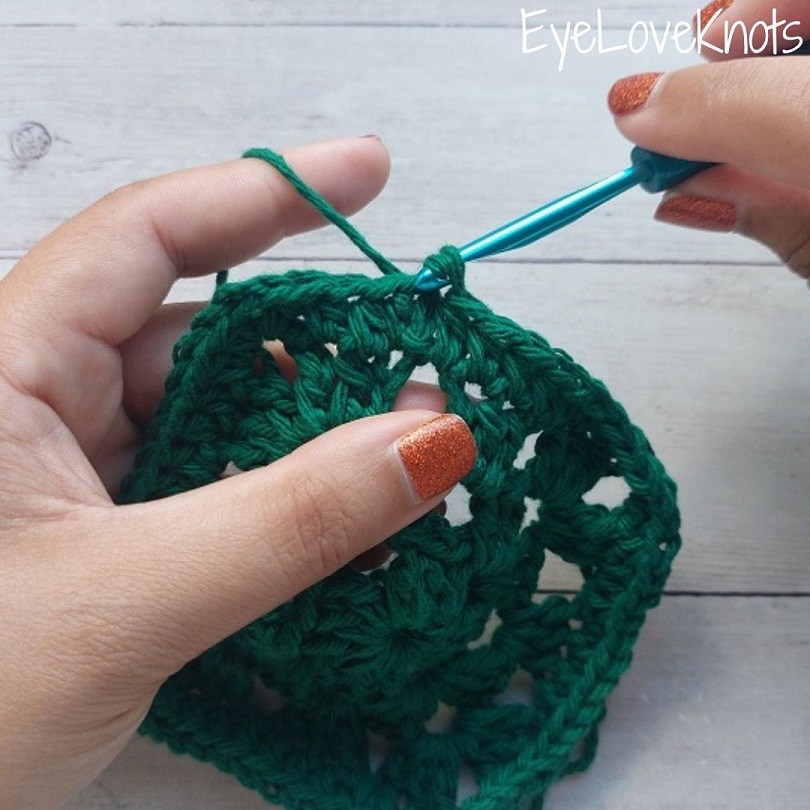
If you want to add additional rounds to the border, simply chain 1, and begin again with a single crochet into the first stitch. Work a single crochet into each stitch around, and increase in the corner stitch following the same method as before.
Video Tutorial Showing How to Evenly Half Double Crochet Around a Granny Square:
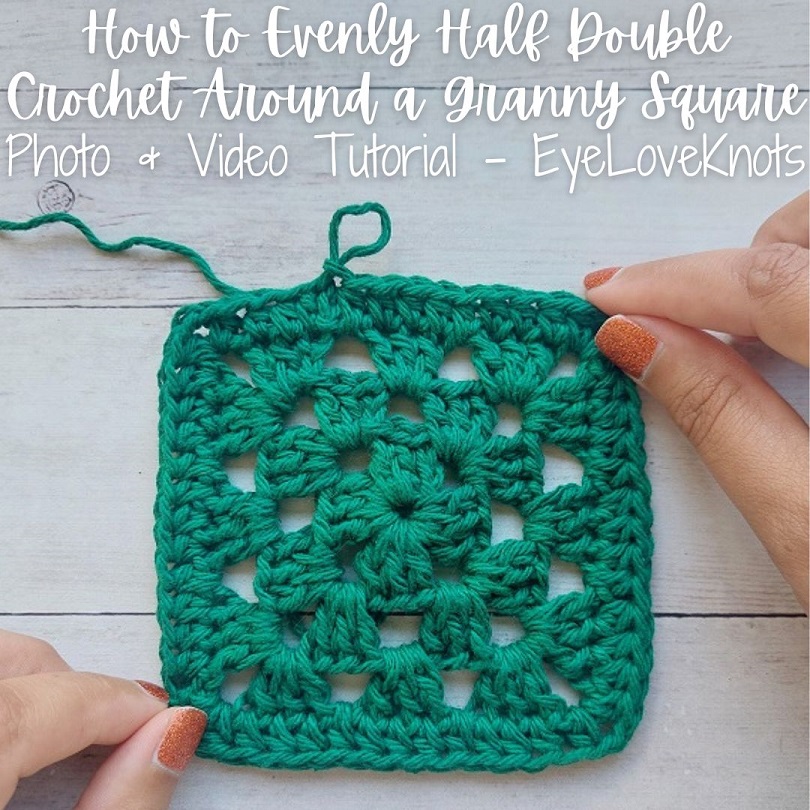
Photo Tutorial Showing How to Evenly Half Double Crochet Around a Granny Square:
Yarn is Lily Sugar n Cream in the Dark Pine colorway, and I’m using an H8/5mm crochet hook – I love this Koi Fish Ergonomic Clay I bought on Etsy. My polish is from Lily and Fox in the Burlesque colorway.
This tutorial begins right after the slip stitch join of the previous round. If you prefer to begin in the corner chain space, then use your preferred method to tie on, begin with a chain 1, and work evenly in pattern.
When working with half double crochets, we start with a chain 1, and this does not count as a stitch.
Yarn over…
… insert your hook into the very first stitch, which is the same stitch you joined to previously.
Yarn over…
… and pull through.
You will have 3 loops on your hook.

Yarn over…
… and pull through to complete the half double crochet.
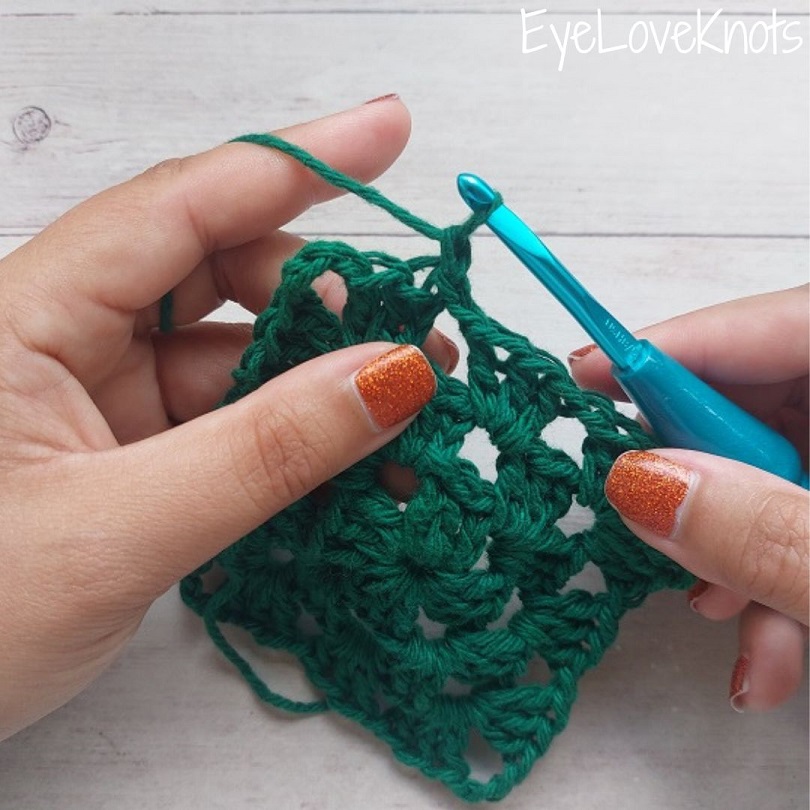
The next half double crochet will be worked into the very next stitch, which is the second double crochet.

Yarn over, and insert your hook into this stitch picking up both loops from the v-shape.
Yarn over, and pull through (3 loops on your hook), then yarn over and pull through all 3 loops to complete the second half double crochet.

Half double crochet once more into the next double crochet.
Now we’ve reached the chain space of the corner, and in this corner (and each remaining corner), we need to increase, which means add more stitches to, so the corner will lay flat.
Since we’re working in half double crochet, we’ll start by yarning over…
… insert your hook directly into the chain space, picking up the chains on your hook so you can crochet over it.
Yarn over…
… and pull through (3 loops on your hook).
Yarn over…
… and pull through to complete the first half double crochet of the corner.
Chain 2 for the corner. [For a more rounded corner, chain 1 instead]
Work another half double crochet into the same corner chain space to complete the corner.
The chain space that we created there gives us a place to comfortably work the next round’s corner into.

Alternatively, if you want a solid corner without a chain space, into the chain space, work 5 half double crochets for a rounded corner, or (2 half double crochet, 1 double crochet, 2 half double crochet) for a more square edge (as shown).
Continue working one half double crochet all the way around the granny square into each double crochet and each chain space, and increasing in the corner using your desired method.
The last stitch of the round will be a half double crochet into the last chain space.
Slip stitch join to the first half double crochet of the round.
If you want to add additional rounds to the border, simply chain 1, and begin again with a half double crochet into the first stitch. Work a half double crochet into each stitch around, and increase in the corner stitch following the same method as before.
Video Tutorial Showing How to Evenly Single Crochet Around SC | How to Add a SC Border:
Photo tutorial under construction…
Video Tutorial Showing How to Evenly Single Crochet Around HDC | How to Add a HDC Border:
Photo tutorial under construction…
Join one of our awesome Facebook groups to share your creations, and see what others are up to!
– Yarn Crafts & Coffee Community
– DIY Home On Rockwood Lane
– Alexandra Lane Lifestyle
Linked Up To…
Home Matters Linky Party #442 – Modern on Monticello
Talent Sharing Tuesday Link Up – Scribbling Boomer
Craftastic Monday Link Party – Sew Can Do
Team Creative Crafts Link Party #158 – Artsy-Fartsy Mama
Wednesday Link Party 515 – Oombawka Design Crochet
Saturday Sparks Link Party 577 – Pieced Pastimes
Handmade Monday #334 – Sum of their Stories
Happiness is Homemade 489 – Decor Craft Design
Hello Monday – Pink Lady
Anything Goes Linky 386 – My Random Musings
Tuesdays with a Twist #535 – God’s Growing Garden
Love Your Creativity Link Party #211 – Life and Linda
271 Senior Salon Pit Stop – Esme Salon
Craft Schooling Sunday – Creative Jewish Mom
Sundays on Silverado #155 – The House on Silverado
692nd Inspire Me Tuesday – A Stroll Thru Life
Fabulous Party 486 – Lou Lou Girls
The Happy Now Blog Link-Up #384 – JENerally Informed
To Grandma’s House We Go Link Party #360 – Grandma’s House DIY
Wonderful Wednesday Blog Hop – My Life Abundant
Traffic Jam Friday Reboot – Is This Mutton?
Create, Bake, Grow & Gather Party #584 – Shabby Art Boutique
Morning Cup of Joe – The Cottage Market
Pink Saturday – How Sweet the Sound
Encouraging Hearts and Home – My Slices of Life
Crafty Creators Link Party #7 – Life as a LEO Wife
Thursday Favorite Things #622 – An Artful Mom
Vintage Charm Party 400 – My Thrift Store Addiction
Leave a Reply