Free Crochet Pattern for how to crochet a cozy granny stitch dickey cowl.
This post contains affiliate links for LoveCrafts and Lion Brand. If you make a purchase by clicking on them, I make a small commission at no extra cost to you. Thanks for your support!
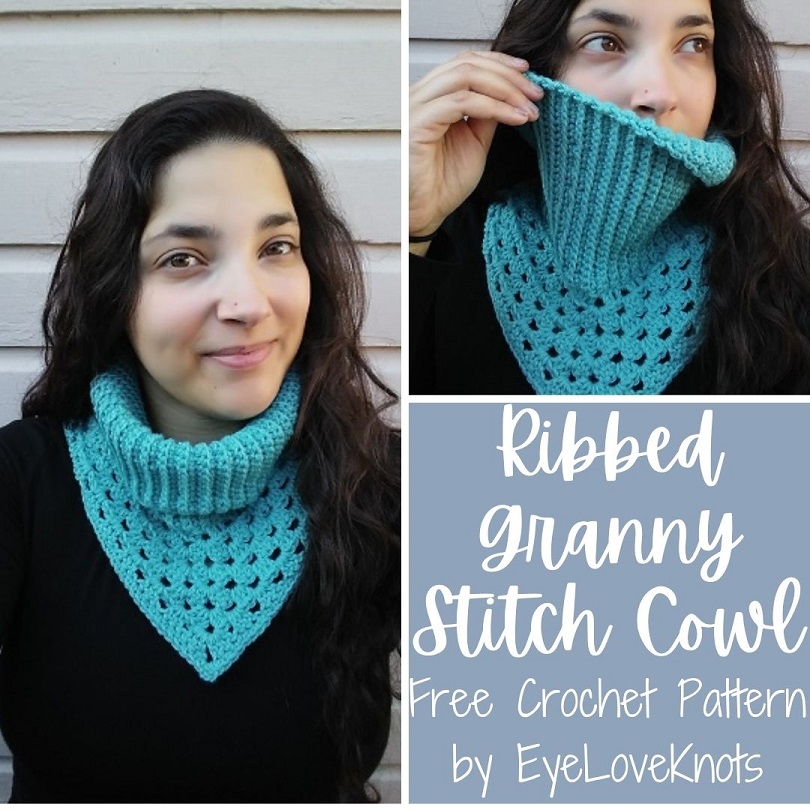
Yay! We have made it to the LAST GrannySpiration Challenge of the year. I am a little sad that the challenge is over, but I am quite proud of myself for sticking to the schedule and theme throughout the whole year. It was a personal challenge that I posed for myself at the end of 2016 for 2017, and asked a few friends to join in on, and it was awesome working alongside them and seeing what they came up with.
I sat and thought long and hard about what to make for this challenge… I thought about a Christmas ornament… a tree skirt… a new pillow… finally a cowl idea popped into mind. I jotted the idea down, and went to bed so I could start fresh on the idea.
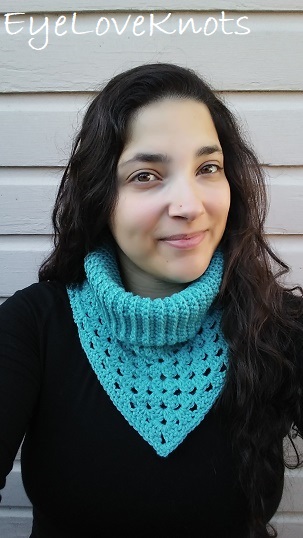
First thing Friday morning, I pulled out the last skein of Berroco’s Vintage Yarn from my stash, and got to work on my vision, and the cowl turned out perfectly!
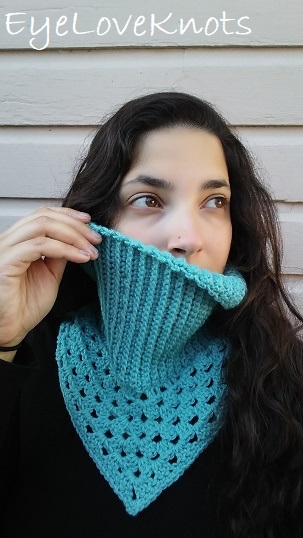
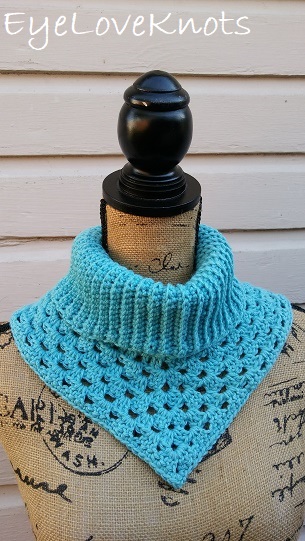
I made the ribbing wide so that it could be pulled up over my face to keep it and my ears warm if it was windy. When not windy, just fold over the ribbing, and it makes for a beautiful collar to go with the granny stitch handkerchief-like pattern.
This cowl only requires one skein, and would make a great holiday gift. Make this in your favorite color, or work the ribbing longer, wider or shorter for a custom fit (and adjust the granny stitch pattern as needed). One last thing I will say about this before I go on to the actual pattern – I wanted mine to be a little looser, but the ribbing has lots of give to it, and stretches about four to five inches. If you want a tighter cowl, shorten the ribbing section by one inch.
Please make sure to stop by our other co-host and see what they’ve been working on too.
Marjan from Atelier Marie-Lucienne
Sandra from Hakelfieber Austria (in German)
Jenny from Crochet is the Way
Rhelena from Crochet n Crafts
Mariam from Mariam’s Creations: Recycle and Create
AD-FREE, PRINTER FRIENDLY PDF:
If you would like a PDF version of this post, you may get one through either my EyeLoveKnots Etsy Shop, Ravelry or LoveCrafts Shop for a small fee. This fee is to compensate for the views lost when you no longer need to return to the blog to for the information, as you will have your own copy. Plus! It helps fund supplies for new projects to share with you!
Shop EyeLoveKnots Etsy: Ribbed Granny Stitch Cowl.
Shop EyeLoveKnots LoveCrafts: Ribbed Granny Stitch Cowl.
Share your version of this project on Ravelry – Ribbed Granny Stitch Cowl.
Save this to your Favorites: AllFreeCrochet, FaveCrafts, Cheap Thrifty Living, Crochet Pattern Bonanza
Materials:
- 218 Yards of Worsted Weight Yarn – I used Berroco’s Vintage Yarn in the Aquae (#5125) colorway
- I9/5.5mm Crochet Hook
- Tapestry Needle
Material Notes:
Yarn Alternative: Lion Brand Wool Ease
For a warmer cowl that will better protect against the wind, you will want something with wool in it – the more wool, the better. The more synthetic yarns, like acrylic, the more the wind will go through.
Time Spent:
I worked my cowl in two seatings for a total of about three and a half hours.
Measurements:
- As WIP: 6 5/8″ Wide in Ribbing, 19″ Long Before Sewing Ribbing
- Finished: 9.5″ Wide at Ribbing, 11.25″ at Tallest Point
- Sized to fit Average Woman/Teen – Ribbing has lots of give
Gauge:
14 DC by 8 Rows = 4″ Wide
Abbreviations (US Terms)
- SC – Single Crochet (Photo Tutorial)
- BLO – Back Loop Only
- DC – Double Crochet (Photo Tutorial)
- RS – Right Side of Fabric
Pattern Notes:
Beginning chain 1 does not count as a stitch, but beginning chain 2 in the granny stitch pattern does.
In the ribbing pattern, it’s indicated to work the first and last stitches into both loops as normal. This is to keep a straighter, cleaner edge.
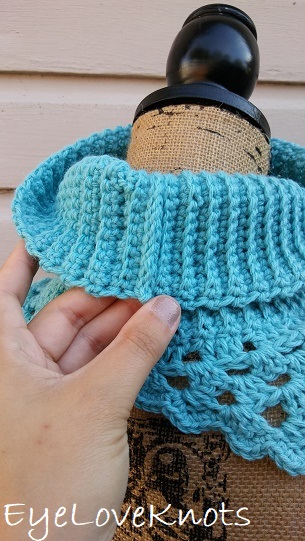
I worked my join in Row 92 with a simple slip stitch, which creates a seam that hides on the wrong side of the cowl, but is visible if you fold the ribbing part down. If this seam bothers you, you may opt to fasten off with a long tail after Row 91, and whipstitch the two pieces together, then you’ll rejoin your yarn to begin the granny stitch pattern.
In the first round of the granny stitch pattern, you will work evenly around. In single crochet, this means to work on stitch per row. Joining will be done to the first stitch, not the beginning chain.
A cluster is referred to as a grouping of 3 double crochets that forms the granny stitch pattern.
Work the slip stitches in the granny stitch pattern loosely as you will work back into these stitches in the final round.
In Rounds 95 through 98, even though there isn’t a chain space before and after the center (formed by 3 double crochets, a chain 3, and another 3 double crochets), you will still count it as a chain space to work into as you go.
Begin Ribbing:
Chain 29. SC into the 2nd chain, and into each chain across. (28 SC)
R2 – 91: Chain 1, turn. SC into the first SC, now working into the BLO: SC into the next 26 SC, back in both loops: SC into the last SC. (28 SC)
R92: Chain 1, turn. Fold, and lay right sides together. Working through both layers, slip stitch into the 1st stitch, and across. (28 stitches)
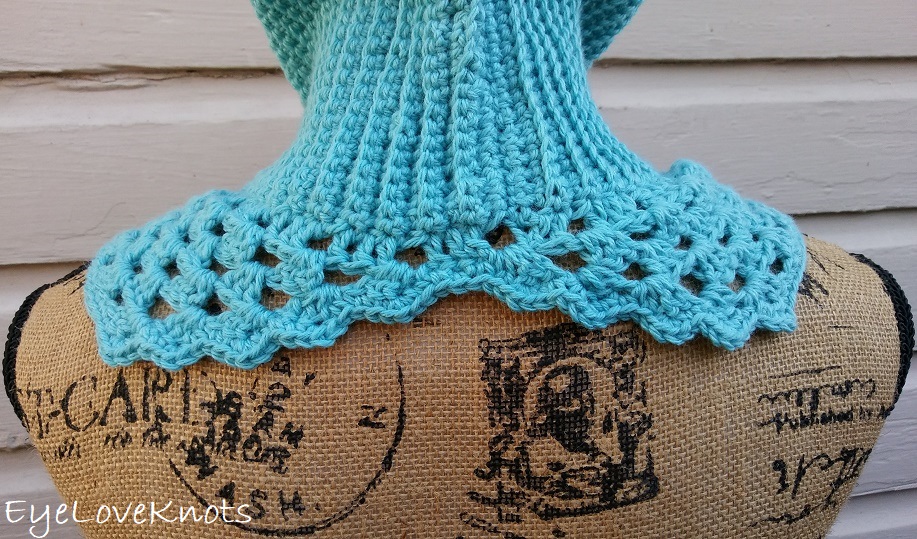
Begin Granny Stitch Pattern:
Turn ribbing so the right side is facing out. Slip stitch into the next stitch. Chain 2. DC into each of the next 2 stitches, chain 1, skip the next stitch, (DC into each of the next 3 stitches, chain 1, skip the next stitch) 22x. Join. (23 clusters)
R94: Turn. Slip stitch into each of the next 3 DC, and then into the chain 1 space. Chain 2. Work 2 DC into the same space, chain 1, (3 DC into the next chain space, chain 1) 9x, 3 DC into the next chain space, (3 DC, chain 3, 3 DC) into the next chain space, 3 DC into the next chain space, (chain 1, 3 DC into the next chain space) 10x. Do not join here, or until the final round. (22 clusters + center)
R95: Turn. Slip stitch into the 2nd and 3rd DC, and then into the chain 1 space. Chain 2. Work 2 DC into the same space, (chain 1, 3 DC into the next chain space) 10x, chain 1, (3 DC, chain 3, 3 DC) into the next chain space, 3 DC into the next chain space, (chain 1, 3 DC into the next chain space) 10x. (22 cluster + center)
R96 – 98: Turn. Slip stitch into the 2nd and 3rd DC, and then into the chain 1 space. Chain 2. Work 2 DC into the same space, (chain 1, 3 DC into the next chain space) 10x, chain 1, (3 DC, chain 3, 3 DC) into the next chain space, 3 DC into the next chain space, (chain 1, 3 DC into the next chain space) 10x. (22 cluster + center)
R99 (RS): Chain 1, turn. SC into the 1st 46 stitches, (SC, chain 3, SC) into the next chain 3 space, SC into the next 45 stitches, 3 SC into the next DC, SC into the side of the next DC, (SC into the next 2 DC, 3 SC into the next DC, SC into the side of the next DC) 4x, SC into the next 3 DC, SC into the side of the next DC, (3 SC into the next DC, SC into the next 2 DC, SC into the side of the next DC) 4x, SC into the same stitch as the 1st. Join. (148 SC)
Fasten off, and weave in ends.
Please feel free to make and sell your own Ribbed Granny Stitch Cowl using this pattern, but please DO NOT claim this pattern as your own nor should you sell my pattern, and DO NOT re-publish my photos as your own. DO NOT copy and paste my pattern anywhere, link to it instead.
Join one of our awesome Facebook groups to share your creations, and see what others are up to!
– EyeLoveKnots Crochet & DIY Community
– DIY Home On Rockwood Lane
– Alexandra Lane Lifestyle
Linked Up To…
December 2017 Sharing Time – Raising Memories
Snickerdoodle Create~Bake~Make Party #210 – Across the Boulevard
Nifty Thrifty Sunday – Nifty Thrifty Things
Create Link Inspire Linky Party #208 – The Crafty Blog Stalker
Inspire Me Monday – Week 309 – Create with Joy
Made by You Monday – Skip to my Lou
Tutorials & Tips Link Party {333} – Home Stories A to Z
Bee Party #42 – My Busy Beehives
04/12 Creative Mondays Link Up – Claire Justine
Simple Christmas Projects | MM #182 – A Wonderful Thought
The Scoop Link Party #304 – Worthing Court
Faux Fur Christmas Stocking & Link Party #193 – Dagmar’s Home
The Really Crafty Link Party #96 and Holiday Celebrations – Keeping it Real
Show and Tell Link Party – Flamingo Toes
The Wednesday Link Party – Oombawka Design
The Linky Ladies Party #121 – The Purple Poncho
Sew It Cook It Craft It Link Party #34 – Sew Historically
Style File Link Up – Lady in Violet
Turning Heads Tuesday Link Up – Elegantly Dressed and Stylish
Your Whims Wednesday #332 – My Girlish Whims
Whisk it Wednesday Link Party #8 – Carrie’s Home Cooking
The Blended Blog Style Link Up – Living on Cloud Nine
Hookin’ on Hump Day – Petals to Picots
{Wow Me} Wednesday #328 – Ginger Snap Crafts
Magical Christmas Home Decor & I’m Lovin’ It {linky party} 165 – Tidy Mom
You’re the Star Linky Party Week 62 – Let it Shine
From Dream to Reality #291 – The DIY Dreamer
Pin Junkie Pin Party #244 – The Pin Junkie
Creativity Unleashed #201 – Practically Functional
No Rules Weekend Blog Party #264 – Sincerely, Paula
Crafty Love Link Party #28 – Jessie at Home
Scrappy Stitchers Link Party #36 – Stitches n Scraps
Thursday Fashion Files Link Up #138 – Curly Crafty Mom
Sweet Inspiration Link Party #86 – The Boondocks Blog
Friday Feature Linky Party – Oh My Heartsie Girl
Friday Frenzy Link Party 12/08/17 – Kelly Lynn’s Sweets and Treats
Link Your Stuff – Anniemarie’s Haak Blog
{nifty thrifty sunday #312} – Nifty Thrifty Things
This week I am featuring, from left to right: Dean’s Day Blanket is Done, Crochet Inspiration Liefs van de Breimeisjes, and Donation for Sahel eV III (A Granny Square Blanket), Crochet Inspiration from HakelLine.
Now, Share Your Granny-Spiration Project With Us!
New Granny-Spiration Projects will be shared from your hosts the first Saturday of each month. Post times will vary. You will be able to link up from 12:00am EST on the first Saturday of the month, through midnight EST on the second Thursday from the start date – specific dates are on top of the Rafflecopter form – giving you almost two weeks to link up and enter the giveaway!
Please share projects that are family friendly, and GRANNY INSPIRED through use of regular granny square or solid granny square, granny stitch pattern or other afghan square in the form of a free pattern, pattern review, or inspiration piece. Not limited to crochet or knit.
Please make sure to link to your post, and not your home page.
*Link ups cannot be to Etsy listings or Ravelry pages where patterns are sold. You can link to blog posts, Flickr or Facebook pages, Pins, etc that are directed towards it, but can’t directly link to it. To be clearer though, Raverly pages of finished projects are okay to share. Sorry for the inconvenience! That’s per InLinkz guidelines. Thanks!
Features may be chosen at the discretion of each host. By linking up, you give us permission to feature your item.
I no longer have the code for this link up, but you can view all 10 projects right HERE.
Congratulations with finishing this challenge!! And I will come back next week to see what you've made. You're giving away so much goodies, awesome!
I love making granny square Christmas stockings
I am addicted to making hat's and cowls, and anything granny square!
I love making and giving prayer shawls
I like making shawls, or scarves.
I enjoy making triangle scarfs
I love to make hats
My favorite thing to make has to be graphghans as I love to watch my patterns come to life!!!
I love making cowls for myself and my family. I also have been enjoying knitting for babies. I love making lovies and stuffed animals!
I love making blankets the most.
My favorite thing to make is anything crocheted! I make anything & everything that catches my eye (which is ALOT! lol)
Such a lovely cowl! Great colour too!
Big hug and "Thank you!" for hosting this challenge. It's been challenging and fun and I was happy to be part of it!
It’ really pretty, perfect for this season. I love the color too. Thank you for sharing at The Really Crafty Link Party this week. Pinned!
I know nothing about crochet. I never learned how, but when I see something I like, it makes me want a little bit to learn. I really love this cowl pattern, and the fact that it's so versatile. Love the color too. I think I will just enjoy looking at the beautiful work of others!
I love to make hats. There are so many varieties out there that you never have to repeat yourself if you don't want to. 😀
Thanks for the giveaway! Now I'm looking forward to January.
I like quick projects b/c I'm easily distracted…usually by pretty patterns and yarn. 😉 I've become a big fan of stitch markers b/c of my crochet ADD, too!
Right now I'm a little obsessed with shawls. So many variations, it's hard to do only one at a time!
My favorite thing to make is Shawls and Wraps. However, this triangle cowl is the perfect gift for my granddaughter. Thank you for sharing and for the inspiration that you provide.
So wonderful to hear! So welcome!! I like making rectangle shawls, though, oddly enough I don’t enjoy wearing them? I love how they look on my dress form though, and then I gift them.
I’m hoping to make this ribbed cowl soon, thank you for the pattern, you are awesome, happy new year ❤️??
Thank you for the mention of #ohmyheartsiegirl and for stopping by to share your blog!!
I love to color of your cowl!
I am having trouble with the last round, what is ” side of 2nd dc” I don’t understand what that is. The rest of the pattern is very easy
You normally work into the top of a stitch. In this case, you are working into the side of it to create the pretty scalloped edge.
HI! I know you posted this over 2 years ago, but I just finished mine and it looks amazing. Your instructions are so clear, I had not problem at all! Thanks!
I saw your pattern at ravelry, and it led me to your website.
It never goes out of style. Glad you enjoyed this pattern 🙂
Hi, my sister and I are trying to do this triangle cowl, it would fit perfect for my sister when she just wants something to go under her jacket.
But we are having so much trouble! When we are trying to do row 94, we are ending up with 10 clusters on one side of the center and 11 clusters on the other. What are we doing wrong? Is there a typo somewhere? Other people seem to have been able to do this fine.
You are absolutely right! I pulled out my original cowl to double check, but I had missed one cluster right after the center cluster. I have fixed it in the pattern. Should be good now. Let me know if anything!
Like the other person who commented, I’m having trouble with row 94. I don’t think the pattern has been corrected. Can you give me the instructions again please. Then centre of the previous row surely needs to be the chain space, not the centre of a cluster of 3 double crochets. Thank you.
Row 94 was corrected when I mentioned. The centers of each row line up. Typo in Row 95 that it isn’t 11x, it is 10x to reach the center.
Thanks Alexandra. So in row 95, does the 10 X include the 2 chain, 2 dc at the beginning of the round. Because row 93 has 23 clusters, the centre of those is the middle of a cluster, not a chain space. That’s what’s confusing me. Sorry to be a pain.
The 10x only includes the information in the parenthesis right before it.
The pattern is written so that the granny stitch clusters are worked into a chain space, and not written to work into any of the double crochet stitches from the cluster. I believe after you work Round 94, you will see it come together.
Can this be made larger to cover the shoulders?
Sure! You could continue to work more repeats to make it larger, though I think it could be more heavy in the front just building the cowl with just a little over the arms, but if I were going to do more of a capelet, I would continue working in rounds after beginning the granny stitch pattern, and not work the staggering pattern along the back. If continuing in rounds, you’ll need to add some increases evenly to make the circle larger to fit over the shoulders – similar to how you would increase the crown of a hat.