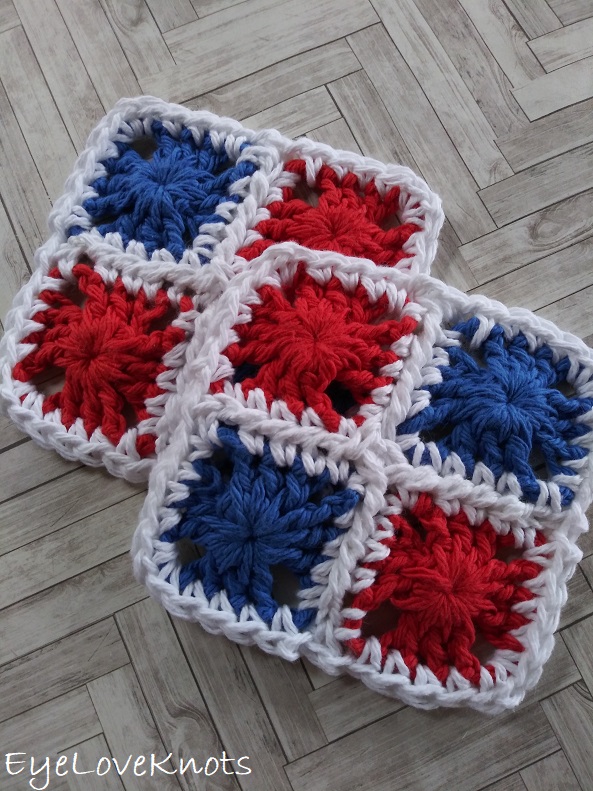
This is a free crochet pattern for how to crochet a granny square coaster.
This post contains affiliate links for LoveCrafts and WeCrochet. If you make a purchase by clicking on them, I make a small commission at no extra cost to you. Thanks for your support!
Find the free crochet pattern instructions below, or purchase a printer-friendly, ad-free PDF on Ravelry by clicking here.
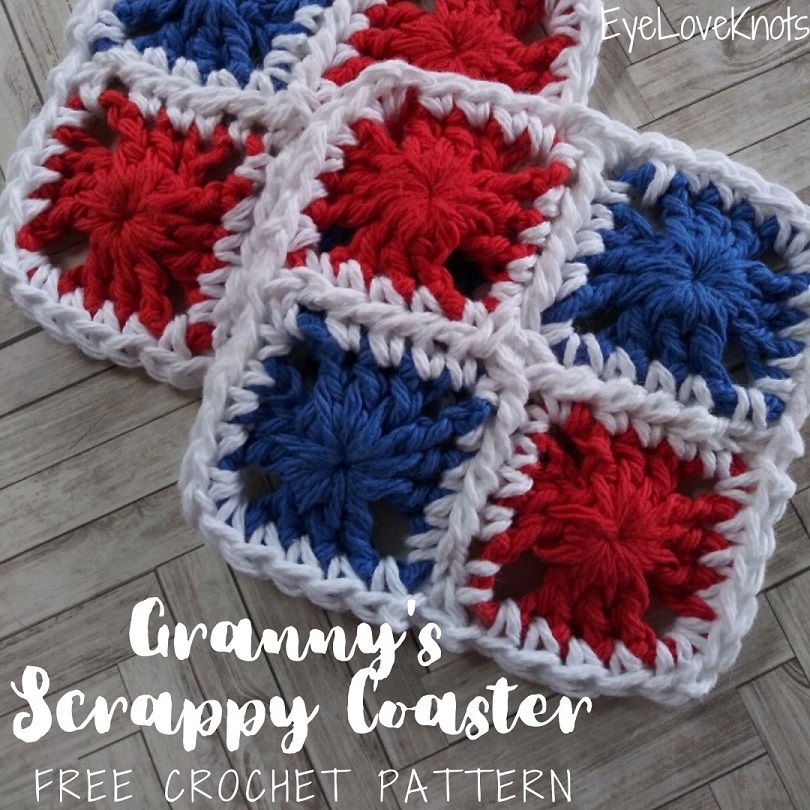
In June of 2018, I shared Granny’s Patriotic Wreath, and in that, I mentioned a red, white, and blue coaster I made. It only took 2 years to get it published, but here is that coaster! I suppose it was mostly because I had started on a matching placemat (which was taking forever to work up, and actually still isn’t done) that I wanted to share with this coaster, and since I didn’t finish that, I lost steam on the project.
Last month, I shared “April Showers Bring May Flowers” themed projects, so I thought it would be fun to do a series of patriotic projects this month, and this coaster pattern was number one on my list.
Check out other crochet projects in the “Granny’s” series, or “4th of July“.
Ad-Free Printer-Friendly PDF:
If you would like a PDF version of this post, you may get one through either my EyeLoveKnots Etsy Shop, Ravelry or LoveCrochet Shop for a small fee. This fee is to compensate for the views lost when you no longer need to return to the blog to for the information, as you will have your own copy. Plus! It helps fund supplies for new projects to share with you!
Shop EyeLoveKnots Etsy: Granny’s Scrappy Coaster.
Shop EyeLoveKnots LoveCrochet: Granny’s Scrappy Coaster.
Are you a Raveler? Share your version of this project on Ravelry – Granny’s Scrappy Coaster.
Save this to your Favorites on: AllFreeCrochet, AllFreeHolidayCrafts, FaveCrafts, Cheap Thrifty Living, and Crochet Pattern Bonanza.
Materials:
- 14 Yards Per Coaster of Worsted Weight Cotton Yarn – I used Lily Sugar n Cream in Red, Royal and White
- H8/5mm Crochet Hook
- Tapestry Needle
- Optional, Jewelry Pliers
Material Notes:
Yarn Alternatives to Lily Sugar n Cream: WeCrochet Dishie, Bernat’s Handicrafter, Red Heart’s Smoothie, Paintbox Yarns Cotton Aran, Rico Creative Cotton Aran
Each square requires about 3 yards of yarn.
I used cotton yarn because it’s more absorbent and durable, but really any yarn will work.
Jewelry pliers are an excellent tool to use to help weave in ends, as cotton yarn can be quite tough on the fingers when weaving in with just fingers and a tapestry needle.
Time Spent:
Just under 30 minutes per coaster.
Measurements:
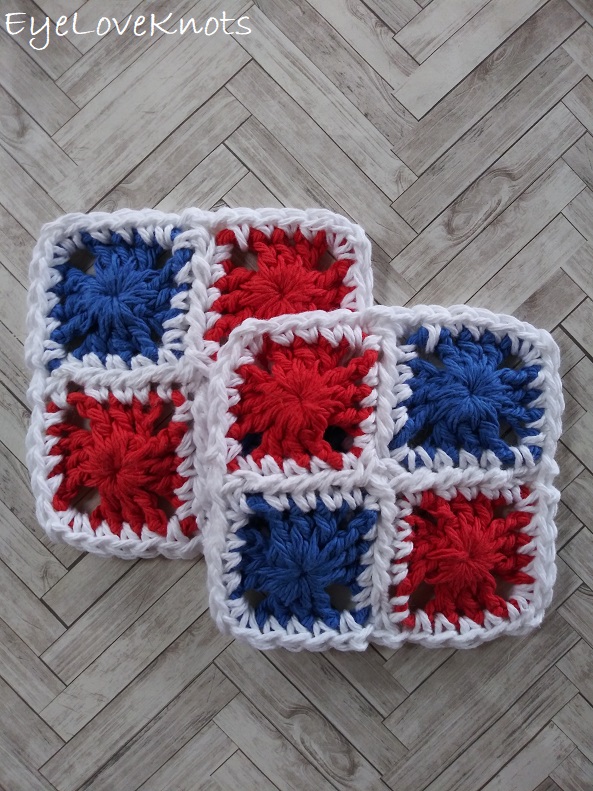
4″ Square
Gauge – Not Essential:
- 16 HDC by 10 Rows = 4″
- 1 Square = 1.88″
Abbreviations (in US Terms):
- DC – Double Crochet (Photo Tutorial)
- SC – Single Crochet (Photo Tutorial)
- PLT – Pull Loop Through (Joining Method)
- To PLT: pull up on current loop (so it doesn’t fall out), insert hook from right side through corresponding stitch of previous square, grab loop with hook, tighten as normal, and pull through, then continue to work next stitch
Pattern Notes:
Originally, I worked the beginning of my continuous join starting from the bottom right side double crochet, and I took all my original photos for the tutorial working from this starting point. When I went to work my second granny square, I tried it a different way (the way that the pattern and tutorial are written) which makes all the center joins uniformed in appearance. So, if the first blue square looks different to you (like shown above), ignore all the stitches on the right side in the beginning. Make the first square look just like the first photo in the tutorial below.
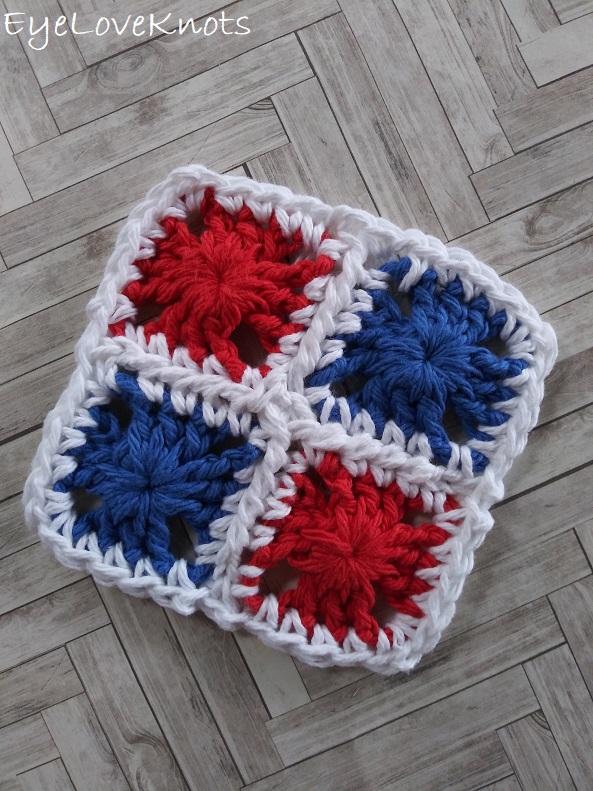
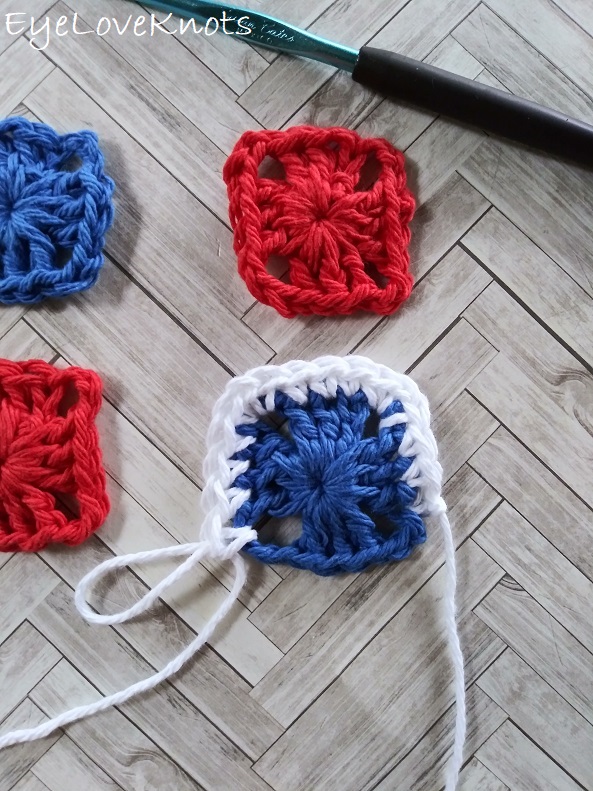
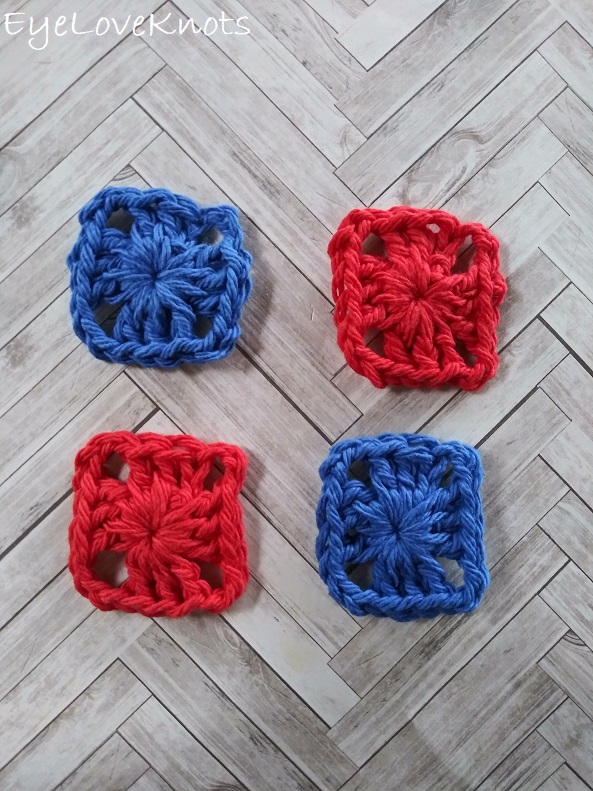
Granny Square Pattern – Make 4 (Per Coaster):
Chain 5. Slip stitch join to form a ring. Chain 2, work 2 DC into the ring, (chain 3, 3 DC into the ring) 3x, chain 2. Join to the 2nd chain of the beginning chain 2.
Fasten off, and weave in the ends.
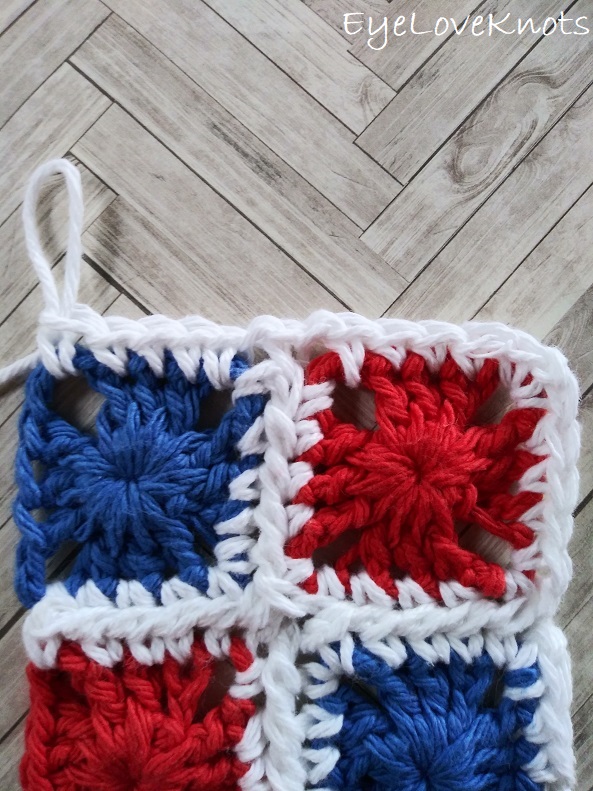
Continuous Join & Border:
Lay the squares out how you’d like them to be on the finished coaster. For a uniformed look, make sure they are all facing the same way (example, with the beginning chain all on top).
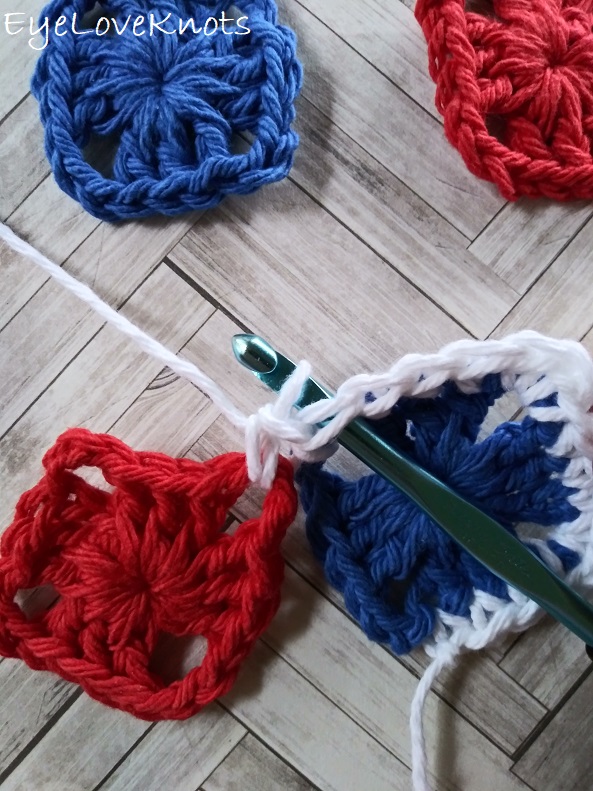
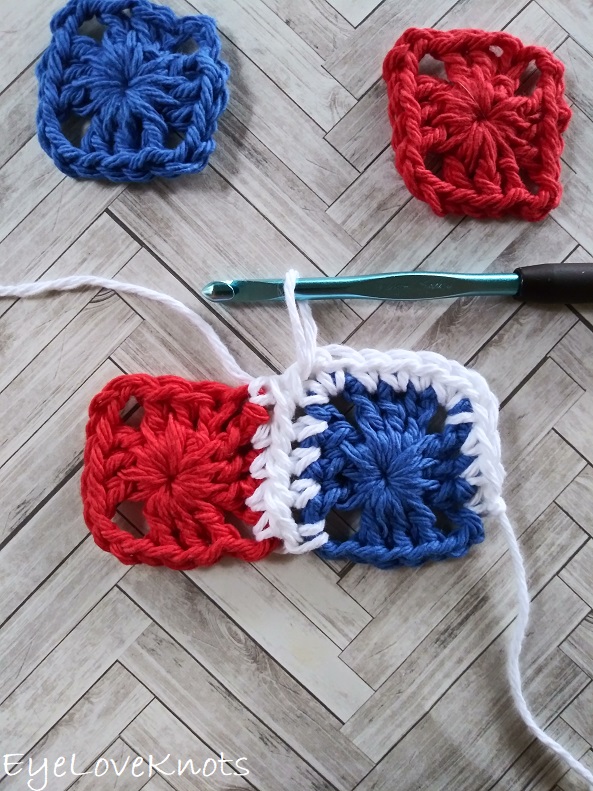
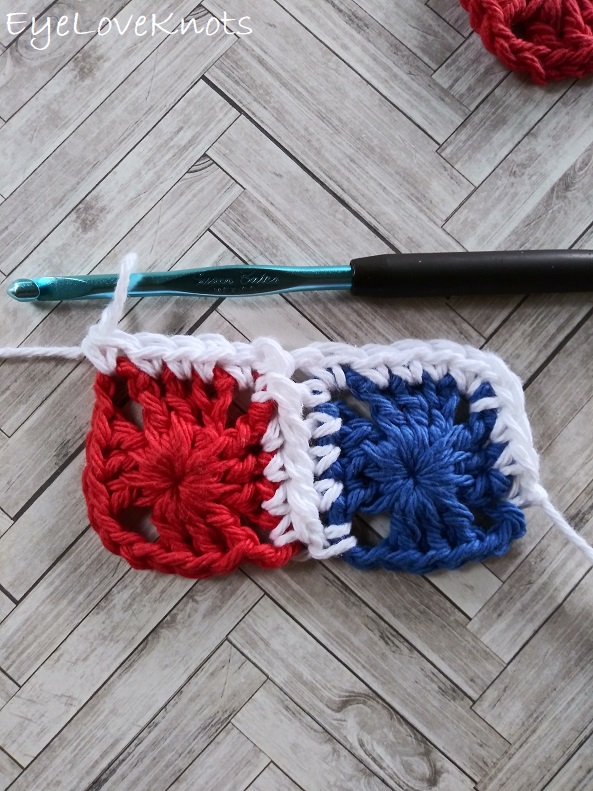
Attach yarn to the top right chain space of the bottom right square (either by tying on, chaining 1, and working a SC, or by making a slip knot, and working a SC into this space), SC into the next 3 DC, (SC, chain 1, SC) into the next chain space, SC into the next 3 DC, SC into the next chain space;
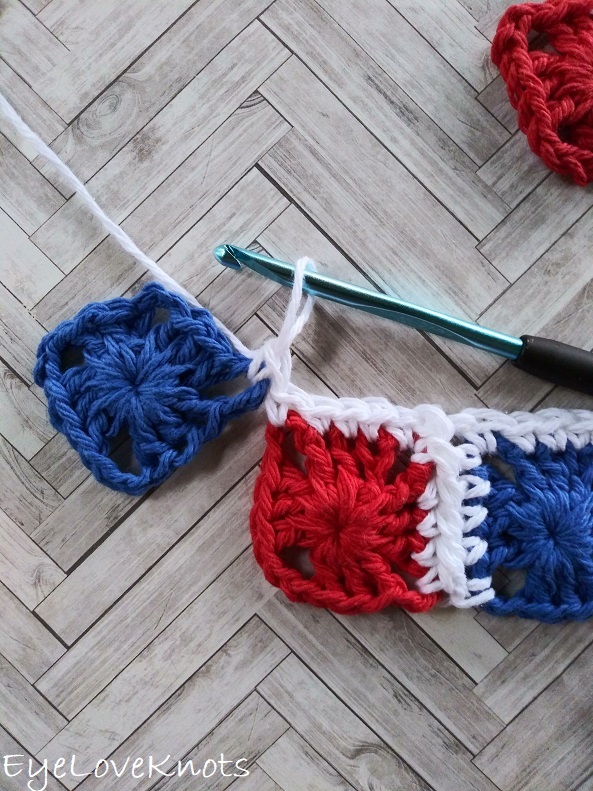
SC into the bottom right chain space of the bottom left granny square, PLT, (SC into the next DC, PLT) 3x, SC into the next chain space, PLT, from behind: SC into the corresponding chain space of the first square, in current square: SC into the same chain space, and into the next 4 stitches;
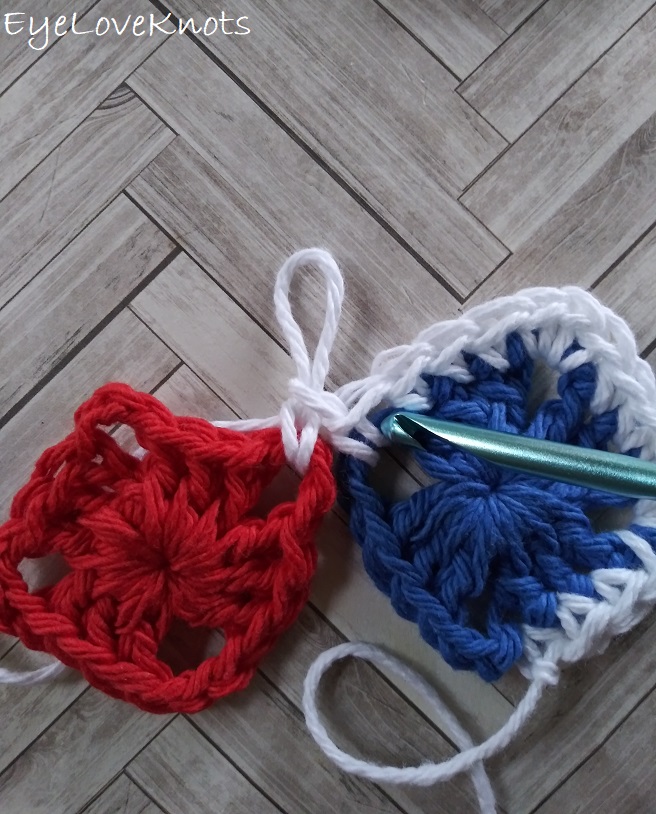
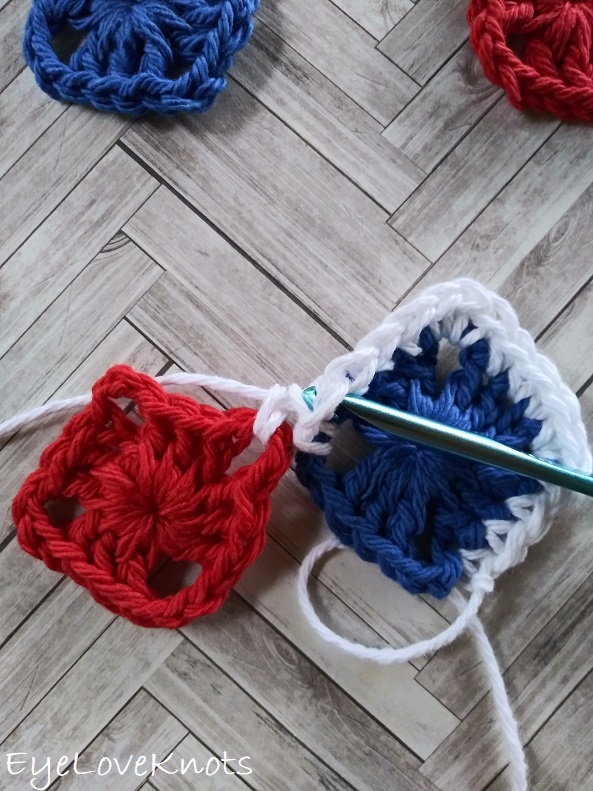
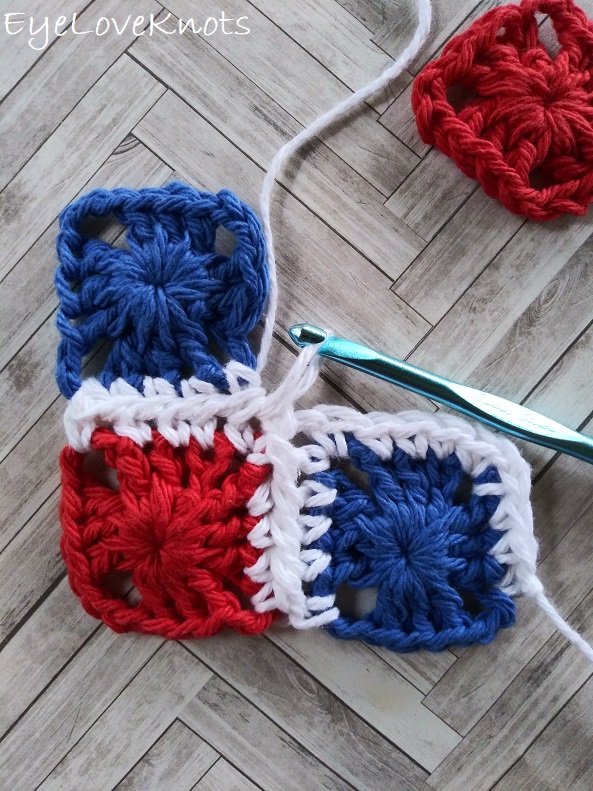
SC into the bottom left chain space of the top right square, PLT, (SC into the next DC, PLT) 3x, SC into the next chain space, PLT, from behind: SC into the center join of the 1st 2 squares, in current square: SC into the same chain space, and into the next 4 stitches;
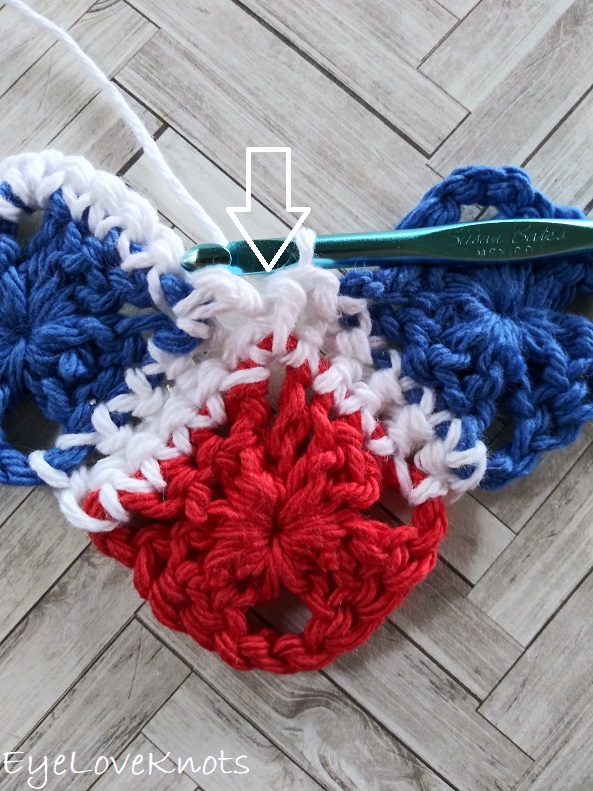
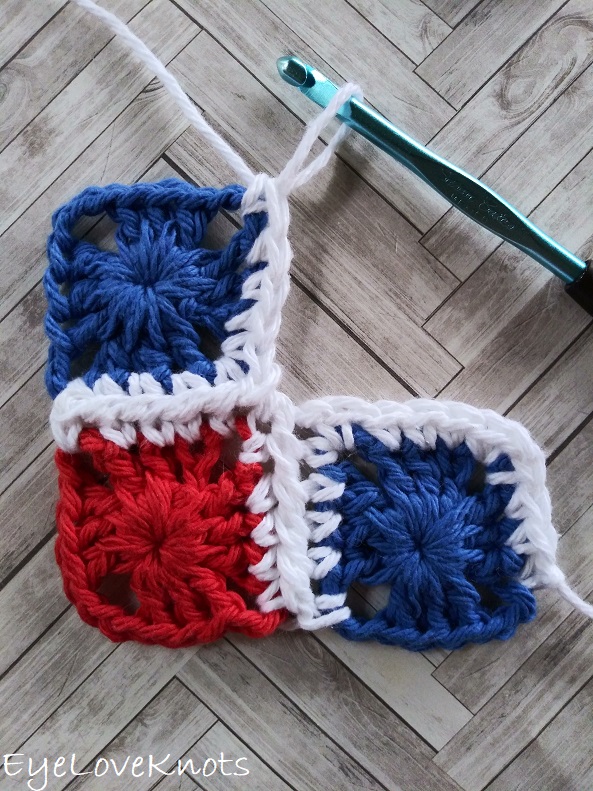
SC into the top left chain space of the top right square, PLT, (SC into the next DC, PLT) 3x, SC into the next chain space, PLT, from behind: SC into the center join of all 3 squares, in current square, SC into the same chain space, and into the next 4 stitches;
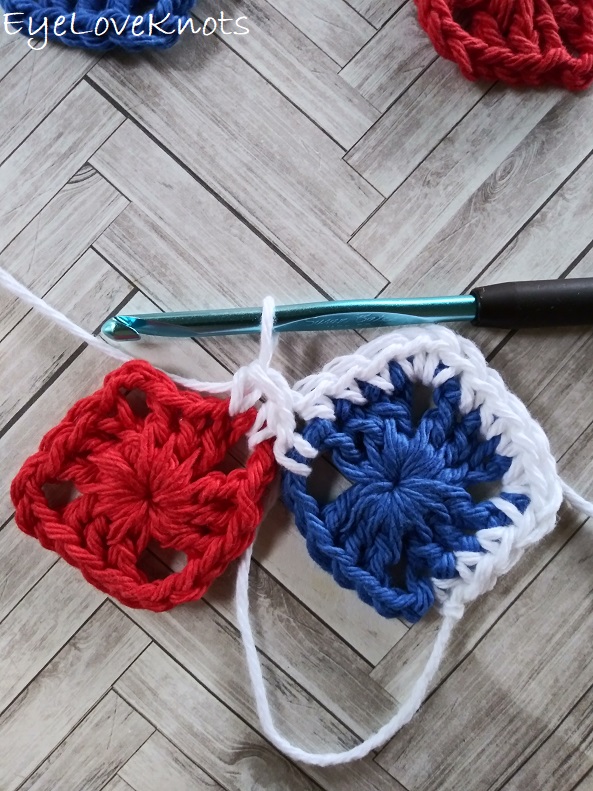
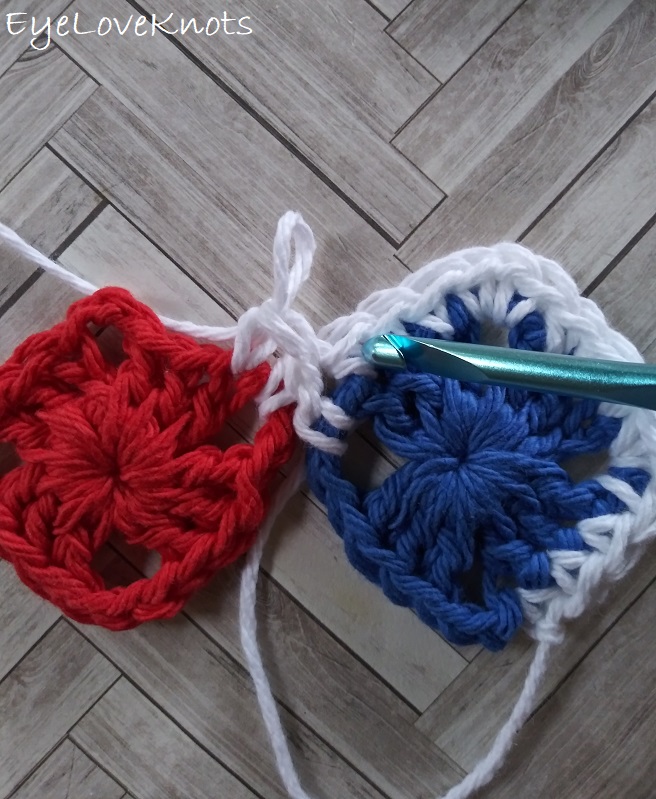
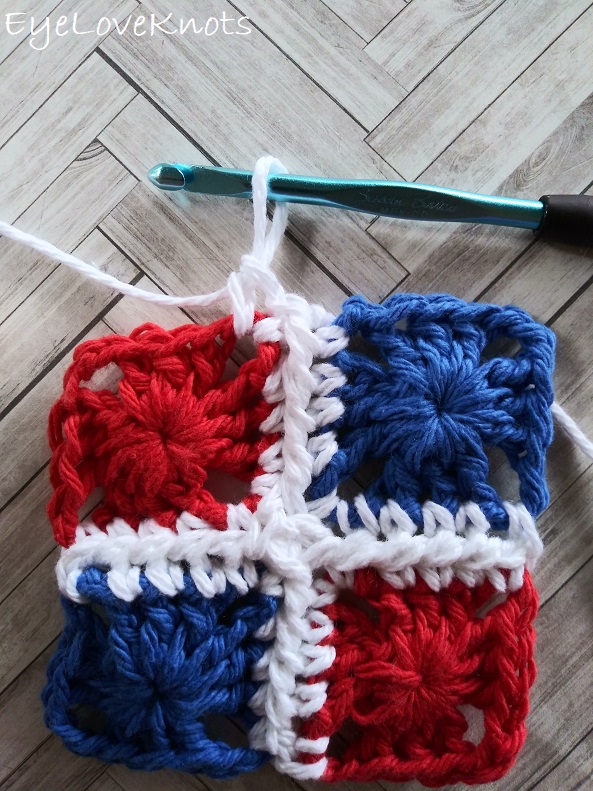
Chain 1, SC into the same chain space, and into each of the next 3 DC, [(SC chain 1, SC) into the next chain space, SC into each of the next 4 stitches, chain 1, SC into the center join, chain 1, SC into the next chain space, and each of the next 3 DC] 3x, (SC, chain 1, SC) into the next chain space, SC into each of the next 4 stitches, chain 1 and join to the first 1st SC.
Fasten off, and weave in final ends.
Photo Tutorial of Join & Border:
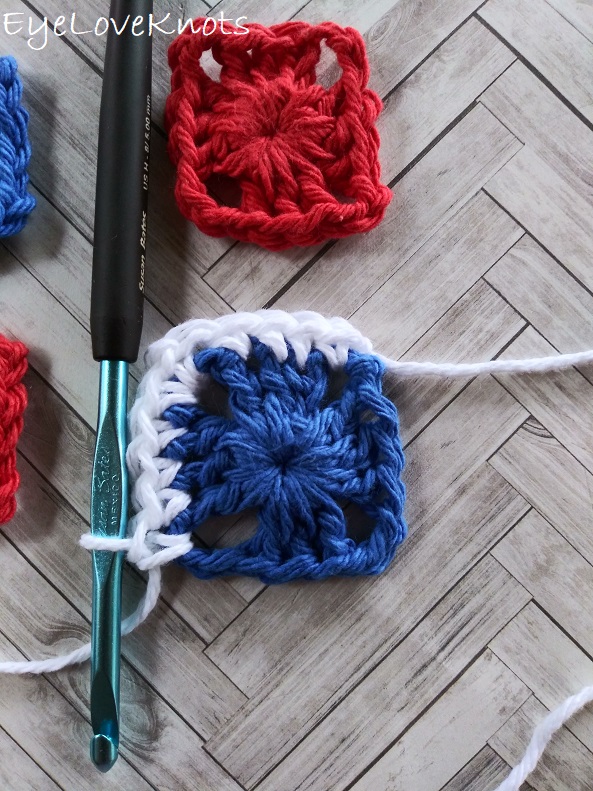
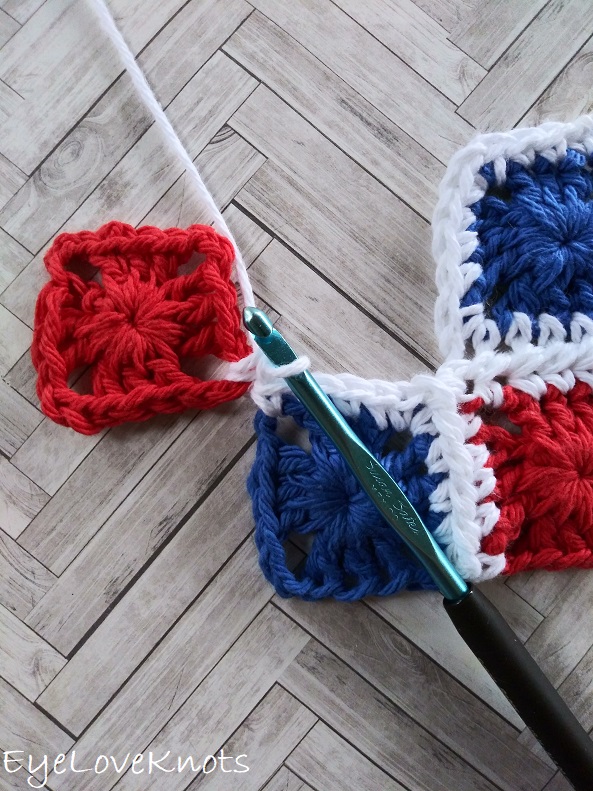
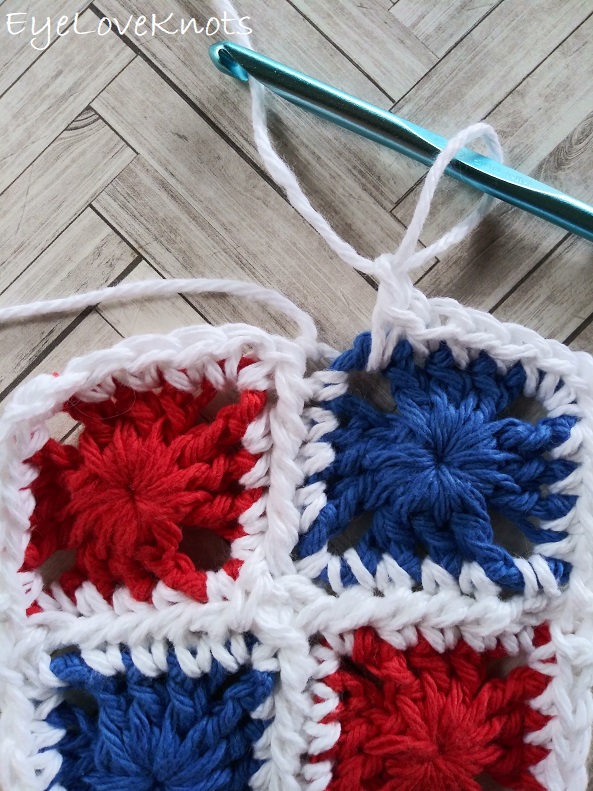
Attach yarn to the top right chain space of the bottom right square (either by tying on, chaining 1, and working a SC, or by making a slip knot, and working a SC into this space), SC into the next 3 DC, (SC, chain 1, SC) into the next chain space, SC into the next 3 DC, SC into the next chain space…
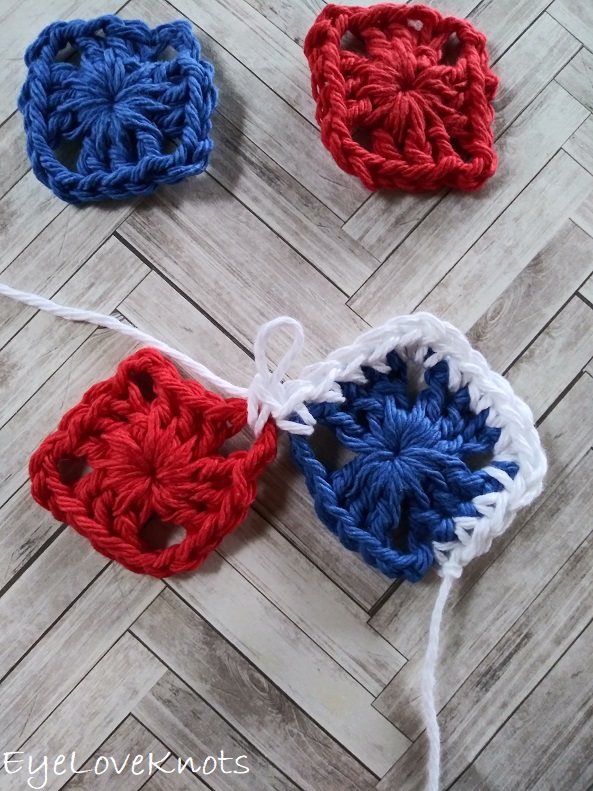
… SC into the bottom right corner of the bottom left square, pull up the loop you currently have on your hook (so it doesn’t come out), and remove crochet hook.
Insert hook into the corresponding SC of the first square…
… and pick the open loop back up on your hook, and tighten to normal tension…
… then pull loop through.

Here’s what it looks like.
SC into the next DC on the current square, pull up loop and remove hook.
Insert crochet hook into the next corresponding stitch of the 1st square, and complete PLT join.
(SC into the next DC on the current square, PLT) 2x, SC into the next chain space on the current square, PLT…
… from behind, insert crochet hook into the chain space of the 1st square…
… and complete a SC.
Turn back to the right side…
… working into the current square: SC into the same chain space, and each of the next 4 stitches.
SC into the bottom left corner of the top left square…
… PLT, (SC into the next DC on the current square, PLT) 3x, SC into the next chain space on the current square, PLT.
From behind, insert hook into the center of the join from the 1st 2 squares, and complete a SC.
Turn to right side, and working in current square, SC into the same chain space, and each of the next 4 stitches.
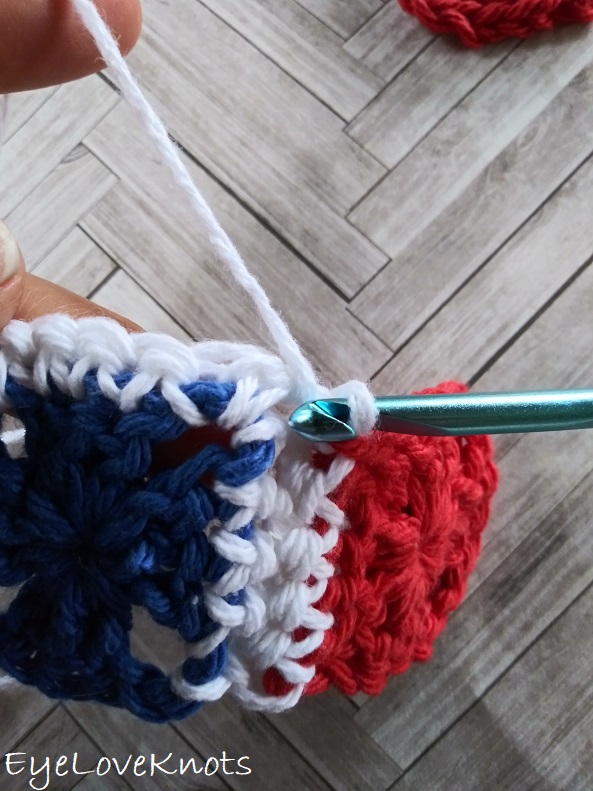
SC into the top left chain space of the top right square, PLT, (SC into the next DC on the current square, PLT) 3x, SC into the next chain space on the current square, PLT.
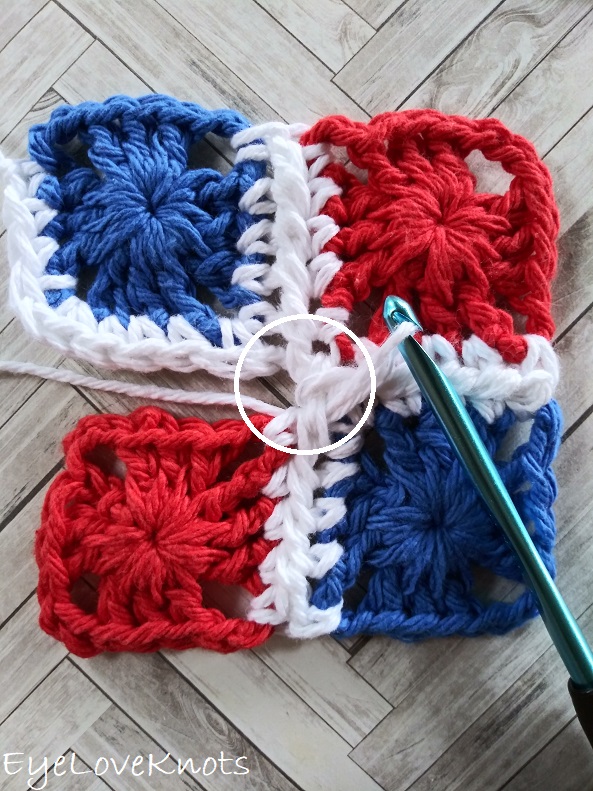
From behind, insert hook into the center of the previous 3 joins, and complete a SC.
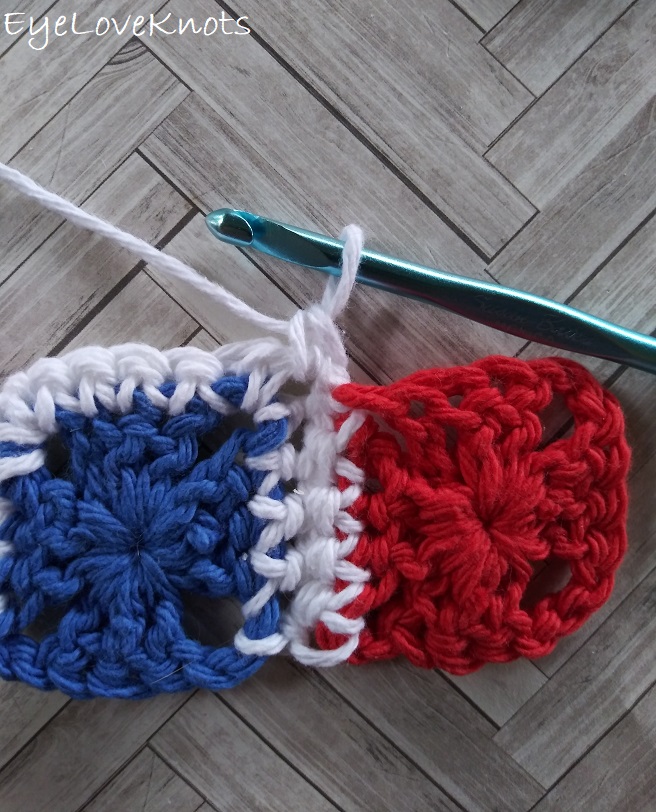
This is where my photo tutorial catches up to the second way I tried. This is how your square should currently look.
Chain 1, SC into the same chain space, and into each of the next 3 DC, (SC chain 1, SC) into the next chain space…
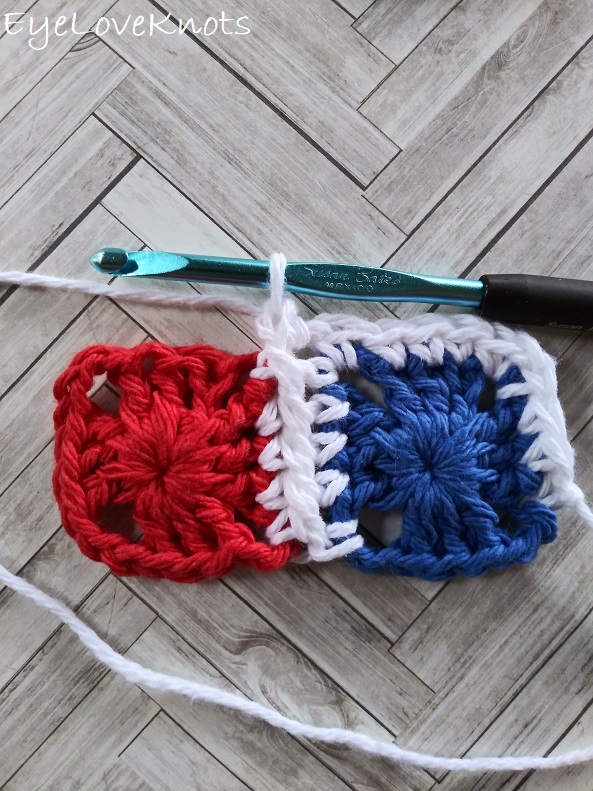
…SC into each of the next 4 stitches, chain 1, SC into the center join, chain 1, SC into the next chain space, and each of the next 3 DC…
… [(SC chain 1, SC) into the next chain space, SC into each of the next 4 stitches, chain 1, SC into the center join, chain 1, SC into the next chain space, and each of the next 3 DC] 2x…
… (SC, chain 1, SC) into the next chain space, SC into each of the next 4 stitches, chain 1 and join to the first 1st SC.

Fasten off, and weave in final ends.
Please feel free to make and sell your own of Granny’s Scrappy Coasters using this pattern, but please DO NOT claim this pattern as your own nor should you sell my pattern, and DO NOT re-publish my photos as your own. DO NOT copy and paste my pattern anywhere, link to it instead.
If you love to DIY: Join the EyeLoveKnots Crafting Community on Facebook to share your creations, and see what others are up to!
Linked Up To…
Craft Schooling Sunday – Creative Jewish Mom
Happiness is Homemade Link Party #326 – Create with Cynthia
Unlimited Monthly Link Party 13 – Grammy’s Grid
Handmade Monday #179 – Sum of their Stories
Ginx Woolly Linx Party June – Ginx Craft
Craftastic Monday Link Party – Sew Can Do The Really Crafty Link Party #221 – Keeping it Real
Little Cottage Link Party #54 – Love my Little Cottage
Fabulous Party #323 – Lou Lou Girls
Linky Ladies Party #186 – The Purple Poncho
All About Home #43 – Common Ground
{Wow Me} Wednesday #458 – Ginger Snap Crafts
Your Whims Wednesday #463 – My Girlish Whims
To Grandma’s House We Go Link Party 196 – Chas’ Crazy Creations
Waste Not Wednesday 209 – Pretty DIY Home
Hookin’ on Hump Day #216 – Moogly Blog
Thursday Favorite Things #443 – An Artful Mom
Creatively Crafty Link Party #227 – Life Beyond the Kitchen
Pin Party #372 – The Pin Junkie
June 2020 Best of the Month Link Party – Calypso in the Country
Home Matters Linky Party #286 – Modern on Monticello
Create, Bake, Grow & Gather Party #423 – Shabby Art Boutique
Link Your Stuff – Annemarie’s Haakblog
Snickerdoodle Create Bake Make Link Party 339 – EyeLoveKnots
Thanks so much for linking up with me at my #UnlimitedMonthlyLinkParty 13, open June 1 to 26. All party entries shared if social media buttons installed.
so sweet and great tutorial! just thinking this would be a great take along summer project to make in the car! thanks for sharing on craft schooling sunday!
Definitely! And if you have an old tin, it is very handy for housing all the sweet little squares until you’re ready to join them – I use an old cookie tin.
Definitely love your choice of colors! So pretty and something practical to use every day. I really need to learn how to make some of your projects. Thanks so much for sharing. #HomeMattersParty